- Can’t preview jpg files in the preview pane — Windows 10 Fall Update (1709)
- Replies (57)
- FIX: Thumbnails are not showing in Windows 10
- How do I fix Windows 10 thumbnails that are not showing?
- 1. Check File Explorer Options
- 2. Use the UNC path to access the shared folder
- 3. Check your context menu
- 4. Restore File Explorer Options to default
- 5. Run SFC scan
- 6. Download the Fix it tool
- 7. Use Disk Cleanup to remove your thumbnails
- 8. Restore default settings for the problematic folder
- 9. Free some space on your system drive
- 10. Check advanced system settings
- 11. Remove problematic applications
- Run a System Scan to discover potential errors
- 12. Install the necessary codecs
- 13. Use Group Policy Editor
- 14. Scan your system for spyware
- 15. Set a different default application for affected files
- 16. Install Paint Shop Pro
- 17. Make sure that IconCodecService.dll is enabled
- Restoro
- 18. Upgrade your RAM
- 19. Use third-party thumbnail generator
- 20. Modify your registry
- 21. Prevent Windows from deleting your thumbnail cache
Can’t preview jpg files in the preview pane — Windows 10 Fall Update (1709)
I have this issue and it started with the Windows 10 Fall update (1709). jpg files are not displayed in the preview pane but other files are displayed (pdf, docx, xlxs, etc.). I’ve tried setting the default jpg program to several different programs to no avail. Prior to the 1709 update, jpg files were displayed in the File Explorer preview pane. It seems to be an issue with the 1709 update.
Replies (57)
* Please try a lower page number.
* Please enter only numbers.
* Please try a lower page number.
* Please enter only numbers.
Noticed the same problem since 1709. The option to show icons is NOT checked and never has been, although I look there every few days just in case. The preview pane is empty white for most JPEGs, but not all. No discernable difference in the files. What’s more, since 1709, most JPEGs don’t even show their thumbnails, just a generic white-and-blue icon. Again, not every JPEG, but most. To make the thumbnails appear, I have to open a photo by double-clicking (opens in Photos). But even then the thumbnail only survives a while. It’s back to generic icons tomorrow.
Initially I blamed it on my user account, so I went through the laborious process of starting with a new user account, but the problem remains.
3 people found this reply helpful
Was this reply helpful?
Sorry this didn’t help.
Great! Thanks for your feedback.
How satisfied are you with this reply?
Thanks for your feedback, it helps us improve the site.
How satisfied are you with this reply?
Thanks for your feedback.
Check which application is associated with JPG files. Right click on a JPG file, select «open with» menu option, then «Choose Another App» from the child menu which appears.
Ensure you are using the «Photos» application.
I suspect you have installed another graphics package such as paint.net and it has taken over the file assocation.
Problem is that Explorer need to get that application to render the image for display in the preview window, and if it cannot do so the preview window will remain blank.
12 people found this reply helpful
Was this reply helpful?
Sorry this didn’t help.
Great! Thanks for your feedback.
How satisfied are you with this reply?
Thanks for your feedback, it helps us improve the site.
How satisfied are you with this reply?
Thanks for your feedback.
My problem is not related to file association, I’ve tried changing file association to multiple programs, including MS Paint. To clarify, my problem is with jpg files not displaying in the File Explorer preview pane and has nothing to do with file icons.
I’ve discovered the problem is related to the new 1709 update feature «OneDrive Files On-Demand«. The problem with jpg files not displaying in the File Explorer preview pane only occurs for files that are on OneDrive with «Files On-Demand» enabled. I have some files & folders specified as «Always Keep on this device» and I expect files to be displayed in preview — and they are except for jpg files. Other file types (pdf, txt, docx, xlsx, etc.) preview without issue. jpg files on disk only and not on OneDrive ARE displayed in preview, the problem is only for jpg files on OneDrive, even though «Always keep on this device» is enabled.
If «Files On-Demand» is enabled and «Always keep on this device» is not enabled (files are in the cloud only) then no files are previewed (makes sense).
I have another computer that was just updated to 1709. The «Files on demand» feature has not been enabled so all OneDrive files are on disk. It displays jpg files on OneDrive in preview without issue.
To summarize my problem as I see it. jpg files on OneDrive are not displayed in File Explorer preview if and only if «Files On-Demand» is enabled, even though those files are kept on disk.
FIX: Thumbnails are not showing in Windows 10

- Windows 10 thumbnails not showing? We have just the right fixes, thoroughly detailed below.
- Many people favor thumbnails over icons and we totally understand why. But every now and then, your trusted OS might decide it does not want to display them.
- If Windows thumbnails are not showing, you should consider tweaking your File Explorer Options a bit.
- Third-party software may have a saying in this as well and you might need to remove some or even add some as shown in our guide.

- Download Restoro PC Repair Tool that comes with Patented Technologies (patent available here).
- Click Start Scan to find Windows issues that could be causing PC problems.
- Click Repair All to fix issues affecting your computer’s security and performance
- Restoro has been downloaded by 0 readers this month.
Thumbnails are rather useful, and many users prefer using thumbnails over icons. However, equally many users reported that thumbnail previews aren’t showing in File Explorer.
This can be an annoying problem, and today we’re going to show you how to fix it on Windows 10.
How do I fix Windows 10 thumbnails that are not showing?
1. Check File Explorer Options
This problem can occur in File Explorer due to your settings. Windows has the ability to show icons instead of thumbnails, and if this option is turned on, your thumbnails won’t appear at all.
To fix the problem, you just need to find this setting and disable it. This is rather simple and you can do it by following these steps:
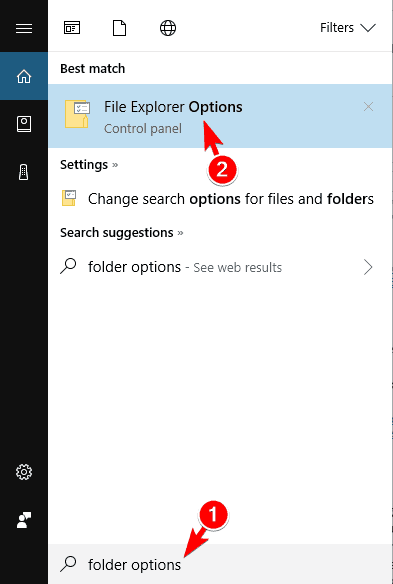
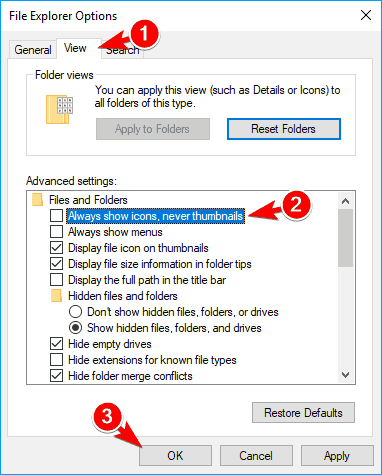
- Press Windows Key + S and enter folder options. Select File Explorer Options from the menu.

- After File Explorer Options window opens, go to View tab and make sure that Always show icons, never thumbnails option is unchecked.
- Now click on Apply and OK to save changes.
Even if this option is disabled, try to enable it and save changes. Now, wait for a minute or two, disable it again and save changes. After doing that check if the problem still appears.
In most cases, this option is the main cause of this problem, but after disabling it the issue should be resolved.
2. Use the UNC path to access the shared folder
Several users reported this problem while trying to access a shared folder.
According to them, thumbnails won’t appear while trying to access a network drive using its letter, but by using the UNC path, such as IP_addresssharename they were able to fix this problem.
Using this method Windows will generate thumbnails again, but keep in mind that this process can take a while.
This isn’t the best solution, but it’s a solid workaround, so feel free to try it out.
3. Check your context menu
Third-party photo viewers can sometimes cause this problem to appear.
According to users, ACDSee is one potential cause of this problem. It seems that Windows used codecs from ACDSee to generate the thumbnails and that caused the problem to appear.
To fix the issue, just right-click the image that is missing the thumbnail and you should see two preview options. Try using any of these preview options and check if that solves the problem.
In addition, be sure to refresh your screen after choosing a preview option. This is an unusual solution, but few users reported that it works, so feel free to try it out.
If you’re not using ACDSee, this solution might not work for you.
4. Restore File Explorer Options to default
Your File Explorer settings are usually the cause for this problem, but few users claim that you can fix it by resetting these settings to default.
This is rather simple and you can do it by following these steps:
- Open File Explorer Options. For detailed instructions on how to do that, check Solution 1.
- When File Explorer Options window opens, click on Restore Defaults button.
- Navigate to View tab and click on Restore Defaults button. Now click on Apply and OK to save changes.
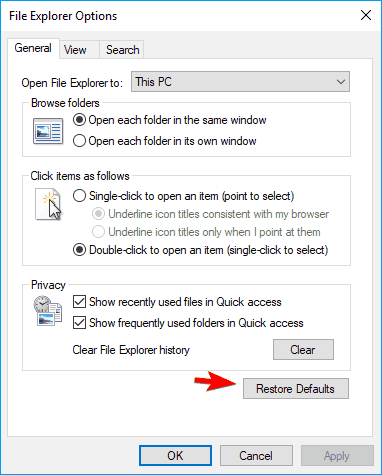
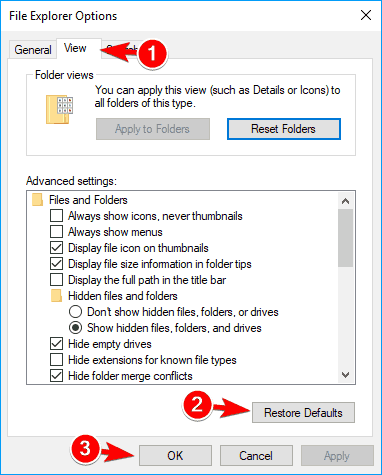
After resetting File Explorer Options to default settings, the problem should be resolved completely.
5. Run SFC scan
Sometimes these types of problems can occur if your system files are corrupted. File corruption can occur due to various reasons, but you can fix it by performing an SFC scan.
To perform this scan, you need to do the following:
- Press Windows Key + X to open Win + X menu. Choose Command Prompt(Admin) from the menu. If Command Prompt isn’t available you can also use PowerShell as administrator.
- When Command Prompt starts, you just need to enter sfc /scannow command and press Enter. Windows will now scan your system for file corruption and fix any corrupted files. This process can take up to 15 minutes, so don’t interrupt it.
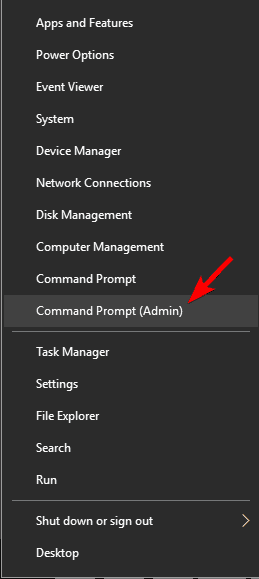
Once the scan is completed your files will be repaired and the problem should be resolved. After completing the scan, repeat Solution 1 and check if that fixes the problem.
6. Download the Fix it tool
Microsoft has its own tool that can fix various problems related to both files and folders. The application can fix various problems including missing icons, thumbnails, etc.
To use this tool, simply download this file and run it on your PC. Follow the instructions on the screen to complete the troubleshooter.
This is a small but useful tool, and since it comes from Microsoft it’s completely safe to use.
After the troubleshooter fixes the problem, feel free to repeat Solution 1 and check if your thumbnails appear.
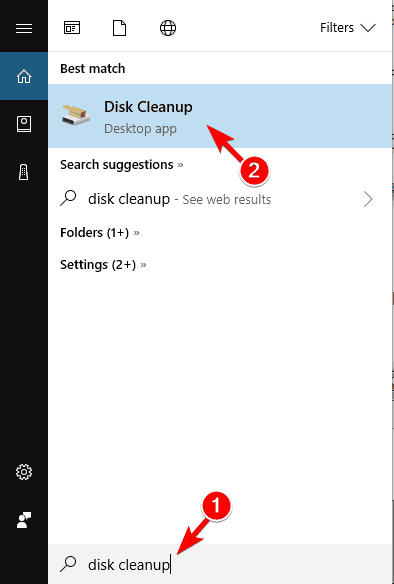
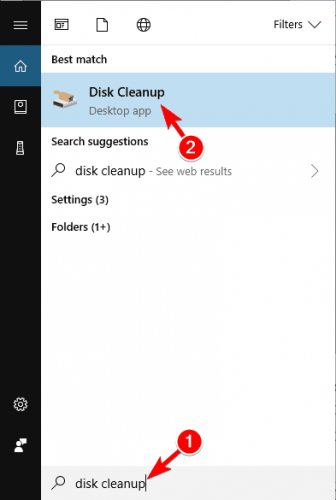
7. Use Disk Cleanup to remove your thumbnails
Your thumbnails use thumbnail cache, but if the thumbnail cache is corrupted you might experience this problem.
To fix the issue, you need to remove the thumbnail cache and Windows will recreate it. This is a simple process and you can do it by following these steps:
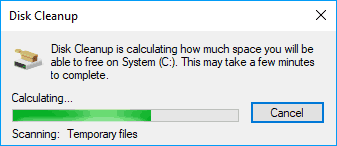
- Press Windows Key + S and enter disk cleanup. Select Disk Cleanup from the menu. Alternatively, you can just open the Start Menu and type disk cleanup to search for it.
- Once Disk Cleanup starts you’ll be asked to select the drive you wish to scan. Select your System drive, by default it should be C, and click on OK.
- Wait while Disk Cleanup scans your drive.
- When Disk Cleanup window appears, check Thumbnails from the list and click on OK. Few users are suggesting to select Temporary files as well, so you might want to do that.
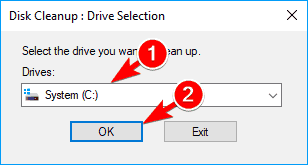
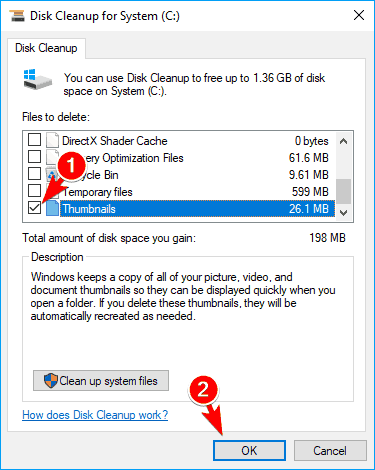
Windows will now remove the thumbnail cache from your PC. Once the thumbnail cache is removed, Windows will generate it again and your problem should be resolved completely.
If you need a faster way to remove your thumbnail cache, you can do it by running this .bat file. This file will run several commands and it should remove all thumbnail cache from your PC.
Keep in mind that this script is slightly outdated, so you might experience problems on Windows 10.
If you’re an advanced user, you can remove the thumbnail cache by using Command Prompt. Using Command Prompt you can remove the cache simply by running a couple of commands.
To delete thumbnail cache, do the following:
- Close any File Explorer windows.
- Now open Command Prompt as administrator.
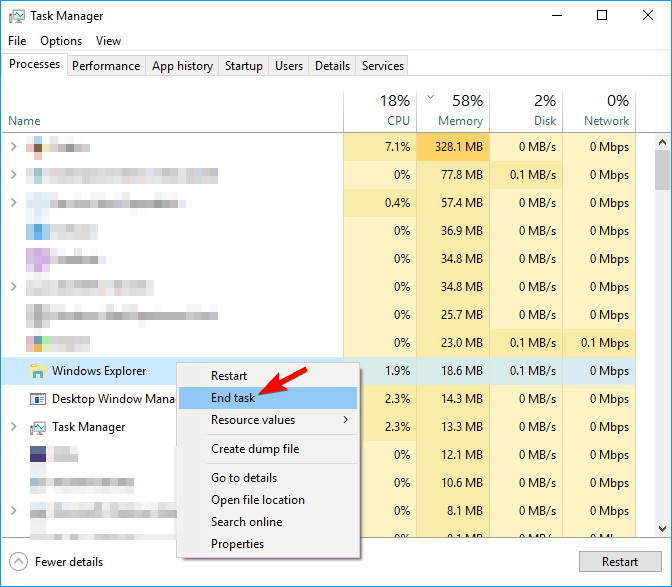
- Optional: You might have to close Windows Explorer completely to complete this process. To do that, press Ctrl + Shift + Esc to open Task Manager. Locate Windows Explorer, right-click it, and choose End Task from the menu. You can also do that quickly by entering this line in Command Prompt: taskkill /f /im explorer.exe
- In Command Prompt, enter the following commands:
- cd /d %userprofile%AppDataLocalMicrosoftWindowsExplorer
- attrib -h thumbcache_*.db
- del thumbcache_*.db
- After running these commands, restart your PC and check if the problem still appears.
8. Restore default settings for the problematic folder
If thumbnail previews aren’t showing, you might be able to fix the problem simply by resetting folder settings to default.
This is relatively simple, and you can do it by following these steps:
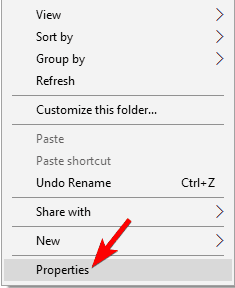
- Navigate to the problematic folder.
- Right click the empty space in it and choose Properties from the menu.
- Navigate to Customize tab and click on Restore Default. Now click on Apply and OK to save changes.
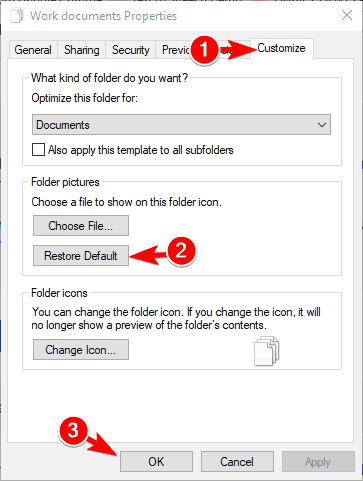
This is a simple solution and if you’re having problems with missing thumbnail previews you might want to try it out.
9. Free some space on your system drive
Several users claim that this problem can occur due to a lack of space on your C drive. To fix the problem, you need to free some space on your C drive and your thumbnails will appear again.
The simplest way to do that is to uninstall large applications or remove large files. Alternatively, you can use Disk Cleanup tool to remove any old and unused files and free up space with ease.
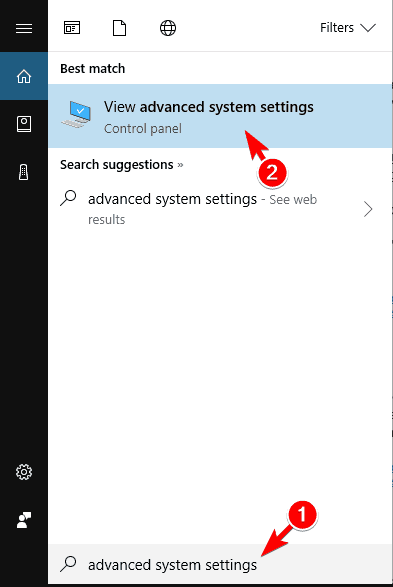
10. Check advanced system settings
If thumbnail previews are missing on your PC, you can enable them by changing advanced system settings.
To fix the problem, you just need to enable two options in the Advanced system settings section.
To do that, follow these steps:
- Press Windows Key + S and enter advanced system settings. Choose View advanced system settings from the menu.
- In the Performance section click on Settings button.
- List of options will appear. Check Save taskbar thumbnail previews and Show thumbnails instead of icons. Now click on Apply and OK to save changes.
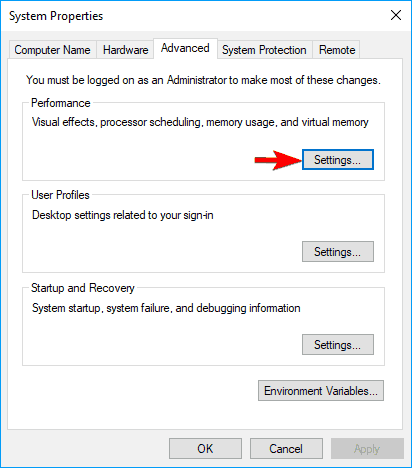
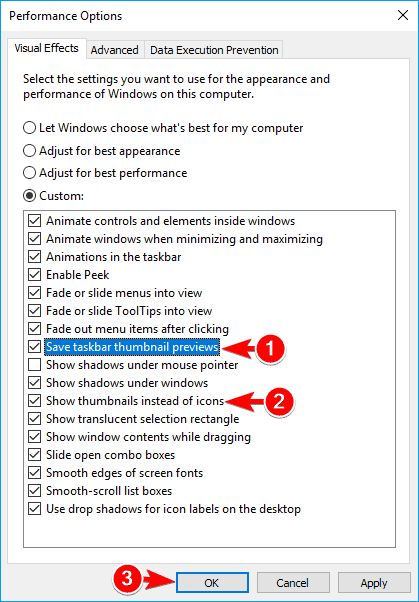
After enabling these two options, your thumbnails should appear again and everything will start working without any issues.
11. Remove problematic applications
Sometimes your thumbnails might not be showing due to third-party applications. Third-party software can sometimes interfere with Windows settings and cause this problem to appear.
According to users, this problem can appear due to video and audio recording software. If you installed any audio or video recording software recently, be sure to remove it and check if that solves the problem.
If the issue still persists, you might want to try removing other third-party applications from your PC and check if that fixes the problem.
Sometimes it might be hard to find the problematic application, so you might have to use trial and error method.
Few users claim that their problem was Java, and after removing it the issue was resolved. If you need to use Java, be sure to update it to the latest version and check if that solves your problem.
Run a System Scan to discover potential errors


12. Install the necessary codecs
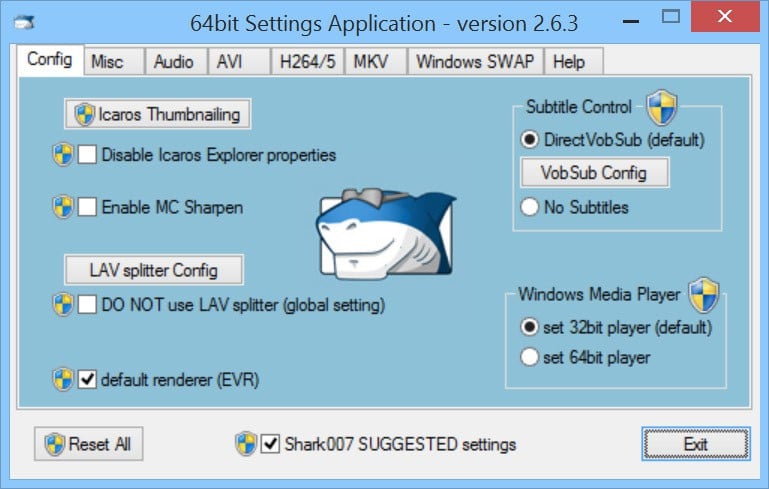
Windows can’t play video files if certain codecs are missing, and sometimes missing codecs can cause thumbnails not to appear. To fix the issue, you need to install the missing codecs and the problem should be resolved.
According to users, installing Shark codecs fixed the issue, so you might want to try that. Of course, you can try other codec packs such as K-Lite instead.
13. Use Group Policy Editor
Group Policy Editor is a powerful tool that allows you to control various settings on your PC.
This tool is available only on Pro and Enterprise versions of Windows, so if you’re using the Home version, you might want to skip this solution entirely.
To fix this problem using Group Policy Editor, you need to do the following:
- Press Windows Key + R and enter gpedit.msc. Press Enter or click on OK.
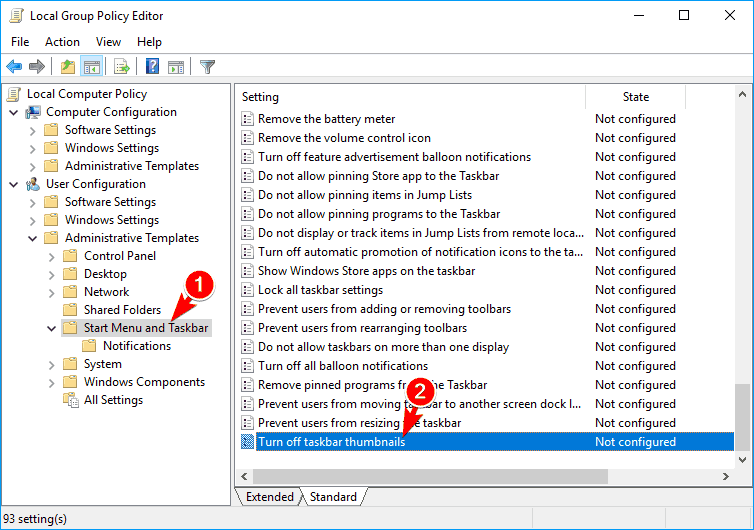
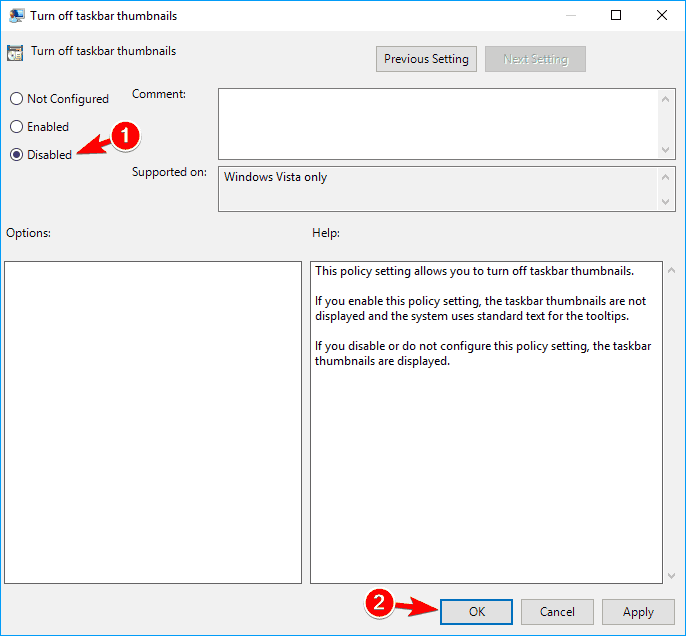
- In the left pane, navigate to User Configuration > Administrative Templates > Start Menu and Taskbar. In the right pane locate and double click on Turn off taskbar thumbnails.
- Select Disable and click on Apply and OK to save changes.
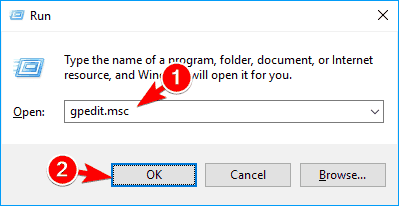
There’s also another method you can use to fix the missing thumbnails. To do that, follow these simple steps:
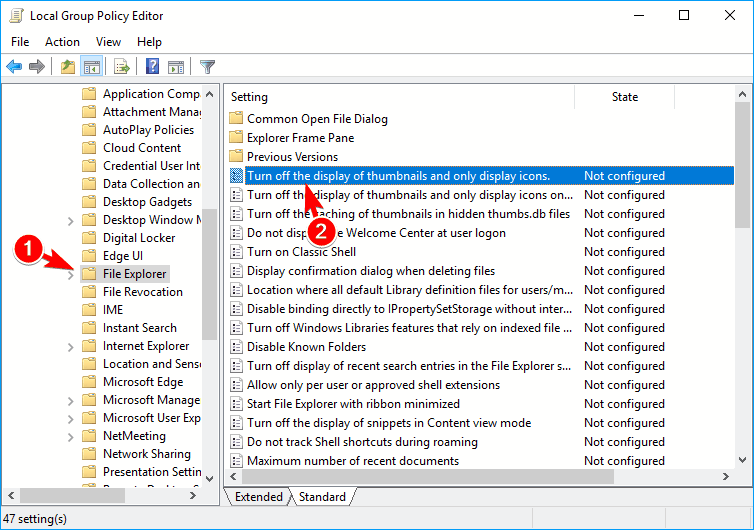
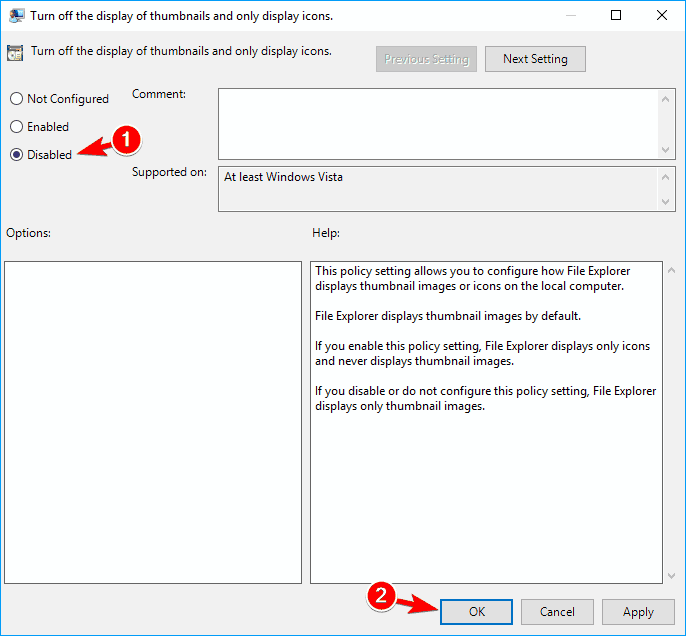
- Start Group Policy Editor.
- In the left pane, navigate to User Configuration > Administrative templates > Windows components > File Explorer. In the right pane double click the Turn off the display of thumbnails and only display icons.
- Now select NotConfigured or Disabledand click on Apply and OKto save changes.
After making these changes in Group Policy Editor, the problem should be resolved.
14. Scan your system for spyware

Sometimes malicious applications can interfere with your system and cause this and other problems to appear.
To fix the issue, you need to perform a spyware scan and remove any malicious files.
Users reported that scanning their system with Spybot fixed the problem, so be sure to download and try this tool.
We also suggest to perform a detailed scan of your system with your antivirus software and check if there are any other malicious files.
15. Set a different default application for affected files
If you’re having problems with missing thumbnails, you might be able to solve the issue simply by setting a different default application for the problematic file type.
This is relatively simple and you can do it by following these steps:
- Right click the problematic file type and choose Open with > Choose another app from the menu.
- Select the desired application and check Always use this app to open files option. Now click on OK to save changes.


After doing that, the selected application will be a default app for this file type, and if everything is in order your thumbnails will appear again.
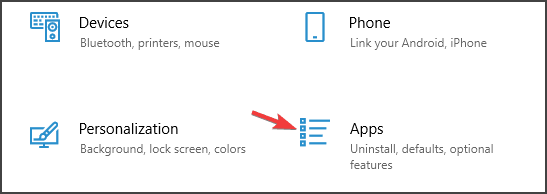
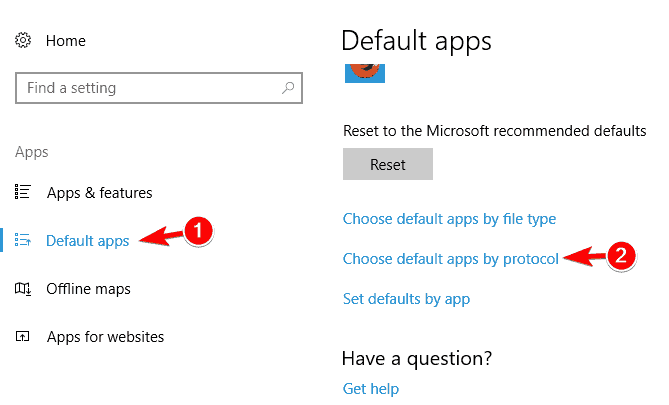
There are also other methods you can use to set default apps for specific file types. For example, you can set default apps in Settings app by following these steps:
- Open Settings app. The fastest way to do that is to press Windows Key + I.
- When Settings app starts, go to Apps section.
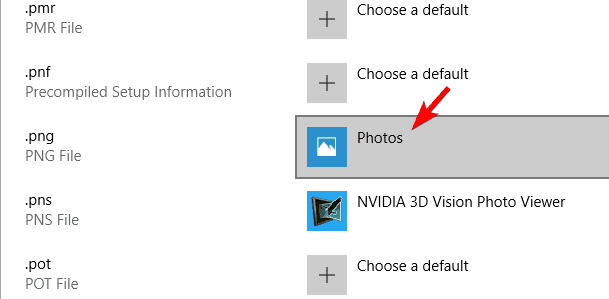
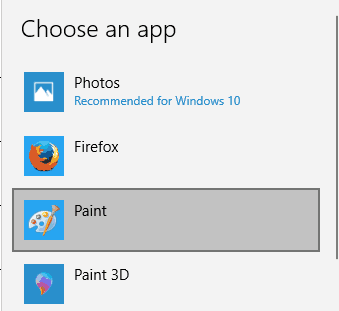
- Go to Default apps section in the left pane. In the right pane, scroll down and select Choose default apps by file type.
- List of all file extensions will appear. Locate the extension that has missing thumbnails and click the application next to it.
- Select the default application from the list or choose one from your PC.
- Repeat these steps for all extensions that have problems with missing thumbnails.
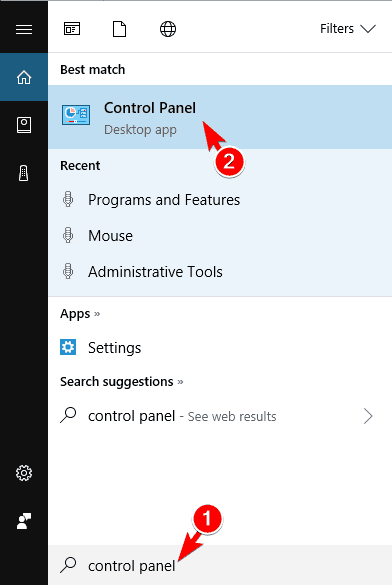
You can also set a default application for a specific file type from Control Panel. To do that, follow these steps:
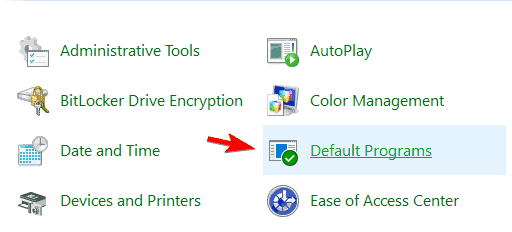
- Open Control Panel. You can do that by pressing Windows Key + S and entering control panel. Now choose Control Panel from the list.
- When Control Panel opens, select Default Programs.
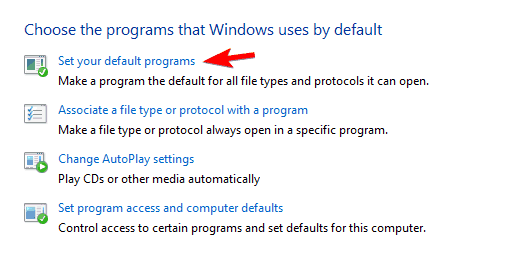
- Default Programs window will now appear. Go to Set your default programs.
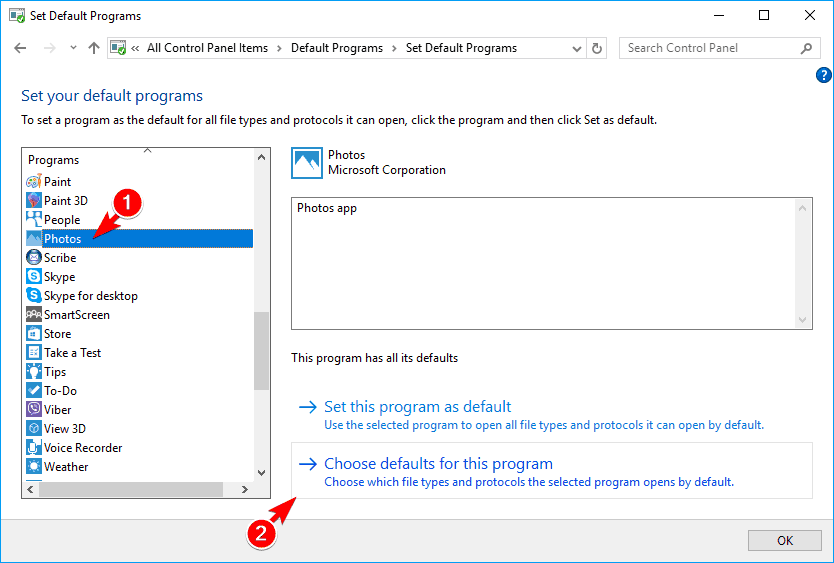
- Select the application that you want to use for the problematic file type from the menu on the left. Now in the right pane click on Choose defaults for this program.
- Now select the problematic file extensions from the list. After you’re done, click on Save.

You can also use Associate a file type or protocol with a program option to fix this problem. To do that, do the following:
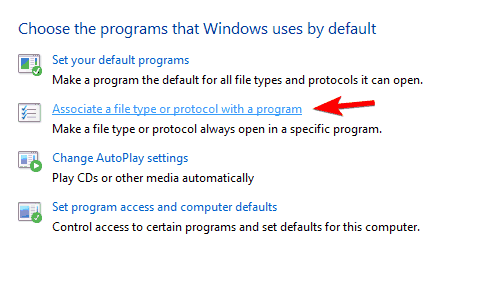
- Go to Default Programs and click on Associate a file type or protocol with a program.
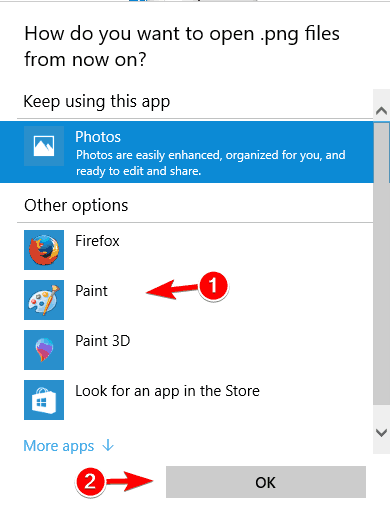
- List of all file extensions will appear. Select the problematic file type and double click it.
- Now select the application you want to use for that file type.
- Repeat this step for all problematic file types.
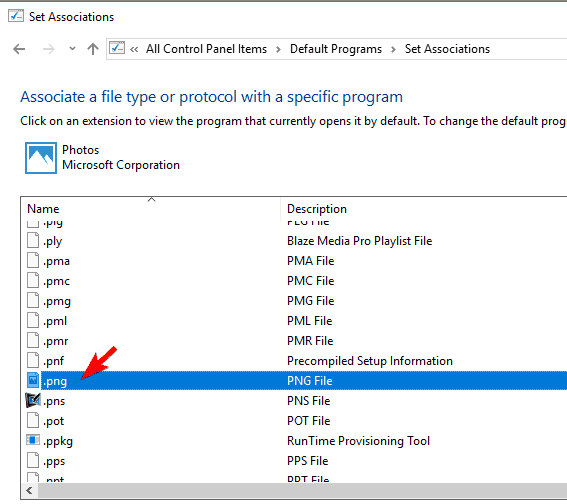
After you’re done, the problem should be resolved and your thumbnails will appear again.
Each of these methods will allow you to set a default application for a problematic file type, and you just have to choose the method that works best for you.
16. Install Paint Shop Pro

According to users, sometimes the problem with missing thumbnails can occur due to Paint Shop Pro software. Users reported that their thumbnails were missing while using the 32-bit version.
To fix the problem, you need to install both the 32-bit and 64-bit versions of the software. After doing that, the issue should be resolved completely.
However, the solution works only with Paint Shop Pro, so if you don’t have this tool installed, you might want to skip this solution.
17. Make sure that IconCodecService.dll is enabled

Few users claim that this problem started appearing after disabling IconCodecService.dll service.
According to users, this service converts PNG icons to BMP icons, and if you disable it, you might cause problems with your thumbnails.
To fix the issue, just enable this service and check if that solves the problem.
Speaking about DLL files, you probably know by now that if broken or missing, they can cause a lot of harm to your system and affect its overall performance.
Don’t sweat it, just try Restoro – a universal repair tool for Windows that will restore and replace DLL files effortlessly so that you don’t have to.
Restoro
18. Upgrade your RAM

Few users claim that this problem appeared due to insufficient RAM. Your RAM is an unlikely cause for this problem, but several users claim that they fixed the issue by installing more RAM.
In most cases your RAM shouldn’t affect thumbnail previews, but if you’re still having this problem you might want to try upgrading your RAM as a last solution.
19. Use third-party thumbnail generator
If thumbnail previews aren’t showing, you might be able to fix the problem by using a third-party tool.
There are many third-party thumbnail generators available that can help you fix this problem.
One of these tools is Icaros and after you install it your thumbnails should appear again.
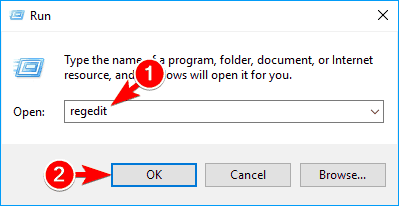
20. Modify your registry
According to users, you might be able to fix this problem simply by making few changes in your registry.
Keep in mind that the registry holds sensitive information, so be extra cautious while modifying it. To fix this problem you need to do the following:
- Press Windows Key + R and enter regedit. Press Enter or click OK.
- Optional: Since modifying the registry is somewhat dangerous, we advise you to create a backup before making any changes. To do that, click on File > Export.Select All as Export range, enter the desired file name, choose a safe location and click on Save. If anything goes wrong after modifying your registry, you can use exported file to easily restore it to the original state.
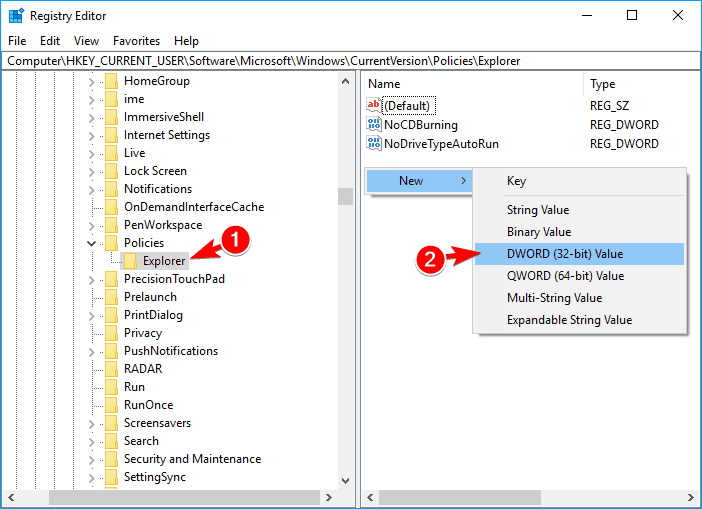
- In the left pane, navigate to
- HKEY_CURRENT_USERSoftwareMicrosoftWindowsCurrentVersionPoliciesExplorer
- In the right pane, look for DisableThumbnails DWORD. If the DWORD isn’t available, right click the empty space in the right pane and choose New > DWORD (32-bit) Value. Enter DisableThumbnails as the name of the new DWORD.
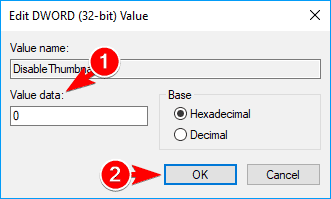
- Double click the newly created DisableThumbnails DWORD to open its properties. Now set the Value data to 0 and click OK to save changes.
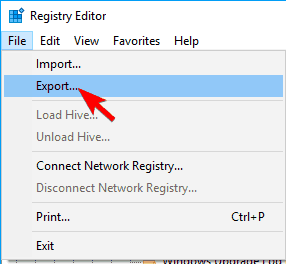 Select All as Export range, enter the desired file name, choose a safe location and click on Save. If anything goes wrong after modifying your registry, you can use exported file to easily restore it to the original state.
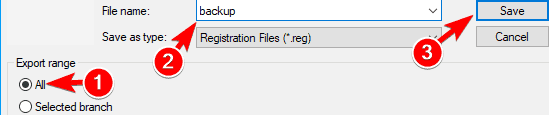
After making these changes, restart your PC and check if the problem still appears.
21. Prevent Windows from deleting your thumbnail cache
If thumbnail previews aren’t showing, that might be because Windows is deleting your thumbnail cache.
Few users claim that you can fix this problem by preventing Windows from deleting the cache.
This solution can be potentially dangerous, so keep in mind that you’re changing these settings at your own risk. To change the security settings, do the following:
- Press Windows Key + R and enter appdata. Press Enter or click OK.
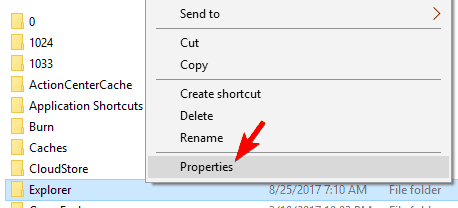
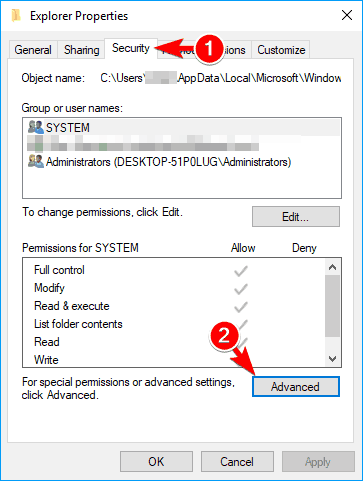
- Navigate to LocalMicrosoftWindows directory. Locate Explorer directory, right click it and choose Properties from the menu.
- Navigate to the Security tab and click on Advanced.
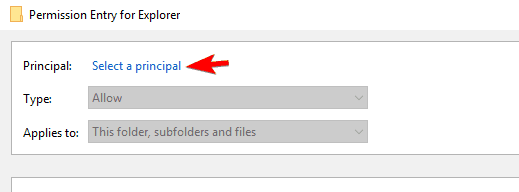
- After Advanced Security Settings opens, click on Add button.
- Now click on Select a principal.
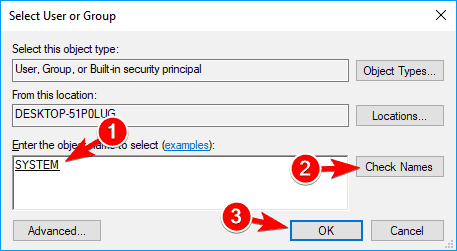
- In Enter the object name to select field enter SYSTEM. Click Check Names button. If everything is in order, click on OK.
- Set Type to Deny and click on Show basic permissions. Uncheck all options except Delete subfolders and files and Delete. Click OK to save changes.


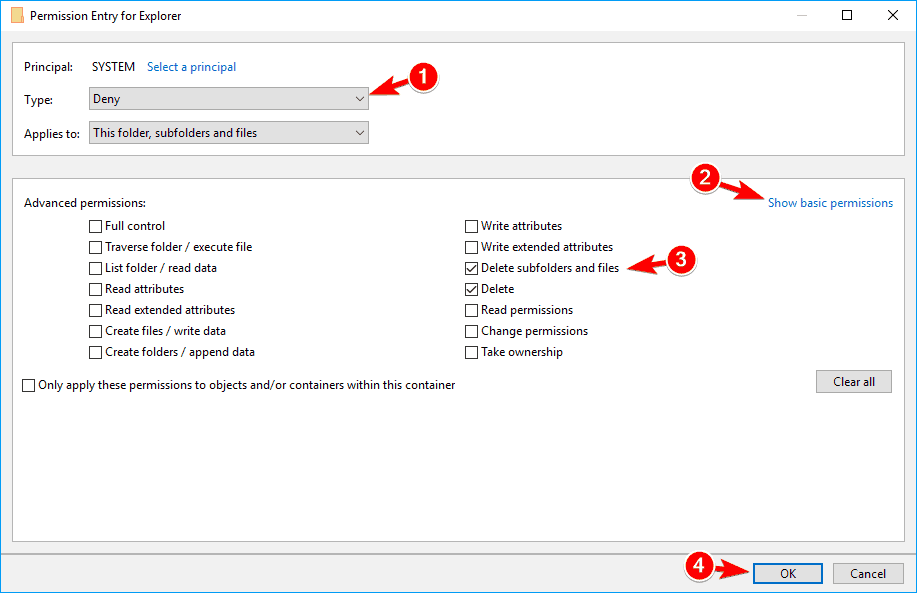
After doing that, your system won’t have access to your thumbnails and it won’t be able to remove them.
Changing these settings might have some unexpected consequences on your system, so keep that in mind.
Thumbnails are quite useful and many users prefer using them over icons.
If for some reason thumbnail previews aren’t showing on your PC, feel free to try any solution from this article.
- Download this PC Repair Tool rated Great on TrustPilot.com (download starts on this page).
- Click Start Scan to find Windows issues that could be causing PC problems.
- Click Repair All to fix issues with Patented Technologies (Exclusive Discount for our readers).
Restoro has been downloaded by 0 readers this month.
As you can see, there are plenty of solutions. Be sure to try the simpler ones first, to avoid all the technicalities, such as editing your registry.


