- Process Image
- Initial program
- File: segment_size1.c
- File: segment_size2.c
- File: segment_size3.c
- File: segment_size4.c
- GraphicsMagick – A Powerful Image Processing CLI Tool for Linux
- How to Install GraphicsMagick on Linux Systems
- Learn How to Use GraphicsMagick in Linux
- If You Appreciate What We Do Here On TecMint, You Should Consider:
- 6 Best Free and Open-Source Tools for RAW Image Processing in Linux
- Best RAW image editors for Linux
- 1. RawTherapee
- Features
- Installation on Linux distributions
- 2. digiKam
- Features
- Installation on Linux distributions
- 3. Darktable
- Features
- Installation on Linux distributions
- 4. Filmulator
- Features
- Installation on Linux distributions
- 5. Photivo
- Photivo features
- Installing Photivo on Ubuntu-based Linux distributions
- 6. LightZone
- Installing LightZone in Linux
- Wrapping up
Process Image
Now that we have seen how to get the basic information of process and its parent process, it is time to look into the details of process/program information.
What exactly is process image? Process image is an executable file required while executing the program. This image usually contains the following sections −
- Code segment or text segment
- Data segment
- Stack segment
- Heap segment
Following is the pictorial representation of the process image.
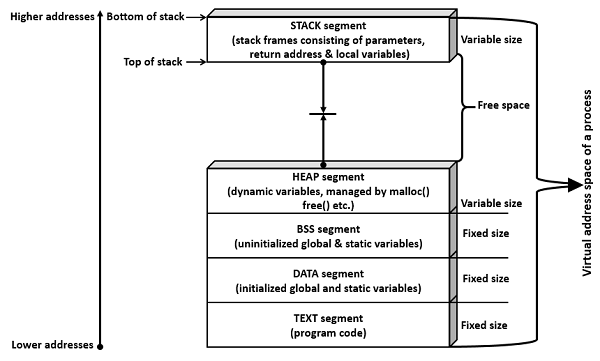
Code segment is a portion of object file or program’s virtual address space that consists of executable instructions. This is usually read-only data segment and has a fixed size.
Data segment is of two types.
Initialized data segment is a portion of the object file or program’s virtual address space that consists of initialized static and global variables.
Un-initialized data segment is a portion of the object file or program’s virtual address space that consists of uninitialized static and global variables. Un-initialized data segment is also called BSS (Block Started by Symbol) segment.
Data segment is read-write, since the values of variables could be changed during run time. This segment also has a fixed size.
Stack segment is an area of memory allotted for automatic variables and function parameters. It also stores a return address while executing function calls. Stack uses LIFO (Last-In-First-Out) mechanism for storing local or automatic variables, function parameters and storing next address or return address. The return address refers to the address to return after completion of function execution. This segment size is variable as per local variables, function parameters, and function calls. This segment grows from a higher address to a lower address.
Heap segment is area of memory allotted for dynamic memory storage such as for malloc() and calloc() calls. This segment size is also variable as per user allocation. This segment grows from a lower address to a higher address.
Let us now check how the segments (data and bss segments) size vary with a few sample programs. Segment size is known by executing the command “size”.
Initial program
File: segment_size1.c
In the following program, an uninitialized static variable is added. This means uninitialized segment (BSS) size would increase by 4 Bytes. Note − In Linux operating system, the size of int is 4 bytes. Size of the integer data type depends on the compiler and operating system support.
File: segment_size2.c
In the following program, an initialized static variable is added. This means initialized segment (DATA) size would increase by 4 Bytes.
File: segment_size3.c
In the following program, an initialized global variable is added. This means initialized segment (DATA) size would increase by 4 Bytes.
File: segment_size4.c
In the following program, an uninitialized global variable is added. This means uninitialized segment (BSS) size would increase by 4 Bytes.
Источник
GraphicsMagick – A Powerful Image Processing CLI Tool for Linux
GraphicsMagick is a free open source, modern and powerful software suite for processing images. It was initially derived from ImageMagick, however, over the years, it has grown to be a fully independent project, with a number of improvements and additional features. It runs on all Unix-like operating system such as Linux, MacOS, and also runs on Windows.
It offers a useful and efficient assortment of tools as well as libraries that allow for reading, writing, and manipulating your images in more than 88 well known formats (such as GIF, JPEG, JPEG-2000, PNG, PDF, PNM, and TIFF).
It can create a composite image in grid format, from multiple images, and create images in web supported formats such as WEBP. It is also used to change image size, sharpen, color reduce, rotate or add special effects to images of various formats. Importantly, it can create a GIF animation from multiple images and much more.
How to Install GraphicsMagick on Linux Systems
On Debian and its derivative such as Ubuntu and Linux Mint, you can install it using APT-package manager as shown.
On Arch Linux and Fedora, you can install GraphicsMagick from the default system repositories using package manager as shown.
On other Linux distributions such as RHEL, CentOS and Fedora (older releases), you can compile GraphicsMagick from source code as shown.
To access GraphicsMagick functions, use gm – a powerful command-line utility, which offers several sub-commands such as display, animate, concert, montage, compare, identify, composite and many more, for accessing the actual functions.
To confirm that the GraphicsMagick package has been installed on your system, you can run the following command.
![]() Verify GraphicsMagick Installation
Verify GraphicsMagick Installation
Then run the following series of commands to verify many aspects of the installed package.
Learn How to Use GraphicsMagick in Linux
Following are some basic examples of how to use gm command with these options.
1. To display or view an image from the terminal, run following command.
![]() View Image in Linux Terminal
View Image in Linux Terminal
2. To resize an image with new width, specify a width and height will auto scale proportionally as shown.
![]() Resize Image in Linux Terminal
Resize Image in Linux Terminal
You can also define a width and a height, and the command will resize the image to that dimensions without altering the proportions.
3. To create an animated image of multiple images in the current working directory, you can use the following command.
![]() Animate Images in Linux Terminal
Animate Images in Linux Terminal
Note: The above animated image quality is poor, because we have optimized to lower the size of image.
4. To convert an image to one format to other, for example .jpeg to .png and vise-versa.
5. Next, you can create a visual image directory of all your .png images as shown.
![]() Create Visual Image
Create Visual Image
6. Additionally, it is possible to create a composite image (in a grid format) from separate images as shown.
![]() Create Grid Format Images
Create Grid Format Images
There is a lot you can do with gm command, we have just covered a few basic examples in this article. You can see see all options for gm and its sub-command, for example, convert, type:
For more information, visit GraphicsMagick Homepage: http://www.graphicsmagick.org/
GraphicsMagick is a powerful and feature-rich image processing system for Linux and other Unix-like systems. If you have any questions or thoughts to share, use the feedback form below.
If You Appreciate What We Do Here On TecMint, You Should Consider:
TecMint is the fastest growing and most trusted community site for any kind of Linux Articles, Guides and Books on the web. Millions of people visit TecMint! to search or browse the thousands of published articles available FREELY to all.
If you like what you are reading, please consider buying us a coffee ( or 2 ) as a token of appreciation.

We are thankful for your never ending support.
Источник
6 Best Free and Open-Source Tools for RAW Image Processing in Linux
Last updated February 4, 2021 By Ambarish Kumar 10 Comments
Brief: Looking for RAW image editing tools in Linux? In this article, we’ll show you the best free tools to edit RAW photos in Linux.
A RAW image file contains minimally processed data from the image sensor and needs processing before you can print or edit them. When you shoot in a JPEG format, the image is compressed and some information is lost and non-recoverable, while RAW images are non-compromised high-quality images preserving all the necessary data from the sensor.
That’s the reason most photographers prefer capturing RAW images and editing it later.
Best RAW image editors for Linux
Note: The list is in no particular order of ranking.

There are many free and open source applications to manipulate RAW images in Linux. In this article, we have compiled 6 best Software to handle RAW images in Linux.
Note that while I have included the installation method for Ubuntu-based distributions, you can easily install them from the software repository of the Linux distro of your choice.
1. RawTherapee
RawTherapee is another cross-platform, free and open-source RAW image processing application supporting different image editing operations and a large number of file handling. Along with the usual RAW image files, it supports some less common types such as X-Trans, Foveon, and Pentax Pixel Shift.

Features
- 96-bit (floating point) processing engine.
- Non-destructive editing.
- Advanced color handling from white balance to HSV (Hue-Saturation-Value) curves, color toning and color management including wide-gamut and soft-proofing support.
- Powerful CIE Color Appearance Model 2002 (CIECAM02) module.
- Enhanced exposure and tonality tools: tone and Lab curves, highlights and shadows tools, tone mapping (HDR-like effect), etc.
- Several tools to enhance details: unsharp mask, RL deconvolution, contrast by detail levels.
Installation on Linux distributions
It is available in the official repository of Ubuntu. You can simply look for it in the software center or install it using the Flatpak package on any Linux distribution.
You might want to refer to our Flatpak guide if you want help.
Alternatively, you can install it using the command below:
2. digiKam
digiKam is another advanced open-source photo management application for Linux which can handle raw files and provides a comprehensive set of editing tools. Prominent features include adjusting colors, cropping and sharpening, curve adjustments, panorama stitching and more.

Features
- Importing and processing RAW files and photos
- digiKam core, image editor and image filters support 16 bits color depth pictures. Image Editor has a full-color management support using ICC color profiles.
- Red-eye, brightness, contrast and Gamma correction
- Color balance, blur/sharpen feature.
- Black and White and tonality converter using curves adjustments.
- Noise reduction, Liquid Rescale, Unsharp mask, correcting lens spherical aberration.
- Hot Pixels Correction, Vignetting, Channel mixer, white balance etc.
- Pseudo HDR-tone mapping tool to recover highlights and shadows while keeping local contrast.
Installation on Linux distributions
It is available in Ubuntu’s official repository. You can install it from the software center or just type in the following command:
You can also utilize the Flatpak package for any other Linux distribution.
3. Darktable
Darktable is an impressive open-source RAW image editing application which allows you to develop RAW images and enhance them. With fully non-destructive editing, Darktable comes with a powerful export system supporting Facebook web albums as well.
In addition to that, it also supports exporting RAW images to a lower dynamic range (JPEG, PNG, TIFF), 16-bit PPM or TIFF, or linear high dynamic range images.

Features
Darktable currently serves 47 image operations modules some of which are:
- Crop and rotate, base curve presets, exposure controls, highlight reconstruction, white balance, demosaic, inverting options.
- Local modification of the exposure based on pixel lightness, level adjustments.
- Tone curve, changing lightness of the image, tone mapping.
- Saturation enhancement, overexposed correction, channel mixer, color correction, contrast adjustment, color transfer from one image to another, managing color profiles.
- Sharpen, equalizer, denoise, lens correction, spot removal, chromatic aberrations, hot pixels.
Low light vision, split toning, framing, watermark support, soften, colorization options etc.
Installation on Linux distributions
It is available in the official repository. You can install it directly from the software center or type in the following command in the terminal:
A flatpak package is also available for Linux distributions if you do not find it listed in your software repository.
4. Filmulator
Filmulator is a simple yet useful RAW image editor available for Linux desktop. It claims to simulate the film development process with its editing tools instead of simply applying a basic filter on top of an image.
If you’re curious to know more about it, you might want to check out our article on it.
Features
- Compressing the output dynamic range
- Enhancing local contrast
- Histograms
- Highlight Recovery
Installation on Linux distributions
It offers an AppImage file to help you get started on any Linux distribution. You can find it in the release section of its GitHub page.
You may refer to our AppImage guide if you need help.
5. Photivo
Note: It isn’t actively maintained for latest Linux distributions (Bitbucket). At the time of updating this article, Photivo is available for Ubuntu 18.04 and older through the PPA.
Photivo is a free and open source RAW file editor supporting almost all RAWs and Bitmaps. A plugin is available for GIMP integration, which allows sending your modified photos to GIMP for further retouching and color profiles. Best suited for distortion and geometry correction and adaptive saturation, Photivo is a powerful RAW editor.

Photivo features
- 16-bit internal processing, color managed with LCMS2.
- CA correction, Green equilibration, line denoise, bad pixel reduction, wavelet denoise, median filters on RAW data.
- Tone mapping and split toning.
- Several local contrast filters and Sharpen.
- Denoise, separately on Luminance and Color (Edge avoiding wavelets, GreyCStoration, Wavelet, Masked bilateral, Pyramid).
- Film grain simulation.
- Black and white conversion and cross processing.
- Texture overlay (external texture)
- Fake tilt/shift, toy effect.
Installing Photivo on Ubuntu-based Linux distributions
To install it use the commands below:
6. LightZone
LightZone is a non-destructive RAW image editor with a variety of tools and options that you can re-adjust and toggle them on/off anytime you want.
You can even apply the same tool stack to a batch of photos if required.
LightZone Features
- Ability to read RAW files for a variety of cameras and display the metadata (e.g. exposure, ISO, flash, etc.)
- Rating of images for one to five stars
- Batch processing of files
- Range of available style filters (e.g. Alien Infrared, Skin Glow, Polarizer, etc.)
- Non-destructive tools including relight, sharpen, gaussian blur, hue/saturation, color balance, white balance, black & white, noise reduction, clone, spot, red eyes
- Editing modes include crop, rotation, and region
- Raw tone curve modification
Installing LightZone in Linux
You can easily install it on Ubuntu or Ubuntu-based distros using the PPA, here’s what you need to type in the terminal:
You can also find it in AUR for Arch-based Linux distros. For other distributions, you can refer to its GitHub page (under the releases section) for build instructions or installation instructions.
Wrapping up
There are a number of Open Source software tools for processing RAW images in Linux desktop. The ones mentioned here are feature-rich and should help you accomplish all your needs.
Of course, it needs prior experience working with RAW images to utilize all the features. So, if you’re new, I suggest you to do some research about it.
What do you prefer to edit RAW images on Linux? Is there any other tool available for Linux that we missed listing here? Let me know in the comments below.
Like what you read? Please share it with others.
Источник


