- Arch Linux User Repository
- Search Criteria
- Package Details: imagewriter 1.10.1432200249.1d253d9.2.8-1
- Package Actions
- Dependencies (2)
- Required by (0)
- Sources (1)
- Latest Comments
- bittin commented on 2021-05-04 06:03
- earlybird commented on 2021-02-18 07:44
- Ferdinand commented on 2020-12-15 07:11
- shimi commented on 2020-12-14 18:14
- Ferdinand commented on 2020-12-14 16:38
- scachemaille commented on 2020-09-28 16:38
- JDCNS commented on 2020-09-27 18:12
- JDCNS commented on 2020-09-20 22:22
- shimi commented on 2020-09-19 09:23
- JDCNS commented on 2020-09-14 03:09
- Burn an ISO File
- Содержание
- Burning to CD/DVD in Linux
- Burning to a CD/DVD in Windows
- Writing to a USB Stick in Linux
- Using the Terminal
- How you can check ISO
- How create isohybrid
- Using a Burning Application
- ImageWriter
- Writing to a USB Stick in Windows
- Using Rufus
- Burn an ISO File
- Содержание
- Burning to CD/DVD in Linux
- Burning to a CD/DVD in Windows
- Writing to a USB Stick in Linux
- Using the Terminal
- How you can check ISO
- How create isohybrid
- Using a Burning Application
- ImageWriter
- Writing to a USB Stick in Windows
- Using Rufus
- Записываем Linux на USB из терминала
Arch Linux User Repository
Search Criteria
Package Details: imagewriter 1.10.1432200249.1d253d9.2.8-1
Package Actions
| Git Clone URL: | https://aur.archlinux.org/imagewriter.git (read-only, click to copy) |
|---|---|
| Package Base: | imagewriter |
| Description: | A graphical utility for writing raw disk images & hybrid isos to USB keys |
| Upstream URL: | https://github.com/openSUSE/imagewriter |
| Licenses: | GPL2 |
| Submitter: | chenxiaolong |
| Maintainer: | yochananmarqos |
| Last Packager: | yochananmarqos |
| Votes: | 185 |
| Popularity: | 0.51 |
| First Submitted: | 2011-03-11 20:36 |
| Last Updated: | 2021-09-25 14:14 |
Dependencies (2)
Required by (0)
Sources (1)
Latest Comments
bittin commented on 2021-05-04 06:03
Updated this package and can take over it:
earlybird commented on 2021-02-18 07:44
Can you update the PKGBUILD?- please.
Ferdinand commented on 2020-12-15 07:11
Thanks, @shimi — that worked like a charm 🙂
shimi commented on 2020-12-14 18:14
@Ferdinand package updated please retry
Ferdinand commented on 2020-12-14 16:38
Don’t know if this is a permanent situation, but two attempts today, a few hours apart, gave a 404 during makepkg -si:
scachemaille commented on 2020-09-28 16:38
@shimi could you please add aarch64 in the supported architecture?. I tested it and it works on arch arm. thanks for your work..
JDCNS commented on 2020-09-27 18:12
OK, I had time to do a bit more research. Not only does PlatformHal.cpp need «#include «, but «toAscii()» is an obsolete function. It is a Qt4 function. It should be «toLatin1()» instead. See https://www.programmersought.com/article/39142944974/.
JDCNS commented on 2020-09-20 22:22
Usually I use yay to build AUR packages. In this case, I did try manually as well:
I get the same error.
I notice qt5-base and udisks2 are dependencies, so I ran the command to update them, but it says they are already the latest version, 5.15.1-1 and 2.9.1-1 respectively.
If you want to see the complete list, I posted it at https://pastebin.com/meH7wQSY, since I’m not sure how to attach it here.
shimi commented on 2020-09-19 09:23
@JDCNS I can’t reproduce the bug. Can you upload a list of your installed packages (with versions) and the step-by-step of how you tried to build the package?
JDCNS commented on 2020-09-14 03:09
I keep getting errors when trying to build. It first died saying «error: ‘QMessageBox’ was not declared in this scope». I added #include to the top of PlatformHal.cpp, but now it is throwing «error: ‘class QString’ has no member named ‘toAscii’». I stopped trying, as I don’t exactly trust it at this point. Anyhow, what am I missing?
Copyright © 2004-2021 aurweb Development Team.
AUR packages are user produced content. Any use of the provided files is at your own risk.
Источник
Burn an ISO File
Содержание
As outlined in the Download Manjaro page, an ISO is not simply a ‘drag and drop’ or ‘copy and paste’ duplication of Manjaro’s installation files. It is in fact a copy of the raw computer code that makes up the files themselves. This is why it is necessary to use a software burning application to ‘burn’ an ISO file, that is, convert its raw code into the files onto a physical medium such as a DVD or USB flashdrive / datastick in order to use it. Once burned / converted, the files on that medium can then be used to run Manjaro directly without having to install it to your system (referred to as Live-CD or Live-USB mode), and/or install Manjaro on your system. Again however, it will not be necessary to to burn an ISO if you intend on running Manjaro in a virtual machine environment using Oracle’s Virtualbox. This is because Virtualbox is able to read ISO files directly as virtual disks.
Burning to CD/DVD in Linux
Several different software burning applications — if not already installed — should be available for installation from your distribution’s Software Center / Software Manager / Package Manager / repositories. Popular burners include XFBurn, K3b, and Brasero. Which one you may choose is entirely down to personal choice. However, a guide to burning your downloaded Manjaro ISO using Brasero has been provided below:
1. Insert a Blank CD/DVD (use a DVD if burning an ISO for anything other than the NET Edition)
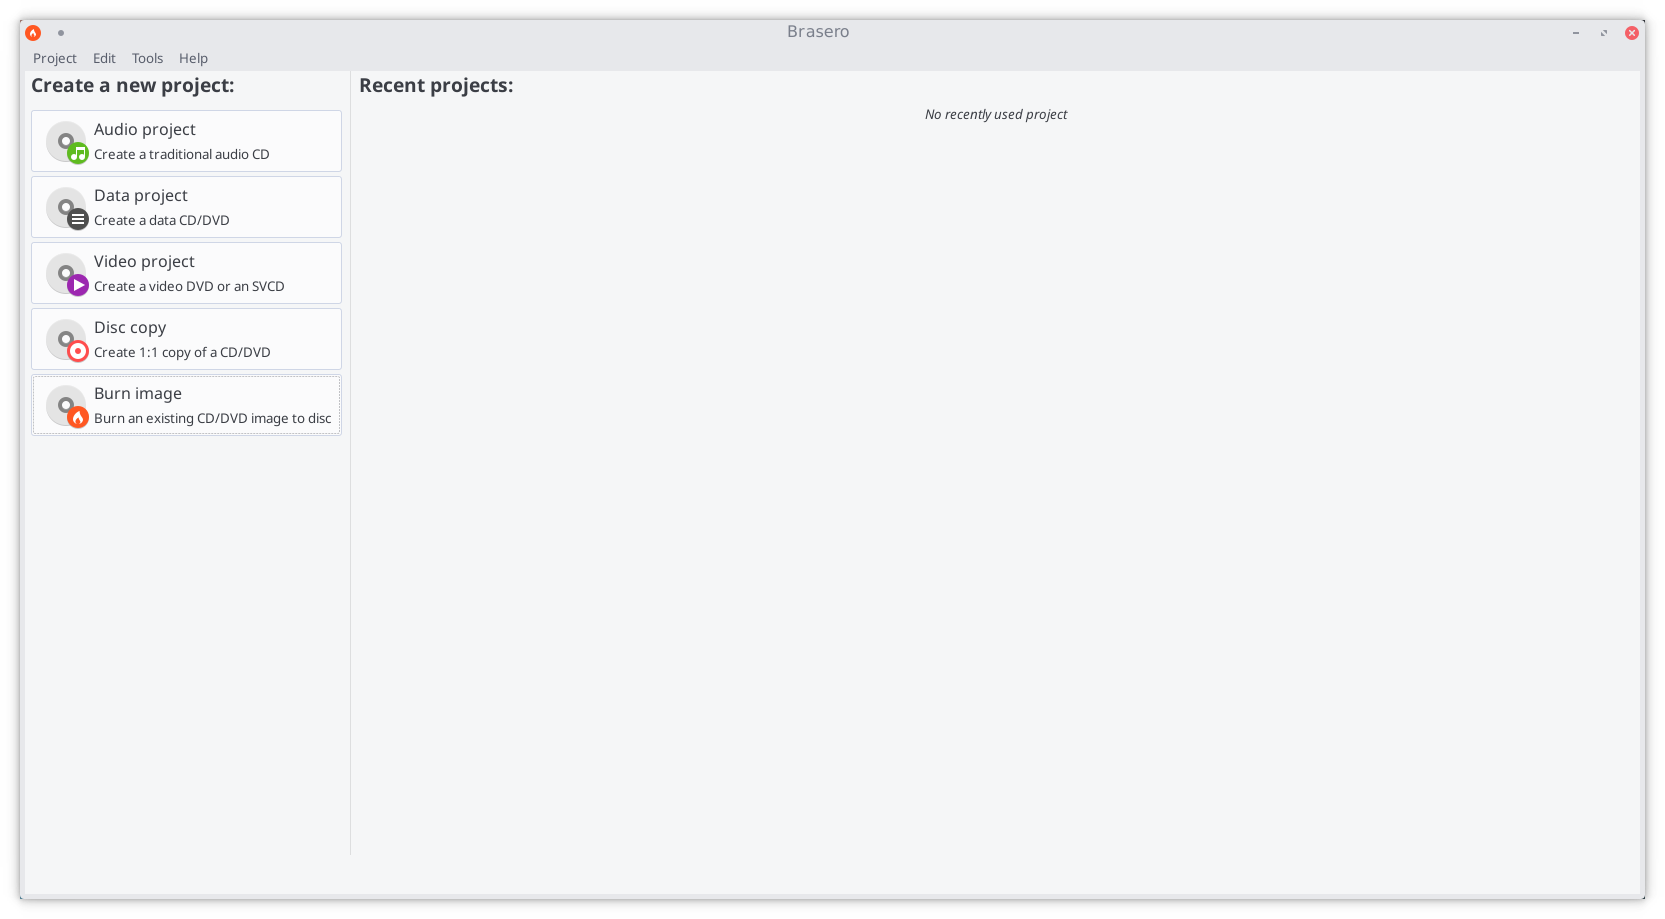
2. Start the Brasero software burner
3. Click the Burn Image — Burn an existing CD/DVD image to disc button to open the Image Burning Setup window.
4. Click the button beneath the title Select a disc image to write to open up your file manager. Locate and double-click the downloaded ISO file to load it. Upon automatically returning to the Image Burning Setup window, note that the ISO file is now listed as the disc image to write.
5. Underneath the title Select a disc to write to the blank CD/DVD inserted should already have been automatically listed. Otherwise, click the button to select it manually.
6. Click the properties button to open the properties window, and then click the button beneath the title Burning Speed. Again, it is strongly recommended to select the slowest speed available. Once selected, click the Close button.
7. Click the Burn button to start the burning process. If necessary, follow any on-screen instructions provided.
Burning to a CD/DVD in Windows
In Windows 7 and later, support for burning an ISO to DVD is built-in. Simply right click on the on .iso file and select «Burn disk image». This will bring up a series of dialogues to walk you through the process.
For Windows Vista or older versions of Windows you will need to download 3rd party software. Several free software burner applications are available for Windows. One such tool is DeepBurner. The portable version can be downloaded from here.
Writing to a USB Stick in Linux
This section describes how to write a Linux ISO file to USB.
Windows ISO files are notoriously difficult and requires special attention. Read the forum post on HowTo create a bootable Windows ISO
Using the Terminal
To burn the iso on an usb stick, enter the following command in a terminal :
Where [drive letter] is the letter of your removable device. Please note that it is the device (e.g. /dev/sdb), and not the partition number (e.g. /dev/sdb1).
To find which drive letter it might be write:
How you can check ISO
Disk manjaro-mate-15.12-x86_64.iso: 7,5 GiB, 8006074368 bytes, 15636864 sectors Units: sectors of 1 * 512 = 512 bytes Sector size (logical/physical): 512 bytes / 512 bytes I/O size (minimum/optimal): 512 bytes / 512 bytes Disklabel type: dos
Disk identifier: 0x00000000 COPY TO CLIPBOARD
Disk manjaro-xfce-16.08-x86_64.iso: 1,5 GiB, 1561657344 bytes, 3050112 sectors Units: sectors of 1 * 512 = 512 bytes Sector size (logical/physical): 512 bytes / 512 bytes I/O size (minimum/optimal): 512 bytes / 512 bytes Disklabel type: dos Disk identifier: 0x06c2dccb . Device Boot Start End Sectors Size Id Type manjaro-xfce-16.08-x86_64.iso1 * 0 3050111 3050112 1,5G 0 Empty
manjaro-xfce-16.08-x86_64.iso2 224 63711 63488 31M ef EFI (FAT-12/16/32) COPY TO CLIPBOARD
Isohybrid have 2 partitions, you can check also with gparted after burn the iso on an usb stick.
How create isohybrid
Using a Burning Application
ImageWriter
ImageWriter should be available for installation from your distribution’s Software Center / Software Manager / Package Manager / repositories. Once Imagewriter has been downloaded and installed, ensure that your USB stick is plugged in before starting it.
A brief guide to writing the Manjaro .ISO image has been provided:
1. Click on the centre icon
2. Navigate to where the ISO image has been saved and select it
3. Ensure that your USB device has been selected from the drop-down menu
4. Click on the Write button
5. After the Write process has finished, reboot your system
Writing to a USB Stick in Windows
Using Rufus
Rufus Rufus is a utility that helps format and create bootable USB flash drives, such as USB keys/pendrives, memory sticks, etc.
When you use Rufus to write a Manjaro Live ISO to USB you must select DD mode when prompted to use standard or DD mode.
Источник
Burn an ISO File
Содержание
As outlined in the Download Manjaro page, an ISO is not simply a ‘drag and drop’ or ‘copy and paste’ duplication of Manjaro’s installation files. It is in fact a copy of the raw computer code that makes up the files themselves. This is why it is necessary to use a software burning application to ‘burn’ an ISO file, that is, convert its raw code into the files onto a physical medium such as a DVD or USB flashdrive / datastick in order to use it. Once burned / converted, the files on that medium can then be used to run Manjaro directly without having to install it to your system (referred to as Live-CD or Live-USB mode), and/or install Manjaro on your system. Again however, it will not be necessary to to burn an ISO if you intend on running Manjaro in a virtual machine environment using Oracle’s Virtualbox. This is because Virtualbox is able to read ISO files directly as virtual disks.
Burning to CD/DVD in Linux
Several different software burning applications — if not already installed — should be available for installation from your distribution’s Software Center / Software Manager / Package Manager / repositories. Popular burners include XFBurn, K3b, and Brasero. Which one you may choose is entirely down to personal choice. However, a guide to burning your downloaded Manjaro ISO using Brasero has been provided below:
1. Insert a Blank CD/DVD (use a DVD if burning an ISO for anything other than the NET Edition)
2. Start the Brasero software burner
3. Click the Burn Image — Burn an existing CD/DVD image to disc button to open the Image Burning Setup window.
4. Click the button beneath the title Select a disc image to write to open up your file manager. Locate and double-click the downloaded ISO file to load it. Upon automatically returning to the Image Burning Setup window, note that the ISO file is now listed as the disc image to write.
5. Underneath the title Select a disc to write to the blank CD/DVD inserted should already have been automatically listed. Otherwise, click the button to select it manually.
6. Click the properties button to open the properties window, and then click the button beneath the title Burning Speed. Again, it is strongly recommended to select the slowest speed available. Once selected, click the Close button.
7. Click the Burn button to start the burning process. If necessary, follow any on-screen instructions provided.
Burning to a CD/DVD in Windows
In Windows 7 and later, support for burning an ISO to DVD is built-in. Simply right click on the on .iso file and select «Burn disk image». This will bring up a series of dialogues to walk you through the process.
For Windows Vista or older versions of Windows you will need to download 3rd party software. Several free software burner applications are available for Windows. One such tool is DeepBurner. The portable version can be downloaded from here.
Writing to a USB Stick in Linux
This section describes how to write a Linux ISO file to USB.
Windows ISO files are notoriously difficult and requires special attention. Read the forum post on HowTo create a bootable Windows ISO
Using the Terminal
To burn the iso on an usb stick, enter the following command in a terminal :
Where [drive letter] is the letter of your removable device. Please note that it is the device (e.g. /dev/sdb), and not the partition number (e.g. /dev/sdb1).
To find which drive letter it might be write:
How you can check ISO
Disk manjaro-mate-15.12-x86_64.iso: 7,5 GiB, 8006074368 bytes, 15636864 sectors Units: sectors of 1 * 512 = 512 bytes Sector size (logical/physical): 512 bytes / 512 bytes I/O size (minimum/optimal): 512 bytes / 512 bytes Disklabel type: dos
Disk identifier: 0x00000000 COPY TO CLIPBOARD
Disk manjaro-xfce-16.08-x86_64.iso: 1,5 GiB, 1561657344 bytes, 3050112 sectors Units: sectors of 1 * 512 = 512 bytes Sector size (logical/physical): 512 bytes / 512 bytes I/O size (minimum/optimal): 512 bytes / 512 bytes Disklabel type: dos Disk identifier: 0x06c2dccb . Device Boot Start End Sectors Size Id Type manjaro-xfce-16.08-x86_64.iso1 * 0 3050111 3050112 1,5G 0 Empty
manjaro-xfce-16.08-x86_64.iso2 224 63711 63488 31M ef EFI (FAT-12/16/32) COPY TO CLIPBOARD
Isohybrid have 2 partitions, you can check also with gparted after burn the iso on an usb stick.
How create isohybrid
Using a Burning Application
ImageWriter
ImageWriter should be available for installation from your distribution’s Software Center / Software Manager / Package Manager / repositories. Once Imagewriter has been downloaded and installed, ensure that your USB stick is plugged in before starting it.
A brief guide to writing the Manjaro .ISO image has been provided:
1. Click on the centre icon
2. Navigate to where the ISO image has been saved and select it
3. Ensure that your USB device has been selected from the drop-down menu
4. Click on the Write button
5. After the Write process has finished, reboot your system
Writing to a USB Stick in Windows
Using Rufus
Rufus Rufus is a utility that helps format and create bootable USB flash drives, such as USB keys/pendrives, memory sticks, etc.
When you use Rufus to write a Manjaro Live ISO to USB you must select DD mode when prompted to use standard or DD mode.
Источник
Записываем Linux на USB из терминала
Чтобы не писать все слово Downloads (или как там у Вас), достаточно ввести первые пару букв или больше и нажать клавишу Tab — система дополнит путь до конца. После того, как мы окажемся в каталоге с нашими файлами *.iso и *.md5sum, введем следующую команду:
Или в случае SHA1:
Через некоторое время система выдаст свой вердикт по поводу целостности загруженного образа. Если все в порядке, можем смело продолжать дальше, в ином случае лучше перекачать образ.
Вот теперь нужно подключить наш USB-накопитель и узнать его адрес. Выполним команду:
Она выдаст «дерево» разделов и носителей. По этому дереву легко определить какой из носителей является нашей флешкой. Вот вывод команды в моем случае:
По скольку у меня флешка на 2GB, то я точно понимаю что моя флешка подключилась как sdb 8:16 1 1,9G 0 disk, а именно sdb. И вот теперь мы можем приступить к записи загрузочного накопителя! В терминале вводим (чтобы не писать имена файлов целиком просто жмем клавишу Tab и, по мере необходимости, исправляем ошибки автодополнения):
Где X — это ссылка на наш USB накопитель, в моем случае это sdb
Осталось дождаться записи накопителя, время ожидания будет зависеть от двух факторов: скорости самого накопителя и объема файла образа.
Таким нехитрым способом можно записать почти любой дистрибутив, за редкими исключениями, к примеру, OpenSUSE или TAILS. Последний, кстати, требует наличия двух флешек, первая из которых записывается способом выше, а вторая из режима live-CD запущенного с первой.
На этом все! Всем добра!
Источник


