- 8 Ways to Transfer Files from PC to Android — you’ll like them
- Part 1: How to transfer files from PC to Android by copy & paste?
- Part 2: How to transfer files from PC to Android with Dr.Fone?
- Dr.Fone — Phone Manager (Android)
- Part 3: How to transfer files from PC to Android using Wi-Fi?
- Part 4: How to transfer files from PC to Android using Bluetooth?
- Part 5: Top 3 Apps to transfer files from PC to Android
- Dr.Fone — Data Recovery and Transfer Wirelessly & Backup
- Dropbox
- Android
- Four ways to transfer data from Windows phone to Android device for free
- Solution 1. How to transfer files from Winphone to Android with 1 Click
- Dr.Fone — Phone Transfer
- Steps about how to transfer data from Windows phone to Android device with Dr.Fone
- Step 1. Launch Winphone to Android Transfer
- Step 2. Connect Windows Phone and Android
- Step 3. Transfer from Windows Phone to Android
- Solution 2. Transfer data from Windows phone to Android device with computer
- Pros and cons of this way
- Solution 3. Transfer content from Windows Phone to Android with OneDrive
- Pros and cons of this way
- Solution 4. Transfer contacts with Outlook and Gmail
8 Ways to Transfer Files from PC to Android — you’ll like them

James Davis
Jan 06, 2021 • Filed to: Backup Data between Phone & PC • Proven solutions
Do you need to transfer files from your PC to Android? Well, the good news is that there are plenty of options at your disposal and fortunately, you do not have to waste time experimenting with different methods. This is so because we have provided a detailed guide on how to transfer files from PC to Android using Bluetooth, third-party software, Wi-Fi, and cloud-based platforms.
So, read this article and select the best possible file transfer method for your Android device.
Part 1: How to transfer files from PC to Android by copy & paste?
The simplest method to transfer files from PC to Android is to copy and paste files. To learn how to transfer files from PC to Android, you just need to follow these steps:
Step 1 – First of all, plug in your Android device via a USB device to the PC.
Step 2 – Please wait for your computer to read the device.
Step 3 — A program called File Explorer will open all the files in your device. Then, you simply have to visit the вЂHard Drive’ folder on your PC and select the files that you wish to transfer to the Android device.
![]()
Step 4 – Now it is a simple case of cutting and pasting videos, songs, and images from PC to Android device by choosing or creating the desired folder on your Android device.
Copy and pasting is the simplest technique for users because you don’t need third-party software to complete the transaction and neither do you need to have good PC knowledge.
However, there are some drawbacks as well.
- This method only works with certain file types like photos and videos.
- There are other data types like messages, contacts, and social media messages that cannot be transferred through this method.
- There might be chances that not all files from your PC are compatible with the Android device.
- Also, the process of copying and pasting can waste a lot of your time if you have a large volume of content.
Part 2: How to transfer files from PC to Android with Dr.Fone?
Dr.Fone is a third party software specifically designed to make it easier to transfer files between different devices. It comes with several modules including Dr.Fone — Phone Manager (Android) which transfers file types across all devices including iOS/Android devices. Dr.Fone is a superior solution to other methods because you can transfer different file types such as text messages, contacts, podcasts, ebooks and so much more. Furthermore, Android devices come in different formats and versions. Not all these versions are compatible with your PC. However, compatibility is not a concern when using Dr.Fone — Phone Manager (Android). The software is compatible with more than 6000 devices. Dr.Fone — Phone Manager is also advantageous because the transaction can be completed in a single click.
![]()
Dr.Fone — Phone Manager (Android)
One-Stop Solution to Transfer files from PC to Android
- Transfer, manage, export/import your music, photos, videos, contacts, SMS, Apps, etc.
- Backup your music, photos, videos, contacts, SMS, Apps, etc. to computer and restore them easily.
- Transfer iTunes to Android (vice versa).
- Fully compatible with 3000+ Android devices (Android 2.2 — Android 10.0) from Samsung, LG, HTC, Huawei, Motorola, Sony, etc.
- Fully compatible with Windows 10 and Mac 10.15.


Do you want to use Dr.Fone — Phone Manager (Android) to transfer files from PC to Android? Well, the first thing you must do is download and install Dr.Fone — Phone Manager (Android). After that, follow the steps outlined below to complete the transaction.
Step 1 – The very first step, as usual, is to launch Dr.Fone software and select the вЂTransfer’ component, then plug in your Android device via USB.
Step 2 – Once the connection is established, you will see various options on the Dr.Fone main page. Select the section such as photos, videos, music, or others that you want to transfer to Android.
![]()
Here, we have taken the example of the Photo option.
Step 3 — Click on the вЂPhotos’ tab to see all the photos stored on the Android device.
![]()
Step 4 – Now, select all the photos that you want to transfer and click on the Icon and select вЂAdd File’ or вЂAdd Folder’ to transfer them to an Android device.
![]()
Step 5 – Lastly, after selecting the relevant data, add all the photos to the Android device.
![]()
Part 3: How to transfer files from PC to Android using Wi-Fi?
Under this section, you will learn how to use Wi-Fi to transfer files from PC to Android. Using a Wi-Fi connection is helpful in the speedy transfer of data between different devices.
For the same purpose here we have chosen the app called “Dr.Fone — Data Recovery & Transfer Wirelessly & Backup”. The app is quite handy while dealing with all kinds of transfer tasks whatever be the medium and no doubt is the most reliable one.
The required process for the transfer of files from PC to Android through Wi-Fi by using the above app is as follows:
Step 1: First download and install the Dr.Fone — Data Recovery & Transfer Wirelessly & Backup from https://play.google.com/store/apps/details?id=com.wondershare.drfone using a fast Wi-Fi connection.
Step 2: Now visit http://web.drfone.me/ through the browser on your PC and open the app on your Android device.
![]()
On your PC: Here you will be provided with an option to upload files from your PC using the “Add Files” option. Once uploaded, simply press the send button after entering a 6-digit key on your PC.
On your Android device: To receive the files, verify those 6-digit key and receive the files
That’s it, by following the simple steps as above you can easily transfer the files from PC to Android.
Part 4: How to transfer files from PC to Android using Bluetooth?
Bluetooth is one of the older methods of transferring files between devices. Long before Wi-Fi-based solutions came along, Bluetooth was the only option available. The method is still valid today and is a viable alternative to Wi-Fi and third-party programs. One advantage of using Bluetooth is its accessibility. Most phones and computers come with Bluetooth capability built into them. Hence, anyone with an Android and PC can use Bluetooth to facilitate file transfers.
If you are interested in using Bluetooth as a method to transfer your files from PC to Android, then follow the steps outlined below to get the job done!
Step 1 – First you must make sure that Bluetooth is activated on both your Android device and PC.
For Android, go to Settings > Bluetooth while for PC click on Start > Settings > Bluetooth.
Step 2 — Connect both the devices to each other and make sure they are both set to discoverable mode.
Step 3 — The Android device should now appear on the list of available devices. Click on вЂPair’ to create the connection.
![]()
Step 4 — The devices should now be paired together. However, on Windows 10 you might get a passcode that must match with the one given on the Android device. Once you match the codes, accept the connection request.
![]()
Step 5 – Now, on your PC (here we have taken the example of Windows 10) Go to Settings > Bluetooth Click on вЂSend and receive files via Bluetooth’.
![]()
Then click on вЂSend Files’ to send data to your Android phone> Select your Android device and click вЂNext’ to complete the transfer of the file.
Though Bluetooth is readily accessible it is not the perfect method to facilitate Windows to Android transfer.
- One reason is efficiency as there are newer technologies that can complete transfers in a single click. Bluetooth takes longer to complete the file transfer process.
- The other reason is reliability, as there are chances of data getting corrupted due to virus attack (if one device is already affected by a virus)
Part 5: Top 3 Apps to transfer files from PC to Android
There are several apps designed to share files from PC to Android. After a comprehensive study, we discovered the three best apps for transferring data between the two devices.
Dr.Fone — Data Recovery and Transfer Wirelessly & Backup
Dr.Fone — Data Recovery and Transfer Wirelessly & Backup is the top app for file transfer. Originally designed to restore missing data, the latest updates bring transfer functionality to this feature-loaded app. The app comes with several features including:
- Easy transfer of files between PC and Android
- Recover data deleted due to overwriting.
- Recover data from the cache without rooting.
- No need for cables to do transactions wirelessly.
- The only thing to do is open we.drfone.me in a browser.
Dropbox
Dropbox is one of the most popular file hosting services available. The program works on both mobile devices and desktop PCs. It is a fantastic option because it is so simple and accessible. You will be completing transactions like Windows to Android transfer in a matter of moments. Dropbox performs several operations like personal cloud, file synchronization, and client software. It is perfect for transferring files between desktop computers and mobile devices.
![]()
Android
Another fantastic app for file transfers, Airdroid is designed specifically to transfer content from mobile to computer and vice versa. If you are looking for a simplified, streamlined method for transferring content from PC to Android, then look no further than Airdroid.
Four ways to transfer data from Windows phone to Android device for free

Alice MJ
Dec 21, 2020 • Filed to: Data Transfer Solutions • Proven solutions
Solution 1. How to transfer files from Winphone to Android with 1 Click
Dr.Fone — Phone Transfer can transfer your photos, videos, music contacts, messages and other files directly from your Winphone to Android. It can also restore your contacts from Onedrive backup of Winphone to your Android device totally hassle-free. With Dr.Fone — Phone Transfer, you can transfer files from Windows phone to Android in batch.
![]()
Dr.Fone — Phone Transfer
Transfer Data from Windows Phone to Android in 1 Click!.
- Easily transfer all videos, music, contacts and photos from Windows phone to Android devices.
- Enable to transfer from HTC, Samsung, Nokia, Motorola and more to iPhone X/8/7S/7/6S/6 (Plus)/5s/5c/5/4S/4/3GS.
- Works perfectly with Apple, Samsung, HTC, LG, Sony, Google, HUAWEI, Motorola, ZTE, Nokia and more smartphones and tablets.
- Fully compatible with major providers like AT&T, Verizon, Sprint and T-Mobile.
- Fully compatible with iOS 11 and Android 8.0
- Fully compatible with Windows 10 and Mac 10.13.
Steps about how to transfer data from Windows phone to Android device with Dr.Fone
Step 1. Launch Winphone to Android Transfer
Open the Dr.Fone on your computer and click on the “Phone Transfer” option.
Step 2. Connect Windows Phone and Android
Use USB cables to connect both your Android device and windows device to your computer. On connecting both devices, click the “Flip” button on the program in order to switch the destination and source phones.
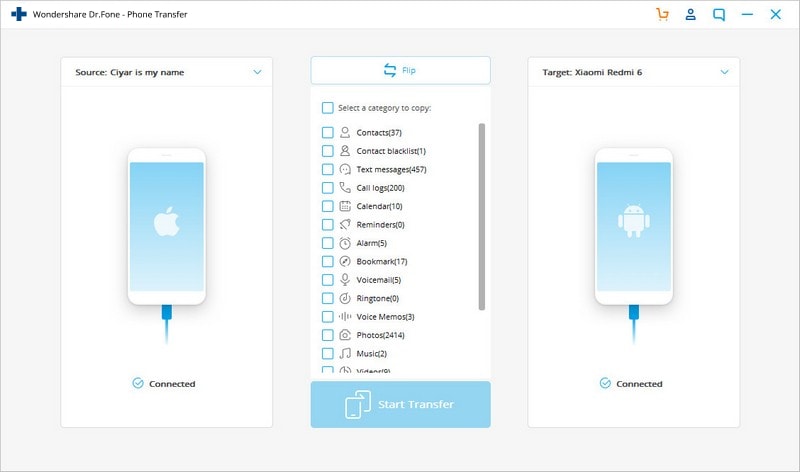
At this point, you will have to select the desired files to transfer by ensuring the box beside the file types is checked. You also have the choice of clearing the data in the destination phone if desired.
Note: Transferring contacts from windows phone to Android device will require you to backup contact to you Onedrive first while Dr.Fone — Phone Transfer helps you restore it to your Android device.
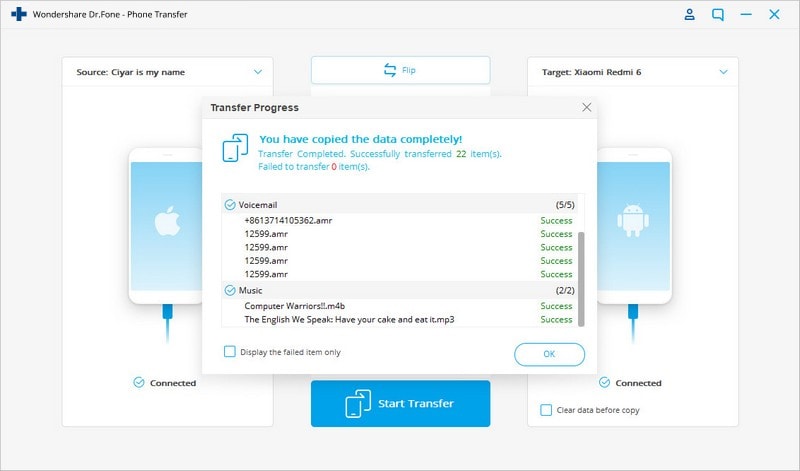
Step 3. Transfer from Windows Phone to Android
Click “Start Transfer” to start transferring. Ensure both phones stay connected during the transfer process.
Solution 2. Transfer data from Windows phone to Android device with computer
When it comes to transferring contacts, documents, audio video files and other data from Windows phone to Android devices, connecting both devices to your PC for data transferring is the most preferred Solution.
All that you need to do is to connect both devices to your computer or laptop with the help of data cables. Open each folder one by one, and simply copy-paste the content from windows phone folders to Android device folders.
Pros and cons of this way
This is the simplest method to transfer content from one device to the other. There is no need for an internet connection. Files are transferred within just few seconds.
The negative aspect is perhaps the fact that files and folders are transferred in their existing format. So, some videos, images, and files that you open in your Windows phone might not be compatible with Android device and may not even open after transferring. Same is the problem with transferring phone contacts, as every handset stores contacts in a different format. This method cannot be used to transfer text messages from one device to another.
Solution 3. Transfer content from Windows Phone to Android with OneDrive
Microsoft’s smart phone operating system may not be as popular as Android or iOS. But, some of Microsoft’s apps are impressive for sure! Microsoft’s OneDrive app is one of those apps that can really prove to be helpful for transferring data from one device to the other. The app supports Windows, iOS and Android devices. With OneDrive, you can transfer Windows Phone files to Android as well. Check the detailed steps below.
![]()
First step is to download OneDrive app in both devices. After downloading, the app will prompt you to sign in using your Microsoft account.
![]()
Once you sign-in using your outlook username and password, the app will open its home page and display your existing content that you have stored in OneDrive.
![]()
Now, open the same app in your windows phone and click on upload icon.
![]()
Click on «Upload files» Solution if you wish to upload documents, audio files, and other supported formats. If you wish to upload videos and photos from your device, just choose the dedicated Solution.
The app will display all the folders and sub-folders from your Windows phone. Open the folder one by one and choose the content that you wish to transfer in your new phone.
![]()
Once you select the concerned files, just click on «upload». The app will start uploading all the selected content on OneDrive server.
![]()
After uploading all the necessary content from Windows phone on OneDrive, open the OneDrive app on your Android device.
Select the content that you wish to sync with your Android phone and simply download the same.
![]()
This Solution is suitable for people who travel in various countries around the world and change their cell phone several times. As all the important content remains stored on OneDrive, users can retrieve it any time and from anywhere. All that they need is an Android, Windows, or iOS handset that supports the OneDrive app.
Pros and cons of this way
As mentioned earlier, this Solution is best suitable for people who wish to transfer contacts, documents, and files without using PC. Several people use this method to transfer their content from one phone to another while on the go. Images, documents and videos can be viewed with the help of OneDrive app, and can be downloaded in compatible format.
Now the drawback! You need an active internet connection in your Windows and Android device, most preferably, Wi-Fi. Transferring data may take considerable time, as files are first transferred to OneDrive, and then, from OneDrive to your Android device.
Unfortunately, this app cannot help in transferring contacts or text messages from one phone to another.
Solution 4. Transfer contacts with Outlook and Gmail
Follow the steps below to transfer contacts from Windows phone to Android phone:
In-order to transfer contacts from Windows phone to Android device, sync your contacts from Windows phone with Outlook. Then, sign-in to your Outlook account from desktop PC or tablet, and click on «People» Solution from the drop down menu.
![]()
In the next screen, click on «Manage» and select «Export for Outlook and other service» from drop down menu.
![]()
Once you click on that Solution, Outlook will automatically download contacts on your device in the form of .CSV file.
![]()
Now, open Gmail, and click on Gmail’s contact Solution.
![]()
The next screen will show you several Solutions, and you need to select «import.»
![]()
Once the pop-up window appears, click on choose file Solution, and select the Outlook contacts CSV file that you downloaded from Outlook. Then, simply click on import.
![]()
Within few seconds, Gmail will sync all the contacts from the Outlook’s file and merge them with your existing contacts on Google. Start your Android device, and simply sync Google’s contacts with your phone’s contacts. That’s it! This is perhaps the best way to transfer contacts from Windows phone to Android device, and that too, free of cost.


