- NTFS recovery
- да хотя бы
- При подключении диска ошибка: $MFTMirr does not match $MFT (record 0)
- Can’t run chkdsk /r
- NTFS/GPT Mount exited with Exit Code 13
- 2 Answers 2
- Solved: Cannot Run CHKDSK Write Protected on Windows 10/8/7
- CHKDSK error: volume is write protected
- Possible causes for write protected
- Quick fixes to remove write protected for CHKDSK in Windows 10/8/7
- Fix CHKDSK write protected disk in CMD
- Remove write protection in Diskpart
- Modify WriteProtected key in Registry Editor
- Remove write protected by completely formatting
- Run disk checking with third party tools
NTFS recovery
Сломался НТФС, хз как вернуть его к жизни. При этом MFT и сама структура жива. Вот как это выглядит:
Попользовал WinHex и увидел что и правда «ключевого» $Volume нет.
Подскажите как его восстановить.
P.S. ТестДиск попробовал, но насколько я понял он такое делать не умеет. Причем проверил несколько утилит, все говорят одно и то же: Файловая система жива, файло доступно, фиксить нечего. Т.е. слить файлы не проблема. Но сливать 200Г — напряжно, да и некуда. Собственно потому и ищу как бы пофиксить именно НТФС раздел

Failed to open inode FILE_Volume: Input/output error
На бэды проверил?
Давай попробуем если бэда на том месте нет прописать по верху туда где он был

run chkdsk /f on Windows then reboot into Windows twice. The usage of the /f parameter is very important!
Этого лучше пока не делать
Выдай-ка
ntfsinfo —inode 3 /dev/sdb1
Я имею в виду, что не имея посекторного бэкапа, лучше не делать это. Оно как может помочь, так и может взять ни с того ни с сего перезаписать всю MFT. Это же венда.
Это НЕ может работать. Почему?
Потому что по мнению винды это RAW партиция(в виду отсутствия «файла» $Volume)
MFT && MFTMirr valid and match
Смотрел винхексом, пропал только файл $Volume
Проверь на бэды сперва. Пока не проверишь на бэды, лучше винт не долбать.
Я подозреваю что проблема как раз в этом.
Чем можно проверить ?
Желательно линуксово конечно, но на крайняк и МХДД могу 🙂
SMART не ругался?
да хотя бы
badblocks -v /dev/sdb1
Запустил 🙂
Через часок отпишусь 🙂
Был синий экран(under WinXp) и матерщина в сторону IAStor.sys
smartctl -a /dev/sdX ?
Из все кучи выгреб вот это:
Интересует 5 Reallocated_Sector_Ct, 196 Reallocated_Event_Count, 197 Current_Pending_Sector и 198 Offline_Uncorrectable.
Всё по нулям. Видимо, проблема не в жёстком диске.
Сдампь секторов надцать с 6291457 по минимум 6291464 и выложи куда-нибудь в hex. Ты уже смотрел, теперь мы посмотрим 🙂
Сори за депозит 🙂 Ничего лучше не придумал
маловато будет 🙂 (200 байт пришло)

Ну так да. я 200 байт и скопировал
Сколько надо ? кило? 2 кило ? 10 кило ? метр ?
с сектора 6291457 по минимум сектор 6291464 раздела /dev/sdb1
. черт. сектор. А сектор сколько байт ?)
С утра был 512 байт ЕМНИП
Вижу бяку со смещения 0x600 по 0xDFF. Это восемь секторов с бякой. Что будем делать?
эм :))))
А что тут можно делать то ?)
Заполнить руками 🙂 Это всего 2048 байт 🙂
Ну я не против 🙂
Только непонятно что заполнять то
Ты в никсах?
Бери hexedit, открывай дамп (не винт!!) именно дамп, который выкладывал на rghost, найли тот участок с 0x600 по 0xDFF. Убедись сам что там бяка.
Пришли размер своего раздела, его UUID из /dev/disk/by-uuid, вспомни чем размечал (вендой или gparted), ну и что ещё вспомнишь возможно важное. Я сейчас сдамплю такой же кусок у себя с вендового раздела, попробуем сделать diff, и потом зальёшь себе.
hexedit -s sdb1_200bytes.dump
Да, это удаленная машина под дебом. Размечался диск фдиском гнутым,
UUID — хз де его взять, для sdb2 есть, для sdb1 нету, да и важен ли он?

Может проще каким-нибудь easyrecovery воспользоваться?
У них у всех одна и та же проблема: все они с радостью достают файлы из раздела, но не чинят сам раздел. Максимум на что они способны это поправить MFT или загрузочный сектор. В моем же случае с конкретно файлами и МФТ все пучком. У меня пропало небольшое количество служебных данным NTFS. В следствии чего, не смотря на то что ФС в порядке(в файловом смысле), смонтировать ее нельзя. Я конечно мог бы слить почти весь веник, форматнуть, и залить обратно. но это адово долго(некуда сливать, придется сливать небольшими порциями)
Да. похоже на то что у меня полная херня )
Всего 2048 байт — ничего страшного. 4 сектора — и раздел вернётся.
Сделай следующее
Дальше будем работать с ними — файлик меньше — удобнее, не заблудишься
ok. что тут . 0x05fe ?
Начиная с 0x600 надо копировать из sda2_8sect.bin, поглядывая на sdb1_8sect.dump в сохранившихся полях — где структуры которые совпадают, а где данные и поля, которые разные из-за разницы в размещении и относительном смещении разделов у тебя и у меня
И сделай чтоб в окне отображалось ровно 512 байт — с
xxd-dump’ы не пригодятся видимо.. diff’ы не особо информативны — ручками и глазками лучше.
tschwarz/coen152_05/PPtPre/NTFSFS.ppt
Там немного обяснения по структуре записи MFT. Одна запись — 1024 байт, тебе надо восстановить только две. Можно ещё найти полное объяснение структуры записи, тогда вообще будет просто.
Ну я так навскидку поглядел, все смещения для других FILE0 совпадают, окромя Volume и LogFile
Нет, там разница есть, смотри строки 0x250 0x260 0x2C0 0x2D0 0x3B0. Они у нас разные, но име.т зависимость от соседних ($MFTmirr который до и $AttrDef который после). Остальное можно потихоньку копировать. По вышеуказанным и может быть каким-нибудь ещё полям надо будет посидеть подумать. А потом как закончишь, просто сдампить из этого файла обратно на винт и профит!
Я бы в другое время сделал бы за тебя эту работу, но сейчас малость занят, так что удачи, отписывайся о процессе и результатах. Если чё, спрашивай. Ты на правильном пути. Чуть-чуть усилий — и всё будет возвращено, а бесценный опыт получен )
Да, вижу. в принципе отличия минимальные 🙂
Дома почитаю, узнаю о них побольше )
Ну удачи, разберёшься, отпишешься — интересно и в плане опыта, и в плане инфы.
Кстати, походу часть из этого даты создания, изменения, доступа итп. Проверишь по книжке
Ха. по ошибке скопипастил айди тома со своего диска Ц. винда БСОДнулась :)))))
При подключении диска ошибка: $MFTMirr does not match $MFT (record 0)
Подключаю к компьютеру по USB внешний жесткий диск с NTFS файловой системой. Но он не подключается (не монтируется) а выдается следующая ошибка:
Error mounting /dev/sdc1 at /media/yuriy/FreeAgent Drive: Command-line `mount -t «ntfs» -o «uhelper=udisks2,nodev,nosuid,uid=1000,gid=1000,dmask=0077,fmask=0177» «/dev/sdc1» «/media/yuriy/FreeAgent Drive»‘ exited with non-zero exit status 13: $MFTMirr does not match $MFT (record 0).
Failed to mount ‘/dev/sdc1’: Input/output error
NTFS is either inconsistent, or there is a hardware fault, or it’s a
SoftRAID/FakeRAID hardware. In the first case run chkdsk /f on Windows
then reboot into Windows twice. The usage of the /f parameter is very
important! If the device is a SoftRAID/FakeRAID then first activate
it and mount a different device under the /dev/mapper/ directory, (e.g.
/dev/mapper/nvidia_eahaabcc1). Please see the ‘dmraid’ documentation
for more details.
Такое иногда происходит, если носитель был неверно извлечен из компьютера в прошлый раз. Для того, чтобы исправить ситуацию необходимо воспользоваться специальной утилитой. Установите ее, выполнив, в терминале:
Затем выполните команду:
Вместо /dev/sdс1 вы должны подставить путь до вашего носителя. В результате на экране появляются сообщения вида:
После этого носитель должен нормально примонтироваться.
Внимание: есть небольшой риск потери данных (хотя у меня все работает без проблем).
Can’t run chkdsk /r
I’ve been advised to run chkdsk /r (twice) to try to sort out a problem with backup and restore (W7).
1. What does this do?
2 I’ve started my machine by booting from my Windows 7 disc — Going into repair — then the command prompt. then on typing chkdsk /r I get the message:
The type of the file system is NTFS
Cannot lock current drive
Windows cannot run disk checking on this volume because it is write protected.
Any ideas — Thank you
From within Windows, open a Command Prompt window: Click on Start, Run, type in CMD and press Enter.
In that window, type
chkdsk /r
and press Enter. You’ll be asked if you want to run chkdsk the next time the system restarts. Type in Y, press Enter, close the window, then reboot your PC.
Chkdsk will start and run, probably for a while. The /r switch not only fixes errors like the /f, but also will locate and mark bad sectors and try to recover readable information from those sectors. It generally takes longer than just the /f since it checks the entire disk, not just the data areas.
—
CHKDSK [volume[[path]filename]]] [/F] [/V] [/R] [/X] [/I] [/C] [/L[:size]]
volume Specifies the drive letter (followed by a colon),
mount point, or volume name.
filename FAT/FAT32 only: Specifies the files to check for fragmentation.
/F Fixes errors on the disk.
/V On FAT/FAT32: Displays the full path and name of every file
on the disk.
On NTFS: Displays cleanup messages if any.
/R Locates bad sectors and recovers readable information
(implies /F).
/L:size NTFS only: Changes the log file size to the specified number
of kilobytes. If size is not specified, displays current
size.
/X Forces the volume to dismount first if necessary.
All opened handles to the volume would then be invalid
(implies /F).
/I NTFS only: Performs a less vigorous check of index entries.
/C NTFS only: Skips checking of cycles within the folder
structure.
/B NTFS only: Re-evaluates bad clusters on the volume
(implies /R)
The /I or /C switch reduces the amount of time required to run Chkdsk by
skipping certain checks of the volume.
SC Tom
-There’s no such thing as TMI when asking for tech support.
4 people found this reply helpful
Was this reply helpful?
Sorry this didn’t help.
Great! Thanks for your feedback.
How satisfied are you with this reply?
Thanks for your feedback, it helps us improve the site.
NTFS/GPT Mount exited with Exit Code 13
This is a duplicated post since I didn’t get any help on askubuntu.com.
I have a 1TB external hard drive that I recently formatted to NTFS. It was mounting on my Ubuntu 11.10 fine until just now. I didn’t make any changes to affect my OS or my exhdd.
The error that I get is:
I tried installing ntfsfix but no such package exists anymore. I have never used this HDD on a windows machine. If I need to use an other machine to do stuff to fix this, I have access to a mac.
This is my sudo fdisk -l output: What in the world is GPT? I didn’t do that. It used to be NTFS.
2 Answers 2
This is the thing that worked:
- I first needed to get ntfs-3g ( sudo apt-get install ntfs-3g )
- Run sudo fdisk -l to figure out where the mount point is. Mine was /dev/sdb1
- I ran ntfsfix -b /dev/sdb1 and that fixed the problem.
Error mounting: mount exited with exit code 13: $MFTMirr does not match $MFT (record 0). Failed to mount ‘/dev/sda1’: Input/output error
NTFS is either inconsistent, or there is a hardware fault, or it’s a SoftRAID/FakeRAID hardware. In the first case run chkdsk /f on Windows then reboot into Windows twice. The usage of the /f parameter is very important! If the device is a SoftRAID/FakeRAID then first activate it and mount a different device under the /dev/mapper/ directory, (e.g. /dev/mapper/nvidia_eahaabcc1).
Please see the ‘dmraid’ documentation for more details.
Solution :-
sudo ntfsfix /dev/select_disk_name
To find Disk name:
Go dashboard -> Disk utility -> Click disk -> then show Device /Dev/***
Solved: Cannot Run CHKDSK Write Protected on Windows 10/8/7
Windows says it cannot run CHKDSK because the volume is write protected? Come and learn how to remove write protected on hard drive for CHKDSK in Windows 10/8/7.
![]()
By Teresa  / Last Updated February 26, 2020
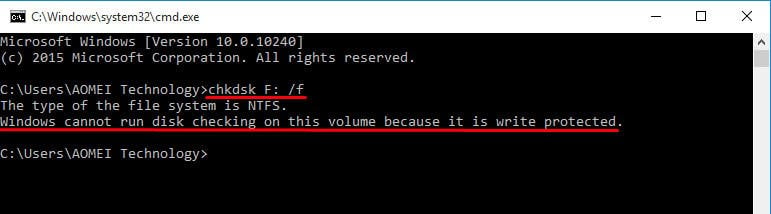
CHKDSK error: volume is write protected
“I get a prompt says Windows detected a hard disk error after my Windows 10 startup this morning. I guess it would be the problem of my newly attached external backup drive, so I decided to check hard drive for errors after some Google. However, after I typed chkdsk F: /f in CMD, only to find that the drive was write-protected. It says: The type of the file system is NTFS. Windows cannot run disk checking on this volume because it is write protected. I don’t remember to set up write protection. What should I do to remove write protection on my external hard drive and run CHKDSK on write protected drive successfully?”
Did you come across similar issues? Write protection problem exists on not only external hard drive, but also USB flash drive, SD card, USB hard drive, and even internal hard disk in Windows 7/8/10. When you run CHKDSK and get write-protected message, you did not give rise to the issue but discover it. Other behaviors like creating new folder and modifying existing data will trigger the write protection error as well. Then, how do you get hard drive write-protected?
Possible causes for write protected
Generally speaking, write-protected status can be understood as read only. That is to say, you can read files on write protected drive but you cannot add new files or make changes for existing data. Following are possible reasons that account for why your drive get write protected.
There is a write protection tab on your hard drive. Usually, it is produced by manufacturer. Check your hard drive or disk enclosure. If yes, switch it to the Off side.
The partition file system is corrupted or damaged due to virus infection or other unknown reasons. A bad file system may cause the data cannot be accessed.
The attribute of selected drive is set as ReadOnly. The attribute may be modified unwittingly.
After knowing why you can’t run CHKDSK on write protected drive, let’s learn how to remove the write protection with different solutions.
Quick fixes to remove write protected for CHKDSK in Windows 10/8/7
To clear the write protection and perform CHKDSK, you may need different solutions under different situations. Some workable fixes are illustrated below.
Fix CHKDSK write protected disk in CMD
According the support of Microsoft, when you encounter the CHKDSK /f volume is write protected issue, you can try another command in CMD: chkdsk / f / r / x. For example, chkdsk F: /f /r /x and press Enter. You can replace F with another drive letter.
However, some users report that that command does not resolve their problem. The write protection error still prompts.

If you have faced such situation, it is suggested to try other methods showing in the next part.
Remove write protection in Diskpart
This method applies to the drive that has been set as readonly. It will clear readonly attributes.
1. Type diskpart in CMD and hit Enter. Click on Yes in the pop up confirming dialogue.
2. In Diskpart, type following commands in sequence and each of them comes with an Enter.
select volume n (where n is the write-protected drive, here is 6)
attributes disk clear readonly
![]()
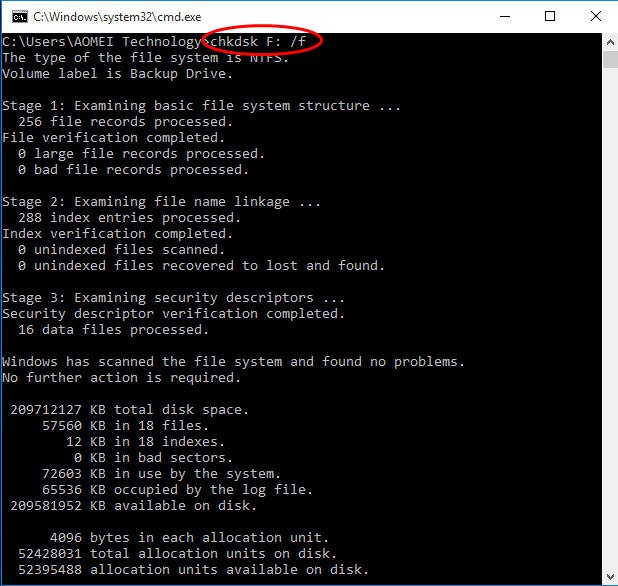
3. Go back to CMD and type CHKDSK F: /f, you’ll find the disk checking runs smoothly.
Modify WriteProtected key in Registry Editor
Another way to clear readonly of a drive is to modify registry. Typeregedit in Run and navigate to this path:
Right click the WriteProtected key and select Modify. Change the value from 1 to 0.
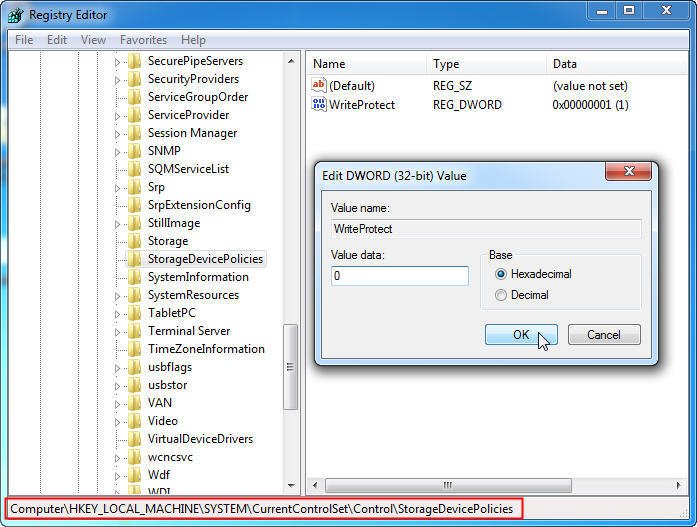
Tips: If you cannot find the StorageDevicePolicies, you can right click Control folder and then New > Key. Name it with WriteProtected and open it.
Remove write protected by completely formatting
If the write protection in CHKDSK is caused by corrupted or damaged file system, you need to format it thoroughly. When format the drive with Device Manager or Diskpart, you may receive format write protected error.
Fortunately, you can format the write protected drive with AOMEI Partition Assistant Standard. It is free hard drive partition manager that will help you better manage internal/external/USB hard drive, USB flash drive, SD card, Pen drive, etc. To solve the CHKDSK write protected trouble in Windows 10, free download and have a try.
Important: formatting will cause data loss. Think twice before you leap.
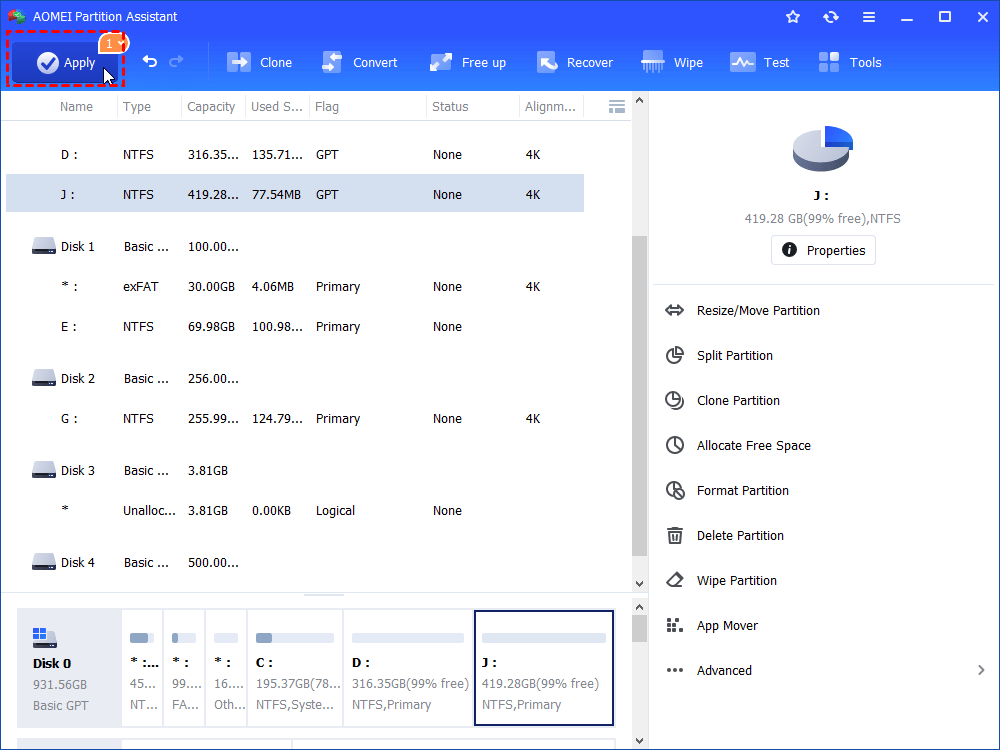
1. Install and run AOMEI Partition Assistant. Right click the write protected partition and select Format Partition.
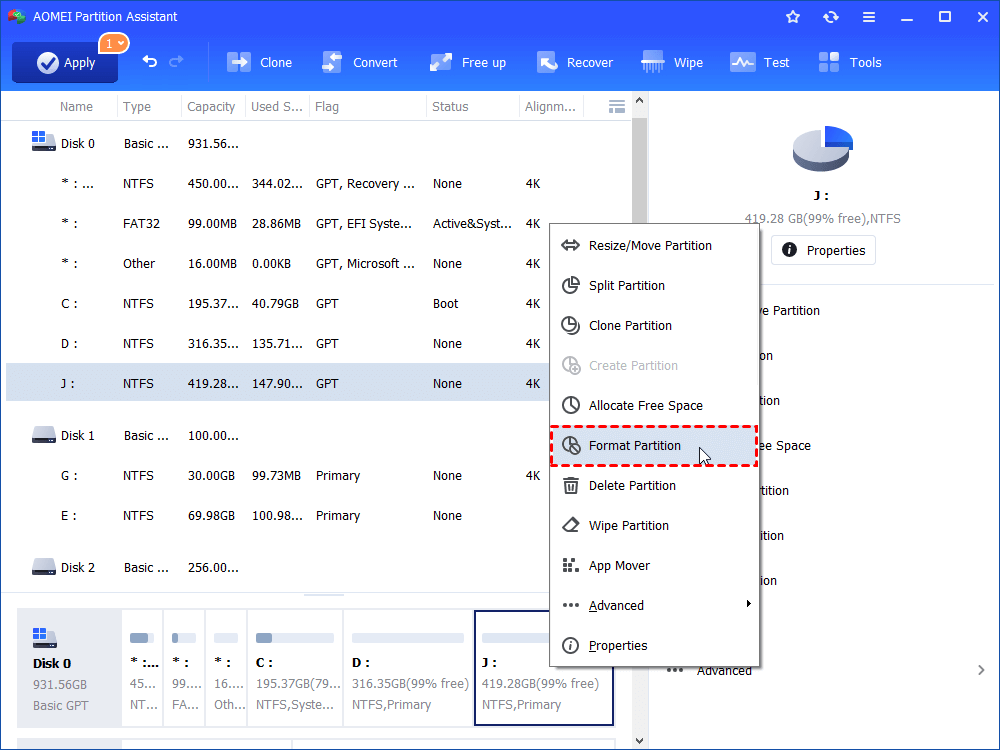
2. Edit partition label, select file system and change cluster size if you wish to in the pop up window.
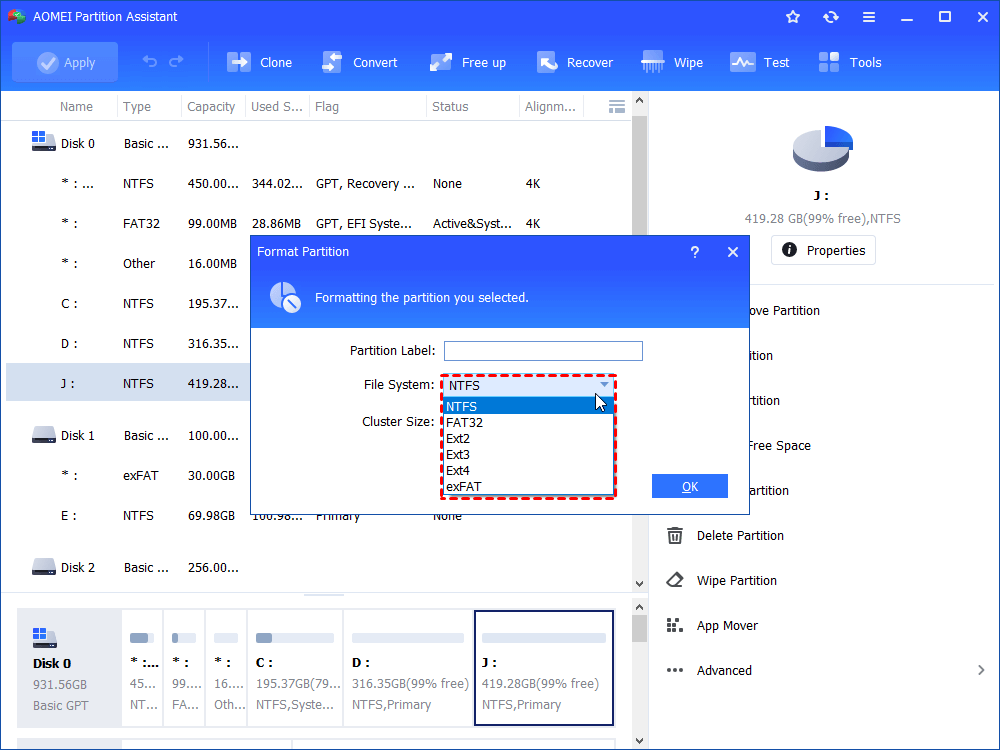
3. Click Apply and then Proceed after your confirmation.
Tips: Except for formatting the partition, you can Wipe Partition if there is no important data stored on that drive.
Run disk checking with third party tools
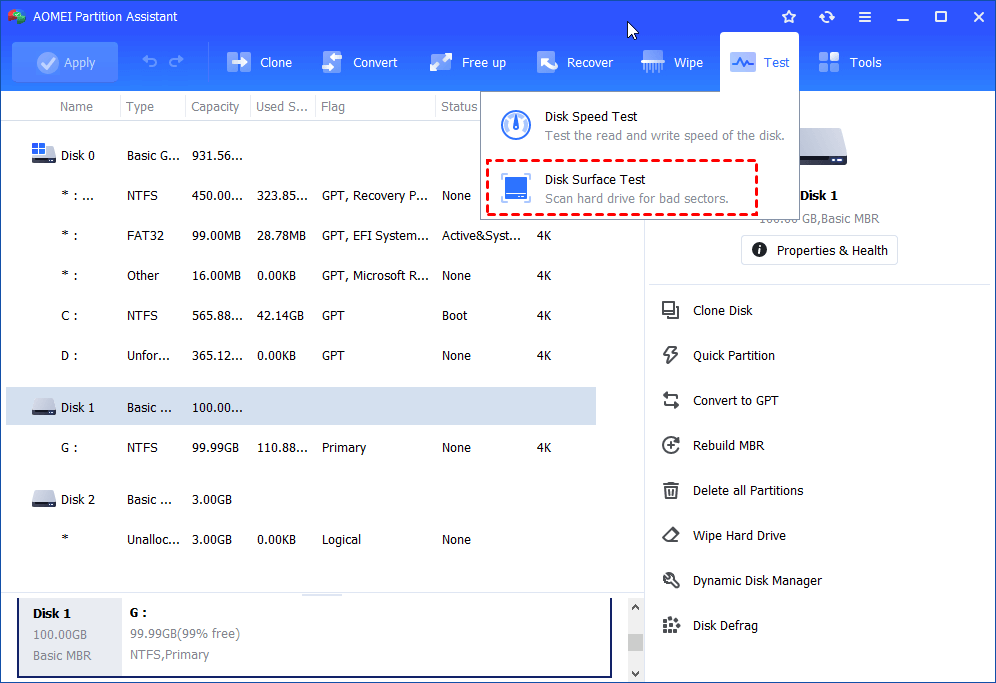
To solve “unable to CHKDSK write protected” error, you can run disk checking with another tool. Aforementioned AOMEI Partition Assistant supports performing not only partition checking but disk checking. Let’s get to know these two features. In the first place, start AOMEI Partition Assistant.
1. For partition error checking, right click the drive and go Advanced >Check Partition.

2. For disk bad sector checking, right click the disk and select Surface Test.
Tips: covered methods also apply to “CHKDSK write protected USB”, “CHKDSK NTFS write protected”, and “unable to install Windows because the partition is write protected” issues.


