- GPU process memory counters report incorrect values
- Symptoms
- Steps to reproduce the issue
- More information
- Исправление ошибки Memory Management в Windows 10
- Что собой представляет ошибка?
- Почему появляется проблема?
- Алгоритмы решения конфликта
- Было установлено новое программное обеспечение
- Повреждения системных файлов или диска
- Обнаружение конфликтного драйвера
- Другие проблемы
- The usable memory may be less than the installed memory on Windows 7-based computers
- Symptoms
- Cause
- What To Try
- Check the system configuration settings
- Update the system BIOS
- Check BIOS settings
- Check possible issues with the physical RAM
- More Information
- Memory status in Windows 7
- Windows 7 memory reporting
- Physical memory limits in Windows 7
GPU process memory counters report incorrect values
This article discusses an issue where Graphics Processing Unit (GPU) process memory counters show memory leaks for running applications and report incorrect values.
Original product version: В Windows 10 — all editions
Original KB number: В 4490156
Symptoms
Graphics Processing Unit (GPU) process memory counters appear to show memory leaks for running applications in Windows 10, version 1709 and later. This issue affects the following counters:
Performance Monitor: GPU Process Memory
Task Manager, Details pane: Dedicated GPU memory
Some GPUs do not use dedicated GPU memory. In those cases, the Dedicated GPU memory counter is either not available or has a value of «0.» The issue that this article describes does not occur.
Steps to reproduce the issue
Theses steps use an Office application as an example.
Right-click the Task bar, and then select Task Manager.
In Task Manager, select Details. On the Details pane, right-click a column head, select Show columns, and then select Dedicated GPU memory.
Start any Office application, create a blank document, and then maximize the application window.
Start any other application, and then maximize that application window in the same monitor as the Office application (so that the new application hides the Office application).
Wait approximately 30 seconds for the Office application to enter «Low Resource Mode.»
In this mode, the Office application flushes its discardable caches, including the GPU resources.
On the Task Manager Details pane, check the Dedicated GPU memory value for the Office application. You should notice that the value has dropped by approximately 100MB.
Bring the Office application window back to the monitor foreground.
- Expected behavior: As the Office application re-creates its resources, its Dedicated GPU memory value should return to approximately the same value that it had the last time that the application was active.
- Actual behavior: On systems that are affected by this issue, the new Dedicated GPU memory value is larger by approximately 100MB (or more) than the last time that the application was active. Every time that you hide the Office application, wait for it to flush its caches, and then reactivate it, the value increases by another 100MB (or more). However, the Dedicated GPU memory value that is visible on the Task Manager Performance pane continues to show the expected value. Additionally, tools such as Windows Performance Recorder (WPR) and Windows Performance Analyzer (WPA) show the expected value.
More information
This is a known issue in Windows 10. To monitor dedicated GPU memory on affected systems, use the Performance pane of Task Manager, WPR, or WPA. For more information about the GPU process memory counters, see GPUs in the Task Manager. For more information about WPR and WPA, see Windows Performance Toolkit.
Исправление ошибки Memory Management в Windows 10
Пользователи, установившие последнюю операционную систему от Microsoft, регулярно сталкиваются с недоработками ее создателей. Сегодня узнаем, каким образом устраняется ошибка memory management в Windows 10.
Что собой представляет ошибка?
Неполадка относится к так называемым BsoD, появление которых сопровождается созданием дампа памяти и перезагрузкой компьютера. Источников данной проблемы масса, столько же и решений, для каждого случая оно будет собственным.

Отметим, что надпись «video memory management internal» в окне ошибки касается неполадок в видеосистеме: следует переустановить драйвер видеокарты, заменив его на новый или более старый, но стабильный. Реже источником ошибки становится драйвер монитора или мониторов.
Почему появляется проблема?
Синий экран смерти вызывается целым рядом факторов, которые производят к конфликту ядра Windows 10 с каким-либо приложением/драйвером.
- Драйвер может быть повреждённым или в его новой версии есть критические ошибки.
- Оперативная память физически повреждена или имеет проблемы с контактами.
- Повреждены системные файлы или диск.
- В BIOS или Windows 10 необходимо правильно настроить схему электропитания.
Алгоритмы решения конфликта
Как исправить ошибку, если ее вызывает множество факторов? Начинать, пожалуй, следует из выявления ее источника и самых простых вариантов его устранения, которые не отнимут у пользователя много времени, а лишь потом браться за более сложные методы исправления неполадки.
Было установлено новое программное обеспечение
Если BSoD начал появляться после инсталляции или обновления какой-либо программы, драйвера или апгрейда Windows 10, необходимо все вернуть на свои места, то есть удалить последние обновления, откатить драйвер или программу до последней версии. Но прежде всего, следует выяснить виновника ситуации. Сделать это поможет чистый запуск Windows 10.
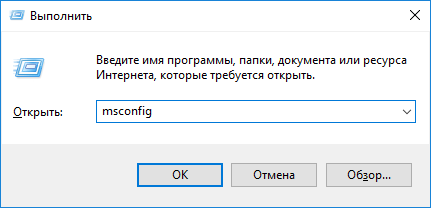
2. В текстовой строке пишем «msconfig» и нажимаем «OK» или «Ввод».
3. На первой вкладке переносим чекбокс к позиции «Выборочный запуск».

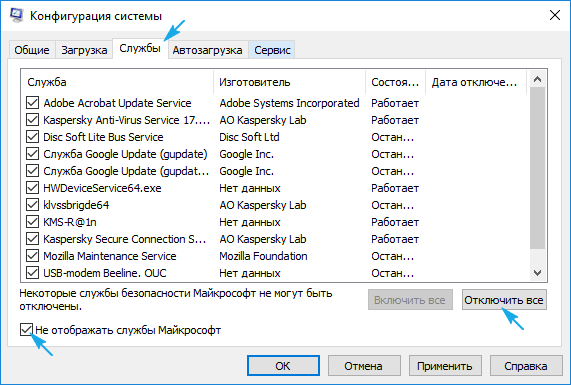
5. Посещаем вкладку «Службы», отключаем отображение сервисов от Microsoft и все остальные службы.
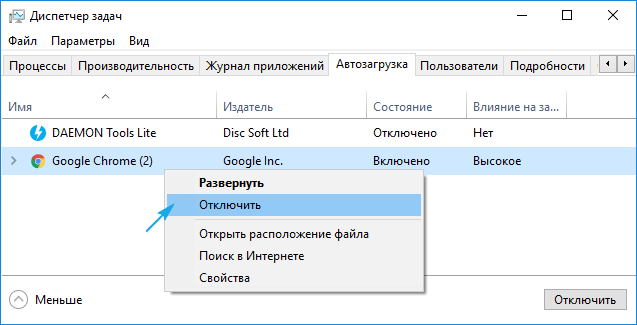
6. Идем во вкладку «Автозагрузка», запускаем «Диспетчер задач» и в нем в одноименной вкладке деактивируем все приложения.
7. Теперь перезагружаем компьютер и делаем все то, что вызывало появление ошибки.
Если она не возникла, вероятнее всего, ее появление связано с отключенной службой, драйвером или приложением. Здесь необходимо по порядку включать каждый отключенный элемент, если не уверены в виновнике проблемы, и выявить его. После удалить, обновить или откатить до предыдущей версии, в зависимости от ситуации.
Здесь же будет очень полезной функция отката, возврата состояния системы к одной из ранее созданных точек восстановления, если она включена. Выбирать следует последнюю точку перед появлением неполадки.
Повреждения системных файлов или диска
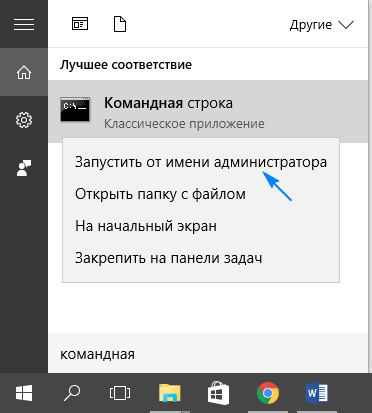
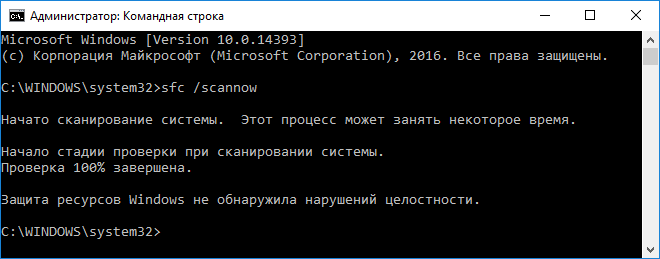
Для проверки контрольных сумм системных файлов и их восстановления следует воспользоваться запущенной от имени администратора командной строкой.
Вводим и выполняем команду «sfc /scannow».
Также следует проверить поверхность системного диска на присутствие в нем битых секторов. Выполняем «chkdsk C: /F /R» в этом же окне.
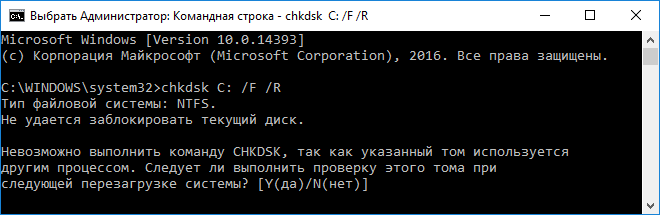
Если Windows 10 не позволяет запустить командную строку, к примеру, ошибка появляется на этапе или сразу после запуска ОС, загрузитесь с установочного дистрибутива Виндовс той же редакции, и в окне с кнопкой «Установить» запускайте нужный инструмент.
Обнаружение конфликтного драйвера
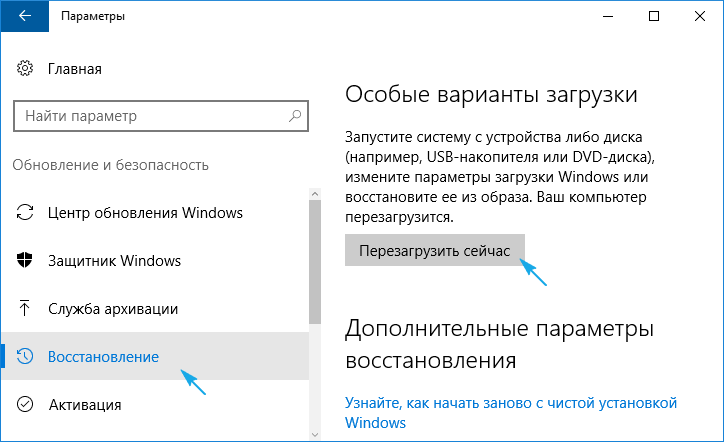
1. Запускаемся в безопасном режиме, например, через «Параметры».
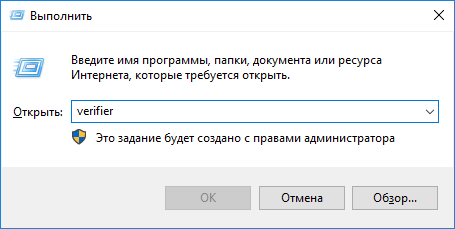
2. Выполняем команду «verifier» в окне, запускаемом через Win+R.
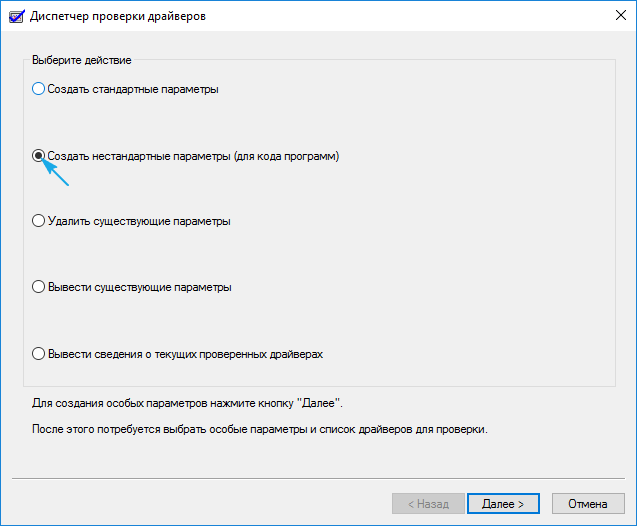
3. В «Диспетчере проверки» создаем нестандартный параметр.
4. Указываем отображённые на скриншоте параметры из приведенного в окне списка, и ставим флажок возле опции «Прочие проверки».

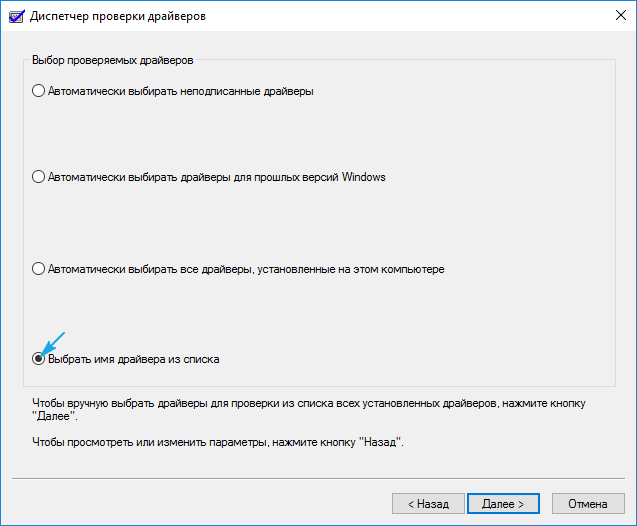
5. Ставим триггерный переключатель в последнее положение: «Выбирать имя драйвера из списка».
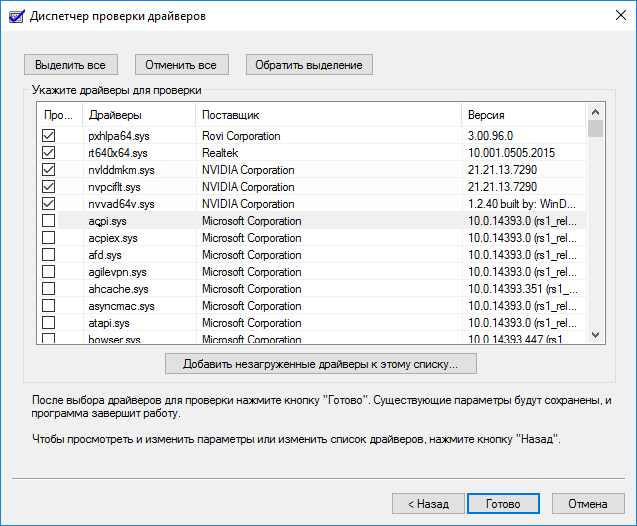
6. Сортируем все продукты по поставщику и снимаем флажки с драйверов от Microsoft.
7. Перезагружаемся для запуска анализа и сбора информации.
Здесь при обнаружении проблемы Windows 10 может выдать синий экран, перезагрузиться и зациклиться на этом. Но паниковать не следует, разработчики предусмотрели подобные случаи: после двух перезагрузок появится меню диагностики с предложениями выбрать путь решения проблемы.
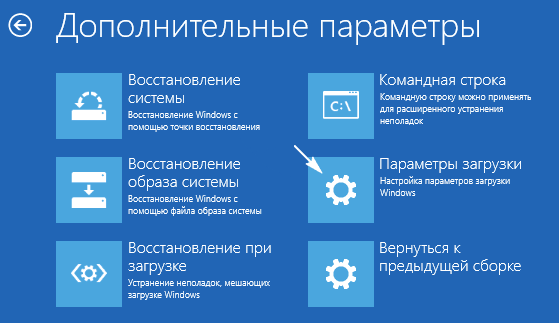
8. В дополнительных параметрах выбираем вариант реанимации системы во время запуска.
9. Перезагружаемся в безопасном режиме с возможностью вызова командной строки.

9. В ней выполняем перечень команд:
- verifier /reset – для деактивации проверки драйверов;
- shutdown -r -t 0 – стандартная перезагрузка ПК.
10. Через проводник или файловый менеджер переходим в каталог «windows\minidump» на системном диске.
11. При помощи свободно распространяемой утилиты BlueScreenView открываем дамп памяти с целью выполнить анализ результатов тестирования и проверки драйверов.
12. Изучаем информацию, содержащуюся в подсвеченных розовым цветом строках в нижнем фрейме.

13. По названию проблемных файлов или библиотек определяем, к каким программам они относятся и делаем откат драйверов этих устройств, удаляем и устанавливаем заново или обновляем. В разных ситуациях помогают различные решения.
Здесь на помощь придет не только логическое мышление и знания (понятно, что при наличии букв dx драйвер относится к платформе DirectX, nv – касается видеокарты Nvidia и т. д.), но и поисковые системы. По названию файла найти драйвер, в состав коего он входит, несложно.
Загружать драйверы следует вручную и только с официальных ресурсов поддержки устройств. Обновлять их через Центр обновления ни в коем случаи не следует.
Другие проблемы
Приведем еще несколько рекомендаций, которые периодически помогают вернуть Windows 10 к штатному режиму функционирования.
1. Проверка ОЗУ при помощи синтетического теста, например, Memtest86.
2. Обновление BIOS до последней версии (это следует выполнять осторожно или обратиться в сервисный центр).
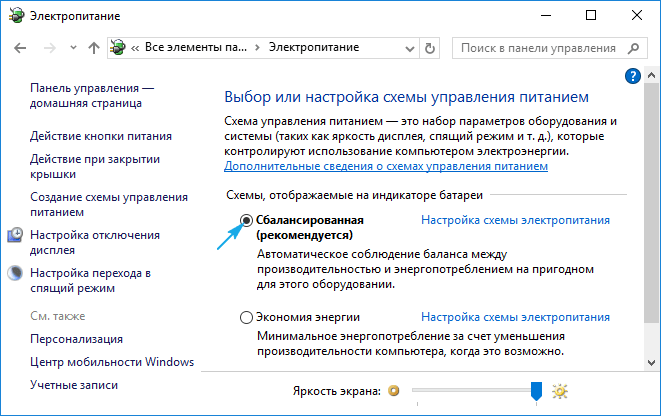
3. Установите сбалансированную схему питания на портативных устройствах при работе от сети.
Не лишней будет очистка реестра, системного тома от мусора и сканирование ПК на вирусы.
The usable memory may be less than the installed memory on Windows 7-based computers
Symptoms
On a computer that is running Windows 7, the usable memory (RAM) may be less than the installed memory.
For example, a 32-bit version of Windows 7 may report that there is only 3.5 GB of usable system memory on a computer that has 4 GB of memory installed.
Or, a 64-bit version of Windows 7 may report that there is only 7.1 GB of usable system memory on a computer that has 8 GB of memory installed.
Note The amount of usable memory in the examples are not exact amounts. Usable memory is a calculated amount of the total physical memory minus «hardware reserved» memory.
To view the installed memory and the usable memory in Windows 7, follow these steps:
Click Start , right-click Computer, and then click Properties.
View the Installed memory (RAM) value under System. For example, if it displays 4.00 GB (3.5 GB usable), this means that you have 3.5 GB of usable memory out of 4 GB of installed memory.
Cause
This is expected behavior on computers that are running Windows 7. The reduction in available system memory depends on the configuration of the following:
The devices that are installed in the computer and the memory that is reserved by those devices
The ability of the motherboard to handle memory
The System BIOS version and settings
The version of Windows 7 that is installed (For example, Windows 7 Starter Edition only supports 2 GB of installed memory.)
Other system settings
For example, if you have a video card that has 256 MB of on-board memory, that memory must be mapped within the first 4 GB of address space. If 4 GB of system memory is already installed, part of that address space must be reserved by the graphics memory mapping. Graphics memory mapping overwrites a part of the system memory. These conditions reduce the total amount of system memory that is available to the operating system.
For more information about how to determine how memory is used on your computer, see the «Physical Memory Allocation in Windows 7» topic in the «More Information» section.
What To Try
There are several additional situations that could cause the usable RAM to be less than expected. These issues and possible solutions are listed here:
Check the system configuration settings
This problem may occur because the Maximum memory option is selected incorrectly. To fix this, follow these steps:
Click Start, type msconfig in the Search programs and files box, and then click msconfig in the Programs list.
In the System Configuration window, click Advanced options on the Boot tab.
Click to clear the Maximum memory check box, and then click OK.
Restart the computer.
Update the system BIOS
The problem may occur because the system BIOS is outdated. If you have an older computer, the system may be unable to access all the installed RAM. In this case, you have to update the system BIOS to the latest version.
To update the BIOS on your computer, visit the Web site of your computer manufacturer to download the BIOS update. Or, contact your computer manufacturer for help.
Check BIOS settings
The problem may occur because some BIOS settings are incorrect.
Enable the memory remapping feature
Check the BIOS settings to see whether the memory remapping feature is enabled. Memory remapping gives Windows access to more memory. You can enable the memory remapping feature in the BIOS by booting to the system setup. See the User’s Guide for your computer for instructions on how to boot to system setup on your computer. The name for the memory remapping feature may be different for different hardware vendors. This can be listed as memory remapping, memory extension, or something similar. Be aware that your computer may not support the memory remapping feature.
Change the AGP video aperture size in the BIOS settings
Check the BIOS settings to see how much memory that you have allocated to AGP video aperture. This is the memory that the system is sharing with the video card that is used for texture mapping and rendering. This memory would not be used by the system, because it is locked by the video card. You can adjust the AGP video aperture size in the BIOS. Standard settings are «32MB,»»64MB,»»128MB,»and «Auto.» After you change this setting in the BIOS, restart your computer, and then check the usable memory. You can test each setting to see which offers the best results.
Check possible issues with the physical RAM
The problem may occur because there are issues with the physical RAM installed.
Check whether you have bad memory modules
To check whether you are experiencing this issue, turn off the computer, unplug the computer, and then swap the order of the memory.
Make sure that the memory arrangement is correct
Refer to the User’s Guide of the computer to determine in what order the memory modules should be inserted into the memory slots. The system may require you to use specific slots when you are not using all the available slots. For example, the computer has four slots available. But you may have to use slot 1 and slot 3 if you want to use only two memory modules.
Check whether memory standoff cards are used
If you use a memory standoff card to hold multiple memory modules on the computer, the system may require specific configurations for this scenario. Therefore, the usable memory may be less than expected.
More Information
The following sections offer additional information about memory allocation as reported in the Resource Monitor, describe the terminology used, and offer additional information on Memory reporting and memory limitations in Windows 7.
The following table shows how the Resource Monitor categorizes the memory currently installed on a Windows 7-based computer.
Memory that is reserved for use by the BIOS and some drivers for other peripherals
Memory that is used by process, drivers, or the operating system
Memory whose contents must go to disk before it can be used for another purpose
Memory that contains cached data and code that is not actively in use
Memory that does not contain any valuable data and that will be used first when processes, drivers, or the operating system need more memory
Note To view how the installed memory is allocated in Windows 7, follow these steps:
Click Start, type resource monitor in the Search programs and files box, and then click Resource Monitor in the Programs list.
Click the Memory tab, and then view the Physical Memory section at the bottom of the page.
Memory status in Windows 7
The following table defines the Resource Monitors current reported status of the installed memory on a Windows 7-based computer.
Amount of memory (including standby and free memory) that is immediately available for use by processes, drivers, and the operating system
Amount of memory (including standby and modified memory) that contains cached data and code for rapid access by processes, drivers, and the operating system
Amount of physical memory that is available to the operating system, device drivers, and processes
Amount of physical memory installed in the computer
Windows 7 memory reporting
Windows 7 reports how much physical memory is currently installed on your computer. Windows NT-based operating systems before Windows Vista Service P1 report how much memory is available to the operating system. The available memory reported in these earlier versions of Windows does not include hardware reserved memory. This is a reporting change only.
You will see this reporting change in Windows Vista SP1 and later versions of Windows in the following locations:
The RAM value in Welcome Center
The Memory value at the bottom of the My Computer windows
The Memory value in the System Properties windows
The Total amount of system memory value of the View and Print Details page of the Performance Information and Tools item in Control Panel
Additionally, the System Information tool (Msinfo32.exe) displays the following entries on the System Summary page:
Installed Physical Memory (RAM)
Total Physical Memory
Available Physical Memory
The reporting in the following diagnostic tool has not changed:
The Performance tab in Task Manager
When the physical RAM that is installed on a computer equals the address space that is supported by the chipset, the total system memory that is available to the operating system is always less than the physical RAM that is installed.
For example, consider a computer that has an Intel 975X chipset that supports 8 GB of address space. If you install 8 GB of RAM, the system memory that is available to the operating system will be reduced by the PCI configuration requirements. In this example, PCI configuration requirements reduce the memory that is available to the operating system by an amount that is between approximately 200 MB and approximately 1 GB. The reduction depends on the configuration.
Physical memory limits in Windows 7
The following table specifies the limits on physical memory for the different versions of Windows 7.


