- How to increase download speed in Windows 10
- How to increase download speed in Windows 10
- 1 – Remove “Limit Reservable bandwidth.”
- 2 – Turn Off Automatic Windows Updates
- 3 – Turn off the apps that are consuming more internet data
- 4 – Disable Large Send Offload (LSO)
- 5 – Use download managers to improve download speed in windows 10
- 6 – Close Background Running Apps to increase download speed
- 7 – Disable Windows Auto-Tuning feature to improve download speed in windows 10
- 8 – Delete temporary files and registries
- How to Increase Store App Download Speed in Windows 10
- Increase Store App download Speed in Windows 10
- Windows Store App download speed is normal
- Ensure that another Download is not in process
- Confirm that Windows Update is Not Downloading
- Stop if Other Windows Store Apps are Being Updated
- Prefer WiFi over Ethernet to Download the Windows Store apps
- Windows Store Apps Download Speed is horribly slow
- Disable or Uninstall 3rd PartyAntivirus
- Reset Windows Store Cache
- Run Windows Store App Troubleshooter
- Clear the Windows update cache
- Run SFC/ SCANNOW
How to increase download speed in Windows 10

Windows 10 is known to be more resource-hungry OS. You may come across a situation where downloading something from your PC browsers gives you the worst speed even if you have a good internet connection. This issue may occur due to various reasons. This article explains various reasons for slow internet speed and explains how to increase download speed in Windows 10.
Reasons behind slow internet on windows 10 or download speed includes background running apps using your data, enabled download speed cap, automatic windows updates enabled. etc. We will see how to boost download speed by fixing these problems.
Table of Contents
How to increase download speed in Windows 10
There are some fixes to increase download speed in windows 10 by performing some task. These solutions are actually tested and worked for me. You can try these fixes to increase download speed in chrome browser while playing online games, streaming online videos etc.
1 – Remove “Limit Reservable bandwidth.”
Windows 10 default settings for bandwidth use is set to 80%. meaning you can only use 80% of your data and 20% bandwidth is reserved for system use(updates, etc).
You can remove this limit and improve download speed
Step1: Open run tool by pressing Win. + R buttons from the keyboard.
Step2: type gpedit.smc and click OK to open group policy editor. For Windows 10 Home users, follow this guide to enable gpedit.msc on your computer.
Step3: Now go to the path mentioned below

Step4: Double click on the Limit reservable bandwidth to open its options.
Step5: From newly opened windows, first click on enable the option to enable the settings and then type 0 in bandwidth limit percentage.

Step6: Click OK to save the changes.
Restart the PC once and you can your download speed is increased now.
2 – Turn Off Automatic Windows Updates
Microsoft has set default option to automatic updates turned ON in Windows 10. This update frequently runs in background and download updates to keep your windows updated. Automatic windows update cause both slow internet speed and slow PC performance. To increase download speed, turning off the auto-updates is essential.
Step1: Open settings and select update and security
Step2: From the options, click on advanced options under update settings.

Step3: Now turn off the option, “Automatically download updates….”

Step4: Now click on delivery optimization, and turn of allow downloads from other PC’s.
You have now turned off the automatic windows updates. However, some users complain that performing the above steps won’t disable auto updates and windows keep eating their valuable data. To overcome their situation, we have made a separate guide to completely disable windows 10 updates. Do check that article also from below link.
3 – Turn off the apps that are consuming more internet data
Finding and turning off the unnecessary data hopping apps will add value to your quest of how to increase download speed in windows 10.
Step1: Right-click on the taskbar and open “task manager” option.
Step2: First click on the More details option to expand the task manager functionality.

Step3: Then click on the “Performance” tab and at the bottom, select “Open Resource Monitor“.

Step4: Now, select the “Network” tab and find the program that is consuming more data. To close the unnecessary program, right-click on it and select End Process.

Now check your download speed, it should be improved.
4 – Disable Large Send Offload (LSO)
LSO is a windows feature that use the internet to sync the background running apps like music service, etc. LSO send and receives internet data without noticing you. Turning it off can surely improve internet speed.
Step1: Press Win. + R buttons to launch the Run tool.
Step2: type devmgmt.msc and hit OK to open device manager tool.
Step3: Expand the Network Adaptors option and select your network Card. Normally (and for me), it’s Realtek PCIe GBE Family Controller.

Step4: Double click on it to open the additional settings in the new pop-up window. Select the Advanced tab from here.
Step5: Now, fro the list, select Large Send Offload v2 (IPv4) then select Disabled from the drop-down menu.

Step6: Do the same for Large Send Offload v2 (IPv6) option, if available on your network card.
5 – Use download managers to improve download speed in windows 10
Regular browsers are not that optimized for downloading large files. Also, downloading the file in browsers can consume more resources, causing the browser to stop working and ultimately to fail the downloading.
Instead, you can use download managers that are designed just for downloading which can improve download speed by taking all available bandwidth. Also, download managers can download files in multiple threads which enables the parallel downloading feature.
Some good download managers are internet download manager, Orbit Downloader, JDownloader, etc.
6 – Close Background Running Apps to increase download speed
Sometimes too many installed programs, multitasking, leave them to run in the background. Such apps then consume your data and cause slow internet on windows 10 / download speed. Such apps should be identified and turned off to speed up internet windows 10.
Step1: Click on start and select settings option
Step2: From the list, select Privacy.
Step3: From the list of numerous options, find and choose Background apps.
Step4: Now turn off the apps that you don’t require or you never launched them (but they are still running in the background -_- ).

Some of the common background running apps are
- Microsoft office click to run service
- Team viewer
- Utorrent
- Antivirus update program
- Adobe creative cloud
- Microsoft Onedrive Sync service
- Cortana ,etc
To close these apps right-click on them, and select End task.
7 – Disable Windows Auto-Tuning feature to improve download speed in windows 10
Windows auto-tuning is also a nearly similar tool to Large Sendoff tool. This tool also uses internet data without users consent. Tun it off and you are a step ahead on the answer of how to increase download speed.
Step1: Open the Command prompt window by pressing Win+X and then select Windows PowerShell (admin).
Step2: Type the following command in the PowerShell and hit enter.
Step3: See the Option named- Receive windows auto-tuning level. If its Normal, you have to disable it to improve download speed in windows 10.

Step4: To disable this windows auto-tuning level, type following command and press enter.

You can now see the option is disabled by typing a command from step2. If you want to enable it again then, just type netsh int tcp set global autotuninglevel=enabled.
8 – Delete temporary files and registries
Temporary files and registries can cause your slow internet speed in windows 10. These files are generated as new programs loads and some of these files stay as it is in the temporary folder. Delete such files to increase download speed.
Step1: Type Win+R to launch Run tool and then time this path, Hit enter and select all files to delete them –

Step2: Now, again go to the run tool and type following command, hit enter and tap continue to allow admin rights.–
Then select all files from opened windows and delete them,
Step3: Again, in Run tool, type following command, Hit enter and tap continue to allow admin rights. Select all files there and delete them.
By this way, you can delete temporary files and temporary registries to experience fast internet speed.
How to Increase Store App Download Speed in Windows 10
Methods and Steps to Increase Store App download Speed in Windows 10. – When you like any application in Windows Store you try to grab it as soon as possible. But many users complain that the momentum of apps downloading is very low and sometimes they need to wait for hours. The big size applications and games are headaches for them because they apprehend about the time period as it is very long. So we are presenting here a guide which could help you to boost Windows Store apps download speed.
Before starting to download Windows Store applications, we would advise you to keep a fast speed network. However, if you haven’t the resources for this you can also increase the rapidness. But in that case, you can boost the momentum within a limit. See the guide
Increase Store App download Speed in Windows 10
This guide includes 2 sections – One the Store App download speed is normal but your intention is to boost and another – it is sluggish due to a certain error.
Windows Store App download speed is normal
If the applications are downloading with an average speed then you will need to be careful about few things.
Ensure that another Download is not in process
Check your browser whether another download is not processing at the same time. If it is, then let the download complete or pause it then download store apps.
Confirm that Windows Update is Not Downloading
Windows 10 nowadays sends updates very frequently. So if Windows store app download speed is slow then it is possible that Updates are in progress on your Windows 10. In this condition, either permit the updates to complete the download or follow the tips – How to Stop Windows 10 Update in Progress.
Stop if Other Windows Store Apps are Being Updated
If other applications are being updated then they will consume the Internet data and rouse the slow speed of download.
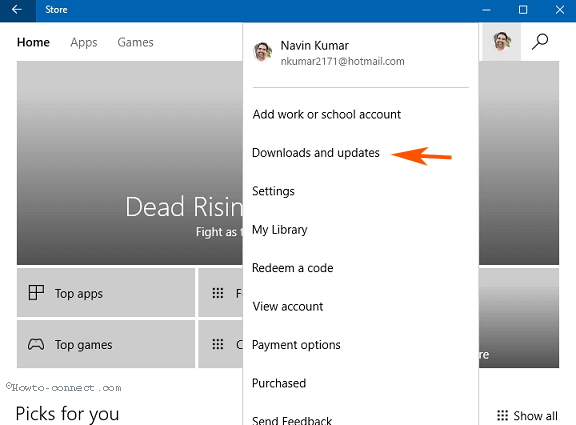
Step 1 – Press the Store icon the taskbar and allow the store to open.

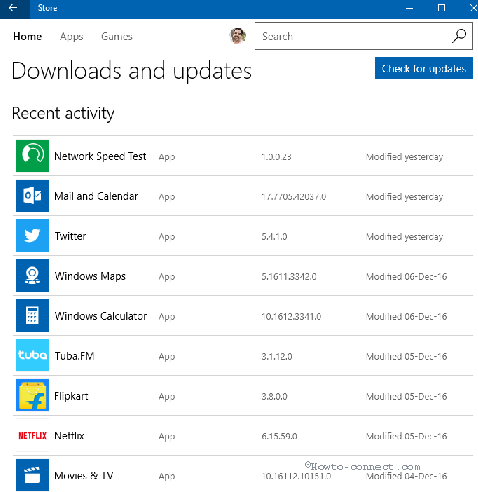
Step 2 – Click on the account picture on the top menu bar and once the drop-down comes out select Downloads and updates. See the application’s list and check if either of them is updating.
Step 3 – If updates for an application is downloading then click the Pause icon to temporarily stop it.
Prefer WiFi over Ethernet to Download the Windows Store apps
Many users report that WiFi better handles the downloading process of Store apps. So if you are running internet through LAN cable then switch to WiFi.
Windows Store Apps Download Speed is horribly slow
The download speed is substantially slower indicates that the Windows store needs to be repaired. Follow the below points in this case.
Disable or Uninstall 3rd PartyAntivirus
Many times third party antiviruses obstruct Windows Store apps download. So suppose you occupy a 3rd party antivirus program and encounter Windows Store App download Speed exceedingly slow on then remove or turn off it.
Reset Windows Store Cache
Reset of Windows Store Cache may be considerably helpful to Increase Store App download Speed in Windows 10. see how
Step 1 – Click Start button located on the extreme left of the taskbar, type WSReset.exe and then press Enter.
Step 2 – Wait for a minute until the Windows Store opens up freshly.
Run Windows Store App Troubleshooter
Still, you need to Increase Store App download Speed in Windows 10 then offer a chance to the troubleshooter. Grab the Windows Store app troubleshooter from this link and complete the process following the onscreen guide.
Clear the Windows update cache
Step 1 – Press Window button on the keyboard, copy the path C:\Windows\SoftwareDistribution\Download from here, paste and hit Enter.
Step 2 – Once the Distribution folder opens up, select the entire items here, and press the Delete button on your keyboard. Reboot your PC and initiate a fresh download in the store.
Run SFC/ SCANNOW
The common tool SFC /SCANNOW might help you to Increase Store App Download Speed in Windows 10.
Step 1 – Press a couple of shortcut keys Win+X altogether and expand the power user menu. Select the option Command prompt (admin).
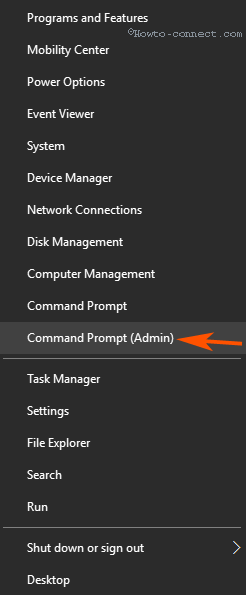
Step 2 – As the UAC pop up asks for your confirmation select the option Yes.
Step 3 – Copy SFC /SCANNOW from this line and paste into the elevated command prompt. Pree Enter.

Step 4 – Wait until the scanning is over and once it shows 100%, reboot your system.
Check whether Store App download speed in Windows 10 increases or not.
Conclusion
Therefore the guide and steps to Increase Store App download Speed in Windows 10. We expect the above points will help you to grab the application at a decent speed.


