- Install Insomnia
- Windows
- Uninstall on Windows
- Linux
- Ubuntu/Debian
- Other Linux Distributions
- Troubleshooting Linux Installations
- Previous Versions
- Insomnia rest client linux
- Use Insomnia for API Requests
- Introduction
- Install Insomnia
- Authentication
- Get client credentials
- Using Insomnia
- Setting up an Insomnia collection for the CMS API
- Get the OpenAPI specification for the CMS API
- Import the OpenAPI specification into Insomnia
- Add variables to the environment
- Set up authentication
- Make a request
- Send a POST request
- Using the code generators
- Conclusion
Install Insomnia
Insomnia is available on Mac, Windows, and Linux. If you have not yet downloaded Insomnia, visit the Download Page.
Download and double-click the disk image. When prompted drag Insomnia to your Applications folder. This will ensure that future updates can be installed correctly.
The minimum OS version supported is macOS 10.12 (Sierra). macOS users can also install Insomnia using Brew Cask via the insomnia package:
brew install —cask insomnia
Windows
The Windows application is a generic installer .exe. Double click the installer file to install Insomnia.
There is also a portable version that can be ran without any installation.
Uninstall on Windows
To uninstall Insomnia from a Windows computer simply go to the settings menu on Windows and select Apps.
From within here in the Add/Remove Programs section, you can click on the app and select to uninstall.
Linux
There are many distributions of Linux in the world. Insomnia should be able to run on the most popular ones.
Ubuntu/Debian
There is a Debian package apt repository that can be added and installed using apt-get. You can also manually download the latest debian package here.
Other Linux Distributions
Snap is a new cross-platform package format that supports convenient auto-updates. You can view Insomnia on Snapcraft or install it directly with the following command.
sudo snap install insomnia
There is also a portable AppImage package that can be run directly as an executable. Double click the package or run it from the command line.
Troubleshooting Linux Installations
Here are some issues that have caused problems for Linux users in the past
- /tmp folder must allow execution
- after installed snap, you might need systemctl restart snapd.service (More details)
- Insomnia is only compatible with 64-bit systems
Previous Versions
To roll-back, you can download a previous version from the Releases Page. Keep in mind that this process is only intended for debugging and emergencies, as the app will try to update itself after it launches.
Источник
Insomnia rest client linux
Insomnia REST Client
![]()

Insomnia is an open-source, cross-platform API Client for GraphQL, REST, and gRPC.
Insomnia is available for Mac, Windows, and Linux and can be downloaded from the website.
Bugs and Feature Requests
Have a bug or a feature request? First, read the issue guidelines and search for existing and closed issues. If your problem or idea is not addressed yet, please open a new issue.
For more generic product questions and feedback, join the Slack Team or email support@insomnia.rest
Please read through our contributing guidelines and code of conduct. Included are directions for opening issues, coding standards, and notes on development.
Development on Insomnia can be done on Mac, Windows, or Linux as long as you have Node.js and Git. See the .nvmrc file located in the project for the correct Node version.
Initial Dev Setup
This repository is structured as a monorepo and contains many Node.JS packages. Each package has its own set of commands, but the most common commands are available from the root package.json and can be accessed using the npm run . command. Here are the only three commands you should need to start developing on the app.
If you are on Linux, you may need to install the following supporting packages:
Also on Linux, if Electron is failing during the bootstrap process, run the following
If you are on Windows and have problems, you may need to install Windows Build Tools
You can use any editor you’d like, but make sure to have support/plugins for the following tools:
- ESLint – For catching syntax problems and common errors
- JSX Syntax – For React components
- Flow – For type annotations
Search, discover, and install plugins from the Insomnia Plugin Hub!
Источник
Use Insomnia for API Requests
Introduction
Some find curl statements and the command line, used for many of the examples in our platform APIs documentation, difficult and intimidating. For those, there are numerous tools to send HTTP requests to REST-based services, which include most of the Brightcove APIs. This document will show you how to use one popular tool, the Insomnia app.
Install Insomnia
Get Insomnia from https://insomnia.rest . Insomnia can be installed on Mac, Linux, or Windows systems.
Authentication
Insomnia can be used to make requests to any of Brightcove’s RESTful APIs. Most of the APIs use OAuth2 for authentication, and we will see how to set that up in Insomnia later in this document. However, you can also use it for the APIs that do not use OAuth, by simply setting the appropriate header.
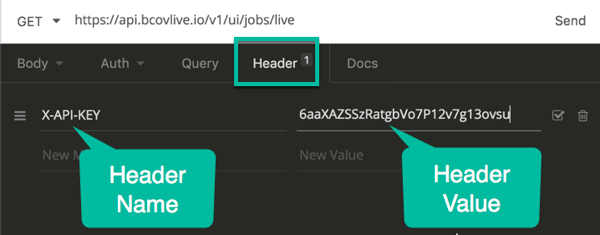 Set Header in Insomnia
Here is what that header will look like for requests with authentication methods other than Oauth2:
Get client credentials
To work with most of the Brightcove APIs, you will need client credentials for the account and API(s) you wish to use. Get your client credentials in Studio by following the directions in Managing API Authentication Credentials. In the steps below, we will make CMS API requests using Insomnia , so your credentials should have at least the following permissions:
- Videos: Read/Write
You can add as many additional permissions as you like to get credentials that will be usable for a wider range of API requests. Also note that you can get credentials that will work for multiple accounts if you like.
Using Insomnia
Once you have your client credentials, you are ready to start using Insomnia . Insomnia will do a lot of set-up work for you if you import the OpenAPI specification for the CMS API, which we make available to you .The steps below walk you through making some CMS API requests using Insomnia .
Setting up an Insomnia collection for the CMS API
Get the OpenAPI specification for the CMS API
- Open the CMS API Reference.
- Click the Download button and save the openapi.yaml file in a place where you can find it again:
 Download Open API Specification
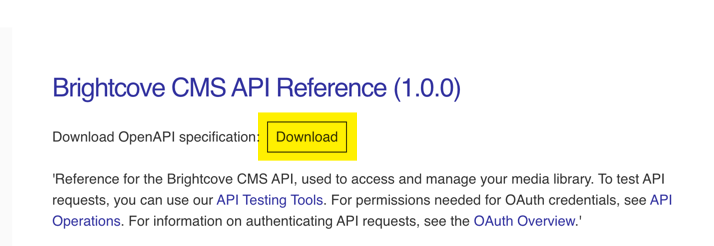 Download Open API Specification
Import the OpenAPI specification into Insomnia
- Launch the Insomnia app.
- Click the dropdown beside Insomnia and select Import/Export: Import/Export
- In the dialog that opens, click Import Data and select From File: Import Data from File
- Select the openapi.yaml file you downloaded and then choose whether to import the data into the current workspace or create a new one. Either will work, but we recommend creating a new workspace for each API: Create New Workspace
- Next you will be asked whether to import the data as a Request Collection or a Design Document. Choose Request Collection: Import as Request Collection
- You will see a dialog confirming that the data was imported.
- Click on Dashboard in the upper left corner to see your workspaces. If you created a new workspace, you will see it displayed with the appropriate name: CMS API Workspace
- Click on the workspace to open it.
- You will see a list of folders that contain the various groups of requests for the CMS API, and also a new OpenAPI environment: CMS API Requests and Environment
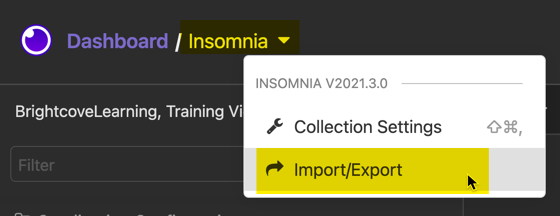 Import/Export
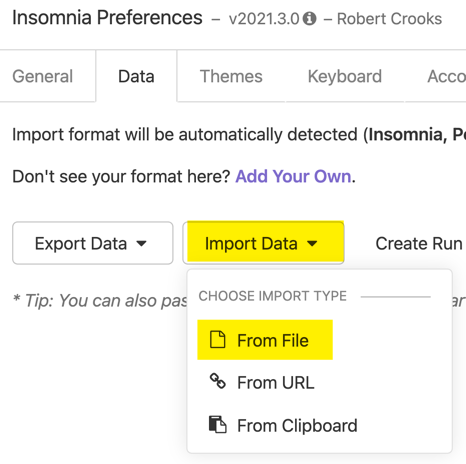 Import Data from File
 Create New Workspace
 Import as Request Collection
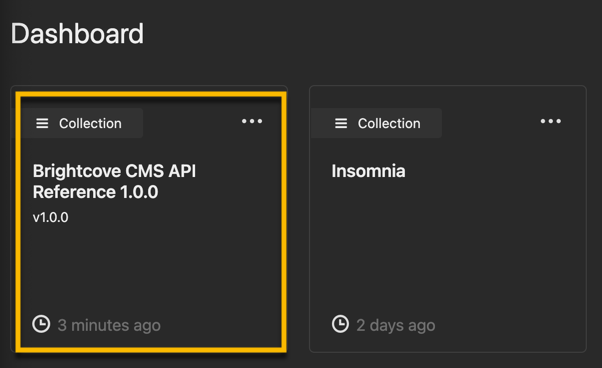 CMS API Workspace
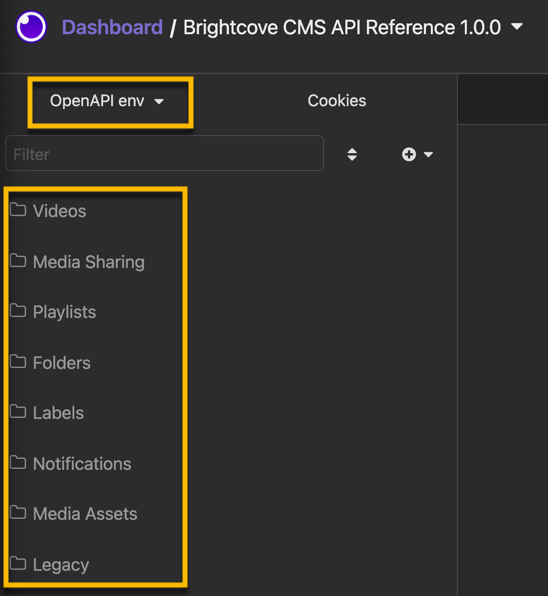 CMS API Requests and Environment
Add variables to the environment
This is an optional step, but it will simplify setting up authentication for requests later.
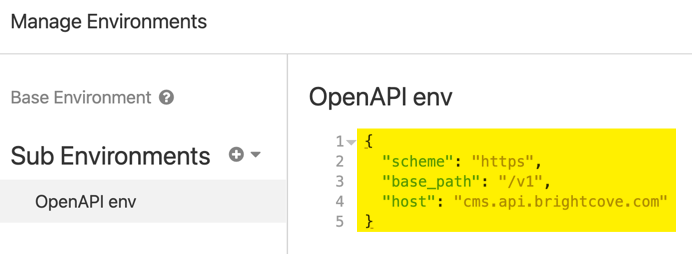
- Click on the OpenAPI env dropdown menu and select Manage Environments: Manage Environments
- You will see the environment variables that Insomnia created from the OpenAPI spec in the form of JSON: Environment Variables
- Add these additional variables to the JSON (see Get Client Credentials above on the client_id and client_secret ):
- «account_id»: » your_account_id «
- «client_id»: » your_client_id «
- «client_secret»: » your_client_secret «
- «access_token_url»: «https://oauth.brightcove.com/v4/access_token»
- When you are finished, the environment JSON should look similar to this: Environment Variables Added
- Click Done in the lower right-hand corner to exit the dialog.
 Environment Variables
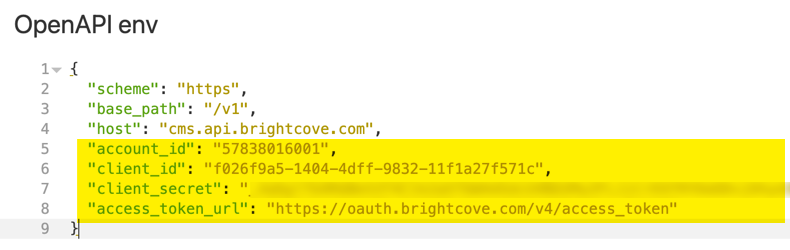 Environment Variables Added
Set up authentication
Now we are ready to set up authentication for API requests.
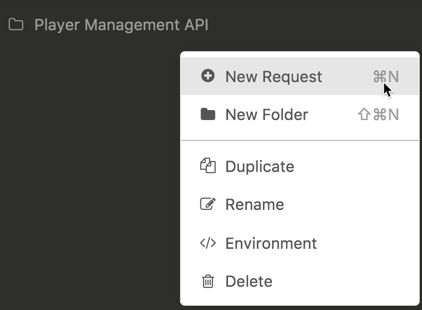
- Click the Videos folder, and select the Get Videos: New Request
- Notice that the URL for the request already contains two variables. If you click on these, you can see (and modify) their values. base_url is automatically generated by Insomnia from the OpenAPI spec. If you click on account_id , you should find that the value matches what you entered as an environment variable in the previous section.
- Click the Auth tab and the Auth dropdown menu, and select OAuth 2.0: Select Auth Type
- Click the Grant Type dropdown and select Client Credentials: Select Grant Type
- In the Access Token URL field, start typing «access_token_url» — you will see the autocomplete menu, and select your access_token_url environment variable: Autocomplete for Variables
- Repeat the previous step to populate the Client ID and Client Secret fields with your client_id and client_secret variables: Auth Variables
- Scroll down to see the Fetch Token button and click it. Make sure you see the Access Token field populated with a token: Access Token
- Click Fetch Tokens to make sure this works. You should see a response like this: Access Token One of the nice features of Insomnia is that once you set this up, you do not have to refresh the token manually — Insomnia will get new ones automatically as they are needed.
- Go to the Header tab and delete the Authorization header (the authentication you just set up will take care of the head — this one will break it): Remove Authorization Header
 New Request
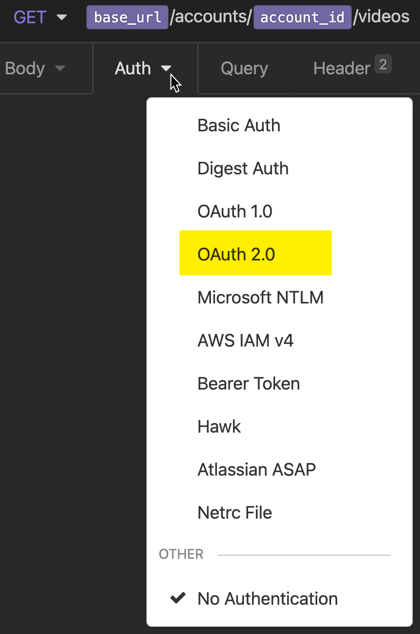 Select Auth Type
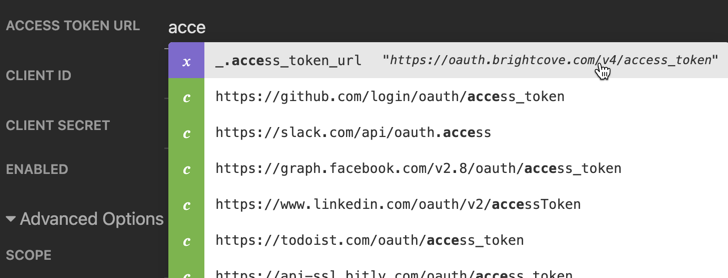 Autocomplete for Variables
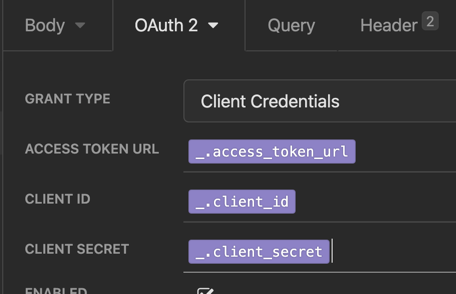 Auth Variables
 Access Token
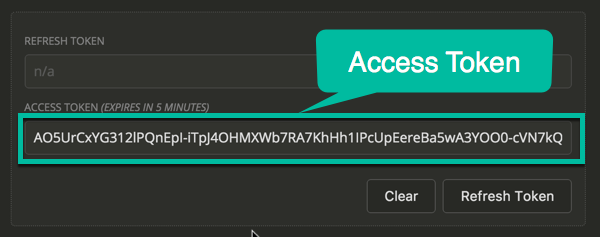 Access Token One of the nice features of Insomnia is that once you set this up, you do not have to refresh the token manually — Insomnia will get new ones automatically as they are needed.
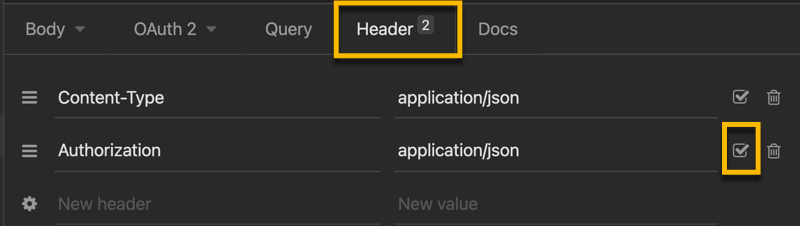 Remove Authorization Header
Notes:
- Insomnia does not replicate authentication settings to other requests, so you will need to repeat these steps for each request that you want to test.
- One of the nice features of Insomnia , though, is that once you set up OAuth 2 authentication, it will automatically fetch new access tokens as needed. You do not have to manually fetch a new one when the existing one expires.
Make a request
Now we are ready to make a Get Videos request.
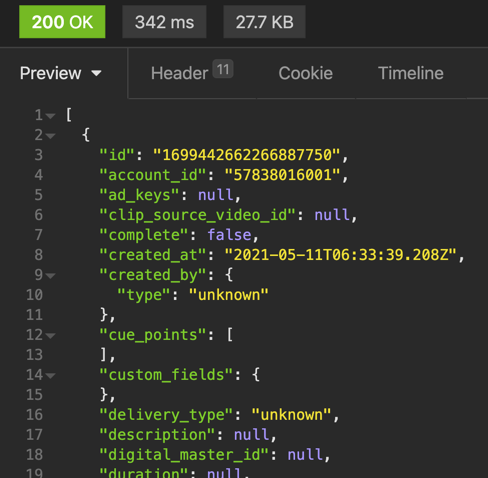
- Since this is a GET request, all you have to do is click Send.
- You should see the JSON response appear in the Response area: API Response
- Note that you can retrieve different sets of videos by using Query params. Click the Query tab for the request, and you will see that Insomnia has populated it based on the OpenAPI spec. Just check the param(s) you want to use and set the values: Query Params
 API Response
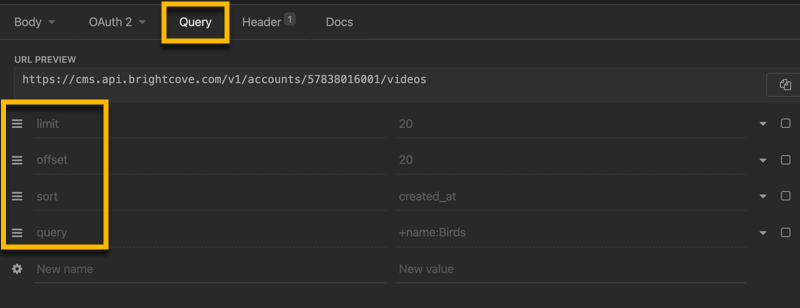 Query Params
Send a POST request
Now, we will send a POST request with some data. In this case, we will create a new video object using the CMS API. Start by selecting the Create Video request in the Videos folder.
- Repeat all the steps in the Set up authentication section above to set up authentication for this new request.
- This request requires a request body, so click the JSON tab, and enter this JSON code to replace the null : Request Body
- Click Send and you should see the new video object returned in the response.
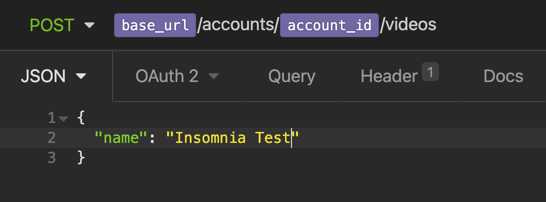 Request Body
Using the code generators
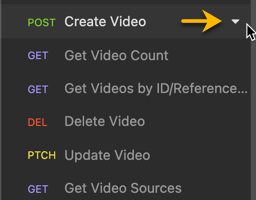
Another nice feature of Insomnia is that it will generate code for making requests in many different languages.
- Hover click on the dropdown menu for a request: Request Dropdown Menu
- Select Generate Code from the menu: Select Generate Code
- In the Generate Client Code dialog that opens, choose the language you want code for: Select the Language
- For many of the languages, there are also variants you can select that may be a better fit for the kind of app you are creating: Select Code Variant
- There is also a handy button for copying the code to your clipboard: View and Copy Code
 Request Dropdown Menu
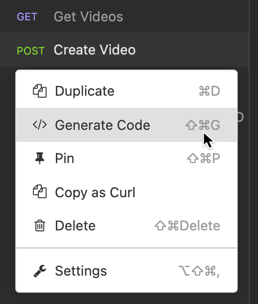 Select Generate Code
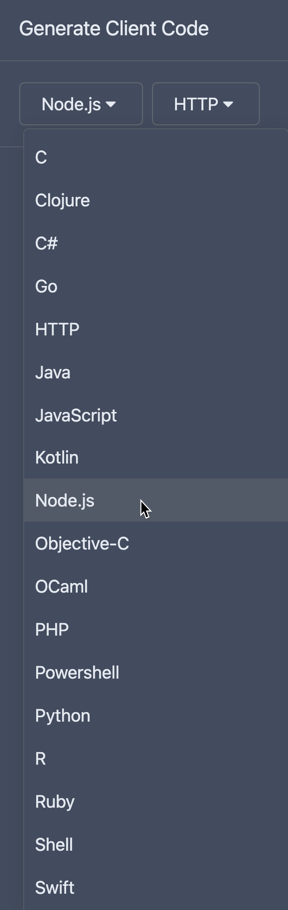 Select the Language
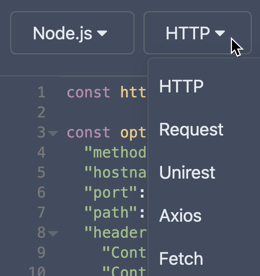 Select Code Variant
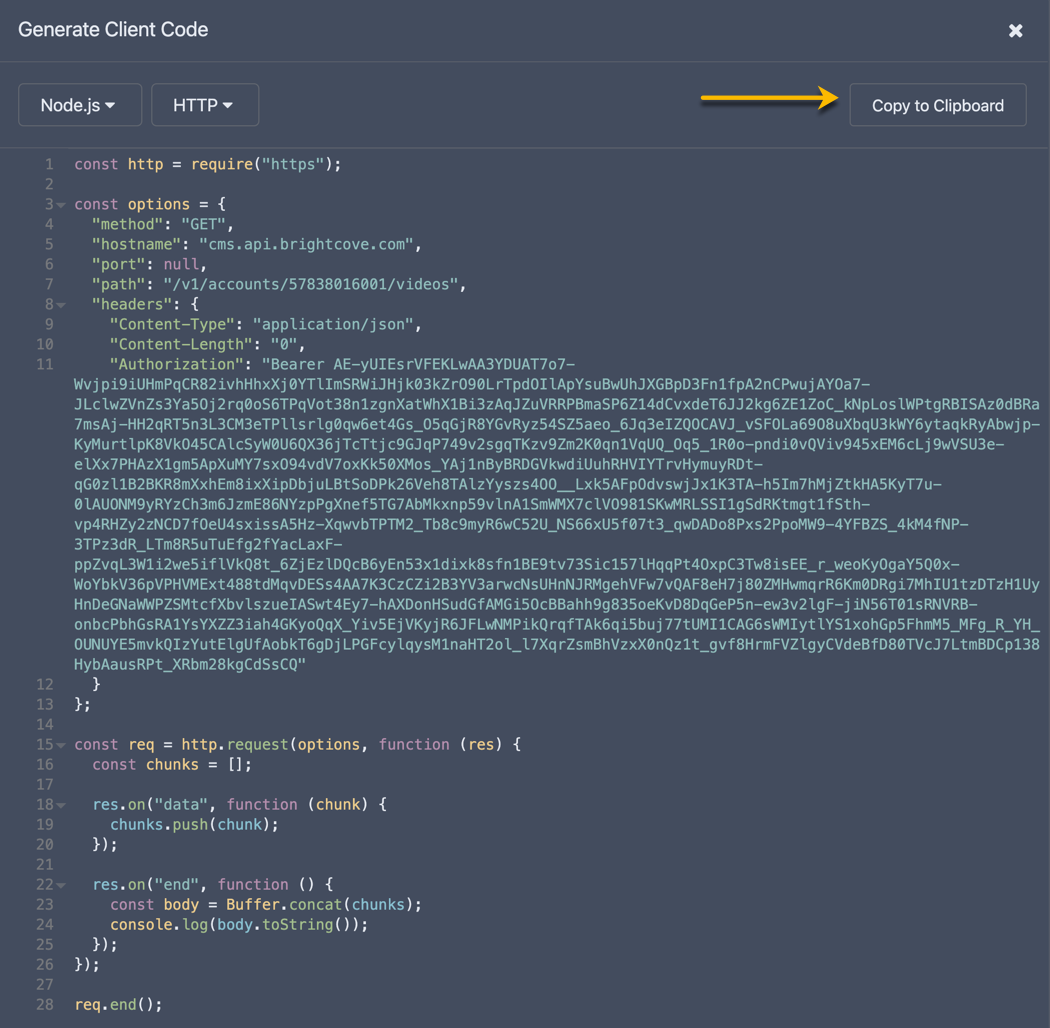 View and Copy Code
Conclusion
You now know the basics of using Insomnia to make requests to the Brightcove APIs. Note that if you choose to upgrade your free Insomnia account to a team account, you can also sync all your requests and environments and share them with other team members.
Источник


