- Как установить Anaconda на Linux Mint 20
- Как установить Anaconda на Linux Mint 20
- Установите Anaconda на Linux Mint 20 Ulyana
- Шаг 1. Перед запуском приведенного ниже руководства важно убедиться, что ваша система обновлена, выполнив следующие apt команды в терминале:
- Шаг 2. Установка Anaconda на Linux Mint 20.
- Шаг 3. Проверьте установку Anaconda.
- Installation
- Anaconda Python Linux Mint 19 Installation Guide
- GNU/Linux Mint 19 Installing Anaconda Python – Quick Start Guide
- 1. Launching Terminal
- Installing Anaconda on Linux
- Installing Anaconda on Linux
- Steps:
- 1. Visit the Anaconda downloads page
- 2. Select Linux
- 3. Copy the bash (.sh file) installer link
- 4. Use wget to download the bash installer
- 5. Run the bash script to install Anaconda3
- 6. source the .bash-rc file to add Anaconda to your PATH
- 7. Start the Python REPL
- Установка Anaconda в Ubuntu
- Установка Anacoda в Ubuntu
- 1. Скачивание и установка программы
- 2. Обновление Anaconda
- 3. Окружения Conda
- 4. Установка пакетов Conda
- Удаление Anaconda
- Выводы
Как установить Anaconda на Linux Mint 20

Как установить Anaconda на Linux Mint 20
В этом руководстве мы покажем вам, как установить Anaconda на Linux Mint 20. Для тех из вас, кто не знал, Anaconda — популярная платформа Python / R для науки о данных и машинного обучения, используемая для крупномасштабной обработки данных, прогнозирования. аналитика и научные вычисления.
В этой статье предполагается, что у вас есть хотя бы базовые знания Linux, вы знаете, как использовать оболочку, и, что наиболее важно, вы размещаете свой сайт на собственном VPS. Установка довольно проста и предполагает, что вы работаете с учетной записью root, в противном случае вам может потребоваться добавить ‘ sudo ‘ к командам для получения привилегий root. Я покажу вам пошаговую установку Anaconda python на Linux Mint 20 (Ульяна).
Установите Anaconda на Linux Mint 20 Ulyana
Шаг 1. Перед запуском приведенного ниже руководства важно убедиться, что ваша система обновлена, выполнив следующие apt команды в терминале:
Шаг 2. Установка Anaconda на Linux Mint 20.
Теперь скачиваем последнюю версию Anaconda с официальной страницы:
После этого проверьте целостность данных скрипта, выполнив sha256sum команду:
Сравните его с официальными хэшами для Anaconda . Если хеш-значение локально загруженного файла установщика совпадает с официальным хешем, все готово.
Затем установите Anaconda для Python 3.8, используя следующую команду:
Теперь продолжайте нажимать Enter, пока он не спросит:
Чтобы активировать установку Anaconda, вы можете либо закрыть и снова открыть оболочку, либо загрузить новую переменную среды PATH в текущий сеанс оболочки, набрав:
Шаг 3. Проверьте установку Anaconda.
Выполните следующую команду из Терминала, чтобы проверить установку Anaconda:
Поздравляю! Вы успешно установили Anaconda . Благодарим за использование этого руководства для установки последней версии Anaconda python в системе Linux Mint. Для получения дополнительной помощи или полезной информации мы рекомендуем вам посетить официальный сайт Anaconda .
Источник
Installation
Review the system requirements listed below before installing Anaconda Individual Edition. If you don’t want the hundreds of packages included with Anaconda, you can install Miniconda, a mini version of Anaconda that includes just conda, its dependencies, and Python.
Looking for Python 3.5 or 3.6? See our FAQ .
System requirements
- License: Free use and redistribution under the terms of the EULA for Anaconda Individual Edition.
- Operating system: Windows 8 or newer, 64-bit macOS 10.13+, or Linux, including Ubuntu, RedHat, CentOS 7+, and others.
- If your operating system is older than what is currently supported, you can find older versions of the Anaconda installers in our archive that might work for you. See Using Anaconda on older operating systems for version recommendations.
- System architecture: Windows- 64-bit x86, 32-bit x86; MacOS- 64-bit x86; Linux- 64-bit x86, 64-bit aarch64 (AWS Graviton2 / arm64), 64-bit Power8/Power9, s390x (Linux on IBM Z & LinuxONE).
- Minimum 5 GB disk space to download and install.
On Windows, macOS, and Linux, it is best to install Anaconda for the local user, which does not require administrator permissions and is the most robust type of installation. However, if you need to, you can install Anaconda system wide, which does require administrator permissions.
Silent mode install
You can use silent mode to automatically accept default settings and have no screen prompts appear during installation.
Using Anaconda on older operating systems
We recommend upgrading your operating system. Most OS that are no longer supported in the latest Anaconda are no longer getting security updates. Upgrading your OS allows you to get the latest packages, performance improvements, bug fixes, etc.
To use Anaconda on older operating systems, download from our archive. You will not be able to use conda to update or install packages beyond the Anaconda version noted in the table below, unless you limit it to versions available at the time that particular version of Anaconda was released. You can see what was available by checking the package table archives.
| Operating system | How to install Anaconda |
|---|---|
| macOS 10.10-10.12; Windows 7 | Use the command line or graphical installers for Anaconda versions 2019.10 and earlier. Download from our archive. |
| macOS 10.9 | |
| macOS 10.7 and 10.8 | Use the command line installers for Anaconda versions 4.2 and earlier. |
| macOS 10.5 and 10.6 | Use the command line installers for Anaconda versions 1.8 and earlier. These installer files end in .sh , not .pkg . |
| Windows XP | Use Anaconda versions 2.2 and earlier. |
| Centos6 (or equivalent) | Use Anaconda versions 2020.11 and earlier. |
| Centos5 (or equivalent) | Use Anaconda versions 4.3 and earlier. |
Installing Anaconda on a non-networked machine (air gap)
- Obtain a local copy of the appropriate Anaconda installer for the non-networked machine. You can copy the Anaconda installer to the target machine using many different methods including a portable hard drive, USB drive, or CD.
- After copying the installer to the non-networked machine, follow the detailed installation instructions for your operating system.
You can install offline copies of both docs.anaconda.com and enterprise-docs.anaconda.com by installing the conda package anaconda-docs: conda install anaconda-docs
You can install offline copies of documentation for many of Anaconda’s open-source packages by installing the conda package anaconda-oss-docs: conda install anaconda-oss-docs
Other ways to get Anaconda or Miniconda
You can find the official Anaconda or Miniconda AMIs on the AWS Marketplace.
You can find the official Anaconda and Miniconda Docker images on Docker Hub.
If you have a CDH cluster, you can install the Anaconda parcel using Cloudera Manager. The Anaconda parcel provides a static installation of Anaconda, based on Python 2.7, that can be used with Python and PySpark jobs on the cluster.
Troubleshooting
If you experience errors during the installation process, review our Troubleshooting topics .
Источник
Anaconda Python Linux Mint 19 Installation Guide
GNU/Linux Mint 19 Installing Anaconda Python – Quick Start Guide
You are Welcome! The Tutorial Shows You Step-by-Step How to Install Anaconda Python 2/3 in Mint 19.x Tara/Tessa/Tina/Tricia LTS GNU/Linux Desktop.
And Anaconda Python for Linux Mint 19 is a Free, Easy-to-Install Package Manager, Environment Manager and Python Distribution with a Collection of 1,000+ Open Source Packages with Free Community Support.
Furthermore, Anaconda includes the most Awesome Scientific Packages:
- NumPy: N-dimensional array for numerical computation
- SciPy: Scientific computing library for Python
- Matplotlib: 2D Plotting library for Python
- Pandas: Powerful Python data structures
and data analysis toolkit - Seaborn: Statistical graphics library for Python
- Bokeh: Interactive web visualization library
- Scikit-Learn: Python modules for machine learning and data mining
- NLTK: Natural language toolkit
- Jupyter Notebook: Web app that allows you to create and share
documents that contain live code, equations,
visualizations and explanatory text - R essentials: R with 80+ of the most used R packages for data science
Finally, this guide includes instructions on How to Getting-Started with Anaconda Python on Linux Mint.

1. Launching Terminal
Open a Terminal Shell emulator window
(Press “Enter” to Execute Commands)
Источник
Installing Anaconda on Linux
Installing Anaconda on Linux
This section details the installation of the Anaconda distribution of Python on Linux, specifically Ubuntu 18.04, but the instructions should work for other Debian-based Linux distributions as well.
Ubuntu 18.04 comes pre-installed with Python (Version 3.6) and legacy Python (Version 2.7). You can confirm the legacy version of Python is installed by opening up a terminal.
In the terminal type:
You will most likely see Python Version 2.7 is installed. If you enter:
You will most likely see Python Version 3.6 is also installed. You can use the 3.6 Version of Python, but each time a new package needs to be downloaded, the $ pip3 install command must be used.
Install the Anaconda distribution of Python to follow the examples in the book without the need to install additional third-party packages.
Steps:
Copy the bash (.sh file) installer link
Use wget to download the bash installer
Run the bash script to install Anaconda3
source the .bash-rc file to add Anaconda to your PATH
Start the Python REPL
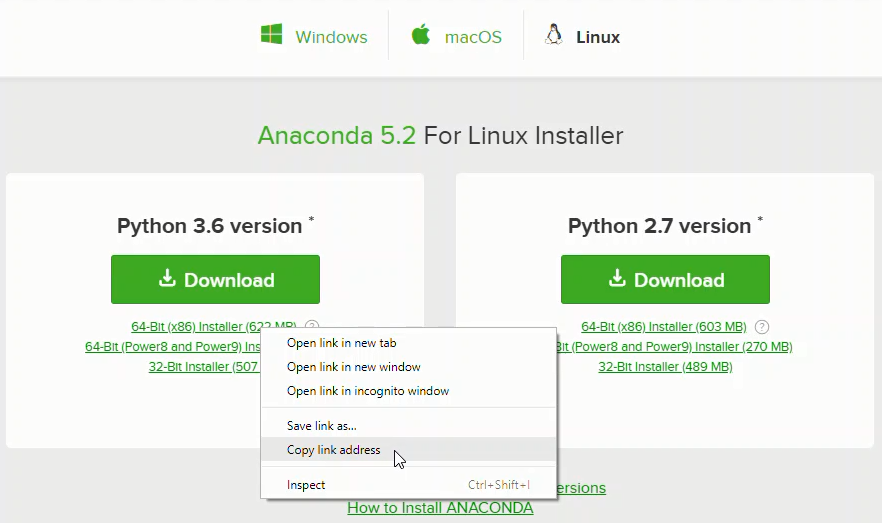
1. Visit the Anaconda downloads page
2. Select Linux
On the downloads page, select the Linux operating system

3. Copy the bash (.sh file) installer link
In the Python 3.6 Version* box, right-click on the [64-Bit(x86) Installer] link. Select .
4. Use wget to download the bash installer
Now that the bash installer (.sh file) link is stored on the clipboard, use wget to download the installer script. In a terminal, cd into the home directory and make a new directory called tmp . cd into tmp and use wget to download the installer. Although the installer is a bash script, it is still quite large and the download will not be immediate (Note the link below includes . the specific release depends on when you download the installer).
5. Run the bash script to install Anaconda3
With the bash installer script downloaded, run the .sh script to install Anaconda3. Ensure you are in the directory where the installer script downloaded:
Run the installer script with bash.
Accept the Licence Agreement and allow Anaconda to be added to your PATH . By adding Anaconda to your PATH , the Anaconda distribution of Python will be called when you type $ python in a terminal.
6. source the .bash-rc file to add Anaconda to your PATH
Now that Anaconda3 is installed and Anaconda3 is added to our PATH , source the .bashrc file to load the new PATH environment variable into the current terminal session. Note the .bashrc file is in the home directory. You can see it with $ ls -a .
7. Start the Python REPL
To verify the installation is complete, open Python from the command line:
If you see Python 3.6 from Anaconda listed, your installation is complete. To exit the Python REPL, type:
Источник
Установка Anaconda в Ubuntu
Anaconda — это очень популярный дистрибутив Python, который содержит удобный пакетный менеджер Conda, несколько предустановленных версий Python (2.7, 3.4 и 3.7), а также среду разработки IDLE Spider и множество библиотек, которые очень просто установить. Ещё здесь есть библиотеки для обработки Big Data, прогнозной аналитики и научных вычислений. Также можно всем управлять через графическую утилиту Anaconda Navigator.
В этой статье мы рассмотрим, как скачать и установить Anaconda Python Ubuntu 18.04 с официального сайта программы, а также как подготовить эту платформу к работе.
Установка Anacoda в Ubuntu
1. Скачивание и установка программы
Сначала нужно скачать установщик платформы с официального сайта. На момент написания статьи самая свежая версия программы — 2019.03. Нажмите кнопку Download, а затем выберите операционную систему Linux:

Вы можете скачать программу прямо в браузере или скопировать ссылку для загрузки через wget. Например, для текущей версии команда будет выглядеть так:

Поскольку это достаточно большой файл, после завершения загрузки желательно проверить его по контрольной суме. Найти контрольную сумму загруженного файла можно командой:
Затем её нужно сравнить с сумой, указанной на этой странице для вашей версии программы. Если полученные значения совпадают, значит всё правильно.

Далее запустите полученный скрипт:
На первом шаге установки нажмите Enter, затем наберите yes, чтобы принять лицензионное соглашение:

Далее нужно выбрать папку, куда будет установлена программа:

Затем пойдёт установка Anaconda 3 Ubuntu. Процесс установки займёт некоторое время.

В конце установки программа предложит изменить
/.bashrc таким образом, чтобы Сonda запускалась автоматически при запуске терминала. Если вы не сделали это во время установки, то это можно выполнить потом командой:
conda init bash
Затем выполните следующую команду, чтобы система перечитала настройки:
Теперь вы можете проверить, всё ли работает, выполнив такую команду:

На этом установка Anaconda Ubuntu завершена.
2. Обновление Anaconda
Обновление Anaconda тоже достаточно просто выполнить. Сначала нужно обновить инструмент conda. Для этого выполните:
conda update conda
На вопросы программы отвечайте y. Когда обновление завершится, можно обновить саму Anaconda 3:
conda update anaconda
Аналогично предыдущему пункту, нажмите y, чтобы продолжить обновление.
3. Окружения Conda
Как я уже сказал, Сonda — это пакетный менеджер, а также это менеджер окружений. Вы можете создать несколько окружений с разными версиями Python, а также с разными установленными в них библиотеками. Посмотреть список доступных окружений можно командой:
conda info —envs

Для активации окружения используется команда activate. Например, сделаем активным окружение base:
conda activate base
Также вы можете создать новое окружение с другой версией Python. Например, сделаем окружение с Python 3.5:
conda create —name ptn35env python=3.5
Программа создаст окружение и сообщит, какие пакеты ей надо установить, соглашаемся на установку:

Затем активируем нужное окружение:
conda activate ptn35env

Чтобы деактивировать текущее окружение, используйте команду deactivate:
Чтобы удалить окружение ptn35env, нужно использовать не команду uninstall, а remove:
conda remove —name ptn35env -all
4. Установка пакетов Conda
Посмотреть список установленных пакетов можно командой list:

Чтобы найти нужный пакет, используйте search, например, ищем пакетный менеджер Python — pip:
comda search pip

А для установки пакета используйте install. Например, установим tensorflow:
conda install tensorflow

Удалить пакет можно командой remove:
conda remove tensorflow
Удаление Anaconda
Чтобы удалить Anaconda из своей системы, достаточно выполнить следующие команды:
/.bashrc и удалите оттуда строки, добавленные Anaconda, обычно, находятся между тегами conda initialize:

Затем удалите скрытые папки с дополнительными файлами и конфигурацией платформы:
Выводы
Теперь установка Anaconda в Ubuntu завершена. Вы можете начать пользоваться пакетным менеджером Conda, использовать виртуальные окружения в Python и легко устанавливать пакеты. Мы разобрали только основы использования conda, чтобы изучить программу лучше, читайте официальную документацию.
Источник


