- How To Install Android SDK Tools On Windows
- Step 1 — Download SDK Tools
- Step 2 — Install Command Line Tools
- Step 3 — Install Platform Tools
- Step 4 — Configure Environment Variable
- Step 5 — Configure Commands
- Step 6 — Using the SDK Manager
- Step 7 — Using the Emulator and AVD Manager
- Summary
- Install android on windows desktop
- How to Install Android on Your PC Without an Emulator
- Run Android apps on your desktop with Phoenix OS and other options
- Why Install Android on PC?
- What Is Phoenix OS?
- How to Install Android Phoenix OS on PC
- How to Disable Secure Boot for Phoenix OS
- Using Phoenix OS to Run Android Apps on PC
How To Install Android SDK Tools On Windows
It provides all the steps required to install Android Platform Tools and SDK Manager on Windows 10 without using Android Studio.
In this tutorial, we will discuss all the steps required to install Android Platform Tools and SDK Manager on Windows 10. This tutorial provides the steps for Windows 10, though the steps should be the same on other versions of Windows.
This post is useful for the developers using Android Platform Tools and SDK manager without installing Android Studio for the use cases including hybrid app development using Ionic. It also assumes that a valid JAVA_HOME environment variable exists pointing to the installation directory of Java.
You can follow How To Install Java 8 On Windows 10, How To Install Java 11 On Windows, How To Install Java 15 On Windows, or How To Install OpenJDK 15 On Windows to install Java on Windows. In case you are interested in developing Android applications using Android Studio, you can also follow How To Install Android Studio On Windows.
Step 1 — Download SDK Tools
Open the download tab of Android Studio and scroll down to the Command line tools only section. This section shows various options to download the SDK tools as shown in Fig 1.
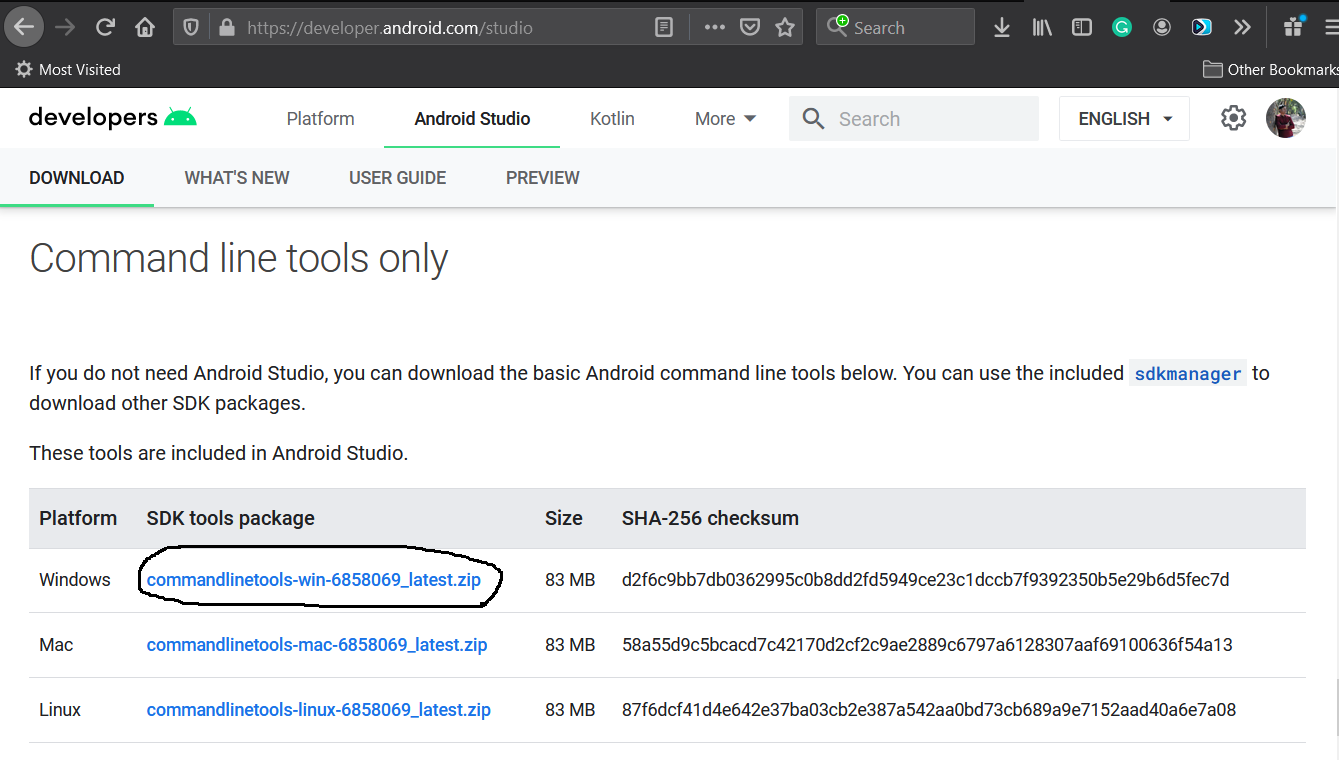
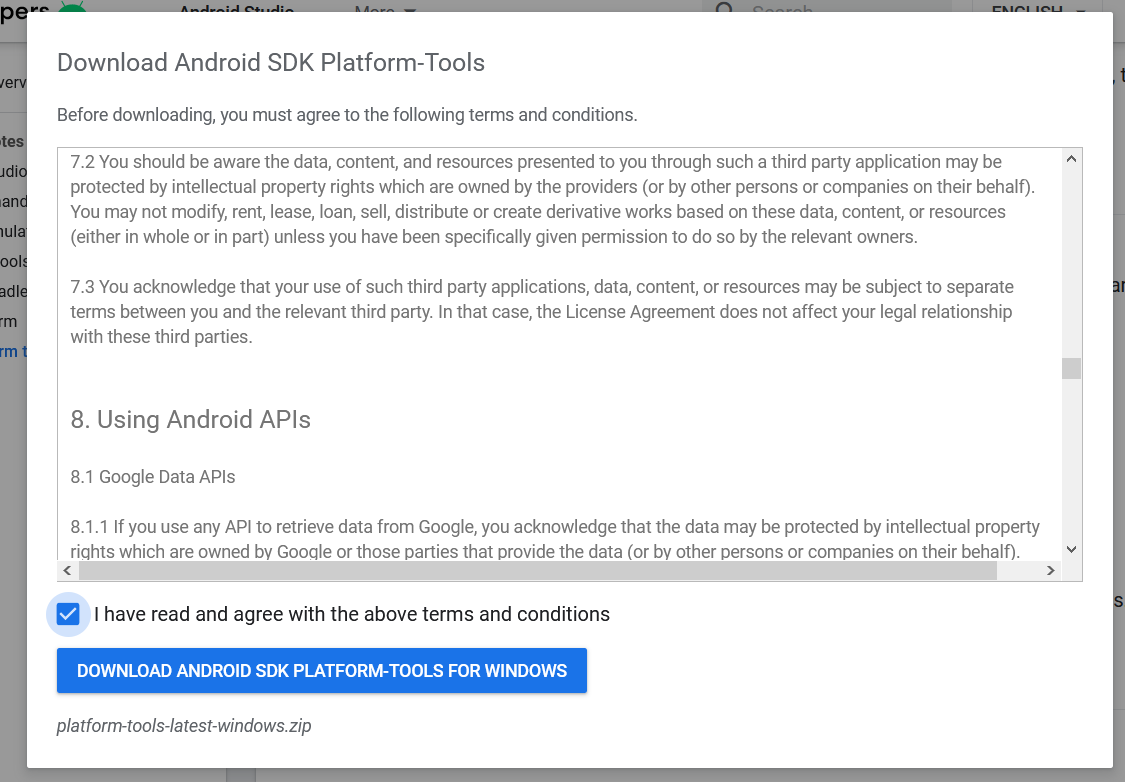
Click the first link having the download option for Windows as highlighted in Fig 1. It will ask to accept to terms and conditions as shown in Fig 2.
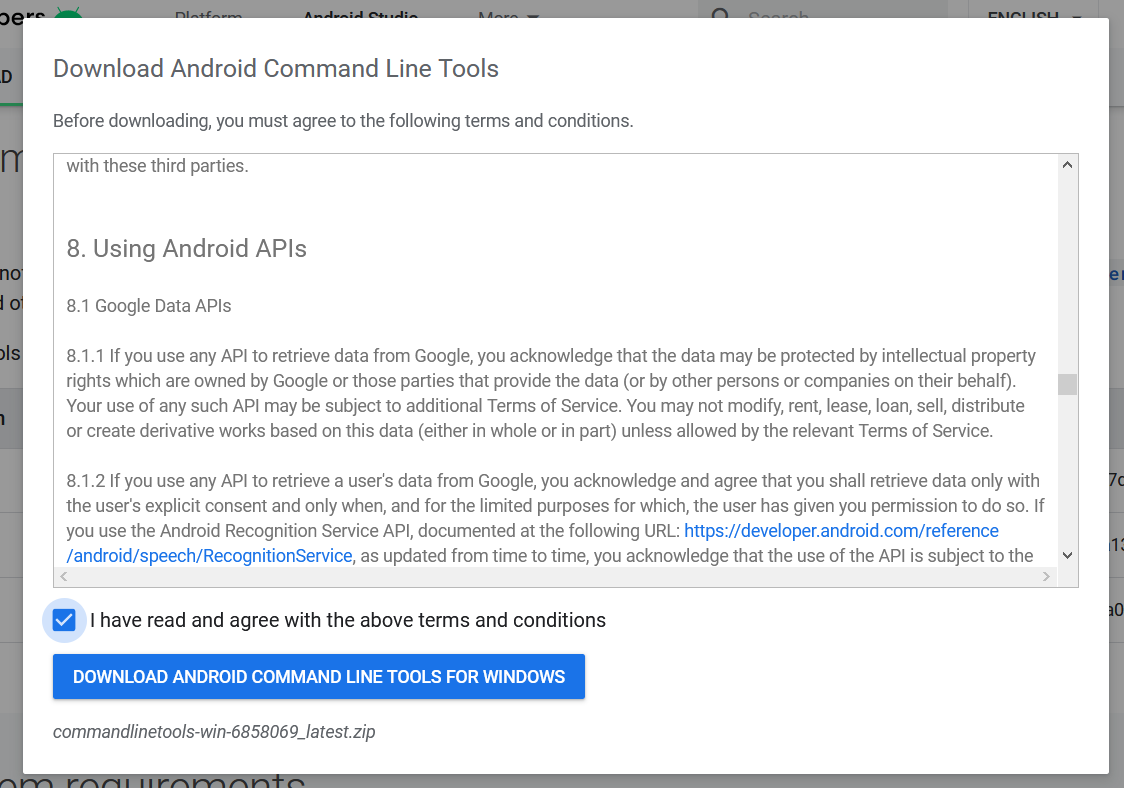
Go through the details, agree on the terms and conditions and click the Download Button to start the download.
Step 2 — Install Command Line Tools
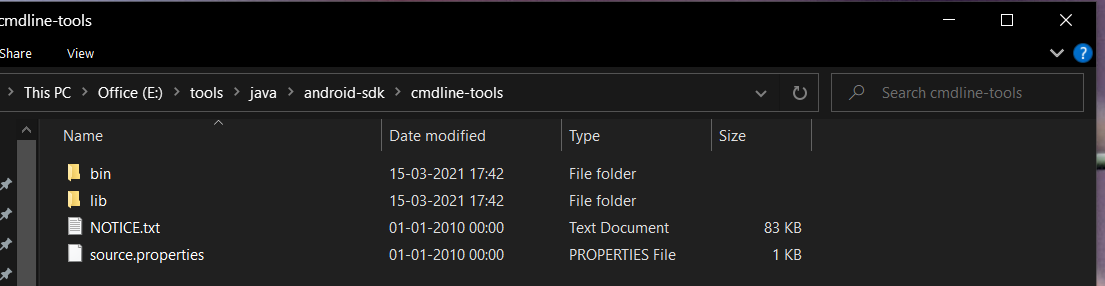
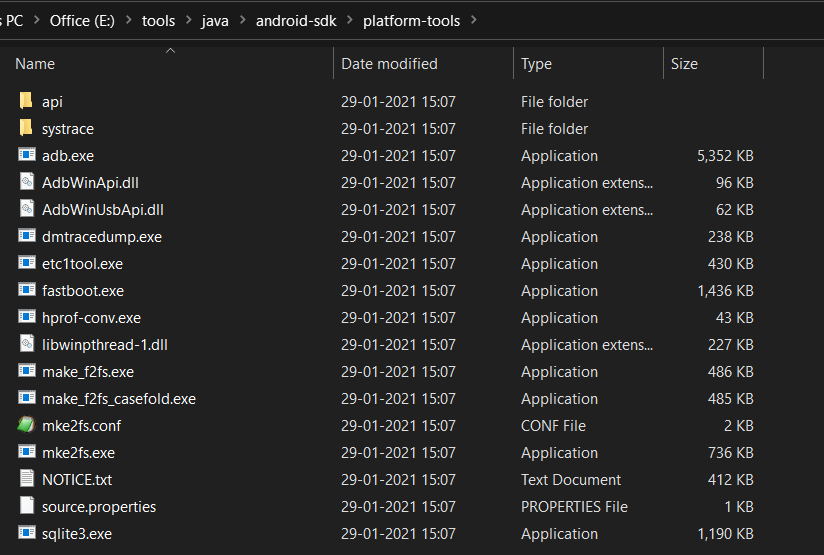
In this step, we will install the Android Command Line Tools on Windows 10. Create the directory android-sdk at your preferred location and extract the content of the downloaded SDK Tools zip to this directory. Make sure that the extracted content is available within the android-sdk directory created by us as shown in Fig 3.
Step 3 — Install Platform Tools
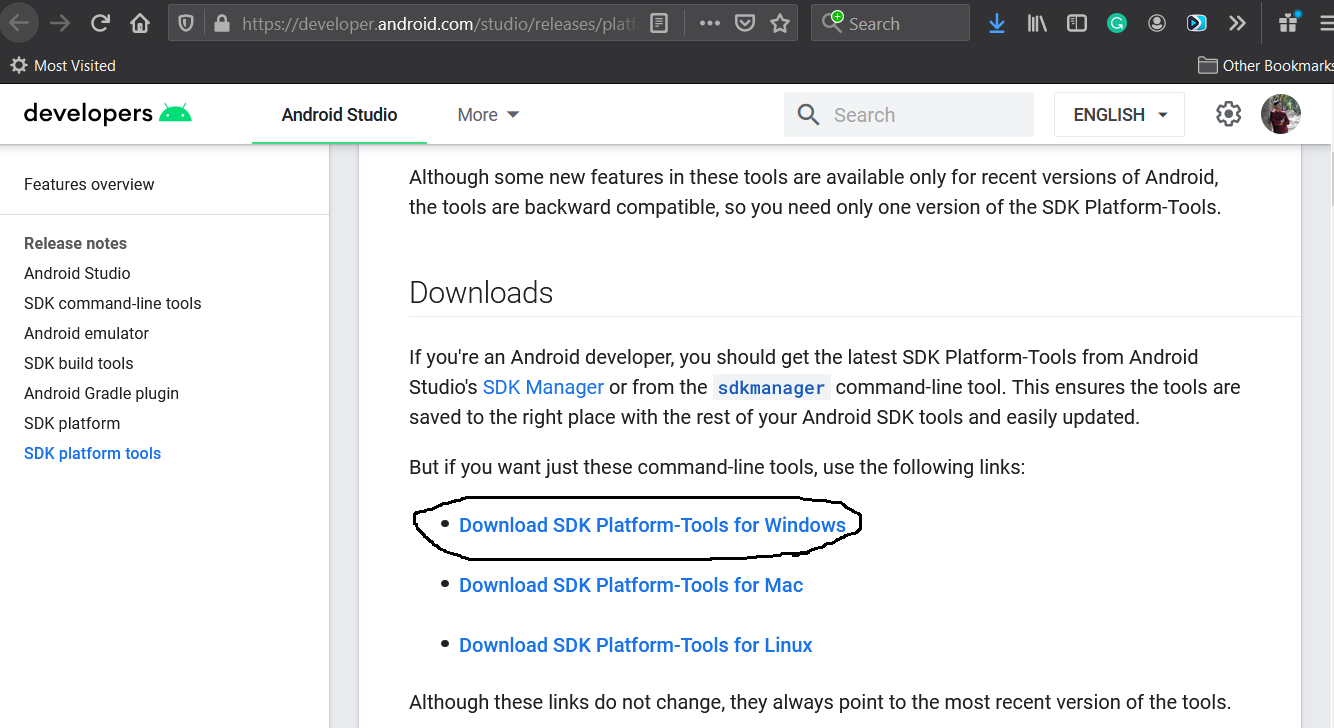
In this step, we will install the Android Platform Tools on Windows 10. Follow the same steps similar to Android SDK Tools to install Android Platform Tools using the download link as shown in Fig 4, Fig 5, and Fig 6.
Step 4 — Configure Environment Variable
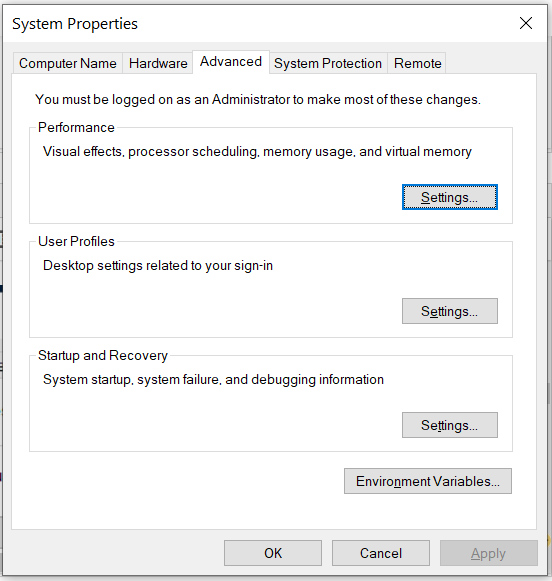
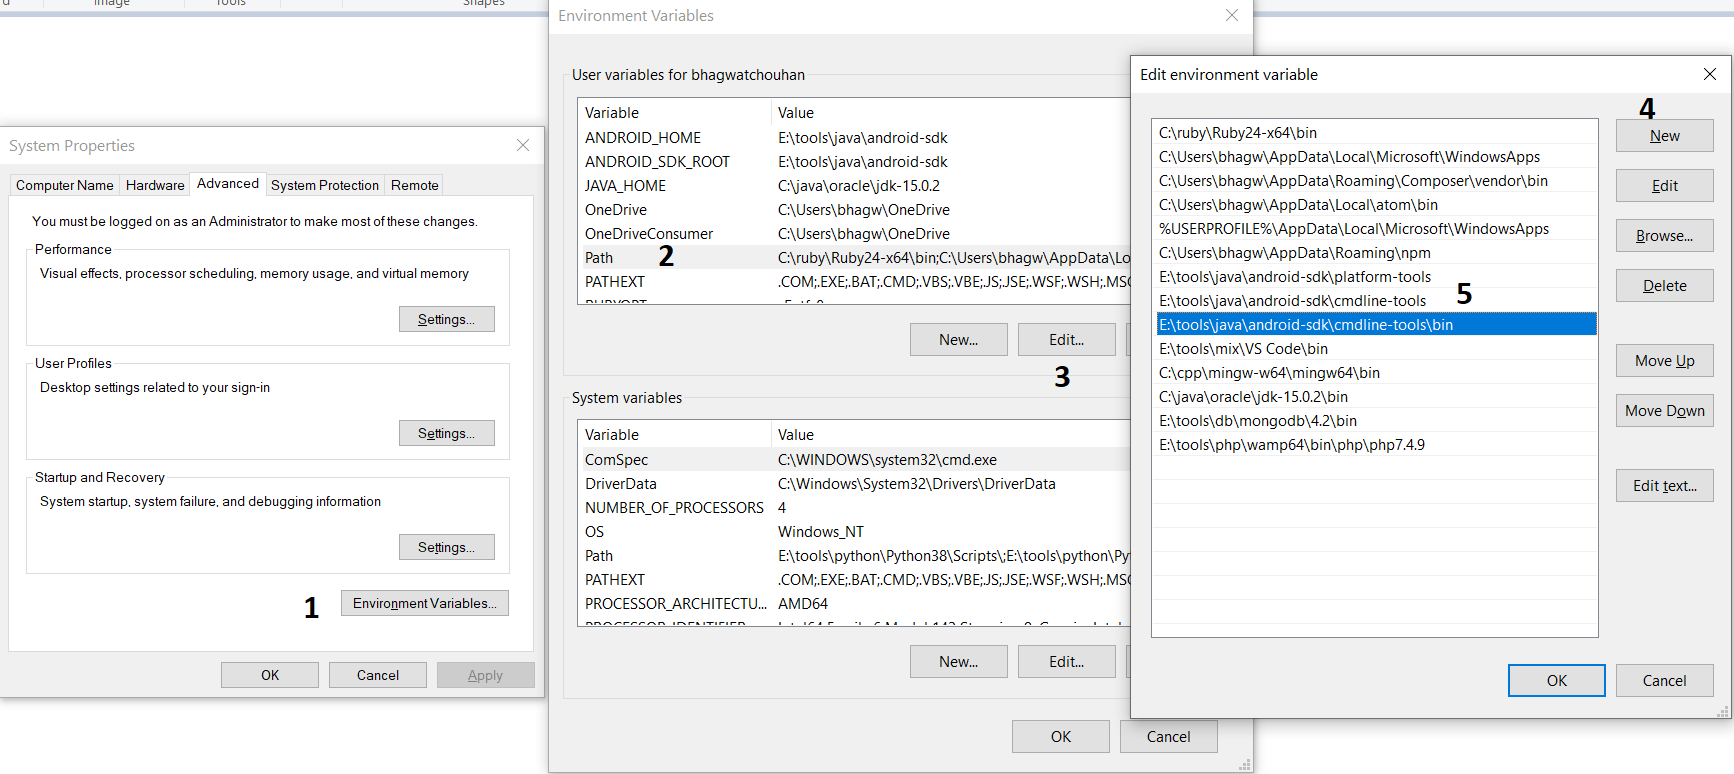
Right-click the My Computer or This PC on the desktop and click the Properties Option. Now click the Advanced system settings. It will show the System Properties dialog having Advanced Tab options as shown in Fig 7.
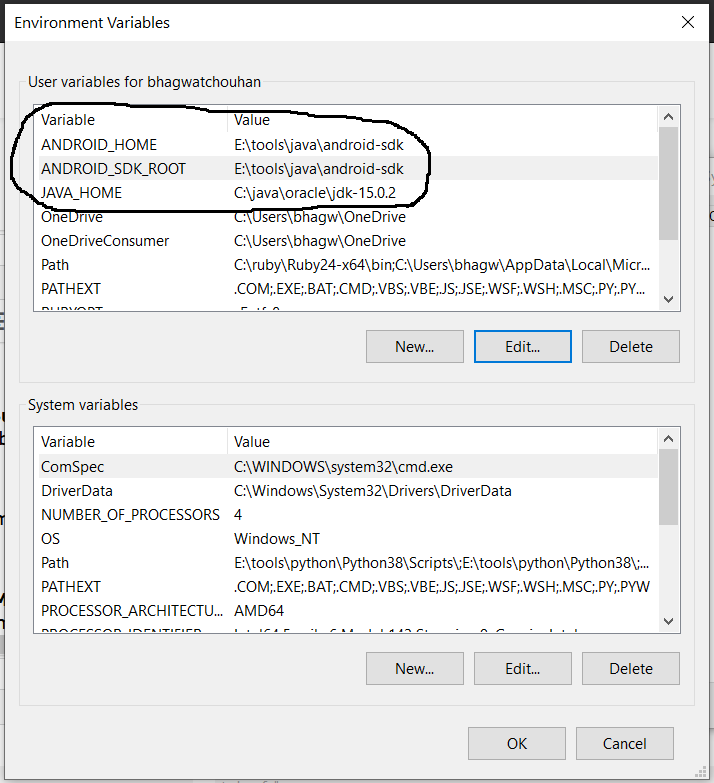
Click the Environment Variables Button and click the New Button in the first section. Set the Variable Name field to ANDROID_HOME and Variable Value to the android-sdk directory created by us in the previous step.
Similarly, also configure the environment variable ANDROID_SDK_ROOT to the android-sdk directory.
Also , make sure that the JAVA_HOME environment variable is set to the JDK installation directory. It must not end with the bin as we do with the system path variable.
Step 5 — Configure Commands
In previous steps, we have downloaded and extracted the Command Line Tools and Platform Tools to the android-sdk directory. Both the tools provide several command-line utilities which we need to run by going to the appropriate directory having the executable files.
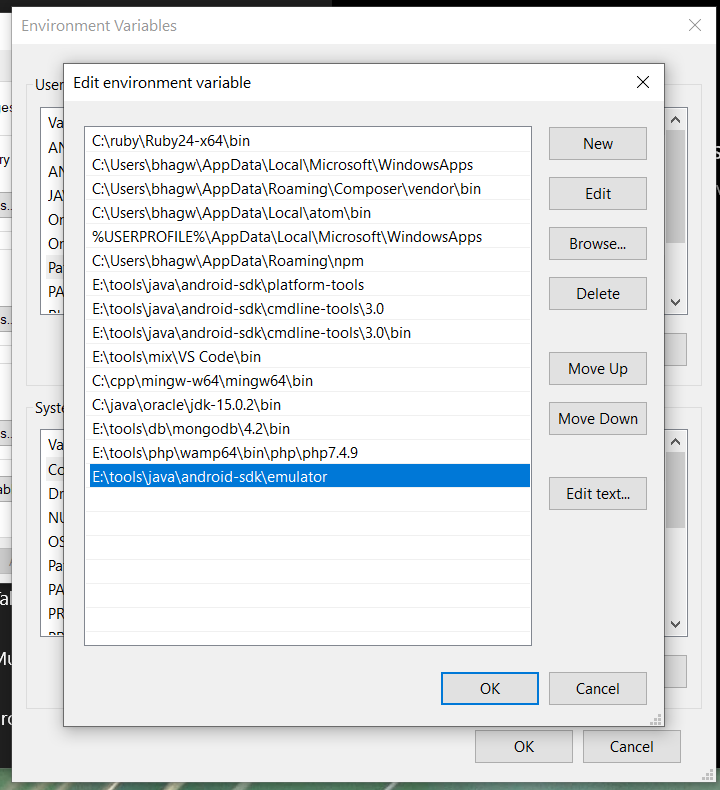
We can make these commands available at the system level without going to these directories by adding the path to tools, tools\bin, and platform-tools to the system path as shown in Fig 9. Make sure that these executables do not break other commands having the same name before adding these paths to the PATH environment variable.
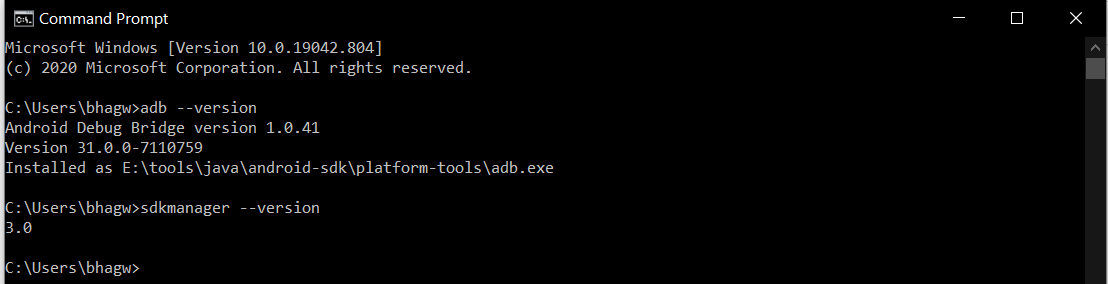
Now open the Command Prompt and check the ADB and SDK Manager versions as shown in Fig 10. You might be required to restart the system to apply the environment variables set by us.
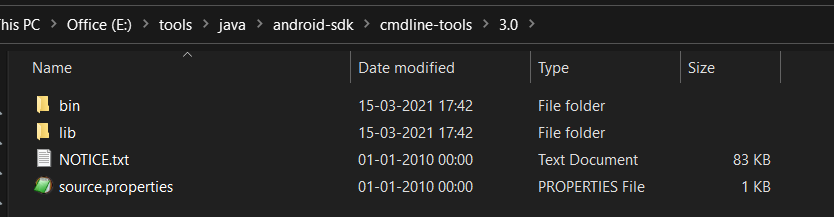
We can see that the ADB command works well and shows the version details, but the sdkmanager shows an error — «error: could not determine sdk root. error: either specify it explicitly with —sdk_root= or move this package into its expected location: \cmdline-tools\latest\» since it expects the Command Line Tools in a version-specific directory. Now open the source.properties file from the cmdline-tools directory to check the version. It will show the version details as shown below.
Now move all the files to the directory cmdline-tools/3.0 as shown in Fig 10.
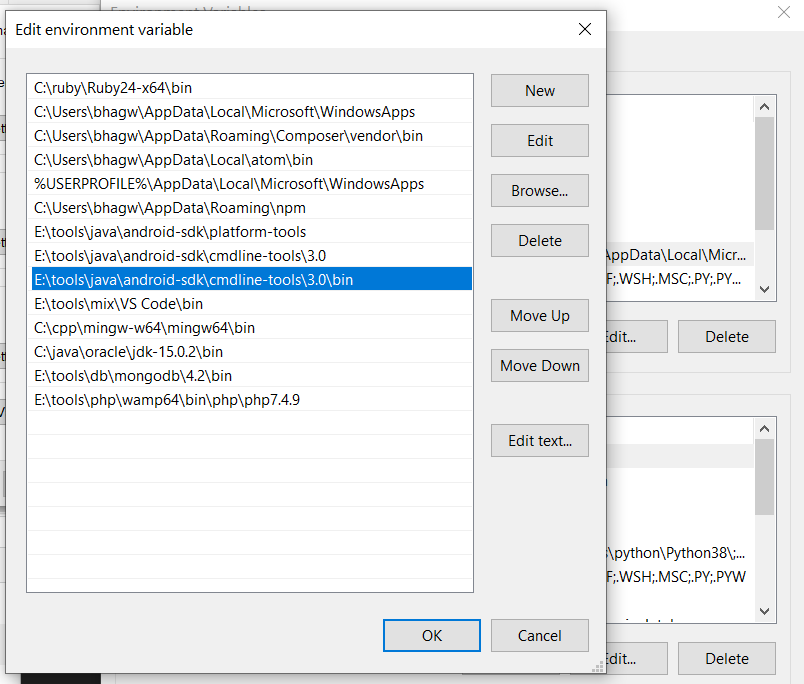
Also, update the system path as shown in Fig 11.
Now close and open the Command Prompt. Also, check the ADB and SDK Manager versions as shown in Fig 12.
Step 6 — Using the SDK Manager
List — We can list the installed and available packages and images using the list command as shown below.
Install Platform — Use the below-mentioned command to install the Android 10 (API level 30) using the SDK manager.
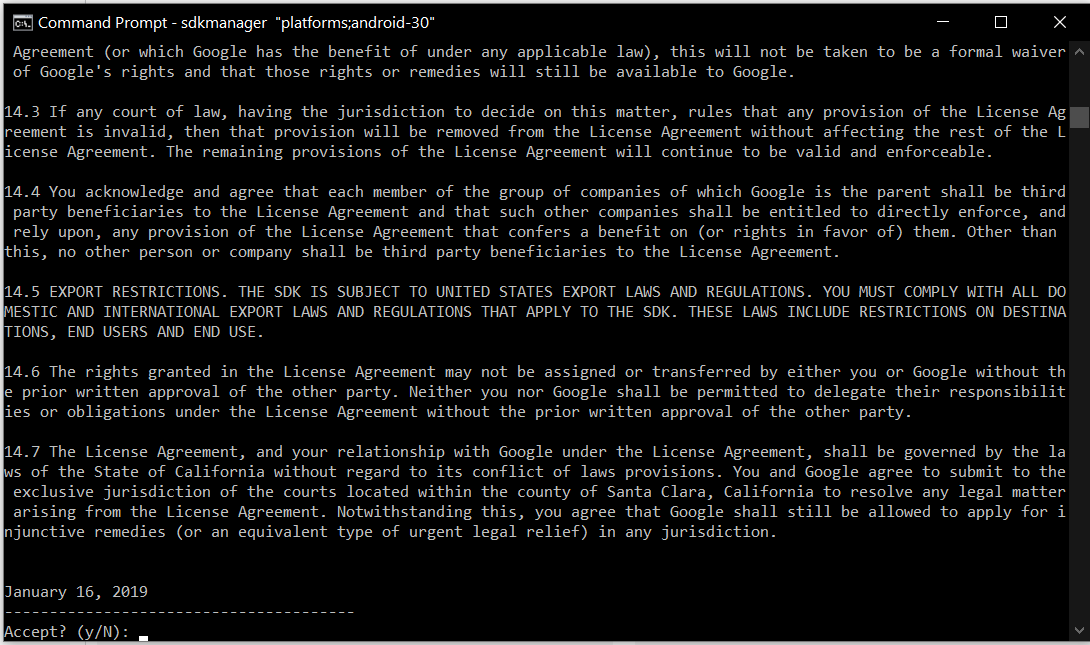
It will ask to accept the terms and conditions as shown in Fig 13. Enter y and hit Enter Key to accept the terms and conditions. This command creates the directory platforms within android-sdk and installs the package android-30 having all the required files to run the emulator for Android 10.
If we again check the installed packages, the list command shows the installed options as shown below.
Update SDK Manager — Update the SDK manager using the below-mentioned command.
Add System Image — We can add system images from available images shown by the list command using the SDK manager as shown below. We are adding the most recent default 64-bit system image.
Accept the License Agreement to complete the download.
There are several projects which need Google Play Services. We need system images specific to Google Play Services as shown below.
Accept the License Agreement to complete the download.
Install Emulator — We need to install the emulator before creating the AVD using SDK Manager.
Accept the License Agreement to complete the download.
Install Build Tools — Install the most recent build tool listed by the list command.
Step 7 — Using the Emulator and AVD Manager
Create Android Emulator — Create the emulator using the system image downloaded in the previous step as shown below. Replace with the actual name preferred by you.
The above commands ask a bunch of questions to configure the AVD if we choose the custom hardware profile option. We have excluded the details of these options from this tutorial since these configuration details depend on the actual needs. After completing all the configurations, it creates the AVD using the name provided by us while configuring it.
Similarly, we can also install the AVD of older versions as shown below.
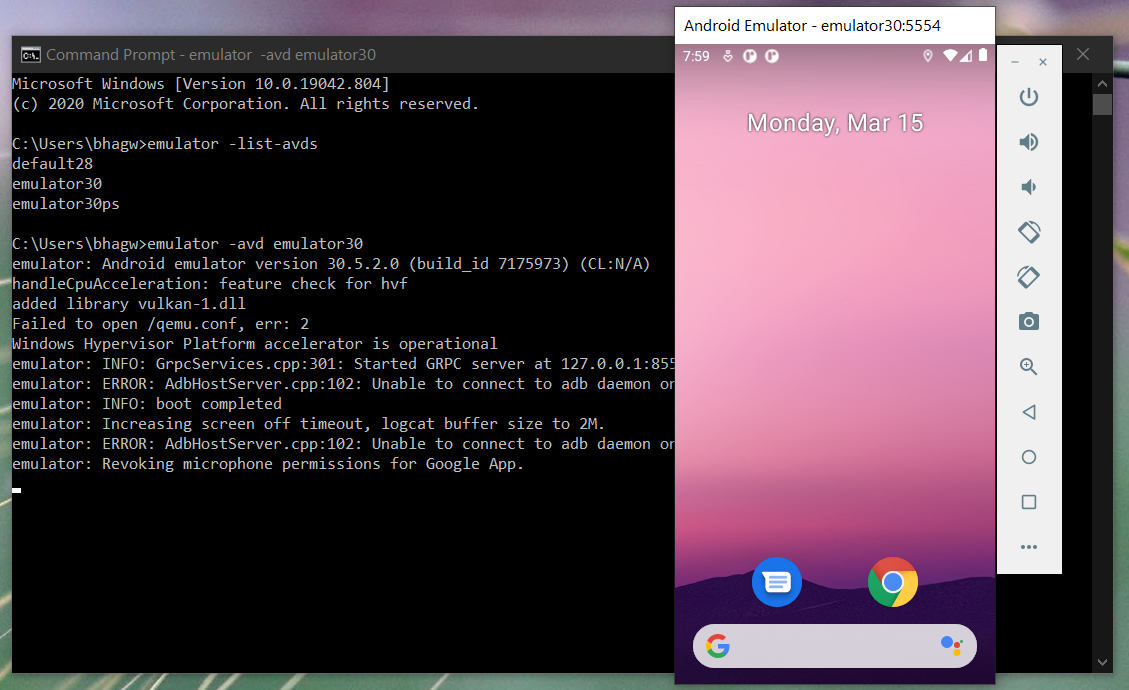
List Android Emulators — Now go to the tools directory on the command line and check the installed platform as shown below.
Notes: Add Emulator to the system path as shown in Fig 14.
Close and re-open the Command Prompt to check the AVDs created by us in the previous steps.
It will list all the AVDs installed by us.
Run Emulator — We can run the emulator created by us as shown below.
The emulator will take some time to completely launch the AVD. The final results should look similar to Fig 15.
Delete Emulator — We can also delete an existing emulator as shown below.
Summary
This tutorial provided all the steps required to install Android Platform Tools and Android SDK Manager on Windows 10. It also provided the steps required to create and launch the AVDs using the Emulator.
Install android on windows desktop
Android OS на x86
В этой теме обсуждаются вопросы общие для всех Андроидов на платформе x86, конкретно проект портирования Android-х86, а также его братья, не имеющие отдельных тем обсуждения на нашем форуме.
Android в виртуальную машину | Сайт и Форум проекта Android-х86 | Android от Intel

Вопросы, касающиеся только проектов Phoenix OS , Remix OS x86 и Bliss-x86 , обсуждаются в своих темах.
За работоспособность ваших устройств ответственность несёте исключительно Вы. Задавая вопрос, постарайтесь указать следующую информацию .
- Hardware List — список совместимого оборудования
- Графическое ускорение нормально работает на видеоадаптерах от AMD и Intel (кроме GMA 500, GMA 600, GMA 3600, GMA 3650, т.к. они основаны на PowerVR).
Графика nVidia поддерживается начиная с Android-x86 4.4-R3; новое поколение начинает поддерживаться после выхода следующего. - Ситуация с поддержкой планшетов, Критическое замечание о звуке.
- Чипы, которые реализуют одновременно и WiFi, и Bluetooth работают хуже, чем отдельные.
- Если Вы не нашли в шапке или в листе совместимости версию для вашего компьютера/ноутбука (модификации железа), то следует попробовать разные версии и опытным путём подобрать оптимальную.
- Загрузочную флешку или диск необходимо записать с помощью Rufus, UNetbootin, LiLi, или WinImage. UltraISO использовать не рекомендуется потому, что созданные им флешки мало где грузятся.
Раздел под Android рекомендуется форматировать в ext3 или ext4 (для версии 5.0 Lollipop и новее) чтобы иметь >4ГБ места под свои нужды и избежать проблем с SuperSU и другим софтом. Форматирование раздела лучше произвести до установки Android сторонним ПО (Acronis, GParted, др.): родной установщик не всегда справляется с этой задачей.
title Android-x86 5.1-rc1
kernel /android-5.1-rc1/kernel quiet root=/dev/ram0 androidboot.hardware=android_x86 SRC=/android-5.1-rc1
initrd /android-5.1-rc1/initrd.img
title Android-x86 5.1-rc1 (Debug mode)
kernel /android-5.1-rc1/kernel root=/dev/ram0 androidboot.hardware=android_x86 DEBUG=2 SRC=/android-5.1-rc1
initrd /android-5.1-rc1/initrd.img
title Android-x86 5.1-rc1 (Debug nomodeset)
kernel /android-5.1-rc1/kernel nomodeset root=/dev/ram0 androidboot.hardware=android_x86 DEBUG=2 SRC=/android-5.1-rc1
initrd /android-5.1-rc1/initrd.img
title Windows
rootnoverify (hd0,1)
chainloader +1
Тут default указывает номер пункта, котоый будет выбран автоматически после истечения timeout секунд. root и rootnoverify указывают с какого диска, и с какого его раздела загружать выбраную операционную систему. Как и в случае с default, нумерация начинается с нуля. Параметры загрузки прописываются в конец строки, которая начинается со слова kernel. Такими параметрами можно повлиять на многие аспекты работы Андроида с железом. К примеру настроить работу с внешним монитором.
GRUB 2 — следующая версия GRUB. Разработчики писали GRUB 2 «с нуля», чтобы добиться переносимости и модульности.
Используется в образах Android-x86 для компьютеров с новым UEFI-BIOS.
Может хранить свои настроки в файле grub.cfg либо menu.lst. Обычно этот файл лежит на отдельном системном разделе EFI (ESP). Типичное содержимое:
set timeout=60
set gfxmode=1024×768
terminal_output gfxterm
How to Install Android on Your PC Without an Emulator
Run Android apps on your desktop with Phoenix OS and other options
:max_bytes(150000):strip_icc()/RobertWells-212887-a1f8524578cc4a1abab9683a905823bf.jpg)
It’s possible to install Android on a PC without using an emulator. Learn how to run Android apps and access a full version of the mobile operating system on Windows.
Instructions in this article apply to desktops and laptops running Windows 10, 8, and 7.
Why Install Android on PC?
If you don’t have an Android device, you’re missing out on millions of apps in the Google Play Store. Even if you already have a smartphone or tablet that you play Android games on, you might prefer to play them on your PC.
There are several ways to run Android apps on your computer. For example, the Android SDK comes with an Android emulator for debugging apps, and BlueStacks is a cloud-based virtual machine that optimizes Android apps for desktops. However, if you want to access the full version of Android without an emulator, then your best bet is Phoenix OS.
:max_bytes(150000):strip_icc()/Delllaptoponcouch-f2bef3a67cb54e84a38022ecda92327d.jpg)
What Is Phoenix OS?
Phoenix OS is an operating system based on Android 7 (Nougat) that is designed to run on desktop and laptop computers. If you install it on your hard drive, you’re given the option to boot into Phoenix OS each time you start up your computer. Alternatively, you can save it to a USB flash drive for use on any computer.
Before you can install Phoenix OS, you must first download the installer for your operating system. Windows users can download an EXE file, but Mac users must download an ISO file and burn it to a flash drive before they can launch the installer. You must also make changes to your system’s BIOS settings.
To run Phoenix OS, your computer needs an Intel x86 series CPU.
How to Install Android Phoenix OS on PC
To get started installing Android on your PC using the Phoenix OS, these are the steps you’ll need to follow:
:max_bytes(150000):strip_icc()/001-how-to-install-android-on-your-pc-without-an-emulator-0ef7c6bb65074546b60f7d1453951c90.jpg)
Open the installer and select Install.
:max_bytes(150000):strip_icc()/002-how-to-install-android-on-your-pc-without-an-emulator-b7ebb87f3aed436abfd21931b4476da4.jpg)
To install Phoenix OS on a USB drive, select Make U-Disk.
Select the hard drive where you want to install the OS, then select Next.
:max_bytes(150000):strip_icc()/003-how-to-install-android-on-your-pc-without-an-emulator-ee04bf03f64340c99ef5495e3cd70f44.jpg)
Select the amount of space you want to reserve on your hard drive for Phoenix OS, then select Install.
:max_bytes(150000):strip_icc()/004-how-to-install-android-on-your-pc-without-an-emulator-a3914dbb5137404cbb680169d1d89f40.jpg)
This option determines the size of the apps you can run, so you should set it as high as possible.
Phoenix OS is now installed, but you’ll likely receive a notification saying you must disable secure boot.
:max_bytes(150000):strip_icc()/005_how-to-install-android-on-your-pc-without-an-emulator-4778092-9ad1ea50b35c4f409166c2ee26c2bb7a.jpg)
How to Disable Secure Boot for Phoenix OS
Windows has a built-in security feature that will prevent Phoenix OS from running at startup. How you disable the secure boot feature depends on your motherboard and your version of Windows. The Microsoft support website has detailed instructions for disabling secure boot for different systems.
Using Phoenix OS to Run Android Apps on PC
Whenever you start your computer, you can choose to load Windows or Phoenix OS. You can also select the shortcut on your desktop to launch Phoenix OS. The first time you start Phoenix, you’ll need to select the language (the default is Chinese) and set it up just like you would a new Android device.
Phoenix OS isn’t always stable, so if it doesn’t load successfully the first time, it might work if you try again.
:max_bytes(150000):strip_icc()/006_how-to-install-android-on-your-pc-without-an-emulator-4778092-74d4275af05646519f13f7d78e33cc37.jpg)
The Phoenix OS interface looks similar to Windows, but it behaves like Android. If using a laptop, then you may need an external mouse as Phoenix OS is not compatible with all trackpads. If your computer has a touch screen, then you can navigate the interface just like you would on a smartphone or tablet.
Phoenix OS comes preloaded with Google Play, so you can download apps directly from Google. You can also sideload apps using APK files. Select the Menu icon in the bottom-left corner of the desktop to see your apps.


