- Как установить Android SDK на Ubuntu / Mint Linux?
- Пользовательское соглашение
- Как установить Android Studio на Linux Mint 20
- Как установить Android Studio на Linux Mint 20
- Установить Android Studio на Linux Mint 20 Ulyana
- Шаг 1. Перед запуском приведенного ниже руководства важно убедиться, что ваша система обновлена, выполнив следующие apt команды в терминале:
- Шаг 2. Установка Java.
- Шаг 3. Включите и установите Snapd в системе Linux Mint.
- Шаг 4. Установка Android Studio на Linux Mint 20.
- Шаг 5. Доступ к Android Studio.
- Install Android SDK Manager on Linux Mint
- Android SDK Manager
- The package contains android sdkmanager and android SDK console tools..
- How to Install Android SDK 4.0.3 and Eclipse ADT on Linux Mint 12 / Ubuntu 11.10
- How to install official Android Emulator (SDK) in Linux
- Prerequisites
- 1) How to install Java in Linux?
- 2) Checking installed JAVA version in Linux
- 3) How to download the SDK package?
- 5) How to add Android Virtual Device (AVD)
- 6) How to launch a new Android Virtual Device (AVD)?
- 7) How to launch a new Android Device?
Как установить Android SDK на Ubuntu / Mint Linux?
Наверно есть пользователи и разработчики которые пользуются ОС Linux и им нужно быстро установить на систему Android SDK. Из данной статьи можно узнать как это лучше всего сделать.
Данная статья гарантированно подойдет обладателям Linux Mint 12/13 и Ubuntu 11.10 и 12.04, на других версиях ОС данный способ не тестировался!

Для того чтобы установить Android SDK откройте терминал
sudo add-apt-repository ppa:upubuntu-com/sdk

и подтвердите добавления ключа
sudo apt-get update

после обновления источников введите команду для установки Android SDK
sudo apt-get install android-sdk

Во время установки скачается 144 мб данных и после установки SDK возрастет на 146 мб.
После установки Вы найдете иконку в меню приложений Android SDK

Android SDK Установлен

Спасибо что посетили сайт Fans Android! Оставляйте сайт в закладках, и следите за нашими новостями! Дальше будет ИНТЕРЕСНЕЙ!
Пользовательское соглашение
При выполнении данных инструкций, ни автор статей, ни администрация сайта не несут ответственность. Ответственность за любые поломки, риски, «Ваши» ошибки совершенные в ходе выполнения инструкций, а также возможные последствия использования информации и/или материалов, возлагается полностью на «Лицо, выполняющее данную инструкцию»!
При выполнении данных инструкций, возможна полная или частичная потеря личных данных и контента. Ни какие материальные требования с Вашей стороны, ни Сайту, ни автору Статей, не могут быть выдвинуты! Любой последующий ремонт устройства, либо полная/частичная замена будет производиться только за Ваш счет! Автор статей и Администрация сайта не гарантируют, что при выполнении данных инструкций, будет достигнут 100%-ый результат. Пользователь обязан, ознакомится с терминами и общепринятым сленгом, которые используются Автором статей и Администрацией сайта, чтобы не допустить ошибок при выполнении каких-либо инструкций.
Ответственность за качество используемого программного обеспечения и риски связанные с его работой, возлагаются на его разработчика.
Пользователь подтверждает, что ознакомлен со всеми пунктами настоящего Соглашения и безусловно принимает их.
Источник
Как установить Android Studio на Linux Mint 20

Как установить Android Studio на Linux Mint 20
В этом руководстве мы покажем вам, как установить Android Studio на Linux Mint 20. Для тех из вас, кто не знал, Android Studio — это официальная интегрированная среда разработки (IDE) для разработки приложений Android, основанная на IntelliJ IDEA. Помимо мощного редактора кода и инструментов разработчика IntelliJ, Android Studio предлагает еще больше функций, которые повышают вашу продуктивность при создании приложений для Android.
В этой статье предполагается, что у вас есть хотя бы базовые знания Linux, вы знаете, как использовать оболочку, и, что наиболее важно, вы размещаете свой сайт на собственном VPS. Установка довольно проста и предполагает, что вы работаете с учетной записью root, в противном случае вам может потребоваться добавить ‘ sudo ‘ к командам для получения привилегий root. Я покажу вам пошаговую установку Android Studio на Linux Mint 20 (Ульяна).
Установить Android Studio на Linux Mint 20 Ulyana
Шаг 1. Перед запуском приведенного ниже руководства важно убедиться, что ваша система обновлена, выполнив следующие apt команды в терминале:
Шаг 2. Установка Java.
Выполните следующую команду, чтобы установить Oracle JDK 11 на Linux Mint 20:
Шаг 3. Включите и установите Snapd в системе Linux Mint.
Snap доступен для Linux Mint 20. Перед установкой в Linux Mint необходимо удалить. Это можно сделать из командной строки: /etc/ apt / preferences . d / nosnap . pref
Затем выполните следующую команду для установки snapd:
Шаг 4. Установка Android Studio на Linux Mint 20.
- Установка Android Studio с помощью Snapd
Чтобы установить Android Studio, просто используйте следующую команду:
- Установите Android studio из официального репозитория
Нам нужно добавить репозиторий Android Studio в систему Linux Mint, чтобы мы могли установить Android Studio:
После этого обновите свой apt и приступайте к установке Android Studio:
Шаг 5. Доступ к Android Studio.
Наконец, запустите Android Studio из диспетчера приложений Linux Mint или, альтернативно, вы можете запустить Android Studio с помощью следующей команды:
Поздравляю! Вы успешно установили Android Studio . Благодарим за использование этого руководства для установки последней версии Android Studio в системе Linux Mint. Для получения дополнительной помощи или полезной информации мы рекомендуем вам посетить официальный сайт Android Studio .
Источник
Install Android SDK Manager
on Linux Mint

Android SDK Manager
- QuasarApp group (quasarrapp) Publisher
- Development
- Utilities


The package contains android sdkmanager and android SDK console tools..
This is snap version of console sdk manager for Android. For more information about sdkmanager see official google [documentation](https://developer.android.com/studio/command-line/sdkmanager) ubuntu
sdkmanager
The sdkmanager is a command line tool that allows you to view, install, update, and uninstall packages for the Android SDK.
Location of installed components:
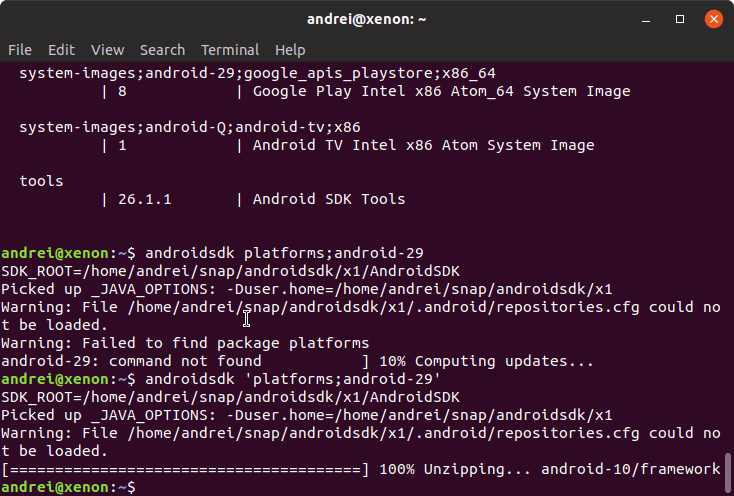
- androidsdk —list — show available packages
- androidsdk ‘platforms;android-29’ — install ‘platforms;android-29’ package
Источник
How to Install Android SDK 4.0.3 and Eclipse ADT on Linux Mint 12 / Ubuntu 11.10
 Ubuntu and Linux Mint are sharing desktop space with significant percentage, both are doing great job for the java developer with Eclipse IDE. Android is one of the famous operating system for mobile devices, which is open source, and is easy for developers to build powerful applications for Android-powered mobile devices. Eclipse most widely used IDE for developing the apps for Android with the help of extension. Here is is the how to guide for installing Android SDK and Eclipse ADT (Android development kit) on Linux Mint 12 / Ubuntu 11.10.
Before installing Android SDK, you must have the following packages installed on your machine.
Install Java development kit:
Issue the following command to install JDK.
Install Eclipse IDE:
Download Android SDK 4.0.3:
Android 4.0 delivers a refined, unified UI for phones and tablets and introduces innovative features for users and developers. If you are developing the apps for the Android download the latest version of SDK. Assume that downloaded file is in
/Downloads directory.
Go to the downloads directory.
Extract the downloaded file.
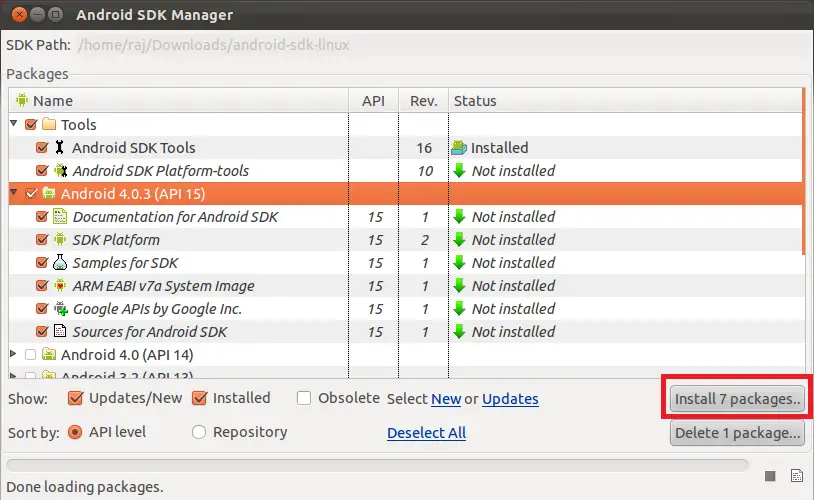
Run the Android SDK manager.
Select the version of your choice and then click on the install packages in the right side (for demonstration purpose i am installing the Android 4.0.3).
Install ADT Plugin:
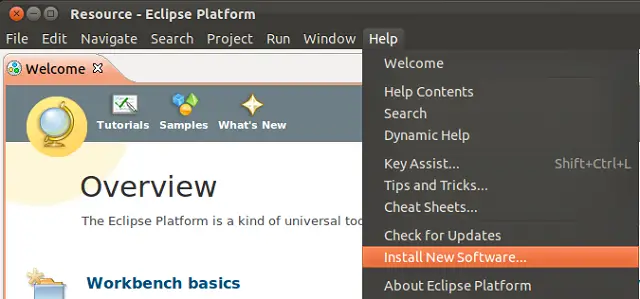
To install ADT plugin, go to Help —> Install New Software .
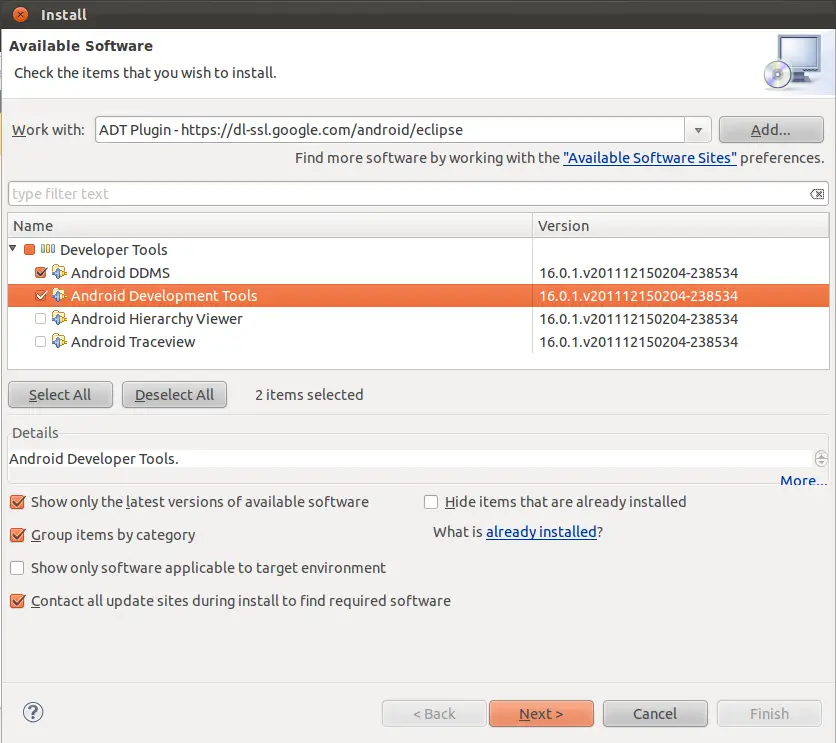
Name: ADT Plugin and Location: https://dl-ssl.google.com/android/eclipse and click on OK.

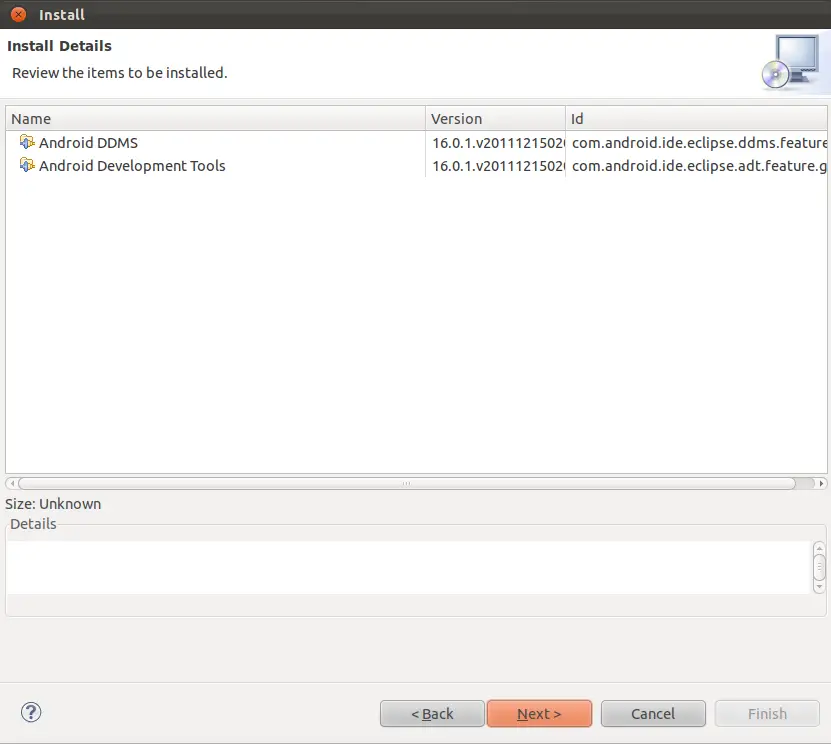
Select Android DDMS and Android Development Tools then click next.
If you got any type of error message like below,
Add Indigo repository:
Name: Indigo Location: http://download.eclipse.org/releases/indigo
Then try to install the above Android DDMS and Android Development Tools . Click on next in the review details.
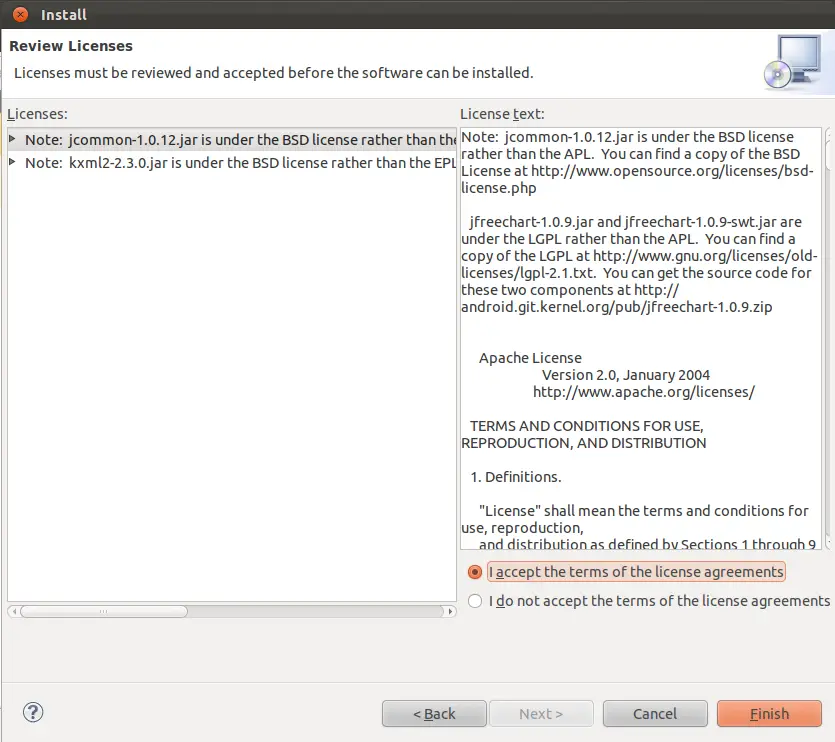
Accept the License agreement and click on Finish.
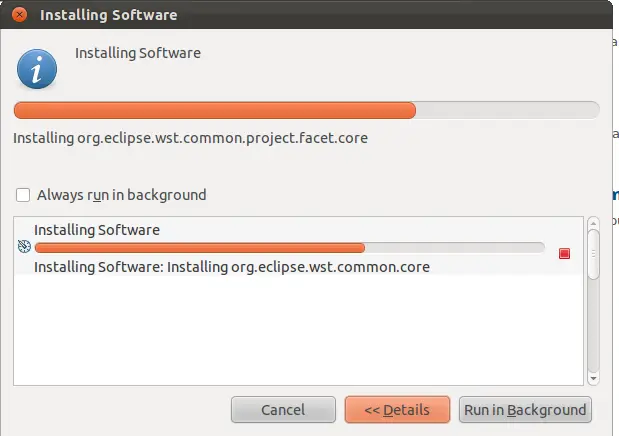
Once you have clicked, it will start to install the ADT plugin for Eclipse.
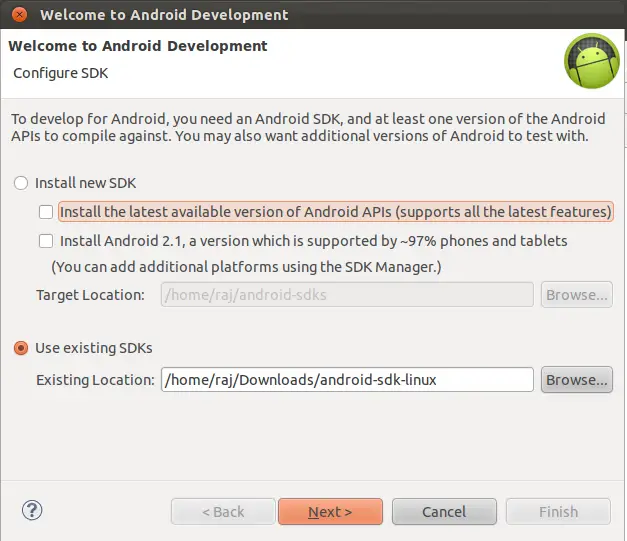
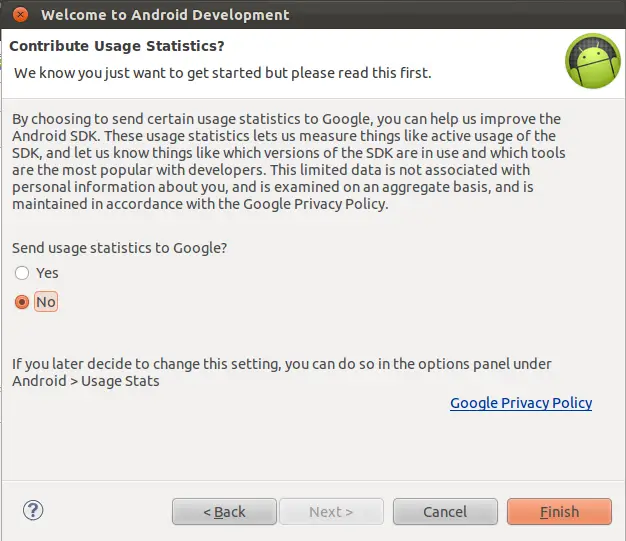
After the restart of Eclipse IDE, you should get the following Welcome to Android Development window which is asking you to configure the Android SDK for the development. Browse for the existing SDK manager that we have downloaded before.
Choose option to send statistics to Google.
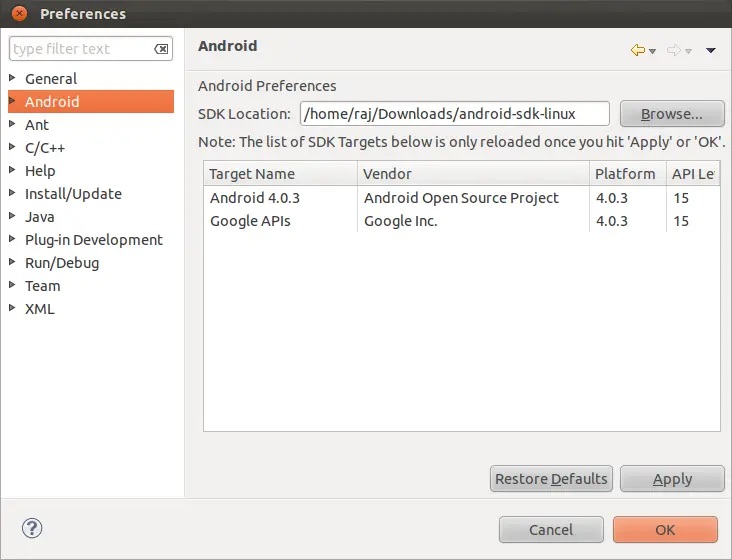
If you haven’t got the above Android development window; you can manually add SDK manager by going to Window —> Preference .
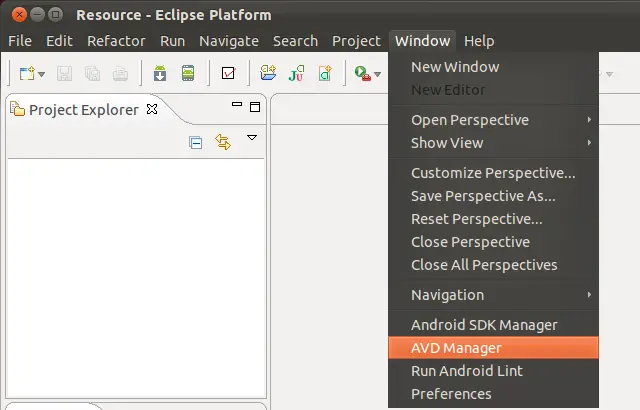
Android Virtual Device:
You can start to test the android apps by creating the virtual device by going to Window —> AVD Manager .
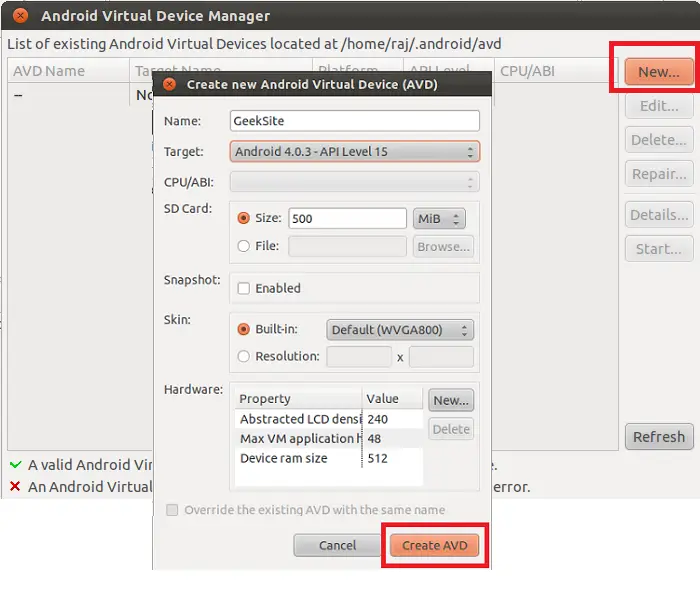
Click on New; fill up the details about the virtual device in the pop up window and then click on create AVD.
Once created; click on Start (This might take some minutes).
Screen Shot of Android 4.0.3:

Now you create the new project for Android from File —> New —> Project .
Источник
How to install official Android Emulator (SDK) in Linux
Everyone knows that Android OS (Opensource) is the market leader. It was developed especially for touchscreen mobile devices like smartphones & tablet computer.
Android was developed by Android Inc. Later Google acquired it and are doing further developments on it.
If you want to run any mobile apps such as WhatsApp in your system, you must install an android emulator. The Android Emulator simulates Android devices on your system, which allows you to test any mobile applications on a variety of devices and Android API levels without requiring those physical device at hand.
It provides almost all of the capabilities of a real Android device and you can simulate incoming phone calls and text messages, specify the location of the device and much more.
Android SDK is the official android emulator which was developed by Google to emulate the Android App in Linux System.
In this article, we will explain how to install android emulator using the android SDK in Linux.
If you are looking for alternative tools, please go through the two articles below:
Prerequisites
Android SDK depends on 32-bit Libraries during run time, so 64-bit users should install 32-bit libraries on their system for it to work properly, otherwise you will get an error when you launch the device:
1) How to install Java in Linux?
Android SDK purely depends on JAVA . So, you have to install either OpenJDK or Oracle JAVA before proceeding with Android SDK installation. Please go through the below articles to understand the Java installation process:
2) Checking installed JAVA version in Linux
Use the below command to check the java version that’s installed on your system:
3) How to download the SDK package?
There is no distribution official package for Android SDK. Hence, we need to download an Android SDK package from the android official site. Make sure to download the package in /opt directory because opt directory is the one dedicated for third party software installations.
You will see the below pop-up window when you run the android shell file:
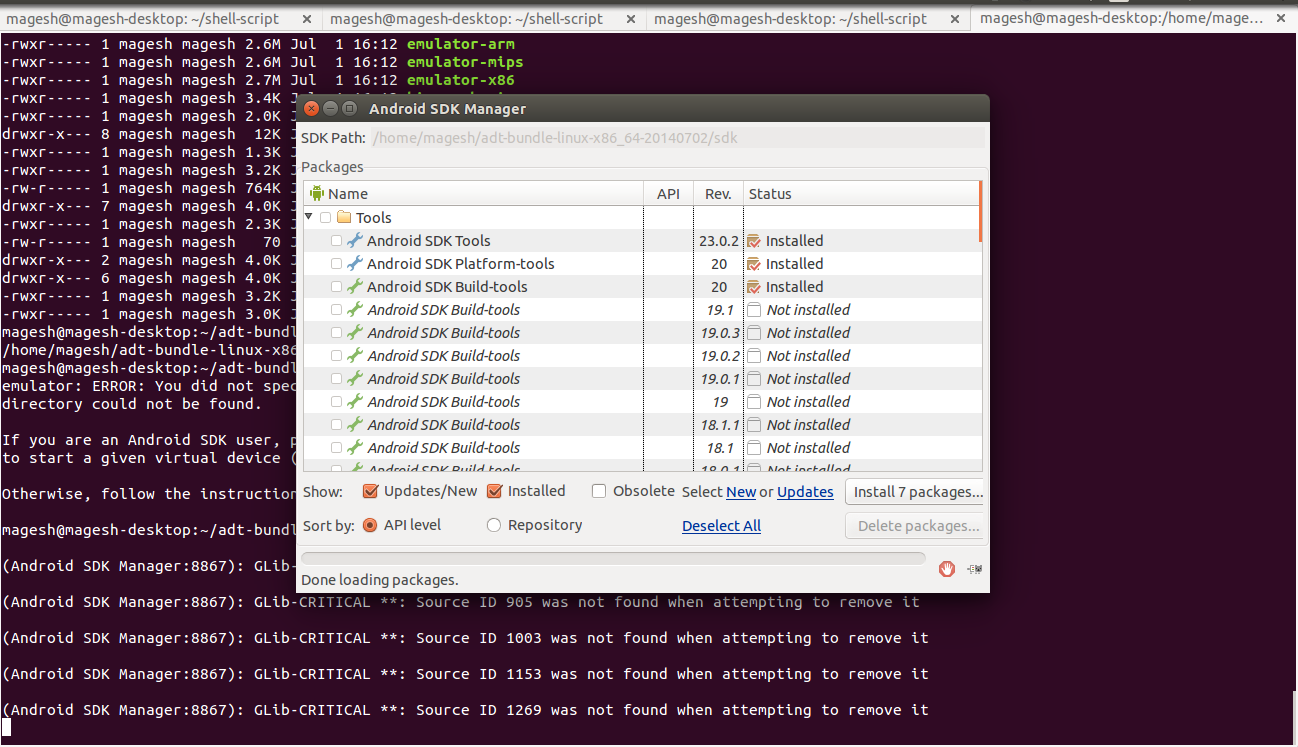
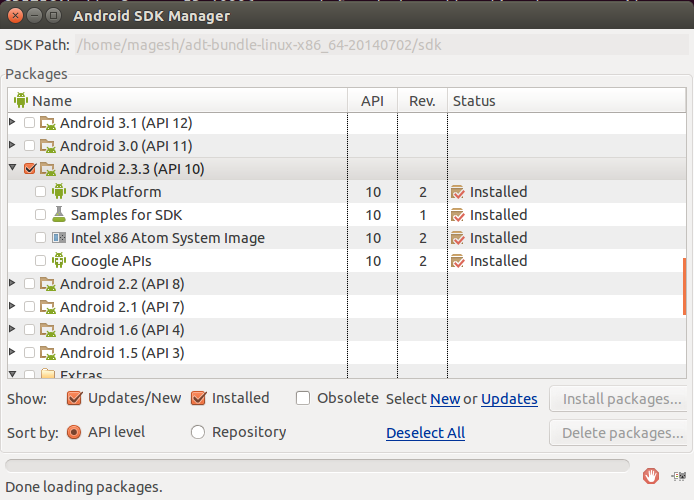
4) Choose the required Android SDK version
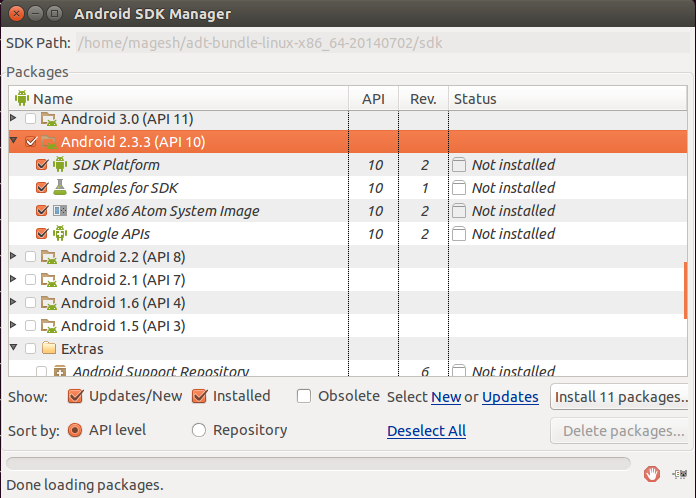
Here you can choose which version of Android SDK you are going to install. I’m going to choose Android version 2.3.3, and hit the Install Packages button to install the required packages from source.
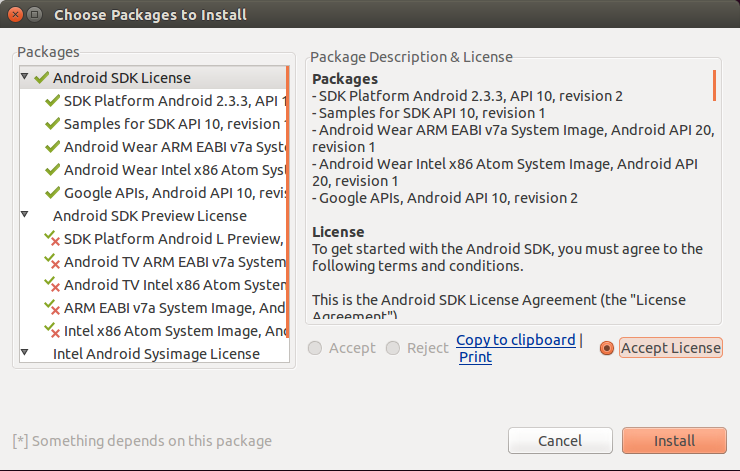
Choose ‘ Accept License ‘ option and hit the Install button to proceed further.
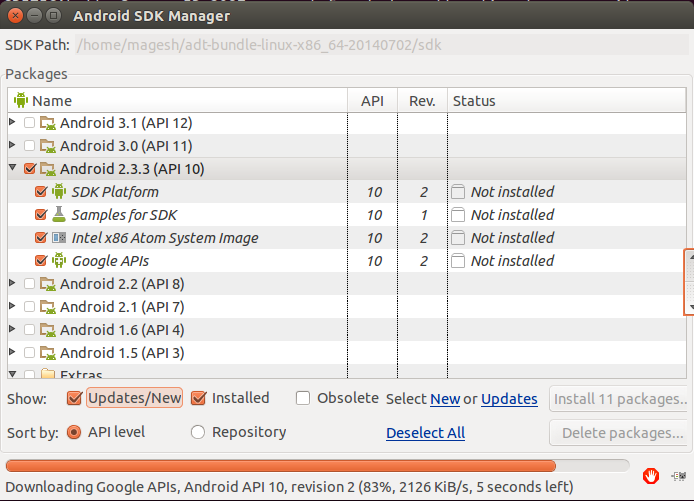
Installation is on-going. Repeat the steps until all the relevant packages are installed.
Installation got over.
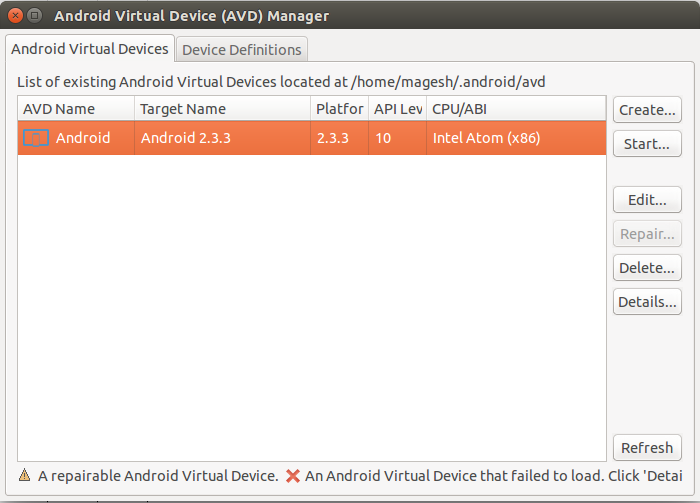
5) How to add Android Virtual Device (AVD)
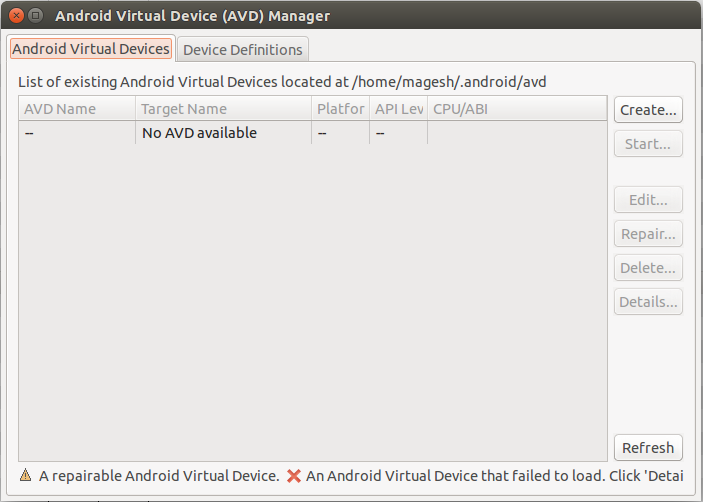
In the Android Virtual Device manager, go to the Android Virtual Devices tab as shown in the screenshot above. Click the Create button to add a new AVD on your android emulator. Click tools button to launch AVD creation window. If it is not showing, maximize the current window to see the ‘ tools button ‘.
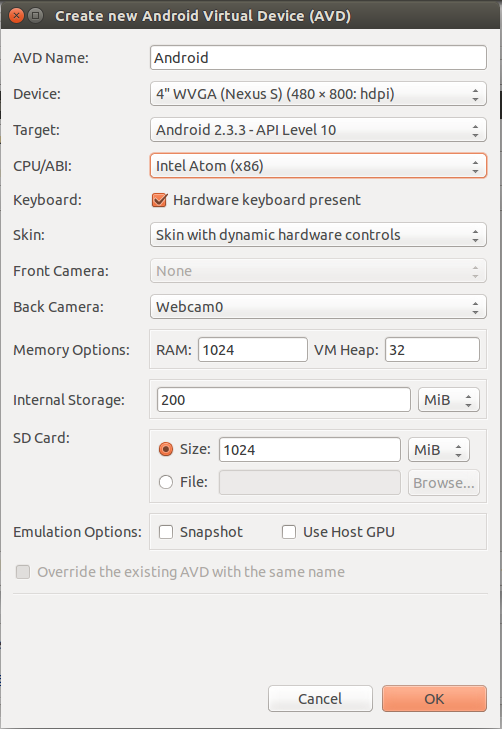
Choose the required configuration as shown in the screenshot below, and hit the OK button:
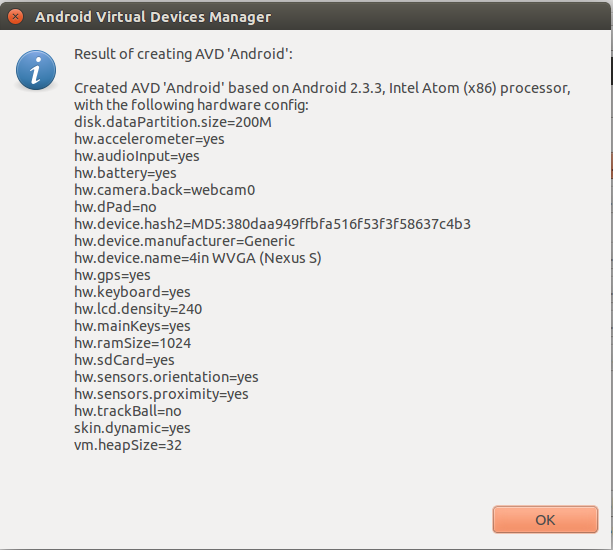
This is your configuration output based on your selections in the above steps 1-5. Hit OK button.
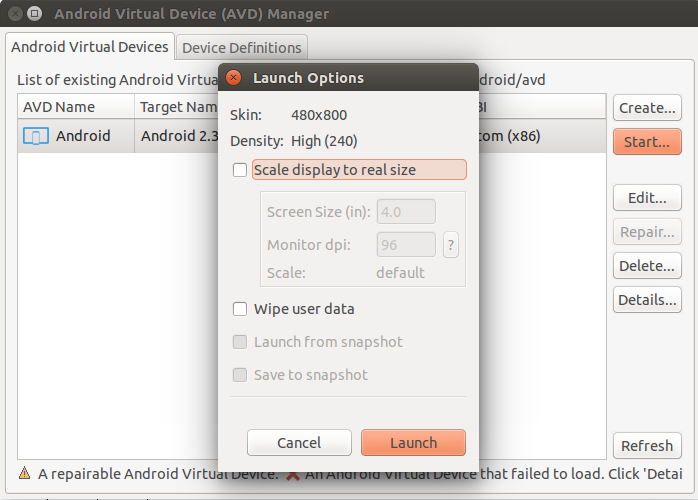
6) How to launch a new Android Virtual Device (AVD)?
Choose your Android Virtual Device (AVD) then hit the Start button. It will popup the Launch Options , Just hit the Launch button to kickstart the Android Emulator, if you don’t want to specify any launch option.
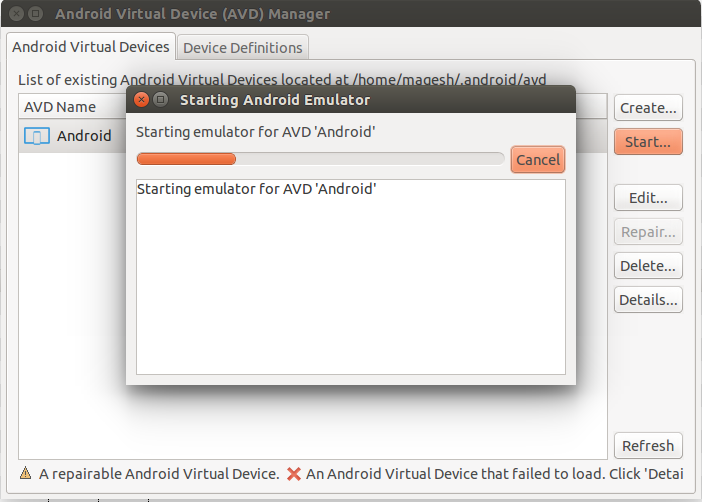
It will take a bit of time to load as shown below:
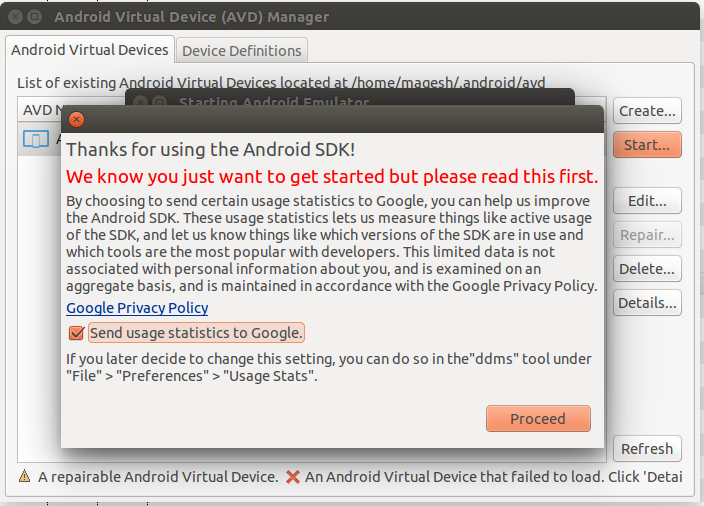
Finally, accept the Google Privacy Policy, and hit the Proceed button to launch the device successfully. Emulator will kickstart your AVD and initiate it. It will take few seconds to load.
7) How to launch a new Android Device?
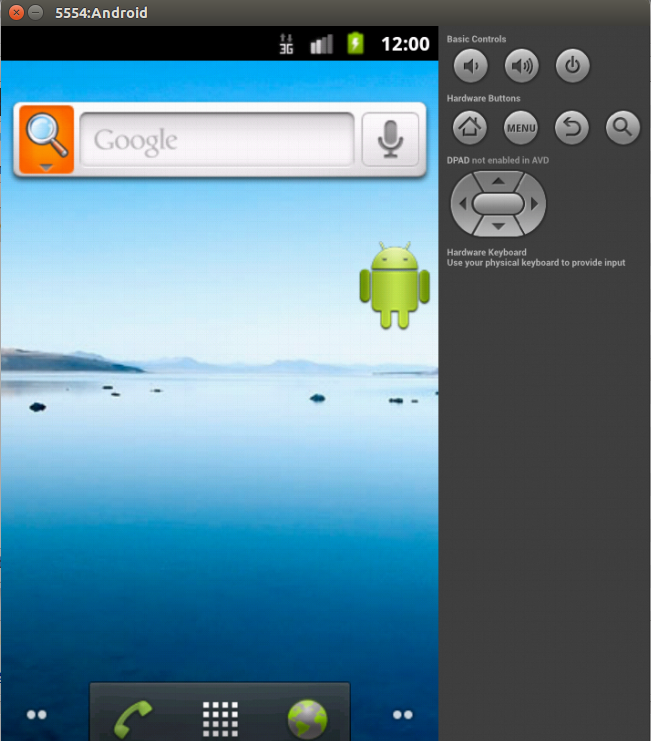
Please refer the below screenshot. You will see that the new android device is launched on my PC:
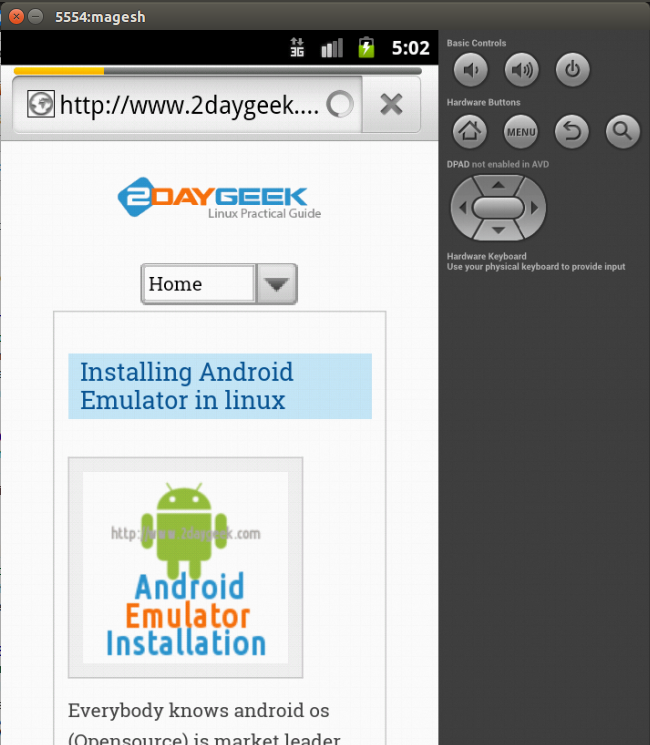
Click the Browser icon to access the Internet.
Conclusion:
In this article, we showed you how to install an Android Emulator in Linux along with it’s prerequisites like Java SDK. We installed the official android SDK.
We are preparing all our articles in-depth so that they can be easily understood by Linux administrators at all levels . If the article was useful to you, then please spend less than a minute to share your valuable comments below.
Please stay tuned with us for more articles…Happy learning!.
Источник


