- .NET console application as Windows service
- 10 Answers 10
- Как установить программу в качестве службы
- Установка программы в качестве службы
- Удаление службы
- Create and consume an app service
- Create a new app service provider project
- Add an app service extension to Package.appxmanifest
- Create the app service
- Write the code for the app service
- Deploy the service app and get the package family name
- Write a client to call the app service
- Debug the app service
- Debug the client
- General app service troubleshooting
- Troubleshoot debugging
- Remarks
.NET console application as Windows service
I have console application and would like to run it as Windows service. VS2010 has project template which allow to attach console project and build Windows service. I would like to not add separated service project and if possible integrate service code into console application to keep console application as one project which could run as console application or as windows service if run for example from command line using switches.
Maybe someone could suggest class library or code snippet which could quickly and easily transform c# console application to service?
10 Answers 10
I usually use the following techinque to run the same app as a console application or as a service:
Environment.UserInteractive is normally true for console app and false for a service. Techically, it is possible to run a service in user-interactive mode, so you could check a command-line switch instead.
I’ve had great success with TopShelf.
TopShelf is a Nuget package designed to make it easy to create .NET Windows apps that can run as console apps or as Windows Services. You can quickly hook up events such as your service Start and Stop events, configure using code e.g. to set the account it runs as, configure dependencies on other services, and configure how it recovers from errors.
From the Package Manager Console (Nuget):
Refer to the code samples to get started.
TopShelf also takes care of service installation, which can save a lot of time and removes boilerplate code from your solution. To install your .exe as a service you just execute the following from the command prompt:
You don’t need to hook up a ServiceInstaller and all that — TopShelf does it all for you.

So here’s the complete walkthrough:
- Create new Console Application project (e.g. MyService)
- Add two library references: System.ServiceProcess and System.Configuration.Install
- Add the three files printed below
- Build the project and run «InstallUtil.exe c:\path\to\MyService.exe»
- Now you should see MyService on the service list (run services.msc)
*InstallUtil.exe can be usually found here: C:\windows\Microsoft.NET\Framework\v4.0.30319\InstallUtil.exe
Program.cs
MyService.cs
MyServiceInstaller.cs

Here is a newer way of how to turn a Console Application to a Windows Service as a Worker Service based on the latest .Net Core 3.1.
If you create a Worker Service from Visual Studio 2019 it will give you almost everything you need for creating a Windows Service out of the box, which is also what you need to change to the console application in order to convert it to a Windows Service.
Here are the changes you need to do:
Install the following NuGet packages
Change Program.cs to have an implementation like below:
and add Worker.cs where you will put the code which will be run by the service operations:
When everything is ready, and the application has built successfully, you can use sc.exe to install your console application exe as a Windows Service with the following command:
I hear your point at wanting one assembly to stop repeated code but, It would be simplest and reduce code repetition and make it easier to reuse your code in other ways in future if. you to break it into 3 assemblies.
- One library assembly that does all the work. Then have two very very slim/simple projects:
- one which is the commandline
- one which is the windows service.
Firstly I embed the console application solution into the windows service solution and reference it.
Then I make the console application Program class public
I then create two functions within the console application
Then within the windows service itself I instantiate the Program and call the Start and Stop functions added within the OnStart and OnStop. See below
This approach can also be used for a windows application / windows service hybrid
And it will appear int the service list. I do not know, whether that works correctly though. A service usually has to listen to several events.
There are several service wrapper though, that can run any application as a real service. For Example Microsofts SrvAny from the Win2003 Resource Kit
Maybe you should define what you need, as far as I know, you can’t run your app as Console or Service with command line, at the same time. Remember that the service is installed and you have to start it in Services Manager, you can create a new application wich starts the service or starts a new process running your console app. But as you wrote
«keep console application as one project»
Once, I was in your position, turning a console application into a service. First you need the template, in case you are working with VS Express Edition. Here is a link where you can have your first steps: C# Windows Service, this was very helpful for me. Then using that template, add your code to the desired events of the service.
To improve you service, there’s another thing you can do, but this is not quick and/or easily, is using appdomains, and creating dlls to load/unload. In one you can start a new process with the console app, and in another dll you can just put the functionality the service has to do.
You need to seperate the functionality into a class or classes and launch that via one of two stubs. The console stub or service stub.
As its plain to see, when running windows, the myriad services that make up the infrastructure do not (and can’t directly) present console windows to the user. The service needs to communicate with the user in a non graphical way: via the SCM; in the event log, to some log file etc. The service will also need to communicate with windows via the SCM, otherwise it will get shutdown.
It would obviously be acceptable to have some console app that can communicate with the service but the service needs to run independently without a requirement for GUI interaction.
The Console stub can very useful for debugging service behaviour but should not be used in a «productionized» environment which, after all, is the purpose of creating a service.
I haven’t read it fully but this article seems to pint in the right direction.
Как установить программу в качестве службы
Наверняка, многие сталкивались с ситуацией, когда есть необходимость запускать программу до входа пользователя в систему, но в установщике программы нет опции «Установить в качестве службы».
Установка программы в качестве службы
Первые 4 пункта понадобятся лишь в windows 8.1
1 Вызовите боковую панель Windows 8.1. Для этого можно использовать комбинацию клавиш WIN+C.
2 Выберите Поиск:

3 В поле поиска введите командная строка. В списке появится позиция Командная строка с системной иконкой.
Нажмите по ней правой кнопкой мыши:

4 Выберите Запуск от имени администратора:

5 Нажмите Да:

6 В командной строке введите путь к программе, которую вы хотите установить в качестве службы, с ключом /installservice и нажать ENTER. Путь необходимо взять в кавычки.
После нажатия на ENTER ответьте «Да» на запрос службы контроля учётных записей:

7 Если программа запросит учётные данные для запуска, как в нашем примере, введите реквизиты учётной записи администратора и нажмите ОК:

Далее, программа, которую вы установили в качестве службы, сообщит вам об успешной установке службы.
У каждой программы это окно будет разным

Зайдите в службы (Выполнить — services.mcs — ENTER) и проверьте, что в списке присутствует только что установленная служба:

Удаление службы
Процедура удаления службы схожа с установкой. Отличие лишь в том, что после пути к программе нужно указать ключ /uninstallservice.
Create and consume an app service
App services are UWP apps that provide services to other UWP apps. They are analogous to web services, on a device. An app service runs as a background task in the host app and can provide its service to other apps. For example, an app service might provide a bar code scanner service that other apps could use. Or perhaps an Enterprise suite of apps has a common spell checking app service that is available to the other apps in the suite. App services let you create UI-less services that apps can call on the same device, and starting with Windows 10, version 1607, on remote devices.
Starting in Windows 10, version 1607, you can create app services that run in the same process as the host app. This article focuses on creating and consuming an app service that runs in a separate background process. See Convert an app service to run in the same process as its host app for more details about running an app service in the same process as the provider.
Create a new app service provider project
In this how-to, we’ll create everything in one solution for simplicity.
In Visual Studio 2015 or later, create a new UWP app project and name it AppServiceProvider.
- Select File > New > Project.
- In the Create a new project dialog box, select Blank App (Universal Windows) C#. This will be the app that makes the app service available to other UWP apps.
- Click Next, and then name the project AppServiceProvider, choose a location for it, and then click Create.
When asked to select a Target and Minimum version for the project, select at least 10.0.14393. If you want to use the new SupportsMultipleInstances attribute, you must be using Visual Studio 2017 or Visual Studio 2019, and target 10.0.15063 (Windows 10 Creators Update) or higher.
Add an app service extension to Package.appxmanifest
In the AppServiceProvider project, open the Package.appxmanifest file in a text editor:
- Right-click it in the Solution Explorer.
- Select Open With.
- Select XML (Text) Editor.
Note that the xmlns:uap4 namespace prefix and the uap4:SupportsMultipleInstances attribute are only valid if you are targeting Windows SDK version 10.0.15063 or higher. You can safely remove them if you are targeting older SDK versions.
The Category attribute identifies this application as an app service provider.
The EntryPoint attribute identifies the namespace qualified class that implements the service, which we’ll implement next.
The SupportsMultipleInstances attribute indicates that each time the app service is called that it should run in a new process. This is not required but is available to you if you need that functionality and are targeting the 10.0.15063 SDK (Windows 10 Creators Update) or higher. It also should be prefaced by the uap4 namespace.
Create the app service
An app service can be implemented as a background task. This enables a foreground application to invoke an app service in another application. To create an app service as a background task, add a new Windows Runtime component project to the solution (File > Add > New Project) named MyAppService. In the Add New Project dialog box, choose Installed > Visual C# > Windows Runtime Component (Universal Windows).
In the AppServiceProvider project, add a project-to-project reference to the new MyAppService project (in the Solution Explorer, right-click on the AppServiceProvider project > Add > Reference > Projects > Solution, select MyAppService > OK). This step is critical because if you do not add the reference, the app service won’t connect at runtime.
In the MyAppService project, add the following using statements to the top of Class1.cs:
Rename Class1.cs to Inventory.cs, and replace the stub code for Class1 with a new background task class named Inventory:
This class is where the app service will do its work.
Run is called when the background task is created. Because background tasks are terminated after Run completes, the code takes out a deferral so that the background task will stay up to serve requests. An app service that is implemented as a background task will stay alive for about 30 seconds after it receives a call unless it is called again within that time window or a deferral is taken out. If the app service is implemented in the same process as the caller, the lifetime of the app service is tied to the lifetime of the caller.
The lifetime of the app service depends on the caller:
- If the caller is in the foreground, the app service lifetime is the same as the caller.
- If the caller is in the background, the app service gets 30 seconds to run. Taking out a deferral provides an additional one time 5 seconds.
OnTaskCanceled is called when the task is canceled. The task is canceled when the client app disposes the AppServiceConnection, the client app is suspended, the OS is shut down or sleeps, or the OS runs out of resources to run the task.
Write the code for the app service
OnRequestReceived is where the code for the app service goes. Replace the stub OnRequestReceived in MyAppService‘s Inventory.cs with the code from this example. This code gets an index for an inventory item and passes it, along with a command string, to the service to retrieve the name and the price of the specified inventory item. For your own projects, add error handling code.
Note that OnRequestReceived is async because we make an awaitable method call to SendResponseAsync in this example.
A deferral is taken so that the service can use async methods in the OnRequestReceived handler. It ensures that the call to OnRequestReceived does not complete until it is done processing the message. SendResponseAsync sends the result to the caller. SendResponseAsync does not signal the completion of the call. It is the completion of the deferral that signals to SendMessageAsync that OnRequestReceived has completed. The call to SendResponseAsync is wrapped in a try/finally block because you must complete the deferral even if SendResponseAsync throws an exception.
App services use ValueSet objects to exchange information. The size of the data you may pass is only limited by system resources. There are no predefined keys for you to use in your ValueSet. You must determine which key values you will use to define the protocol for your app service. The caller must be written with that protocol in mind. In this example, we have chosen a key named Command that has a value that indicates whether we want the app service to provide the name of the inventory item or its price. The index of the inventory name is stored under the ID key. The return value is stored under the Result key.
An AppServiceClosedStatus enum is returned to the caller to indicate whether the call to the app service succeeded or failed. An example of how the call to the app service could fail is if the OS aborts the service endpoint because its resources have been exceeded. You can return additional error information via the ValueSet. In this example, we use a key named Status to return more detailed error information to the caller.
The call to SendResponseAsync returns the ValueSet to the caller.
Deploy the service app and get the package family name
The app service provider must be deployed before you can call it from a client. You can deploy it by selecting Build > Deploy Solution in Visual Studio.
You will also need the package family name of the app service provider in order to call it. You can get it by opening the AppServiceProvider project’s Package.appxmanifest file in the designer view (double-click it in the Solution Explorer). Select the Packaging tab, copy the value next to Package family name, and paste it somewhere like Notepad for now.
Write a client to call the app service
Add a new blank Windows Universal app project to the solution with File > Add > New Project. In the Add New Project dialog box, choose Installed > Visual C# > Blank App (Universal Windows) and name it ClientApp.
In the ClientApp project, add the following using statement to the top of MainPage.xaml.cs:
Add a text box called textBox and a button to MainPage.xaml.
Add a button click handler for the button called button_Click, and add the keyword async to the button handler’s signature.
Replace the stub of your button click handler with the following code. Be sure to include the inventoryService field declaration.
Replace the package family name in the line this.inventoryService.PackageFamilyName = «Replace with the package family name»; with the package family name of the AppServiceProvider project that you obtained above in Deploy the service app and get the package family name.
Make sure to paste in the string literal, rather than putting it in a variable. It will not work if you use a variable.
The code first establishes a connection with the app service. The connection will remain open until you dispose this.inventoryService . The app service name must match the AppService element’s Name attribute that you added to the AppServiceProvider project’s Package.appxmanifest file. In this example, it is .
A ValueSet named message is created to specify the command that we want to send to the app service. The example app service expects a command to indicate which of two actions to take. We get the index from the text box in the client app, and then call the service with the Item command to get the description of the item. Then, we make the call with the Price command to get the item’s price. The button text is set to the result.
Because AppServiceResponseStatus only indicates whether the operating system was able to connect the call to the app service, we check the Status key in the ValueSet we receive from the app service to ensure that it was able to fulfill the request.
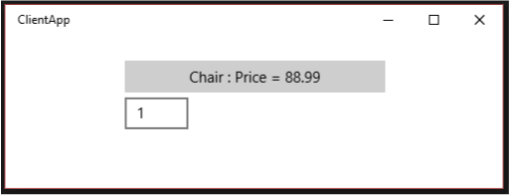
Set the ClientApp project to be the startup project (right-click it in the Solution Explorer > Set as StartUp Project) and run the solution. Enter the number 1 into the text box and click the button. You should get «Chair : Price = 88.99» back from the service.
If the app service call fails, check the following in the ClientApp project:
- Verify that the package family name assigned to the inventory service connection matches the package family name of the AppServiceProvider app. See the line in button_Click with this.inventoryService.PackageFamilyName = «. «; .
- In button_Click, verify that the app service name that is assigned to the inventory service connection matches the app service name in the AppServiceProvider‘s Package.appxmanifest file. See: this.inventoryService.AppServiceName = «com.microsoft.inventory»; .
- Ensure that the AppServiceProvider app has been deployed. (In the Solution Explorer, right-click the solution and choose Deploy Solution).
Debug the app service
- Ensure that the solution is deployed before debugging because the app service provider app must be deployed before the service can be called. (In Visual Studio, Build > Deploy Solution).
- In the Solution Explorer, right-click the AppServiceProvider project and choose Properties. From the Debug tab, change the Start action to Do not launch, but debug my code when it starts. (Note, if you were using C++ to implement your app service provider, from the Debugging tab you would change Launch Application to No).
- In the MyAppService project, in the Inventory.cs file, set a breakpoint in OnRequestReceived.
- Set the AppServiceProvider project to be the startup project and press F5.
- Start ClientApp from the Start menu (not from Visual Studio).
- Enter the number 1 into the text box and press the button. The debugger will stop in the app service call on the breakpoint in your app service.
Debug the client
- Follow the instructions in the preceding step to debug the client that calls the app service.
- Launch ClientApp from the Start menu.
- Attach the debugger to the ClientApp.exe process (not the ApplicationFrameHost.exe process). (In Visual Studio, choose Debug > Attach to Process. .)
- In the ClientApp project, set a breakpoint in button_Click.
- The breakpoints in both the client and the app service will now be hit when you enter the number 1 into the text box of ClientApp and click the button.
General app service troubleshooting
If you encounter an AppUnavailable status after trying to connect to an app service, check the following:
- Ensure that the app service provider project and app service project are deployed. Both need to be deployed before running the client because otherwise the client won’t have anything to connect to. You can deploy from Visual Studio by using Build >Deploy Solution.
- In the Solution Explorer, ensure that your app service provider project has a project-to-project reference to the project that implements the app service.
- Verify that the entry, and its child elements, have been added to the Package.appxmanifest file belonging to the app service provider project as specified above in Add an app service extension to Package.appxmanifest.
- Ensure that the AppServiceConnection.AppServiceName string in your client that calls the app service provider matches the specified in the app service provider project’s Package.appxmanifest file.
- Ensure that the AppServiceConnection.PackageFamilyName matches the package family name of the app service provider component as specified above in Add an app service extension to Package.appxmanifest
- For out-of-proc app services such as the one in this example, validate that the EntryPoint specified in the element of your app service provider project’s Package.appxmanifest file matches the namespace and class name of the public class that implements IBackgroundTask in your app service project.
Troubleshoot debugging
If the debugger does not stop at breakpoints in your app service provider or app service projects, check the following:
- Ensure that the app service provider project and app service project are deployed. Both need to be deployed before running the client. You can deploy them from Visual Studio by using Build >Deploy Solution.
- Ensure that the project you want to debug is set as the startup project and that the debugging properties for that project are set to not run the project when F5 is pressed. Right-click the project, then click Properties, and then Debug (or Debugging in C++). In C#, change the Start action to Do not launch, but debug my code when it starts. In C++, set Launch Application to No.
Remarks
This example provides an introduction to creating an app service that runs as a background task and calling it from another app. The key things to note are:


