- xtrymind / archinstall.md
- This comment has been minimized.
- gihyeonsung commented Feb 25, 2020
- This comment has been minimized.
- GreasyPizzaToppings commented Feb 29, 2020
- This comment has been minimized.
- ShahinSha-dot commented Nov 19, 2020
- Pamblam / Initial Setup.md
- 🐧 Полное руководство по установке Arch Linux
- Установить Arch Linux второй системой с Windows 10
- Шаг 1. Подготовка к установке Arch Linux
- Шаг 2. Загрузка и проверка образа
- Шаг 3. Запись Arch на USB
- Шаг 4. Загрузка с USB-Flash
- Шаг 5. Подключение к интернету
- Шаг 6. Выбор часового пояса
- Шаг 7. Разбиение диска
xtrymind / archinstall.md
Arch Linux installation (Windows 10 dual boot)
- Disable Windows Fast-Startup
- Disable Secure Boot
Windows 10 Efi partitioning
| Partition | Location | Size | File system |
|---|---|---|---|
| Recovery | sda1 | 500 MB | ntfs |
| ESP | sda2 | 100 MB | vfat |
| Reserved | sda3 | 16 MB | ? |
| Windows 10 | sda4 | 80 GB | ntfs |
Connect to the internet (Wi-Fi)
Format and mount disks
Chroot and configure base system
/etc/hosts should look like:
Initial ramdisk environment
Then add following content to /boot/loader/entries/arch.conf
and following content to /boot/loader/loader.conf
Edit /etc/default/grub , set DEFAULT_TIMEOUT=30 .
Now, let’s add Windows to the GRUB menu. Edit /boot/grub/grub.cfg and add the following menuentry after the Arch Linux menuentries:
$hints_string by the output of $ grub-probe —target=fs_uuid /boot/efi/EFI/Microsoft/Boot/bootmgfw.efi
$fs_uuid by the output of $ grub-probe —target=hints_string /boot/efi/EFI/Microsoft/Boot/bootmgfw.efi
Network configuration (Wi-Fi)
Unmount and reboot
This comment has been minimized.
Copy link Quote reply
gihyeonsung commented Feb 25, 2020
But, in my opinion, options root=/dev/sba6 rw should be changed to options root=/dev/sdb2 rw .
This comment has been minimized.
Copy link Quote reply
GreasyPizzaToppings commented Feb 29, 2020
Very helpful but there are some errors.
- «tittle Arch» has ‘title’ misspelled
- Where you say to substitute ‘$hints_string’ and ‘$fs_uuid’ for outputs of grub-probe, you put fs_uuid for $hints_string and fs_uuid for $hints_string. The grub-probe command should be swapped for these variables so fs_uuid goes with $fs_uuid and hints_string goes with $hints_string.
This comment has been minimized.
Copy link Quote reply
ShahinSha-dot commented Nov 19, 2020
You could have used os-prober to detect windows automatically
You can’t perform that action at this time.
You signed in with another tab or window. Reload to refresh your session. You signed out in another tab or window. Reload to refresh your session.
Источник
Pamblam / Initial Setup.md
Newb’s Guide to installing Arch Next to Pre-installed Windows 10
The steps I took to dual boot Arch Linux alongside the preinstalled Windows 10 that came with my new Lenovo Ideapad. I used Ubuntu exclusively for the last 6 years so I’m Window’s illiterate. I don’t know a whole lot about the inner workings of Linux either.
Prepare the preinstalled Windows to share the system.
Verify the boot mode.
- Boot into Windows
- Press Win key and ‘R’ to start the Run dialog
- In the Run dialog type «msinfo32» and press Enter
- In the System Information windows, select System Summary on the left and check the value of BIOS mode item on the right.
- Make sure the value is UEFI, which means Windows boots in UEFI/GPT mode
Disable secure boot
- Open Settings (The gear icon in the start menu)
- Click «Updates & Security»
- In the «Recovery» menu, click «Restart now» under the «Advanced startup» header
- After restart, choose the «Troubleshoot» option.
- Choose «Advanced Options»
- Choose «UEFI Firmware Settings»
- Press the restart button to load the UEFI firmware
- In the Security settings find and disable Secure Boot
- In the Boot settings also find and disable Fast Boot
Disable Fast Startup
- Open Control Panel (Press Windows key, Type «Control Panel» and press enter)
- In the «View by» menu, choose «Small Icons» and click on «Power Options».
- Open «Choose what power buttons do» on the left side menu.
- Click «Change settings that are currently unavailable»
- Uncheck «Turn on Fast Startup» and save changes.
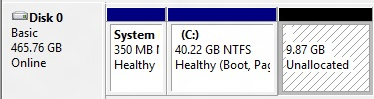
Shrink the Windows partition
- Press Windows Key + R and type diskmgmt.msc — hit enter
- Right click the C drive and choose «Shrink Volume»
- Enter the amount of space to shrink the partition (I shrunk mine by 200000mb — 200 gigs)
- Click «Shrink»
Make a bootable USB
- Choose a mirror from www.archlinux.org/download — I used the American pair.com mirror because it’s the first reputable domain I recognised.
- Download the .iso file.
- Download Rufus from https://rufus.akeo.ie/
- Plug in a new USB stick and open Rufus
- Select the USB drive and the downloaded Linux iso.
- Choose the GPT partition scheme, FAT32 file system
- Press start
We’re ready to boot and install Arch.
- Plug in the USB
- Hold down the shift key while clicking Restart
- Choose «Troubleshoot» then «Advanced Options» then «UEFI Firmware Settings» then restart.
- In the Boot menu, find your bootable USB and move it up above the Windows boot manager so it will boot the USB first.
- Save and exit
Load keyboard layout & locale
- Type loadkeys us at the command line and press enter
- Type locale-gen at the command line and press enter
Hookup them internets
- At the command line type rfkill unblock wifi and press enter
- Type iw dev and press enter. It will tell you the name of the Wifi interface.
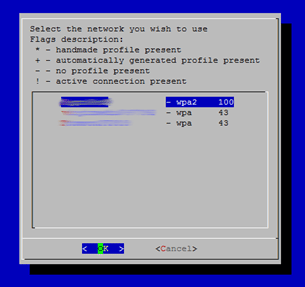
- Type wifi-menu (using your actual interface name) and press enter.
- A UI will show allowing you to choose a network and log into it.
- After logging in, ping google.com to verify the internets work. After a few packets are sent, CTRL+C to stop pinging — if it says no packets were lost then we’re good.
- First type free -m , hit enter. Take note of the amount of total memory available.
- Type gdisk /dev/sda and hit enter to start the GPT partitioning program
- Create SWAP partition
- At the prompt, type n , press enter to create a new partition
- It will prompt for a partition number. Just hit enter to use the default.
- It asks where to start the first sector. Press enter to accept the default which is automatically the start of unallocated space.
- It asks for the last sector. Type +12GB (I have 12 gigs of memory — if you have more or less you should adjust accordingly) and press enter.
- If it says anything other than «Linux Filesystem» type 8200 at the next prompt. Hit enter.
- Create Root partition
- At the prompt, type n , press enter to create a new partition
- It will prompt for a partition number. Just hit enter to use the default.
- It asks where to start the first sector. Press enter to accept the default which is automatically the start of unallocated space.
- It asks for the last sector. Press Enter to accept the default and use all of remaining unallocated space.
- If it says anything other than «Linux Filesystem» type 8300 at the next prompt. Hit enter.
- At the prompt, type W , press enter to write changes to the drive. When prompted, type Y and press enter to confirm.
Create SWAP space
- Type gdisk -l /dev/sda , press enter and take note of the partition number of the Swap part.
- Type mkswap -L «Linux Swap» /dev/sda7 (My swap partition was number 7 — if yours is 5 use /dev/sda5 instead). Hit enter.
- Type swapon /dev/sda7 (again, using the apprpriate swap partition number). Hit enter.
- Verify status of swap space by typing free -m and press enter. If the last line starts with «Swap:» we’re good.
Format and mount the root partition
- Type gdisk -l /dev/sda , press enter and take note of the partition number of the Root part.
- Type mkfs.ext4 -L /dev/sda8 (My root partition was number 7 — if yours is 6 use /dev/sda6 instead). Hit enter.
- Type mount /dev/sda8 /mnt (again, using the apprpriate swap partition number). Hit enter.
Start the installation
- Type pacstrap /mnt base , hit enter.
Mount the EFI partition
- Type gdisk -l /dev/sda , press enter and take note of the partition number of the EFI part.
- Type mount /dev/sda1 /mnt/boot/efi (My efi partition was number 1 — if yours is 2 use /dev/sda2 instead). Hit enter.
Configure the system
- Type genfstab -U /mnt >> /mnt/etc/fstab . Hit enter.
- Type cat /mnt/etc/fstab , press enter, to verify the file was created correctly.
- Change root into the new installation: type arch-chroot /mnt and press enter.
Set the timezone
- Type cd /usr/share/zoneinfo && ls press enter. Take note of the appropriate region and use it as follows.
- Type cd && ls (replacing with the most appropriate region.) press enter. Take note of the most appropraite city.
- Type ln -sf /usr/share/zoneinfo/ / /etc/localtime (replacing and with the most appropriate region and city.)
- Type hwclock —systohc . Hit enter.
- Create the file /etc/hostname and write your hostnme in it with nano or vim
- Create the file etc/hosts and populate it like this (replacing myhostname with whatever you put in your hostname file.)
Create the root user’s password
- Type passwd and press enter
- Enter a new root password and press enter. verify it and press enter.
Create new initramfs image
- Type mkinitcpio -p linux . Hit enter.
Install Grub bootloader
- Type pacman -Syu grub efibootmgr and hit enter.
- Type pacman -Syu efibootmgr and hit enter.
- Type grub-mkconfig -o /boot/grub/grub.cfg . Hit enter.
- Type grub-install /dev/sda . Hit enter.
- Verify the install. Type ls -l /boot/efi/EFI/arch/ . Hit Enter. If you see a file called grubx64.efi then all is well.
Create new user
- Type useradd -s /bin/bash -m username (replace «username» with the new user’s name). Hit enter.
- Type passwd username (replace «username» with the new user’s name). Hit enter.
- Enter and verify the password.
Install a desktop environment and some important packages
Источник
🐧 Полное руководство по установке Arch Linux

Среди множества дистрибутивов GNU / Linux есть тот, который сочетает в себе практически все преимущества и недостатки этих систем (конечно, есть и другие преимущества).
Речь идет об Arch Linux.
Разработчики все еще следуют своему первоначальному принципу, согласно которому система должна быть максимально простой и функциональной.
Новые пользователи GNU / Linux (и даже те, кто перешел с Ubuntu, Mint и т. д.) могут посчитать Arch довольно недружелюбным и даже грубым.
Дистрибутив просто общается с пользователем чуть более «умным» языком, предлагая ему всю власть над собой.
Это довольно интересный шаг в изучении работы ОС «изнутри».
Статья описывает, как установить Arch Linux с USB Flash.
Установить Arch Linux второй системой с Windows 10
Шаг 1. Подготовка к установке Arch Linux
Если вы планируете установить систему на отдельный диск, который является пустым, то никаких подготовительных операций не требуется.
В другом случае вы должны выделить место на диске специально для новой ОС.
Для этого в Windows 10:
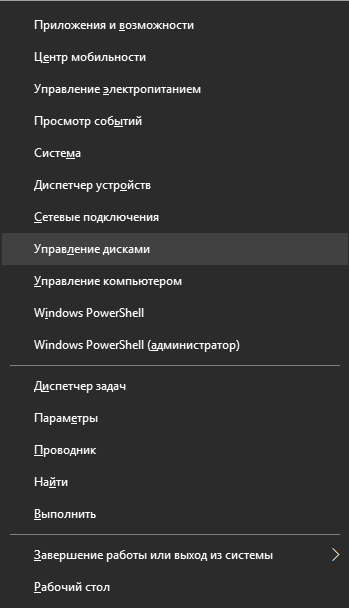
Щелкните правой кнопкой мыши по нужному диску и выберите «Сжать том»
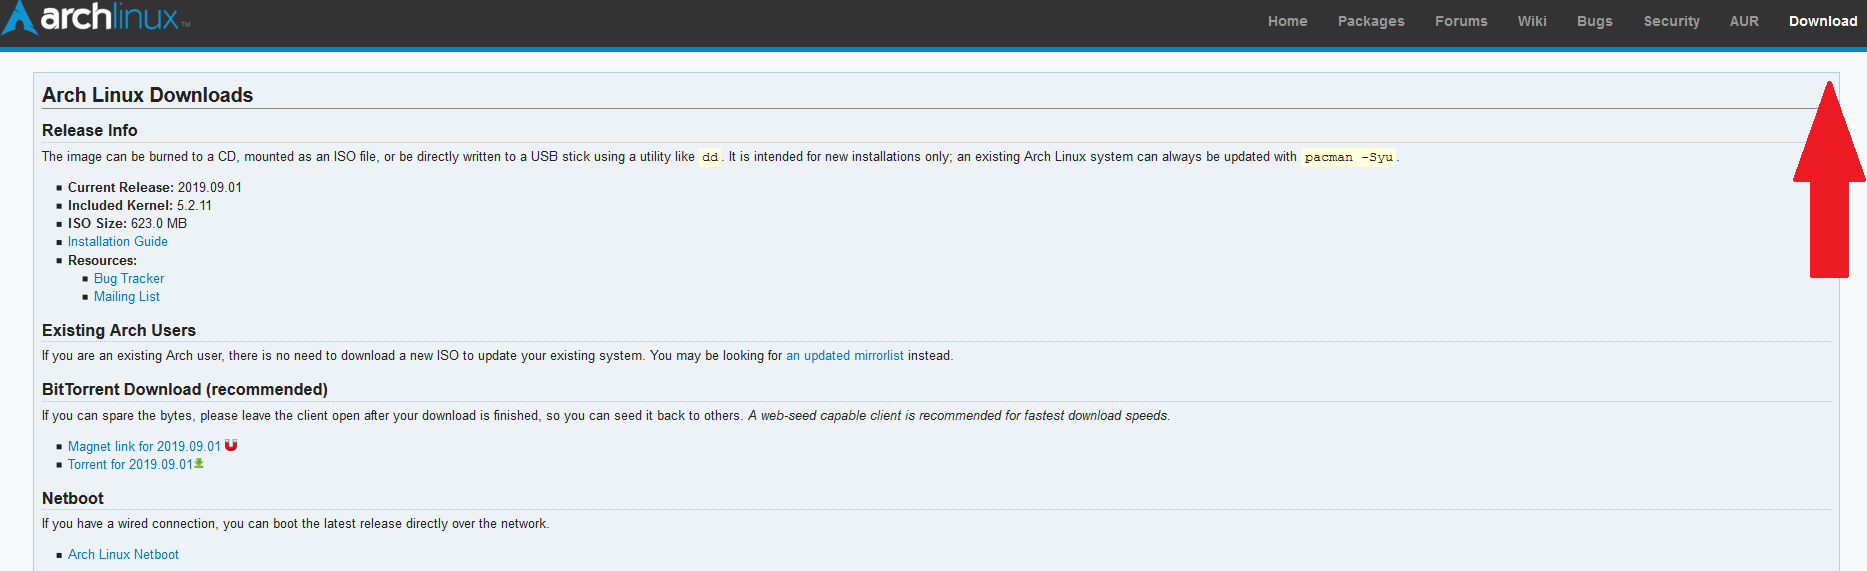
Шаг 2. Загрузка и проверка образа
Arch Linux распространяется бесплатно на официальном сайте.
Они предлагают несколько вариантов загрузки, в том числе через http.
- Нажмите Win + X и выберите «Windows PowerShell».
- Напишите эту строку в терминале:
3. Сравните значение поля Hash с суммой MD5, указанной на сайте (регистр букв не имеет значения).

Шаг 3. Запись Arch на USB
Файл с системой занимает
600 МБ, поэтому подходит практически любая флешка.
Существует несколько программ для записи образа, но одна из них особенно проста и удобна ― Etcher.
Он кроссплатформенный и позволяет выполнить всю процедуру в три клика.
- Новый список слов для Русский -> Русский…
Скачайте и установите Etcher с официального сайта.
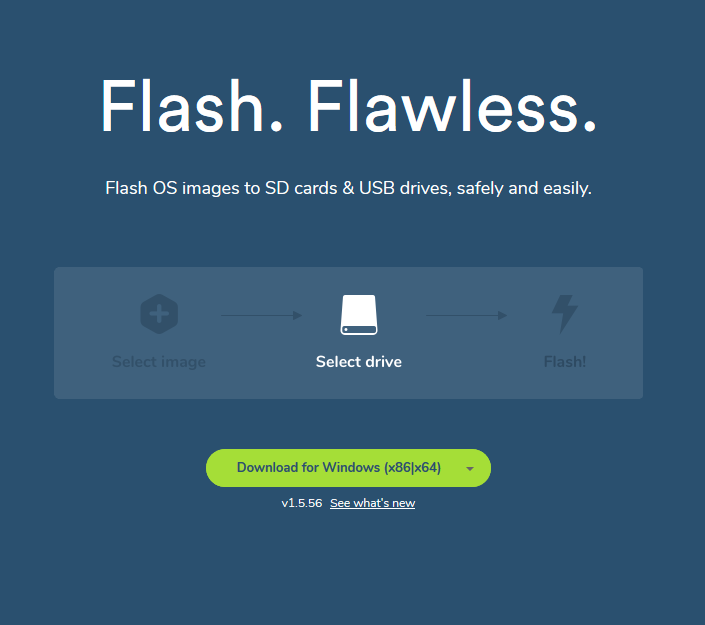
Также есть возможность скачать портативную версию без установки.
З апустите программу.
Следуйте простым инструкциям, предоставленным программой, чтобы записать образ
Шаг 4. Загрузка с USB-Flash
После записи образа перезагрузите компьютер.
Когда компьютер находится на этапе проверки POST (в этот момент появляется логотип материнской платы или текст подсказывает вам нажать функциональные клавиши), нажмите клавишу меню загрузки (в зависимости от материнской платы ее можно назначить по-разному).
Обычно это F11 или F12.
После этого выберите USB-Flash с Arch Linux.
Когда появится начальный экран с логотипом системы, просто нажмите Enter, чтобы выбрать первую строку.
Шаг 5. Подключение к интернету
Через 20 секунд перед вами появится консоль с оболочкой ZSH.
Все действия будут выполняться под суперпользователем, поэтому будьте осторожны.
Небольшой размер дистрибутива означает, что все необходимые компоненты будут взяты из Интернета.
Если вы используете кабель, запустите:
DHCP-клиент будет включен, после этого проверьте доступ в Интернет с помощью строки:
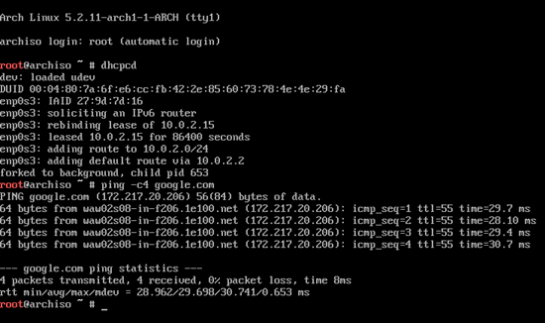
4 пакета будут отправлены на удаленный сервер.
Если они вернутся успешно, это будет написано с фиксацией времени возврата.
Если вы используете Wi-Fi, запустите утилиту:
Шаг 6. Выбор часового пояса
Чтобы определить и исправить нужный часовой пояс, выполните следующую команду:
Измените Europe/Moscow на ваш регион.
ZSH скажет вам, что делать, если после установки часового пояса вы дважды нажмете Tab.
Откроется список всех зон.
Используйте стрелки и Enter, чтобы выбрать нужную зону.
После этого примените изменения:
Чтобы правильно установить время даже после перезагрузки, введите:
Шаг 7. Разбиение диска
Этот этап установки Arch Linux немного отличается в зависимости от использования BIOS или UEFI, о которых будет сказано ниже.
Чтобы узнать, какое устройство будет использоваться для новой системы, запустите:
Источник


