- Flashing BIOS from Linux
- Contents
- fwupd
- BiosDisk
- Installation
- Usage
- Flashrom
- Installation
- Usage
- FreeDOS
- Unetbootin
- dosemu
- Pre-built images
- Using a FreeDOS-provided Disk Image + USB stick on Linux
- Using a FreeDOS-provided Disk Image + USB stick with Windows
- Usage
- Bootable optical disk emulation
- Installation
- Usage
- Using a Windows PE
- Usage
- HP Users
- Обновление BIOS из под Ubuntu 10.10. Весь процесс от начала и до конца.
Flashing BIOS from Linux
This article aims on providing information on flashing your system BIOS under Linux. Most manufacturers provide a Windows executable or a BIOS executable that can only be run under Windows. However, there are a few utilities that allow you to upgrade your system BIOS under Linux.
Contents
fwupd
fwupd is a simple daemon to allow session software to update device firmware on your local machine.
Large vendors including Dell and Logitech use this way to distribute firmware updates to Linux.
fwupd only supports flashing BIOS updates in UEFI mode.
See fwupd for further information about installation and usage.
BiosDisk
BiosDisk simplifies the process of flashing your system BIOS under Linux.
Installation
Usage
To use the biosdisk utility to create a BIOS flash image, first download the latest raw BIOS image for your system from your manufacturer’s website. Make sure however, that you always get the BIOS executable and NOT the Windows executable. You then have one of two options: create a ISO or install the image for your bootloader.
- The mkimage action will create a ISO image on the user’s hard drive. Usage is the following:
- The install action will create the biosdisk image, copy the image file to /boot, and then update the bootloader with an entry for the image. Then all the user has to do is boot the system and select the image to flash the BIOS; this will load the biosdisk image directly from the hard drive and flash the BIOS.
Flashrom
Flashrom is a utility for identifying, reading, writing, verifying and erasing flash chips. It is designed to flash BIOS/EFI/coreboot/firmware/optionROM images on mainboards, network/graphics/storage controller cards, and various programmer devices.
Installation
Usage
Find out if your motherboard and chipset (internal) is supported by flashrom at this website. Supported Hardware You can also find out if your hardware is supported by issuing the following command
The above command will tell you your motherboard and chipset. You can then find out if yours is supported by issuing this command:
On modern mainboards you probably get more than one rom chip listed. You have to select the chipname you get from the upper command. Then you use the -c option to select which rom is affected by the command
Write and verify the new BIOS image (proprietary or Coreboot) on the ROM chip:
If you want to flash other flash chips on your mainboard, you will find all options with
FreeDOS
FreeDOS a free DOS-compatible operating system, is up to the challenge, no need for proprietary DOS versions. So, all you need is a bootable floppy disk image with FreeDOS kernel on it.
Unetbootin
By far the easiest way to make a bootable FreeDOS USB Stick is using unetbootin AUR .
You should format a pendrive with FAT16 and flag it as «boot» (you may do this through a GUI with gparted or partitionmanager ). Then, after mounting the flash drive, select under distribution FreeDOS and your mounted stick. The app will automatically download the image for you and copy it to the drive. Finally, you may copy everything you want to flash there (BIOS, firmwares, etc).
dosemu
The problem with the official FreeDOS images is the lack of extra space for holding firmware and BIOS update files and programs. The easiest way to create a DOS, bootable FAT drive of arbitrary size under Linux is to mount a FAT drive under dosemu and then make it bootable with the FreeDOS sys command.
Pre-built images
Using a FreeDOS-provided Disk Image + USB stick on Linux
As of writing (2017-07-11), unetbootin AUR does not support versions of FreeDOS more recent than 1.0 (current version is 1.2). The following procedure worked to upgrade an Inspiron 17-3737 to the A09 BIOS. (Dell offers this as a possibility on their site)
Some notes before starting:
- You can check your current BIOS version with dmidecode . You might already be at the latest version.
- Ensure that your hardware vendor has verified this method works (use of FreeDOS to run BIOS update .exe )
- Laptop users should not attempt this without AC power
- This is dangerous, and you assume all risk for following this procedure.
- Grab the latest USB installer from the FreeDOS Download Page
- author note: used the «Full» version on suspicion that it might include more drivers, etc (pure speculation)
- Extract the archive, you get a .img file
- Determine which of /dev/sdX is your USB stick (use fdisk -l )
- Write the image directly to the block device:
- dd if=FD12FULL.img of=/dev/sdX status=progress (where X is the letter representing your USB stick as a block device, do not write the image to a partition)
- Double-check that the image copying worked:
- fdisk -l (you should see a single partition on a DOS disk with the bootable («boot») flag set)
- Mount the partition, and copy over the .exe used to update your firmware
- Stay on the safe side and limit the filename to 8 characters (without extension), upper case
- Ensure that you verified any checksums provided by your hardware vendor
- Unmount and reboot. Do whatever is needed to boot from the USB drive
Now you will find yourself in the FreeDOS live installation environment.
- Select your language
- You will be prompted to install FreeDOS
- Select «No — Return to DOS»
- You should see a prompt ( C:\> )
- Run dir /w and verify that your firmware upgrade tool is present
- Run the executable
- author note: in the case of the Dell tool, the machine displayed a spash screen and then rebooted. Upon reboot, it started the firmware upgrade automatically, and ran for about 2 minutes with the fan at full speed)
- Once the process specific to your vendor completes, optionally verify through the BIOS setup screen, as well as by running dmidecode when you are back in linux
Using a FreeDOS-provided Disk Image + USB stick with Windows
The author for this procedure encountered several issues related to mounting the FAT partition type of the USB using the previous method on Linux with dd. This procedure seeks to outline a method to flash the BIOS with FreeDOS, a USB stick and Ruckus on Windows 7/8/8.1/10. This procedure was performed on 4 JULY 2019 on a Dell Inspiron 5547 Laptop to upgrade from BIOS A10 to A12.
- Download and install Rufus for Windows. This can be either the full installation or the portable version.
- Download the latest Full USB installer for FreeDOS (v1.2 as of the time of writing).
- Download the latest BIOS update from the vendors’ website
- It is assumed that dmidecode is installed on the system
- Extract the contents of the FD12FULL.zip archive, noting the .img file
- Insert a flash drive and flash the FD12FULL.img file using Rufus, leaving all default options
- Detailed use of Rufus is not covered in this guide. Refer to Rufus’ manual or documentation for detailed usage
- Once flashed with Rufus, rename the BIOS file with 8 uppercase characters (not including the extension) and copy it over to the flash drive
- Eject the flash drive and plug it into the laptop.
- Perform whatever steps are necessary to boot from the USB with LEGACY BOOT
- Author note: For my Dell Laptop, I press F12 for boot options and select ‘USB Storage Device’ under ‘Legacy Options’. I have explicitly enabled legacy boot from within my BIOS, but this option may not be present if the system is only configured to boot with UEFI
- You will be presented with the FreeDOS Installation environment
- Select preferred language
- Select ‘No — Return to DOS’ on the next screen
- Type dir to view the contents of the USB flash drive
- To execute the BIOS upgrade file, simply type the filename and press enter
- Note: My upgrade took Images that are too large for a floppy
If your flash image is too large for a floppy, go to the FreeDos bootdisk website, and download the 10Mb hard-disk image. This image is a full disk image, including partitions, so adding your flash utility will be a little trickier:
First find the first partition (at time of writing, the first partition starts at block 63; this means that the partitions starts at offset 512 * 63 = 32256 ). You can either use:
Now you can mount the image:
Then you can copy your flash utility onto the filesystem as normal. Once you are done:
The image can now be copied to a USB stick for booting, or booted as a memdisk as per normal instructions.
Usage
The OEM Bootdisk version is recommended, as it only includes kernel and command.com thus leaving more space for the flash utility and new BIOS image. Download the FreeDOS image and decompress it.
Copy your BIOS flash utility and new BIOS image to the mounted floppy disk image. Load the necessary modules:
/proc/fileystems shows if the needed file systems are supported. «loop mount» the floppy disk image to a temporary path:
If the mount went without errors, copy the BIOS flash utility and new BIOS image to the mounted floppy disk image. You will probably have to unzip the archive you downloaded from your motherboard vendor site, to get to those two files. For example:
Check that the two files were not too big for the floppy:
Unmount the floppy disk image:
The next step is to burn the floppy image to a CD/DVD-RW media, but in a way that it can be booted afterwards. First create a bootable CD image, and then burn it.
You may alternatively add your image to the GRUB menu. Install syslinux and copy memdisk and your image to /boot :
Now add an entry to /boot/grub/menu.lst :
Or for GRUB2 in /boot/grub/grub.cfg :
Or for syslinux in /boot/syslinux/syslinux.cfg :
Finally reboot your machine, making sure the CD drive is first in the boot sequence, and run the BIOS upgrade procedure when the CD boots. If using the GRUB method, choose the new entry on the list, and it should boot into FreeDOS.
Bootable optical disk emulation
The script Geteltorito.pl will extract the El Torito boot image. It has worked with Lenovo laptops like the X1 Carbon, X200, X220, X230, X260, X395, W540, T450, T450s and P50. It may work for other vendors as well.
Installation
Usage
Get the bios update iso from the vendor support site. Run the geteltorito image extraction:
Copy the image to the usb thumbdrive:
Reboot and boot from the USB drive, follow vendor directions.
Using a Windows PE
If your manufacturer only provides an exe file and you were not successful following the prior advice , you can update your bios creating a Windows PE flash drive and from there flash the bios update as normally.
Usage
Download a ISO Windows PE to create a bootable drive.
Boot the usb and go to your manufacturer website and download the respective update, and execute normally.
HP Users
Some HP BIOS, especially the ones available in their business lines — ProDesk 600, EliteDesk 800, Thin Clients (T620, T730 etc) — have an option to update the BIOS from within the BIOS. This option is usually available under the File Menu and is called «Flash System ROM». There are 2 different directory structures that seem to work. Your BIOS may or may not work with either directory structure.
- Placing the BIOS *.bin file in the root of the FAT32 formatted USB drive without any other directories. You do not need any other files.
- Using the directory structure as described here
If neither of the above directory structures seem to work, then either use the FreeDOS method if HP provides the relevant DOS executables for your BIOS version or get a Windows machine to first create a HP BIOS Flash Recovery USB and then use that USB to flash the BIOS using the same Flash System ROM option.
- Download the BIOS executable from HP’s support website using your serial number and indicating Windows as the OS .
- The exe file is an archive and can then be extracted using 7z
- 7z e .exe
- Create the appropriate directory structure in the USB as described above. If one does not work, try the other
- Unmount the USB
- Attach it to the computer whose BIOS needs to be upgraded (if using a different computer to create the USB drive)
- Reboot the computer and get into the BIOS using the assigned key (F10 for eg.) for your BIOS.
- Once in the BIOS, find and select the «Flash System ROM» option. It may provide you with 3 options to flash from
- USB
- Hard disk
- Network
- Select the appropriate option (in this case USB) and it will pop up another text box which will have the file name of the BIN file that you put in the root of the USB drive.
- Hit Enter and it should indicate that current version of the BIOS and new one being upgraded to.
- Follow the screen prompts to upgrade the BIOS and finally reboot.
Источник
Обновление BIOS из под Ubuntu 10.10. Весь процесс от начала и до конца.
BIOS (базовая система ввода/вывода), позволяющая операционным системам и оборудованию корректно взаимодействовать друг с другом, присутствует в каждом современном компьютере и располагается в чипе на материнской плате.
Чтобы узнать версию BIOS , выполните в Ubuntu следующую команду:
$ sudo dmidecode -s bios-version
FA
Чтобы посмотреть дату релиза BIOS вашего компьютера , выполните команду:
$ sudo dmidecode -s bios-release-date
04/09/2009
Узнаем марку нашей материнской платы :
$ sudo dmidecode —type baseboard
SMBIOS 2.4 present.
Handle 0x0002, DMI type 2, 8 bytes
Base Board Information
Manufacturer: Gigabyte Technology Co., Ltd.
Product Name: GA-MA770-UD3
Как видим в моем случаем материнская плата фирмы Gigabyte. Заходим на официальный сайт и смотрим есть ли обновления для моего биоса. Оказывается я давненько не следил за обновлениями: у меня самый первый релиз.
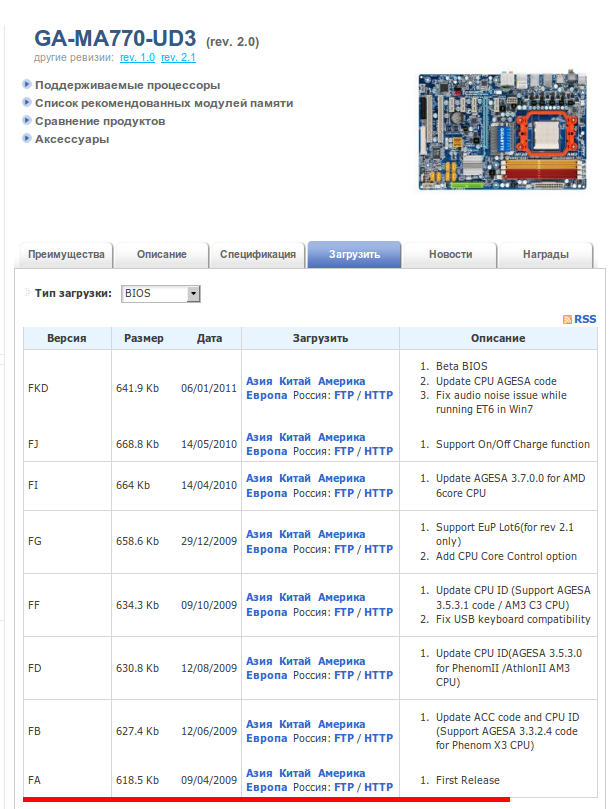
Для обновления версии Биоса из под Операционной системы Ubuntu понадобится следующая утилита: — flashrom.
$ sudo aptitude search flashrom
p flashrom — Identify, read, write, erase, and verify BIOS/ROM/flash chips
$ sudo aptitude install flashrom
Перед записью новой прошивки в БИОС, желательно сохранить старую версию , то есть скопировать прошивку, которая уже прошита в БИОСе, чтобы потом можно было легко восстановить все обратно:
/bios$ sudo flashrom -r bios_fa_09_04_2009.bin
Смотрим информация по нашему файлу:
/bios$ file bios_fa_09_04_2009.bin
Скачав последнюю версию Биоса обнаруживаем, что программа предназначена под операционную систему Windows, исправив это воспользуемся пакетом эмуляции wine, он поможет распаковать исполняемый файл.
Где файл MA77UD32.FKd — и есть сама прошивка с официального сайта (на сайте расположены exe-файлы, но это всего лишь SFX-RAR архив с самой прошивкой и программой-флэшером для ДОСа).
Записываем скачанную прошивку в Биос на свой собственный риск:
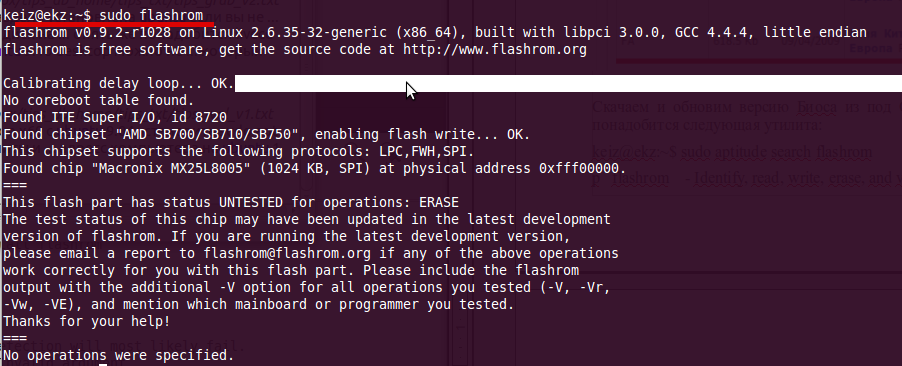
/bios$ sudo flashrom -w MA77UD32.FKd
flashrom v0.9.2-r1028 on Linux 2.6.35-32-generic (x86_64), built with libpci 3.0.0, GCC 4.4.4, little endian
flashrom is free software, get the source code at http://www.flashrom.org
Calibrating delay loop… OK.
No coreboot table found.
Found ITE Super I/O, id 8720
Found chipset «AMD SB700/SB710/SB750», enabling flash write… OK.
This chipset supports the following protocols: LPC,FWH,SPI.
Found chip «Macronix MX25L8005» (1024 KB, SPI) at physical address 0xfff00000.
This flash part has status UNTESTED for operations: ERASE
The test status of this chip may have been updated in the latest development
version of flashrom. If you are running the latest development version,
please email a report to flashrom@flashrom.org if any of the above operations
work correctly for you with this flash part. Please include the flashrom
output with the additional -V option for all operations you tested (-V, -Vr,
-Vw, -VE), and mention which mainboard or programmer you tested.
Thanks for your help!
Flash image seems to be a legacy BIOS. Disabling checks.
Writing flash chip… Erasing flash before programming… Erasing flash chip… SUCCESS.
Programming flash done.
Verifying flash… VERIFIED.
Теперь можно перезагрузиться с новым биосом .
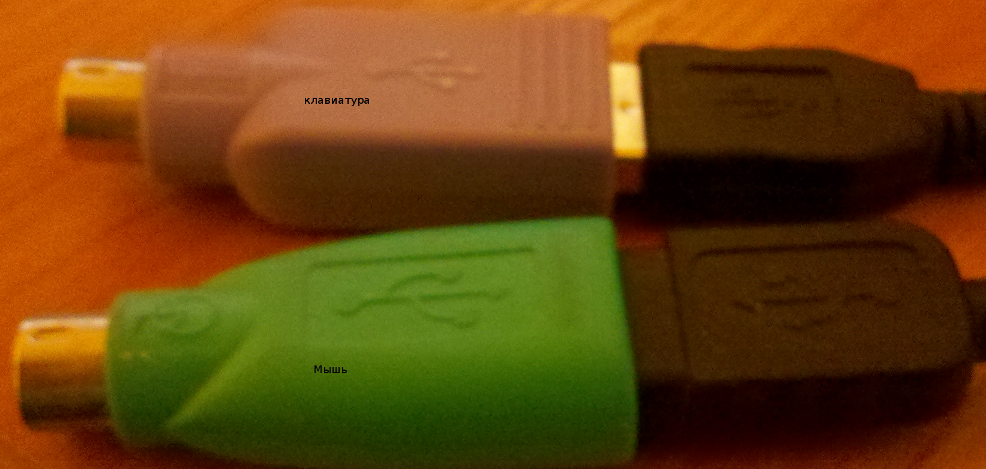
Хм, после перезагрузки отказала мышка (USB), клавиатура (USB), выходом пока почему, так получилось буду разбираться, а пока поставил работать мышь и клавиатуру через переходники PS/2 на usb.
В ходе анализ экрана самотестирования устройств при загрузки и логов системы, причиной не работающих устройств подключенных к USB оказалось, что в БИОСЕ была отключена поддержка.
Включаем поддержку через BIOS:
Перезагружаем компьютер, F2 — Integrated Peripherals — USB Controllers было DISABLED. Включаю :
USB Controllers — Enable
USB Legacy Function — Enable
USB Storage Funtion — Enable
Смотрим версию биоса и дату после обновления:
/bios$ sudo dmidecode -s bios-version && sudo dmidecode -s bios-release-date
Таким вот образом можно пере прошивать БИОС из под нашей системы Ubuntu. На этом всё. А пока обновлю на предыдущий релиз.
Используйте прокси ((заблокировано роскомнадзором, используйте vpn или proxy)) при использовании Telegram клиента:
Поблагодари автора и новые статьи
будут появляться чаще 🙂
Карта МКБ: 4432-7300-2472-8059
Большое спасибо тем кто благодарит автора за практические заметки небольшими пожертвованиями. С уважением, Олло Александр aka ekzorchik.
Источник


