- Как сделать джейлбрейк Linux с помощью Checkra1n?
- Процесс
- Checkra1n Linux
- What is Checkra1n Linux?
- Download checra1n for Linux
- How toinstall Checkra1n on Linux
- Terminal commands
- How to remove checkra1n jailbreak
- Upgrade to newest iOS
- Disable revokes on checkra1n jailbreak
- Checkra1n Install in Kali Linux
- How to Run checkra1n on Linux Ubuntu or Windows
- If you have Linux already installed / Ubuntu use this tutorial:
Как сделать джейлбрейк Linux с помощью Checkra1n?
побег из тюрьмы (форма повышения привилегий) иЭто процесс, который выполняется на устройствах iOS для снятия некоторых ограничений. навязанные Apple с помощью модифицированных ядер (его эквивалент в Android — root). Джейлбрейк позволяет пользователям получить полный доступ к операционной системе, позволяя загружать приложения, расширения и темы, недоступные в официальном магазине приложений.
Apple сделала все возможное, чтобы заблокировать побег из тюрьмы, Поскольку после того, как было объявлено о новой ошибке, которая использовалась для выполнения процесса взлома, Apple немедленно приступила к исправлению этой ошибки и выпустила обновления для ее исправления. Поэтому находить методы было все труднее.
Но тыВсе это изменение с помощью checkm8, который представляет собой xploit, который действует на bootrom. (постоянная память) и предоставляет доступ к устройствам iOS, которые Apple не может установить.
Этот эксплойт был взят за основу checkra1n (проект сообщества), о котором с последнего квартала прошлого года было много поговорить, и что до сих пор в этом месяце февраля была выпущена версия для Linux (поскольку ранее она была доступна только для Mac OS).
С появлением версии для Linux возможность взлома была увеличена в геометрической прогрессии. Поскольку, как упоминалось выше, это было только эксклюзивно для Mac OS, и тем, кому нужно выполнить Jailbreak, у которых нет Mac, пришлось создать образ Mac OS для своего устройства (со многими ограничениями и довольно большим количеством проблем для его создания).
Хотя спустя некоторое время был выпущен установочный образ MacOS, модифицированный с помощью Checkra1n, хотя он также был ограничен аппаратными средствами.
Но все это изменилось с выпуском для Linux, так как это можно сделать прямо из установки или с действующей версией системы (при этом те, кто использует Windows и не намеревается использовать Linux, могут выполнять этот процесс).
Процесс
Чтобы сделать джейлбрейк Linux, просто есть любой дистрибутив Linux, в моем случае я сейчас использую Voyager Linux (на основе Ubuntu 18.04), так как я покинул Arch Linux, потому что мой предыдущий жесткий диск перестал работать, и у меня под рукой был только USB с Voyager для установки на новый диск.
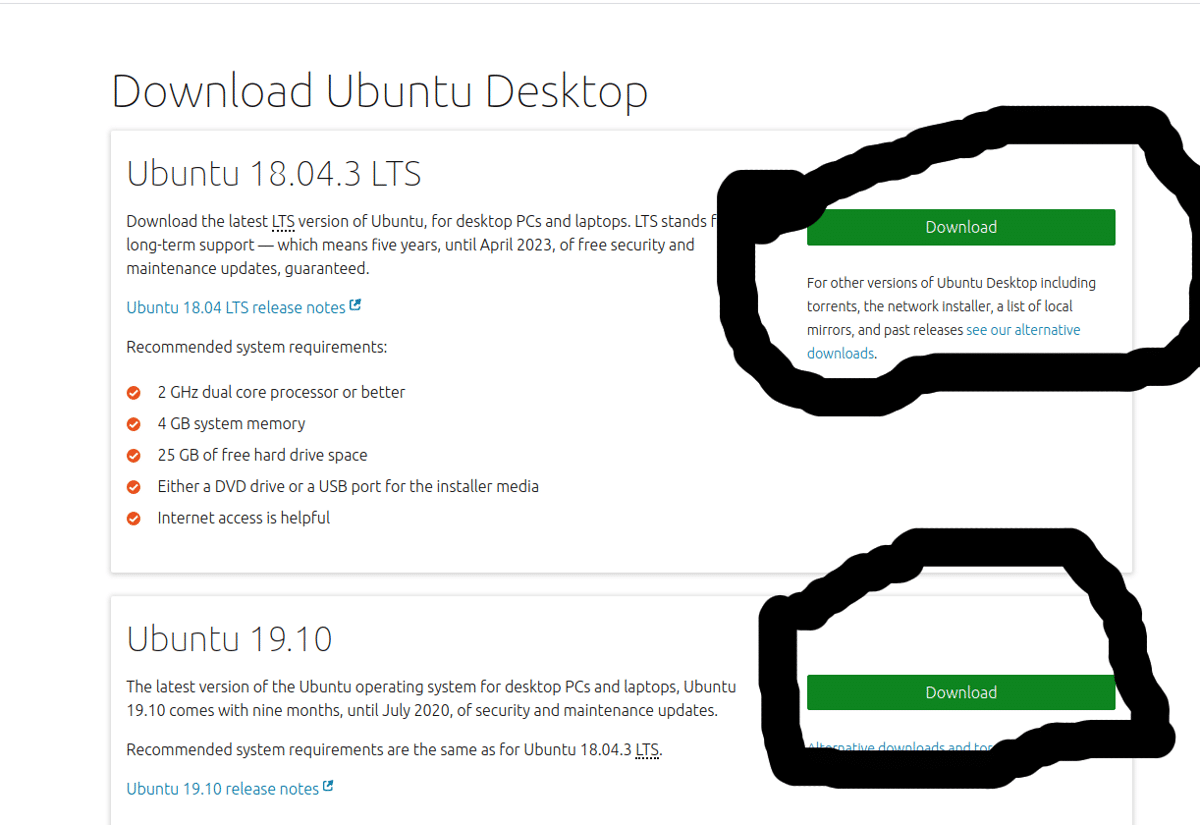
Переходя к процессу, если у вас нет дистрибутива Linux, вы можете использовать любой но чтобы упростить задачу, если вы никогда не использовали Linux перейдите по следующей ссылке, где вы скачаете Ubuntu (любой версии).
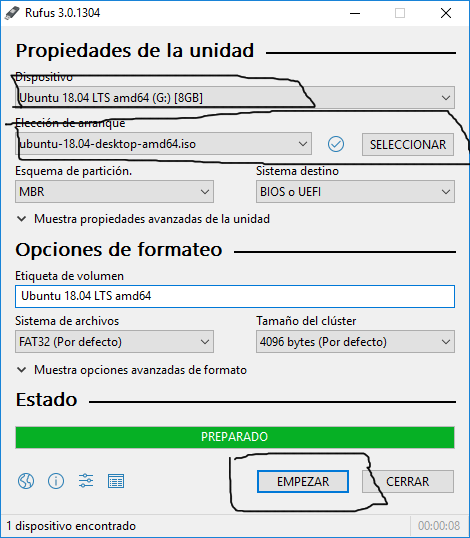
Теперь вы собираетесь скачать rufus так что вы можете создать загрузочный usb с Ubuntu, Вы подключаете USB-накопитель, выбираете уже загруженный образ Ubuntu, свое устройство и начинаете.
При этом вы должны загрузить устройство на свой компьютер и изменить параметры BIOS для загрузки системы (если вы не знаете, как это сделать, поищите видео на YouTube). На первом экране вас спросят, хотите ли вы установить систему или протестировать ее вживую, здесь мы переходим ко второму варианту.
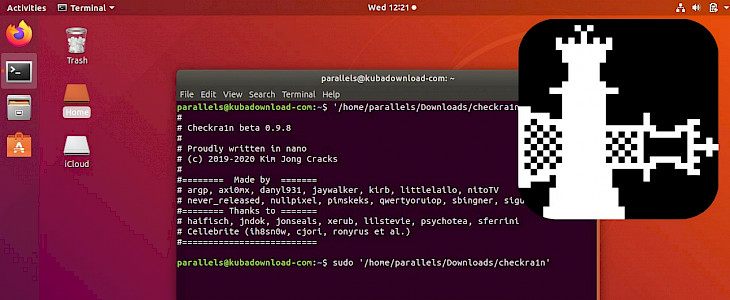
Уже находясь внутри системы давайте скачаем бинарный файл checkra1n или если вы новичок, вы собираетесь открыть терминал, вы можете найти «терминал» в меню приложений или открыть его с помощью комбинации клавиш «ctrl + Alt + T». В ее вы собираетесь добавить репозиторий checkra1n с помощью следующей команды:
Или вы добавляете его вручную с помощью:
Здесь вас спросят, в каком редакторе вы собираетесь выбрать «nano» и прокрутить до конца с помощью клавиш навигации или прокрутки, и здесь вы добавите:
Вы сохраняете изменения с помощью Ctrl + O и закрываете с помощью Ctrl + X.
После давайте скачаем и добавим публичный ключ репо:
Мы обновляем с помощью:
И устанавливаем инструмент с:
Если вы выбрали загрузку двоичный файл должен давать ему только разрешения на выполнение:
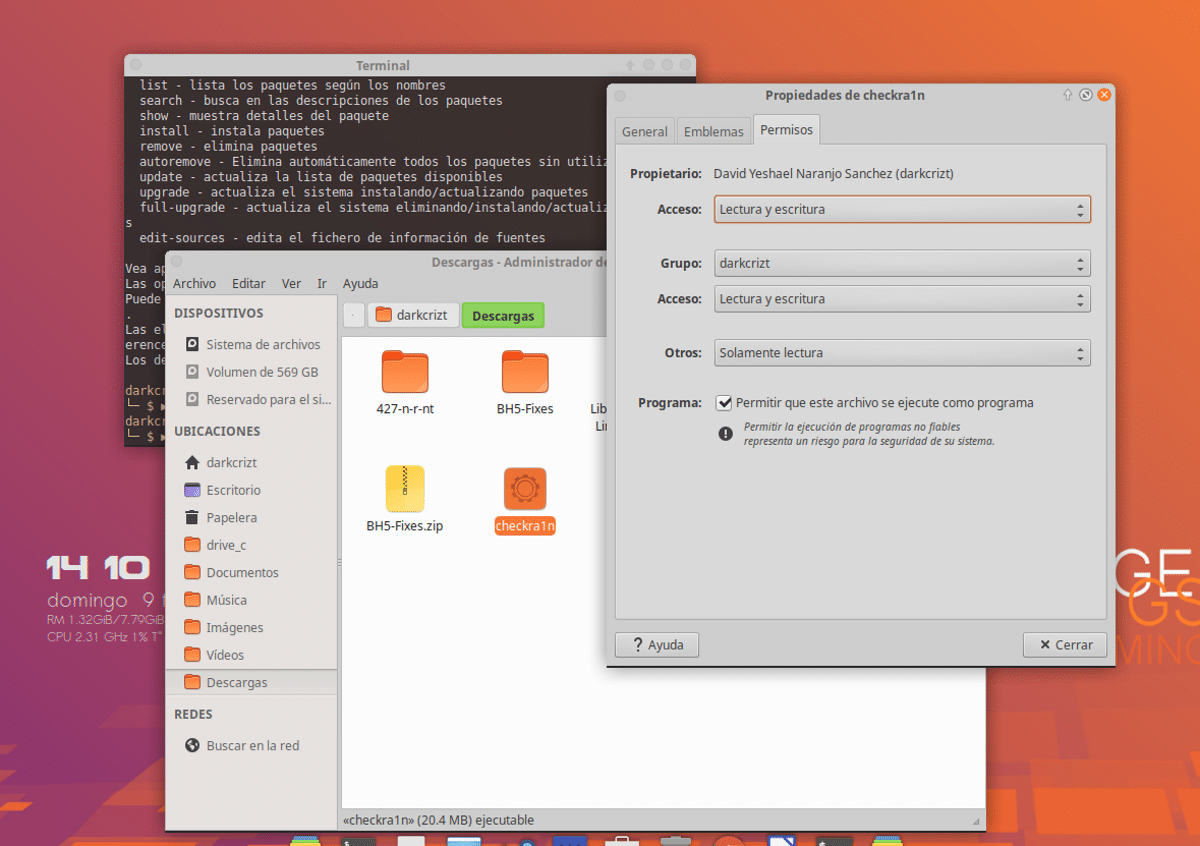
И вы приступаете к запуску инструмента (если вы загрузили двоичный файл) с помощью:
Или, если вы установили из репозитория, вы ищите в меню приложения программу запуска. Здесь, если вы используете двоичный файл, вы используете версию CLI (командная строка) или из репозитория версию GUI (графическая версия). Таким же образом оба работают одинаково.
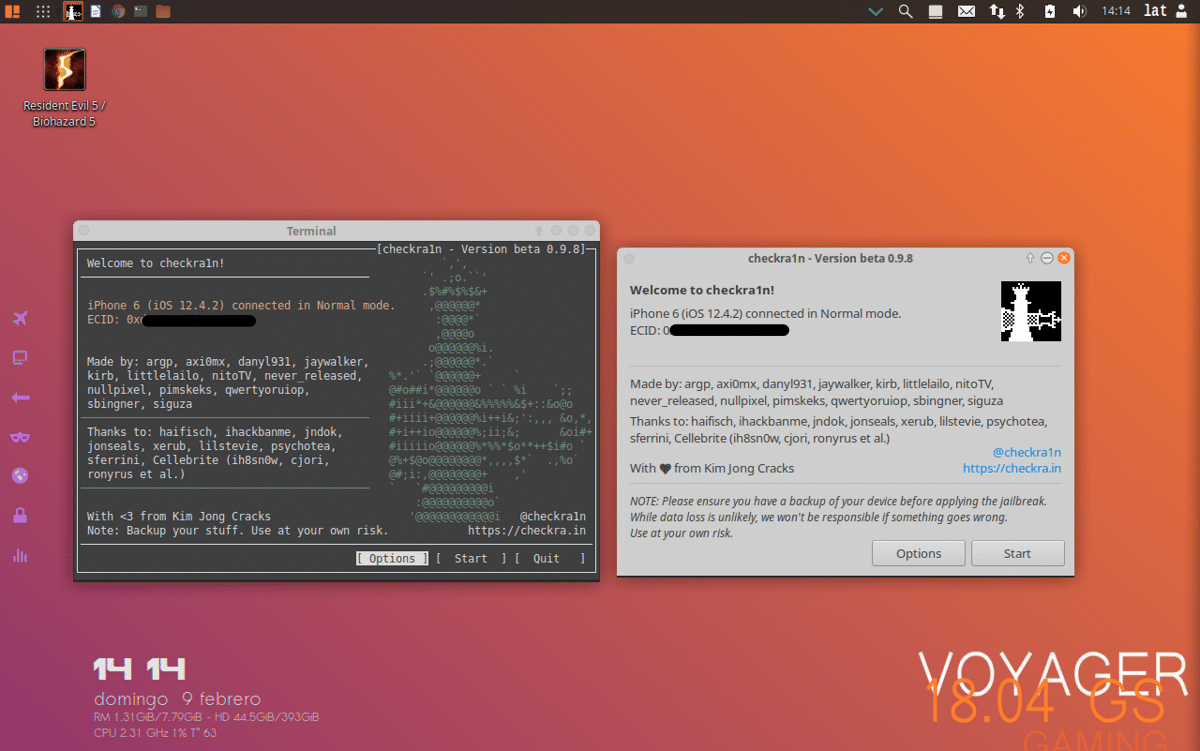
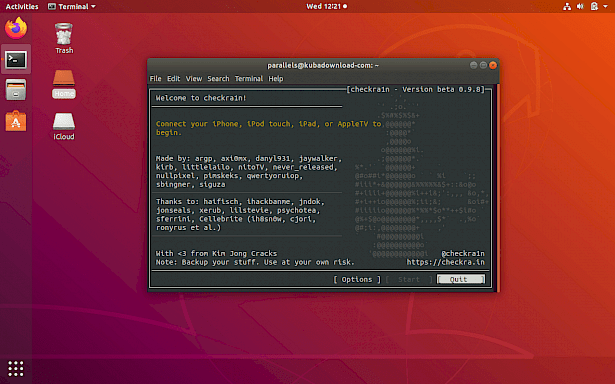
Сделано все это, вы собираетесь подключить свое устройство, и инструмент должен его распознать Чтобы запустить процесс взлома, нажмите кнопку «Пуск» или в версии cli, которую вы переместите с помощью клавиш навигации, а с помощью клавиши пробела вы запустите процесс.
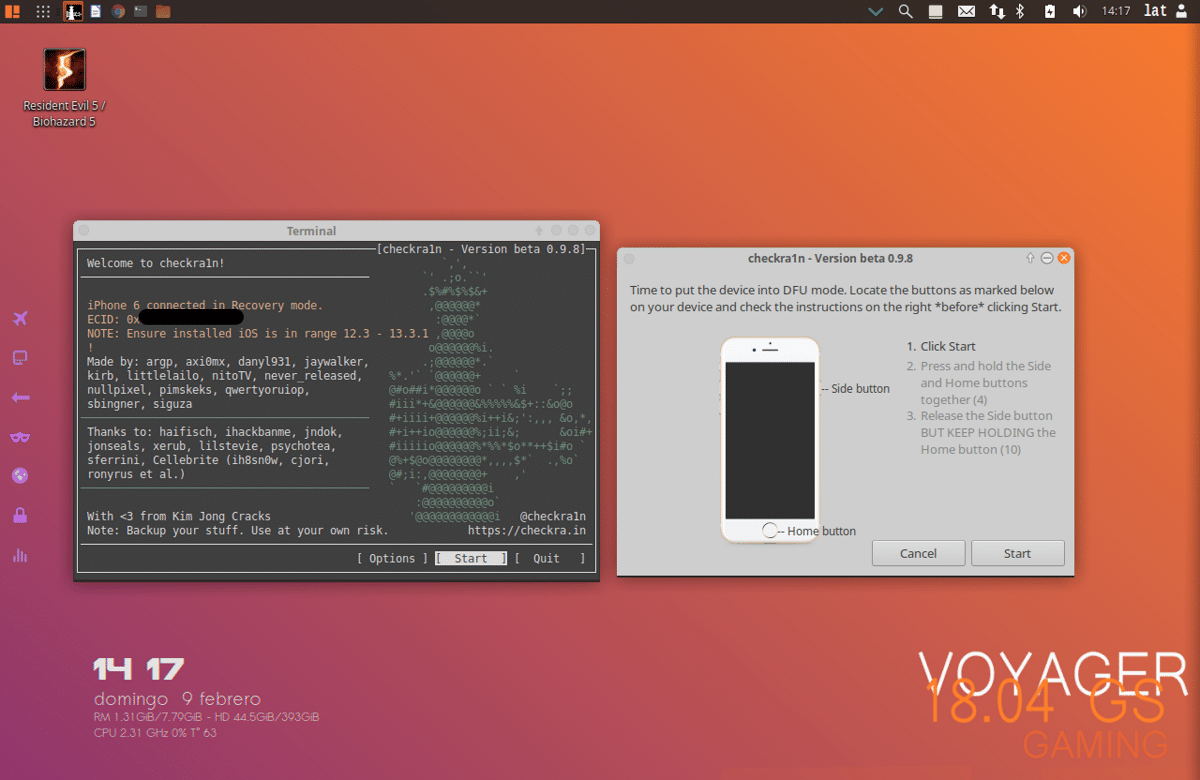
С этого момента инструмент поможет вам перевести устройство в режим DFU, и все.
Содержание статьи соответствует нашим принципам редакционная этика. Чтобы сообщить об ошибке, нажмите здесь.
Полный путь к статье: Любители Linux » Общие » Ресурсы » Как сделать джейлбрейк Linux с помощью Checkra1n?
Источник
Checkra1n Linux
Checkra1n Linux was released! This is great news for all jailbreak community running on iOS 12, iOS 13, and iOS 14. It took some time but finally, Checkra1n Linux jailbreak tool is available for the free open-source system. Download Checkra1n for Linux and learn how to jailbreak iPhone, iPod, and iPad Touch.
What is Checkra1n Linux?
Checkra1n is an ultimate jailbreak tool with support for most generations of iOS devices starting from iPhone 4S (A5 chip) to iPhone 8 and iPhone X (A11 chip). All of the devices mentioned are jailbreakable for their entire lifetime. This means every present iOS version and versions that will come in the future.
All A5 to A11 devices are compatible with checkra1n Linux. Only the latest devices including iPhone 11 Pro, iPhone 11, iPhone 11 Pro Max, iPhone XR, iPhone XS Max, iPhone XS, and iPhone XS Max are not compatible with checkra1n Linux. Install Cydia app on the latest iOS 13 to iOS 14.
Checkra1n 0.9.8 beta was the first version allowing you to jailbreak iOS 12, iOS 13, and iOS 14 on Linux. Checkra1n Team released a CLI version (no GUI) for x86_64, arm, arm64, and i486 architectures that can but executed from terminal. It is really easy to use the jailbreak tool from the command line.
iOS 14 can be jailbroken only on the following devices:
- iPhone 6s, 6s Plus, and SE
- iPad 5th generation
- iPad Air 2
- iPad mini 4
- iPad Pro 1st generation
- Apple TV 4 and 4K
- iBridge T2
Download checra1n for Linux
To check your system architecture type in the terminal
How toinstall Checkra1n on Linux
Now when Checkra1n jailbreak tool is available also for Linux users you can freely jailbreak all supported Apple devices running on iOS 12 and iOS 13 firmware.
1. Download checkra1n.dms on your computer.
2. Right-click on the checkra1n.dms file and select Properties.
3. Switch to Permission Tab.
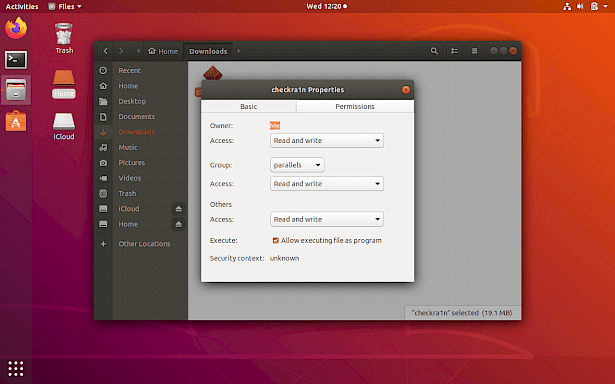
4. Activate «Allow executing file as program» or use the command option
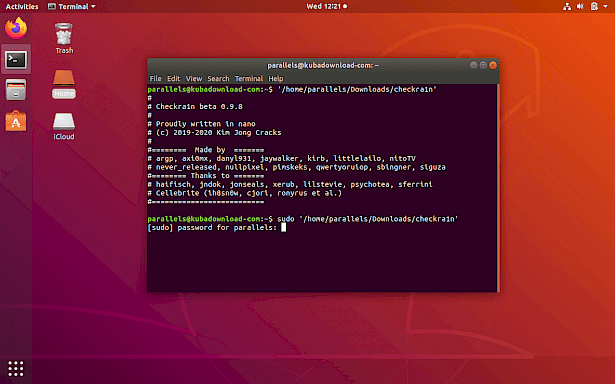
5. Open terminal app.
6. Run command as root and provide your password to open the jailbreak tool.
7. Connect your iPhone to PC or Mac using USB cable.
8. Select «Start» to jailbreak your device.
9. checkra1n will activate Recovery Mode.
10. Enter DFU mode (screen must stay black) on your iDevice.
Enter DFU Mode before jailbreak:
- Keep iDevice in Normal Mode or Recovery Mode, plug USB cable (please don’t use USB extension cable)
- Hold HOME button (iPhone7/7p hold Volume Down button instead), then hold POWER button until the screen is blank
- Release the POWER button after about 10 seconds, but keep holding the HOME button (iPhone7/7p hold Volume Down button instead) for about 5 seconds
iPhone8, iPhone8 Plus Steps to enter DFU Mode:
- Plug an original USB cable, quick-press Volume «+» button, then Volume «-» button and hold the Power button.
- When the iDevice turns off, hold the Volume «-» button, then release the Power button after 5 seconds, until it prompts «succeded».
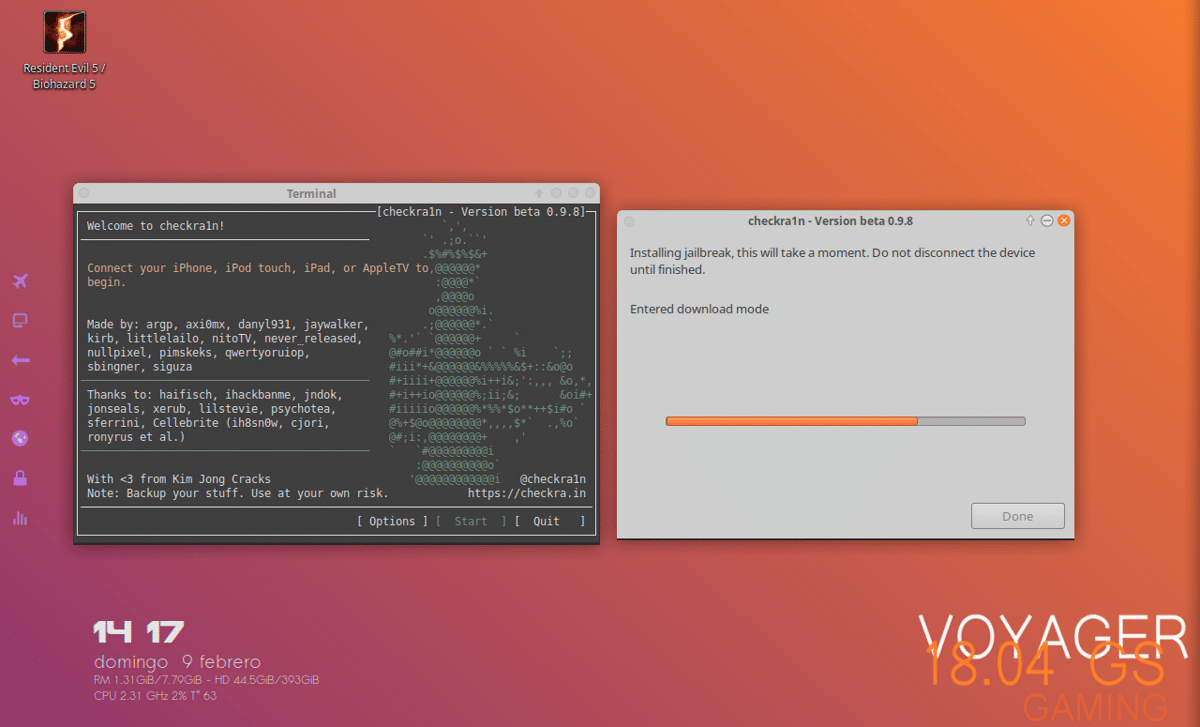
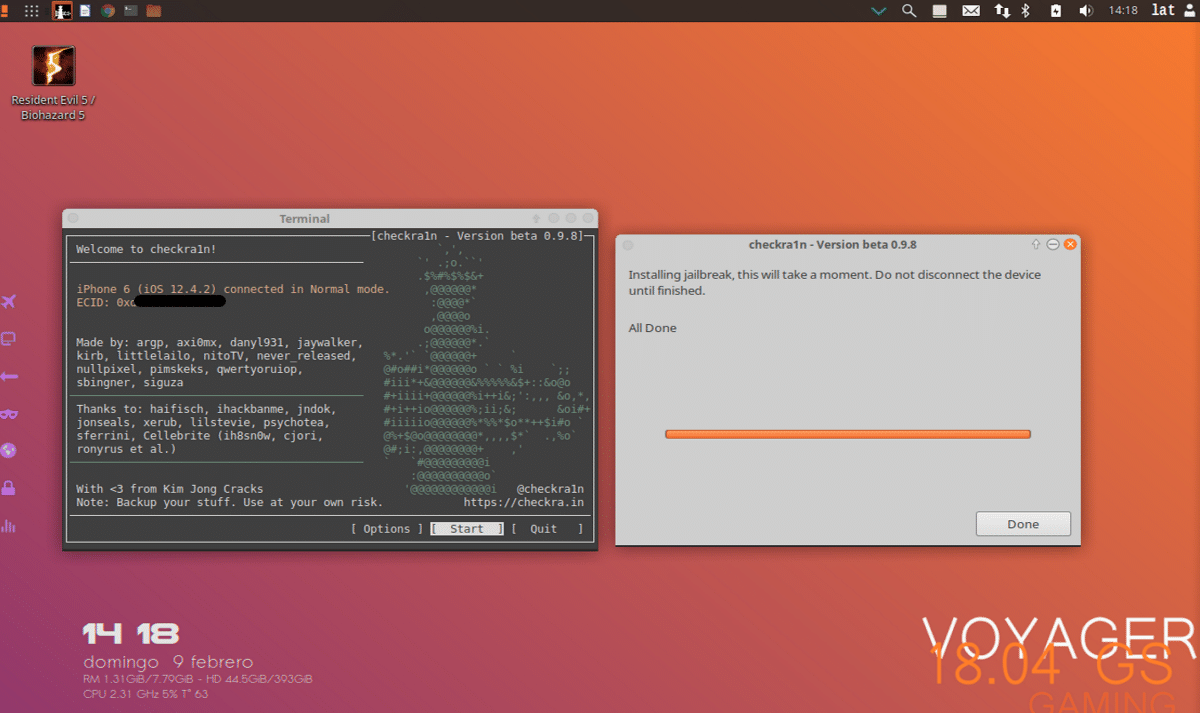
11. Wait till the device will boot into jailbreak mode.
12. Lunch checkra1n loader from home screen.
13. Install Cydia tweaks on your iPhone.
Terminal commands
How to remove checkra1n jailbreak
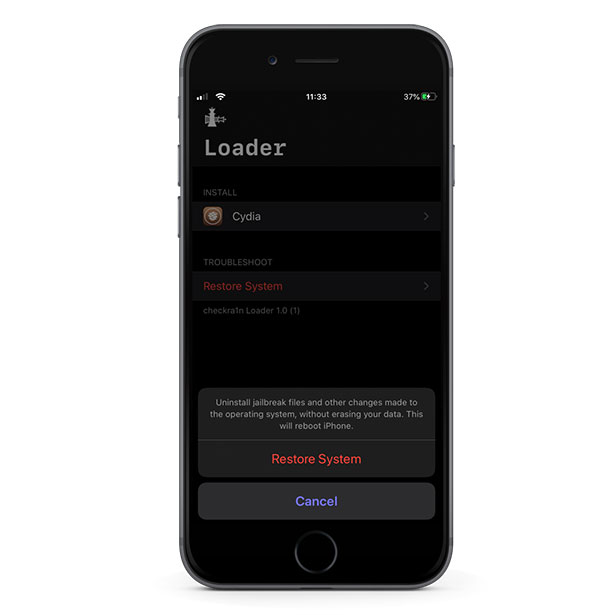
The latest version of checkra1n Linux app allows you to easily remove the jailbreak from your device. checkra1n loaders installed on your iOS device allows you to install Cydia. Besides that, there is also an option to Restore system. When you click on this option you will uninstall jailbreak files and other changes made to the operating system, without erasing data. This will reboot iPhone.
Upgrade to newest iOS
The safest way to update iOS on jailbroken devices is to restore the system to the state before you have jailbroken your device in the first place. This option is available via Loader app (the same you used to install Cydia) available from home screen. It is also important to save all tweaks and settings on checkra1n jailbreak to restore them after re-jailbreaking the upgraded iOS version.
1. Install Batchomatic tweak to save all tweaks, apps, and settings.
2. Generate a .deb file with iOS jailbreak configurations.
3. Save the .deb file on any Cloud service.
4. Open the Loader app and tap Restore System.
5. Navigate to System → General → Software Update.
6. Update iOS to the newest version.
7. Jailbreak your device using checkra1n.
8. Move the .deb file on your device and install it using Filza.
Disable revokes on checkra1n jailbreak
If you decide to jailbreak your device with a tool like checkra1n Linux it is possible to disable revokes for all apps installed from 3uTools, and even 3rd party AppStores like AppValley, PandaHelper, and others. Please be informed that some apps doesn’t work on jailbroken system like iSpoofer.
1. Open the Cydia app on your device.
2. Tap Sources → Edit → Add the kiiimo Repository.
3. Switch to Search Tab and type Anti-Revoke 2.
4. Tap the Install button.
5. Respring your device.
All apps installed on Anti-Revoke 2 hack will work until you restart your device. The jailbreak state will be lost, so it’s required to re-jailbreak your device. This solution was tested on iOS 12, iOS 13, and iOS 14.
Источник
Checkra1n Install in Kali Linux
In this article, we are installing the Checkra1n Tool, Checkra1n is a jailbreaking tool, you can jailbreak any IOS device iphone6 to X, checkra1n supported any version of IOS.
checkra1n jailbreak is the new generation jailbreaking tool based on the permanent unpatchable bootrom exploit called checkm8 by axi0mX.
The app can be used to jailbreak all iOS Devices between A5 to A11 including iOS 12.3 up to iOS 13. checkra1n install Kali Linux
You can install checkra1n on other Linux distributions like Ubuntu, Mint, Linux, etc. The recommended operating system is Debian-based.
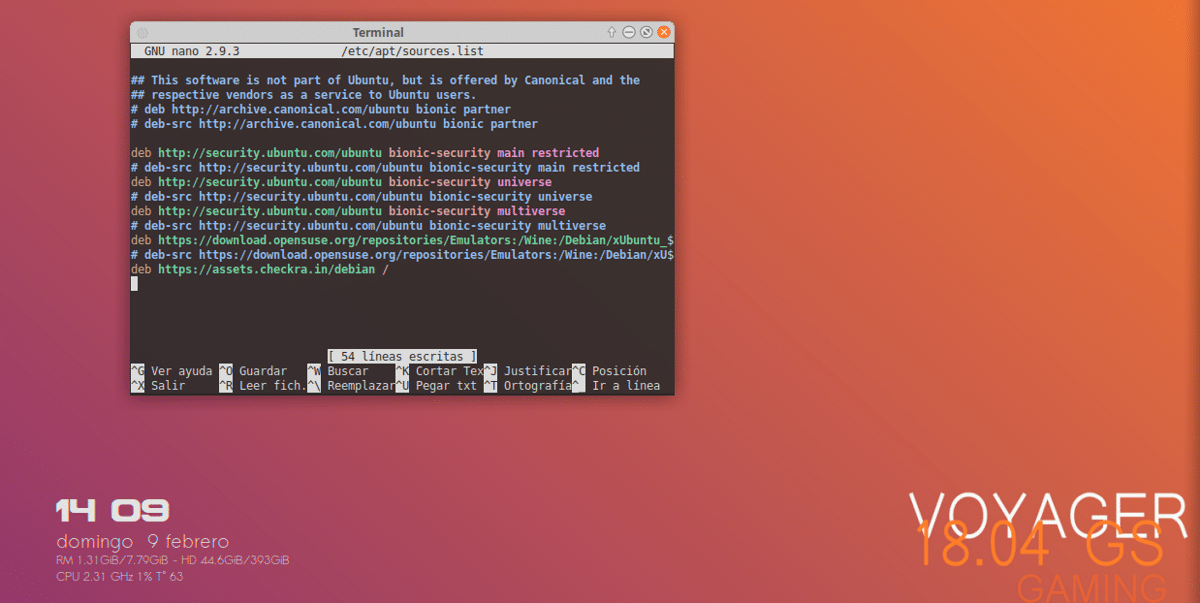
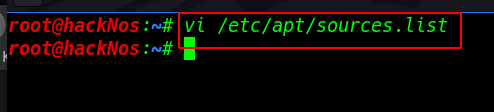
1. The First Step is Adding checkra1n official repositories to our sources.list file edits our sources.list open the file any text editor I am using Linux editor vi you used and editor
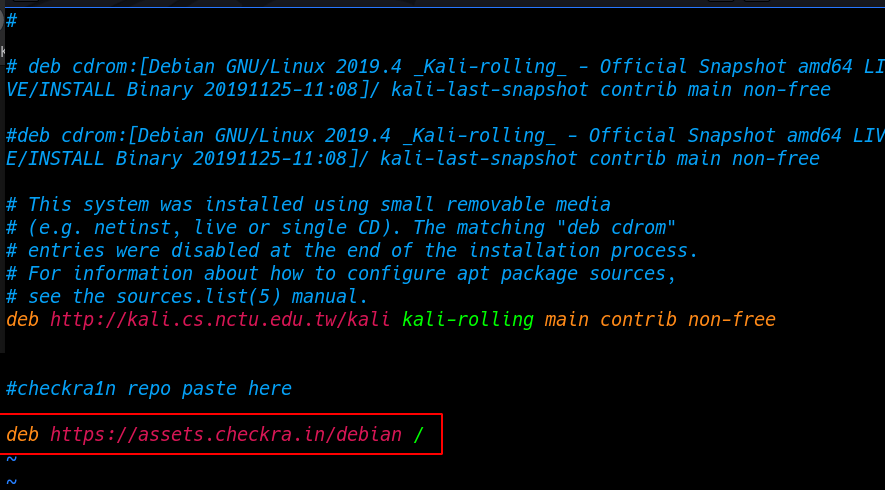
After opening the file go to the last line and add a repo deb https://assets.checkra.in/debian / after adding the repo save the file and exit go to the next step
Adding checkra1n Public key our Kali Linux OS and update our system
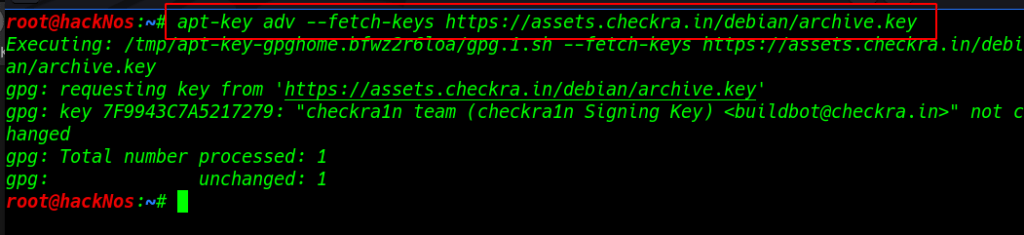
After adding the public key we need to update our system for updating new checkra1n repositories
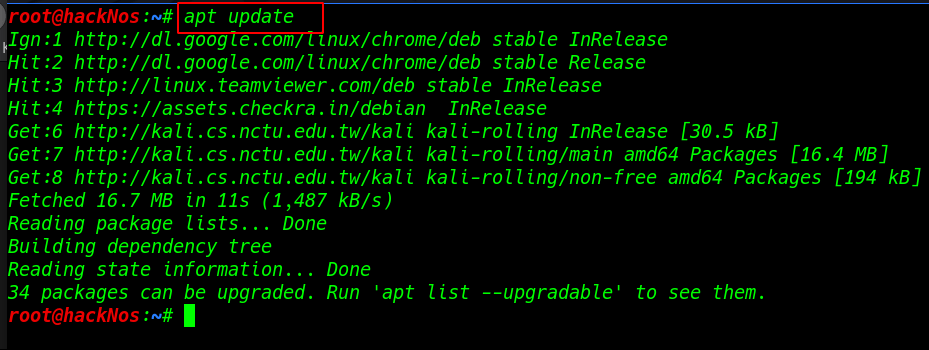
Run the command and install the checkra1n package

After installing the checkra1n open the checkra1n software our terminal type the command checkra1n
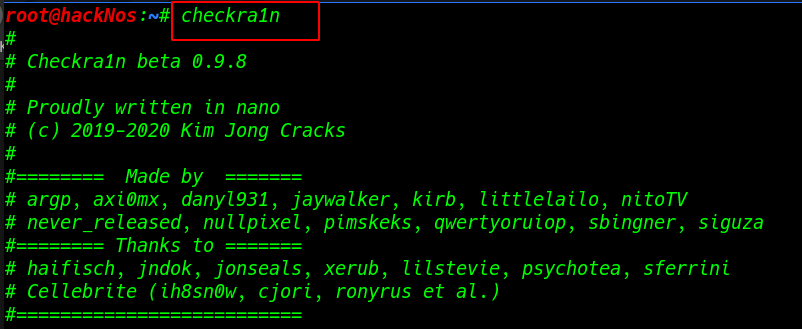
We see checkra1n Welcome message our step is Succesful install the latest beta version.
Источник
How to Run checkra1n on Linux Ubuntu or Windows
If you’re on windows, here’s how to get checkra1n without installing Linux / UBUNTU. this is full tutorial and simple way to use the new version of checkra1n on Linux!
CheckRa1n has been released for Linux webra1n PongOS. Finally, you can run CheckRa1n on Linux system like UBUNTU. However, if you are on Windows, you can run Linux directly using USB HARD DRIVE. you don’t need to install Linux at all. it is a very easy way. you can follow my tutorial,
How to Run checkra1n on Linux or Windows
- Download Ubuntu from https://ubuntu.com
- Use Rufus to install it to a usb https://rufus.ie
- Boot from the usb by spamming f8 while rebooting with USB in (on most computers).
- Click try, not install when prompted
- When you’re in, go to http://checkra.in
- Download x86_64 for Linux
- Put it on desktop
- Open terminal
- Type the following commands and press return after each one
- cd
/Desktop chmod 777 checkra1n

CheckRa1n has been released for Linux. Finally, you can run CheckRa1n on Linux. However, if you are on Windows, you can run Linux directly using USB HARD DRIVE. you don’t need to install Linux at all. it is a very easy way. you can follow my tutorial,
If you have Linux already installed / Ubuntu use this tutorial:
Don’t download checkra1n from the website in this case, run or install it from the terminal. If you download the files from webpage you will miss out on many dependencies and that’s why it doesn’t work and probably you will gets stuck in many places. Install from their apt repo. Simply copy and paste these 4 commands:
- Open ubuntu terminal
- Add our APT repo: echo “deb https://assets.checkra.in/debian /” | sudo tee -a /etc/apt/sources.list
- Add our public key: sudo apt-key adv —fetch-keys https://assets.checkra.in/debian/archive.key
- sudo apt update
- sudo apt-get install checkra1n
Источник


