- Installing CMake on macOS using Homebrew
- Installing CMake
- Windows
- macOS
- Linux, UNIX
- Download Verification
- Cmake — собираем переносимые приложения для Mac Os X и Windows
- CMake Tutorial
- Introduction
- A Basic Starting Point (Step 1)В
- Adding a Version Number and Configured Header File
- Specify the C++ Standard
- Build and Test
- Adding a Library (Step 2)В
- Adding Usage Requirements for Library (Step 3)В
- Installing and Testing (Step 4)В
- Install Rules
- Testing Support
- Adding System Introspection (Step 5)В
- Adding a Custom Command and Generated File (Step 6)В
- Building an Installer (Step 7)В
- Adding Support for a Dashboard (Step 8)В
- Mixing Static and Shared (Step 9)В
- Adding Generator Expressions (Step 10)В
- Adding Export Configuration (Step 11)В
- Packaging Debug and Release (Step 12)В
Installing CMake on macOS using Homebrew
If you already have Homebrew installed skip to step 5
Homebrew is a command line package manager of macOS.
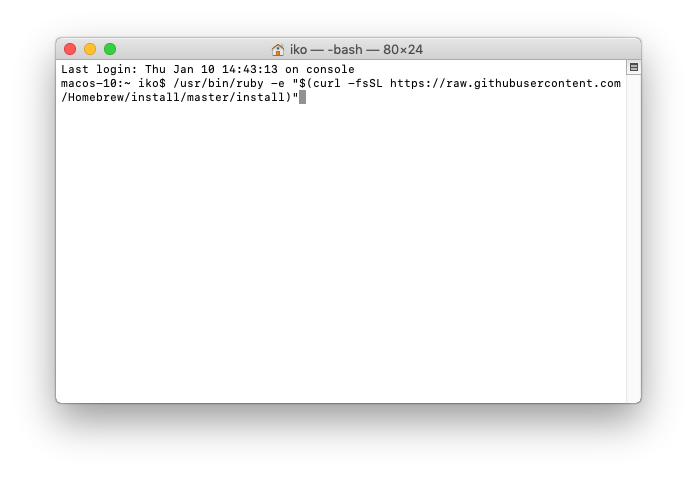
- Open the “Terminal” application
- Paste the following string from the brew.sh website into the window and press “Return” (⮐):
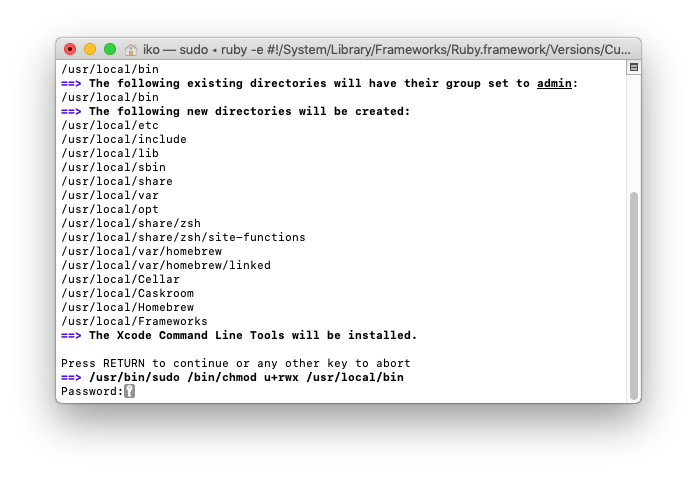
- You will be asked to confirm the installation and enter your administrator password for your computer

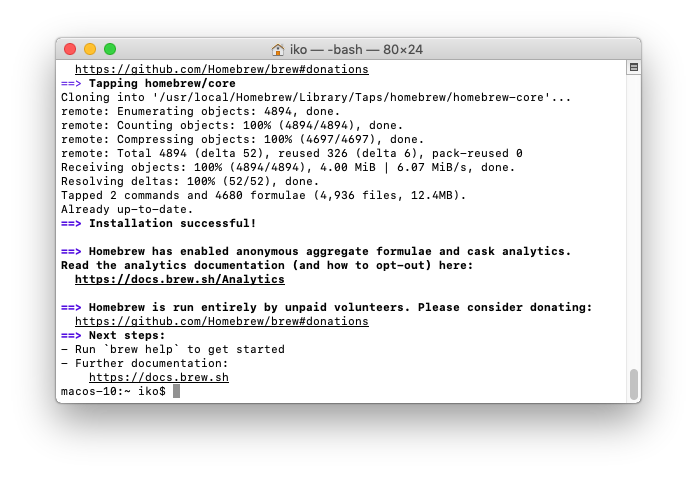
- After Homebrew is installed you should see the $ prompt again
- Install CMake by pasting the following into your command line:
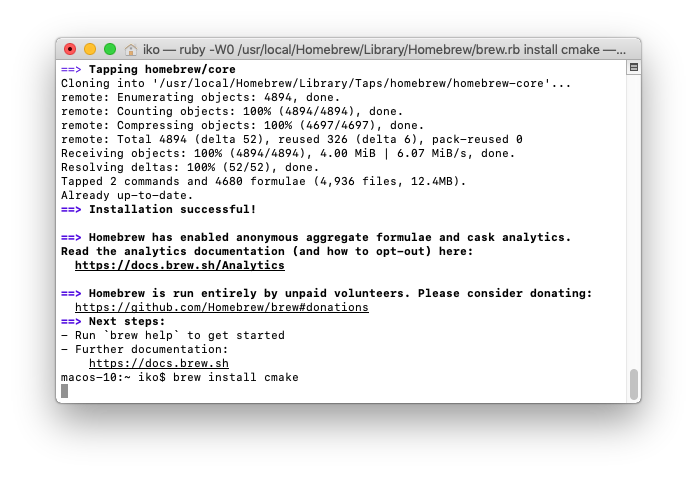
- Homebrew will now install CMake
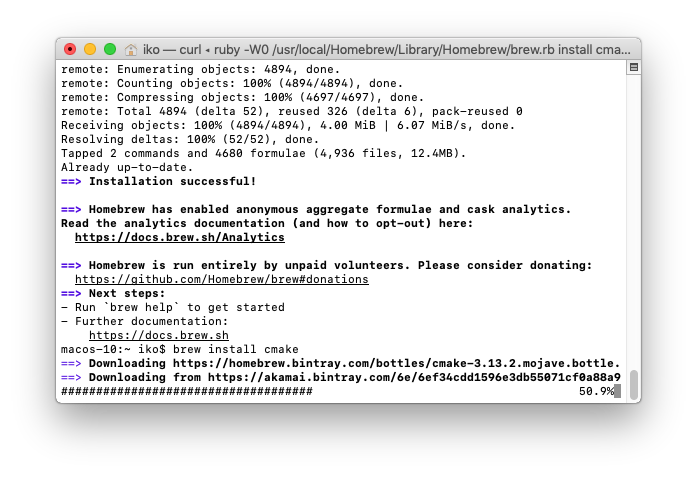
- After CMake is installed you should see the $ prompt again
Источник
Installing CMake
There are several ways to install CMake, depending on your platform.
Windows
There are pre-compiled binaries available on the Download page for Windows as MSI packages and ZIP files. The Windows installer has an option to modify the system PATH environment variable. If that is not selected during installation, one may manually add the install directory (e.g. C:\Program Files\CMake\bin) to the PATH in a command prompt.
One may alternatively download and build CMake from source. The Download page also provides source releases. In order to build CMake from a source tree on Windows, you must first install the latest binary version of CMake because it is used for building the source tree. Once the binary is installed, run it on CMake as you would any other project. Typically this means selecting CMake as the Source directory and then selecting a binary directory for the resulting executables.
macOS
There are pre-compiled binaries available on the Download page for macOS as disk images and tarballs. After copying CMake.app into /Applications (or a custom location), run it and follow the “How to Install For Command Line Use” menu item for instructions to make the command-line tools (e.g. cmake) available in the PATH. Or, one may manually add the install directory (e.g. /Applications/CMake.app/Contents/bin) to the PATH.
One may alternatively download and build CMake from source as in the following section.
Linux, UNIX
There are pre-compiled binaries available on the Download page for some UNIX platforms. One may alternatively download and build CMake from source. The Download page provides source releases. There are two possible approaches for building CMake from a source tree. If there is no existing CMake installation, a bootstrap script is provided:
(Note: the make install step is optional, cmake will run from the build directory.)
By default bootstrap will build CMake without any debug or optimization flags. To enable optimizations you will need to specify the CMAKE_BUILD_TYPE option to bootstrap like this: ./bootstrap — -DCMAKE_BUILD_TYPE:STRING=Release
For more options with bootstrap, run ./bootstrap —help .
Or, an existing CMake installation can be used to build a new version:
(Note: the make install step is optional, cmake will run from the build directory.) If you are not using the GNU C++ compiler, you need to tell the bootstrap script (or cmake) which compiler you want to use. This is done by setting the environment variables CC and CXX before running it. For example:
Download Verification
Each release on the Download page comes with a file named cmake-$version-SHA-256.txt, where $version is the release version number.
One may use this file to verify other downloads, such as the source tarball. For example:
The SHA-256 file itself can be verified by GPG signature:
The GPG key C6C265324BBEBDC350B513D02D2CEF1034921684 is a signing subkey whose expiry is updated yearly.
Источник
Cmake — собираем переносимые приложения для Mac Os X и Windows

Рано или поздно наступает тот момент, когда приложения из наших лабораторий, полных чудес, вкусных библиотек и красивых фреймворков начинают проситься в большой мир, на компьютеры простых людей, не искушённых в магии. На их компьютерах не то, что не стоят наши новомодные фреймворки и средства разработки, там даже простого компилятора днём с огнем не сыщешь. Не может наше приложение жить без библиотек, которые так редко встречаются в дикой природе, зачахнет оно без них, никогда не видать ему белого света…
Но не всё так печально.
Обычно в таких случаях разработчики создают так называемые бандлы, которые содержат в себе все необходимые библиотеки и плагины для запуска приложения. Чаще всего их создают или при помощи скриптов или зависимых от IDE инструментов или вовсе руками.
Если вы никогда не вылезали за пределы Visual Studio, то вам для счастья особенно многого и не надо, все рецепты создания инсталляторов уже давно известны и обкатаны. Но если вы приверженец кроссплатформенного ПО, то тут начинаются сложности. Зачастую это все приводит к появлению небольшой рощицы из костылей для создания готовых к распространению бандлов без каких-либо намеков на универсальность. Но есть способы этого избежать.
Уже много лет самым популярным способом сборки для кроссплатформенных приложений является cmake, который имеет поддержку кучи платформ и компиляторов, умеет Qt, умеет создавать инсталляторы и dmg’шки и многое другое. Как раз о кроссплатформенном создании бандлов я и хочу рассказать. Для этого в cmake 2.8 появилась прекрасная утилита fixup_bundle
Описание утилиты
Утилита fixup_bundle опрашивает приложение и дополнительный список библиотек(чаще всего плагинов) на предмет наличия внешних зависимостей, после чего она ищет их в списке директорий, который мы заранее приготовили и копирует библиотеки и устанавливает значение RUNPATH, где это необходимо, чтобы приложение и плагины смогли ими воспользоваться. На заключительном этапе утилита проверяет получившийся бандл на наличие внешних зависимостей, если всё плохо, то она сообщает об ошибке.
Подготовка проекта
Проще всего работать с результатом выполнения команды make install. В этом случае, при правильном создании целей установки, получится хорошо структурированный каталог, на который уже будет легко натравливать fixup_bundle.
Ниже приведен мой вариант путей установки для различных типов целей.
if(WIN32)
set(BUNDLE_NAME $<_name>.exe)
set(BINDIR bin)
set(BUNDLE_PATH «$
set(LIBDIR lib$
set(SHAREDIR share)
set(PLUGINSDIR bin)
set(IMPORTSDIR $
set(RLIBDIR $
elseif(APPLE)
set(BUNDLE_NAME $<_name>.app)
set(BUNDLE_PATH «$
set(BINDIR $
set(LIBDIR $
set(RLIBDIR $
set(SHAREDIR $
set(PLUGINSDIR $
set(IMPORTSDIR $
else()
set(BUNDLE_NAME $<_name>)
set(BINDIR bin)
set(BUNDLE_PATH «$
set(LIBDIR lib$
set(RLIBDIR $
set(SHAREDIR share/apps/$<_name>)
set(PLUGINSDIR $
set(IMPORTSDIR $
endif()
Пример использования
install(TARGETS client
RUNTIME DESTINATION $
LIBRARY DESTINATION $
ARCHIVE DESTINATION $
BUNDLE DESTINATION .
)
Аналогичным образом нужно завернуть все устанавливаемые файлы и цели, дабы можно было менять пути для новых платформ простым образом. Это очень облегчает создание бандлов, инкапсулируя все особенности платформ.
Установка плагинов
Все зависимости для библиотек и бинарников будут найдены и прописаны автоматически, при условии, что они есть в путях поиска. Но раз нам удалось собрать приложение, то логично предположить, что все эти пути у нас на руках есть! Сложнее с плагинами и библиотеками, которые подгружаются динамически. Пока не запустишь программу никогда не будешь уверен, что же ей ещё нужно для корректной работы. К сожалению, это не самый лучший вариант. Но мы же разработчики приложения и знаем какие же плагины использует наше пока ещё не вышедшее в свет приложение, поэтому мы можем написать код для их поиска и добавления в цели установки примерно таким образом:
macro(DEPLOY_QT_PLUGIN _path)
get_filename_component(_dir $ <_path>PATH)
get_filename_component(name $ <_path>NAME_WE)
string(TOUPPER $
if($ <_type>STREQUAL «DEBUG»)
set(name «$
endif()
#message($
if(EXISTS $
message(STATUS «Deployng $ <_path>plugin»)
install(FILES $
else()
message(STATUS «Could not deploy $ <_path>plugin»)
endif()
endmacro()
После чего можно будет просто перечислить те Qt плагины, которые реально нужны. И по make install’у они окажутся все в нужном нам месте.
list(APPEND QT_PLUGINS
bearer/qgenericbearer
.
imageformats/qtiff
iconengines/qsvgicon
)
По хорошему, для распространения софта через менеджеры пакетов нужно, чтобы при обычной работе make install’а все внешние библиотеки не трогались, поэтому лучше всего включать режим сборки бандла отдельной опцией в конфигураторе.
option(CREATE_BUNDLE «Create application bundle then install» ON)
Запуск fixup_bundle
Из приведенного куска кода вполне очевидно, как работает fixup_bundle. В конечном итоге для получения бандла достаточно команды make install. А инсталляторы на основе cpack’а уже станут делом техники, но это тема отдельного разговора.
Ну и небольшой пример в виде индикатора прогресса для qml. В приложении используются QtComponents Desktop. Кому интересно, можете попробовать его запустить на Windows или Mac Os X Lion. 
Код примера на github’е, там же набор макросов для cmake’а, который делает создание бандлов крайне простым и удобным.
Источник
CMake Tutorial
Introduction
The CMake tutorial provides a step-by-step guide that covers common build system issues that CMake helps address. Seeing how various topics all work together in an example project can be very helpful. The tutorial documentation and source code for examples can be found in the Help/guide/tutorial directory of the CMake source code tree. Each step has its own subdirectory containing code that may be used as a starting point. The tutorial examples are progressive so that each step provides the complete solution for the previous step.
A Basic Starting Point (Step 1)В
The most basic project is an executable built from source code files. For simple projects, a three line CMakeLists.txt file is all that is required. This will be the starting point for our tutorial. Create a CMakeLists.txt file in the Step1 directory that looks like:
Note that this example uses lower case commands in the CMakeLists.txt file. Upper, lower, and mixed case commands are supported by CMake. The source code for tutorial.cxx is provided in the Step1 directory and can be used to compute the square root of a number.
Adding a Version Number and Configured Header File
The first feature we will add is to provide our executable and project with a version number. While we could do this exclusively in the source code, using CMakeLists.txt provides more flexibility.
First, modify the CMakeLists.txt file to use the project() command to set the project name and version number.
Then, configure a header file to pass the version number to the source code:
Since the configured file will be written into the binary tree, we must add that directory to the list of paths to search for include files. Add the following lines to the end of the CMakeLists.txt file:
Using your favorite editor, create TutorialConfig.h.in in the source directory with the following contents:
When CMake configures this header file the values for @Tutorial_VERSION_MAJOR@ and @Tutorial_VERSION_MINOR@ will be replaced.
Next modify tutorial.cxx to include the configured header file, TutorialConfig.h .
Finally, let’s print out the executable name and version number by updating tutorial.cxx as follows:
Specify the C++ Standard
Next let’s add some C++11 features to our project by replacing atof with std::stod in tutorial.cxx . At the same time, remove #include .
We will need to explicitly state in the CMake code that it should use the correct flags. The easiest way to enable support for a specific C++ standard in CMake is by using the CMAKE_CXX_STANDARD variable. For this tutorial, set the CMAKE_CXX_STANDARD variable in the CMakeLists.txt file to 11 and CMAKE_CXX_STANDARD_REQUIRED to True. Make sure to add the CMAKE_CXX_STANDARD declarations above the call to add_executable .
Build and Test
Run the cmake executable or the cmake-gui to configure the project and then build it with your chosen build tool.
For example, from the command line we could navigate to the Help/guide/tutorial directory of the CMake source code tree and create a build directory:
Next, navigate to the build directory and run CMake to configure the project and generate a native build system:
Then call that build system to actually compile/link the project:
Finally, try to use the newly built Tutorial with these commands:
Adding a Library (Step 2)В
Now we will add a library to our project. This library will contain our own implementation for computing the square root of a number. The executable can then use this library instead of the standard square root function provided by the compiler.
For this tutorial we will put the library into a subdirectory called MathFunctions . This directory already contains a header file, MathFunctions.h , and a source file mysqrt.cxx . The source file has one function called mysqrt that provides similar functionality to the compiler’s sqrt function.
Add the following one line CMakeLists.txt file to the MathFunctions directory:
To make use of the new library we will add an add_subdirectory() call in the top-level CMakeLists.txt file so that the library will get built. We add the new library to the executable, and add MathFunctions as an include directory so that the mysqrt.h header file can be found. The last few lines of the top-level CMakeLists.txt file should now look like:
Now let us make the MathFunctions library optional. While for the tutorial there really isn’t any need to do so, for larger projects this is a common occurrence. The first step is to add an option to the top-level CMakeLists.txt file.
This option will be displayed in the cmake-gui and ccmake with a default value of ON that can be changed by the user. This setting will be stored in the cache so that the user does not need to set the value each time they run CMake on a build directory.
The next change is to make building and linking the MathFunctions library conditional. To do this we change the end of the top-level CMakeLists.txt file to look like the following:
Note the use of the variable EXTRA_LIBS to collect up any optional libraries to later be linked into the executable. The variable EXTRA_INCLUDES is used similarly for optional header files. This is a classic approach when dealing with many optional components, we will cover the modern approach in the next step.
The corresponding changes to the source code are fairly straightforward. First, in tutorial.cxx , include the MathFunctions.h header if we need it:
Then, in the same file, make USE_MYMATH control which square root function is used:
Since the source code now requires USE_MYMATH we can add it to TutorialConfig.h.in with the following line:
Exercise: Why is it important that we configure TutorialConfig.h.in after the option for USE_MYMATH ? What would happen if we inverted the two?
Run the cmake executable or the cmake-gui to configure the project and then build it with your chosen build tool. Then run the built Tutorial executable.
Now let’s update the value of USE_MYMATH . The easiest way is to use the cmake-gui or ccmake if you’re in the terminal. Or, alternatively, if you want to change the option from the command-line, try:
Rebuild and run the tutorial again.
Which function gives better results, sqrt or mysqrt?
Adding Usage Requirements for Library (Step 3)В
Usage requirements allow for far better control over a library or executable’s link and include line while also giving more control over the transitive property of targets inside CMake. The primary commands that leverage usage requirements are:
Let’s refactor our code from Adding a Library (Step 2) to use the modern CMake approach of usage requirements. We first state that anybody linking to MathFunctions needs to include the current source directory, while MathFunctions itself doesn’t. So this can become an INTERFACE usage requirement.
Remember INTERFACE means things that consumers require but the producer doesn’t. Add the following lines to the end of MathFunctions/CMakeLists.txt :
Now that we’ve specified usage requirements for MathFunctions we can safely remove our uses of the EXTRA_INCLUDES variable from the top-level CMakeLists.txt , here:
Once this is done, run the cmake executable or the cmake-gui to configure the project and then build it with your chosen build tool or by using cmake —build . from the build directory.
Installing and Testing (Step 4)В
Now we can start adding install rules and testing support to our project.
Install Rules
The install rules are fairly simple: for MathFunctions we want to install the library and header file and for the application we want to install the executable and configured header.
So to the end of MathFunctions/CMakeLists.txt we add:
And to the end of the top-level CMakeLists.txt we add:
That is all that is needed to create a basic local install of the tutorial.
Now run the cmake executable or the cmake-gui to configure the project and then build it with your chosen build tool.
Then run the install step by using the install option of the cmake command (introduced in 3.15, older versions of CMake must use make install ) from the command line. For multi-configuration tools, don’t forget to use the —config argument to specify the configuration. If using an IDE, simply build the INSTALL target. This step will install the appropriate header files, libraries, and executables. For example:
The CMake variable CMAKE_INSTALL_PREFIX is used to determine the root of where the files will be installed. If using the cmake —install command, the installation prefix can be overridden via the —prefix argument. For example:
Navigate to the install directory and verify that the installed Tutorial runs.
Testing Support
Next let’s test our application. At the end of the top-level CMakeLists.txt file we can enable testing and then add a number of basic tests to verify that the application is working correctly.
The first test simply verifies that the application runs, does not segfault or otherwise crash, and has a zero return value. This is the basic form of a CTest test.
The next test makes use of the PASS_REGULAR_EXPRESSION test property to verify that the output of the test contains certain strings. In this case, verifying that the usage message is printed when an incorrect number of arguments are provided.
Lastly, we have a function called do_test that runs the application and verifies that the computed square root is correct for given input. For each invocation of do_test , another test is added to the project with a name, input, and expected results based on the passed arguments.
Rebuild the application and then cd to the binary directory and run the ctest executable: ctest -N and ctest -VV . For multi-config generators (e.g. Visual Studio), the configuration type must be specified. To run tests in Debug mode, for example, use ctest -C Debug -VV from the build directory (not the Debug subdirectory!). Alternatively, build the RUN_TESTS target from the IDE.
Adding System Introspection (Step 5)В
Let us consider adding some code to our project that depends on features the target platform may not have. For this example, we will add some code that depends on whether or not the target platform has the log and exp functions. Of course almost every platform has these functions but for this tutorial assume that they are not common.
If the platform has log and exp then we will use them to compute the square root in the mysqrt function. We first test for the availability of these functions using the CheckSymbolExists module in MathFunctions/CMakeLists.txt . On some platforms, we will need to link to the m library. If log and exp are not initially found, require the m library and try again.
If available, use target_compile_definitions() to specify HAVE_LOG and HAVE_EXP as PRIVATE compile definitions.
If log and exp are available on the system, then we will use them to compute the square root in the mysqrt function. Add the following code to the mysqrt function in MathFunctions/mysqrt.cxx (don’t forget the #endif before returning the result!):
We will also need to modify mysqrt.cxx to include cmath .
Run the cmake executable or the cmake-gui to configure the project and then build it with your chosen build tool and run the Tutorial executable.
Which function gives better results now, sqrt or mysqrt?
Adding a Custom Command and Generated File (Step 6)В
Suppose, for the purpose of this tutorial, we decide that we never want to use the platform log and exp functions and instead would like to generate a table of precomputed values to use in the mysqrt function. In this section, we will create the table as part of the build process, and then compile that table into our application.
First, let’s remove the check for the log and exp functions in MathFunctions/CMakeLists.txt . Then remove the check for HAVE_LOG and HAVE_EXP from mysqrt.cxx . At the same time, we can remove #include .
In the MathFunctions subdirectory, a new source file named MakeTable.cxx has been provided to generate the table.
After reviewing the file, we can see that the table is produced as valid C++ code and that the output filename is passed in as an argument.
The next step is to add the appropriate commands to the MathFunctions/CMakeLists.txt file to build the MakeTable executable and then run it as part of the build process. A few commands are needed to accomplish this.
First, at the top of MathFunctions/CMakeLists.txt , the executable for MakeTable is added as any other executable would be added.
Then we add a custom command that specifies how to produce Table.h by running MakeTable.
Next we have to let CMake know that mysqrt.cxx depends on the generated file Table.h . This is done by adding the generated Table.h to the list of sources for the library MathFunctions.
We also have to add the current binary directory to the list of include directories so that Table.h can be found and included by mysqrt.cxx .
Now let’s use the generated table. First, modify mysqrt.cxx to include Table.h . Next, we can rewrite the mysqrt function to use the table:
Run the cmake executable or the cmake-gui to configure the project and then build it with your chosen build tool.
When this project is built it will first build the MakeTable executable. It will then run MakeTable to produce Table.h . Finally, it will compile mysqrt.cxx which includes Table.h to produce the MathFunctions library.
Run the Tutorial executable and verify that it is using the table.
Building an Installer (Step 7)В
Next suppose that we want to distribute our project to other people so that they can use it. We want to provide both binary and source distributions on a variety of platforms. This is a little different from the install we did previously in Installing and Testing (Step 4) , where we were installing the binaries that we had built from the source code. In this example we will be building installation packages that support binary installations and package management features. To accomplish this we will use CPack to create platform specific installers. Specifically we need to add a few lines to the bottom of our top-level CMakeLists.txt file.
That is all there is to it. We start by including InstallRequiredSystemLibraries . This module will include any runtime libraries that are needed by the project for the current platform. Next we set some CPack variables to where we have stored the license and version information for this project. The version information was set earlier in this tutorial and the license.txt has been included in the top-level source directory for this step.
Finally we include the CPack module which will use these variables and some other properties of the current system to setup an installer.
The next step is to build the project in the usual manner and then run the cpack executable. To build a binary distribution, from the binary directory run:
To specify the generator, use the -G option. For multi-config builds, use -C to specify the configuration. For example:
To create a source distribution you would type:
Alternatively, run make package or right click the Package target and Build Project from an IDE.
Run the installer found in the binary directory. Then run the installed executable and verify that it works.
Adding Support for a Dashboard (Step 8)В
Adding support for submitting our test results to a dashboard is simple. We already defined a number of tests for our project in Testing Support. Now we just have to run those tests and submit them to a dashboard. To include support for dashboards we include the CTest module in our top-level CMakeLists.txt .
The CTest module will automatically call enable_testing() , so we can remove it from our CMake files.
We will also need to create a CTestConfig.cmake file in the top-level directory where we can specify the name of the project and where to submit the dashboard.
The ctest executable will read in this file when it runs. To create a simple dashboard you can run the cmake executable or the cmake-gui to configure the project, but do not build it yet. Instead, change directory to the binary tree, and then run:
ctest [-VV] -D Experimental
Remember, for multi-config generators (e.g. Visual Studio), the configuration type must be specified:
Or, from an IDE, build the Experimental target.
The ctest executable will build and test the project and submit the results to Kitware’s public dashboard: https://my.cdash.org/index.php?project=CMakeTutorial.
Mixing Static and Shared (Step 9)В
In this section we will show how the BUILD_SHARED_LIBS variable can be used to control the default behavior of add_library() , and allow control over how libraries without an explicit type ( STATIC , SHARED , MODULE or OBJECT ) are built.
To accomplish this we need to add BUILD_SHARED_LIBS to the top-level CMakeLists.txt . We use the option() command as it allows users to optionally select if the value should be ON or OFF.
Next we are going to refactor MathFunctions to become a real library that encapsulates using mysqrt or sqrt , instead of requiring the calling code to do this logic. This will also mean that USE_MYMATH will not control building MathFunctions, but instead will control the behavior of this library.
The first step is to update the starting section of the top-level CMakeLists.txt to look like:
Now that we have made MathFunctions always be used, we will need to update the logic of that library. So, in MathFunctions/CMakeLists.txt we need to create a SqrtLibrary that will conditionally be built and installed when USE_MYMATH is enabled. Now, since this is a tutorial, we are going to explicitly require that SqrtLibrary is built statically.
The end result is that MathFunctions/CMakeLists.txt should look like:
Next, update MathFunctions/mysqrt.cxx to use the mathfunctions and detail namespaces:
We also need to make some changes in tutorial.cxx , so that it no longer uses USE_MYMATH :
Always include MathFunctions.h
Always use mathfunctions::sqrt
Don’t include cmath
Finally, update MathFunctions/MathFunctions.h to use dll export defines:
At this point, if you build everything, you may notice that linking fails as we are combining a static library without position independent code with a library that has position independent code. The solution to this is to explicitly set the POSITION_INDEPENDENT_CODE target property of SqrtLibrary to be True no matter the build type.
Exercise: We modified MathFunctions.h to use dll export defines. Using CMake documentation can you find a helper module to simplify this?
Adding Generator Expressions (Step 10)В
Generator expressions are evaluated during build system generation to produce information specific to each build configuration.
Generator expressions are allowed in the context of many target properties, such as LINK_LIBRARIES , INCLUDE_DIRECTORIES , COMPILE_DEFINITIONS and others. They may also be used when using commands to populate those properties, such as target_link_libraries() , target_include_directories() , target_compile_definitions() and others.
Generator expressions may be used to enable conditional linking, conditional definitions used when compiling, conditional include directories and more. The conditions may be based on the build configuration, target properties, platform information or any other queryable information.
There are different types of generator expressions including Logical, Informational, and Output expressions.
Logical expressions are used to create conditional output. The basic expressions are the 0 and 1 expressions. A $ results in the empty string, and results in the content of «. «. They can also be nested.
A common usage of generator expressions is to conditionally add compiler flags, such as those for language levels or warnings. A nice pattern is to associate this information to an INTERFACE target allowing this information to propagate. Let’s start by constructing an INTERFACE target and specifying the required C++ standard level of 11 instead of using CMAKE_CXX_STANDARD .
So the following code:
Would be replaced with:
Next we add the desired compiler warning flags that we want for our project. As warning flags vary based on the compiler we use the COMPILE_LANG_AND_ID generator expression to control which flags to apply given a language and a set of compiler ids as seen below:
Looking at this we see that the warning flags are encapsulated inside a BUILD_INTERFACE condition. This is done so that consumers of our installed project will not inherit our warning flags.
Exercise: Modify MathFunctions/CMakeLists.txt so that all targets have a target_link_libraries() call to tutorial_compiler_flags .
Adding Export Configuration (Step 11)В
During Installing and Testing (Step 4) of the tutorial we added the ability for CMake to install the library and headers of the project. During Building an Installer (Step 7) we added the ability to package up this information so it could be distributed to other people.
The next step is to add the necessary information so that other CMake projects can use our project, be it from a build directory, a local install or when packaged.
The first step is to update our install(TARGETS) commands to not only specify a DESTINATION but also an EXPORT . The EXPORT keyword generates and installs a CMake file containing code to import all targets listed in the install command from the installation tree. So let’s go ahead and explicitly EXPORT the MathFunctions library by updating the install command in MathFunctions/CMakeLists.txt to look like:
Now that we have MathFunctions being exported, we also need to explicitly install the generated MathFunctionsTargets.cmake file. This is done by adding the following to the bottom of the top-level CMakeLists.txt :
At this point you should try and run CMake. If everything is setup properly you will see that CMake will generate an error that looks like:
What CMake is trying to say is that during generating the export information it will export a path that is intrinsically tied to the current machine and will not be valid on other machines. The solution to this is to update the MathFunctions target_include_directories() to understand that it needs different INTERFACE locations when being used from within the build directory and from an install / package. This means converting the target_include_directories() call for MathFunctions to look like:
Once this has been updated, we can re-run CMake and verify that it doesn’t warn anymore.
At this point, we have CMake properly packaging the target information that is required but we will still need to generate a MathFunctionsConfig.cmake so that the CMake find_package() command can find our project. So let’s go ahead and add a new file to the top-level of the project called Config.cmake.in with the following contents:
Then, to properly configure and install that file, add the following to the bottom of the top-level CMakeLists.txt :
At this point, we have generated a relocatable CMake Configuration for our project that can be used after the project has been installed or packaged. If we want our project to also be used from a build directory we only have to add the following to the bottom of the top level CMakeLists.txt :
With this export call we now generate a Targets.cmake , allowing the configured MathFunctionsConfig.cmake in the build directory to be used by other projects, without needing it to be installed.
Packaging Debug and Release (Step 12)В
Note: This example is valid for single-configuration generators and will not work for multi-configuration generators (e.g. Visual Studio).
By default, CMake’s model is that a build directory only contains a single configuration, be it Debug, Release, MinSizeRel, or RelWithDebInfo. It is possible, however, to setup CPack to bundle multiple build directories and construct a package that contains multiple configurations of the same project.
First, we want to ensure that the debug and release builds use different names for the executables and libraries that will be installed. Let’s use d as the postfix for the debug executable and libraries.
Set CMAKE_DEBUG_POSTFIX near the beginning of the top-level CMakeLists.txt file:
And the DEBUG_POSTFIX property on the tutorial executable:
Let’s also add version numbering to the MathFunctions library. In MathFunctions/CMakeLists.txt , set the VERSION and SOVERSION properties:
From the Step12 directory, create debug and release subbdirectories. The layout will look like:
Now we need to setup debug and release builds. We can use CMAKE_BUILD_TYPE to set the configuration type:
Now that both the debug and release builds are complete, we can use a custom configuration file to package both builds into a single release. In the Step12 directory, create a file called MultiCPackConfig.cmake . In this file, first include the default configuration file that was created by the cmake executable.
Next, use the CPACK_INSTALL_CMAKE_PROJECTS variable to specify which projects to install. In this case, we want to install both debug and release.
From the Step12 directory, run cpack specifying our custom configuration file with the config option:
Источник


