- Installing Windows Server 2012
- Preinstallation information
- System requirements
- Processor
- Disk space requirements
- Other requirements
- Important information for x64-based operating systems
- Before you start Setup
- Supported upgrade paths
- Copyright
- Install and Deploy Windows Server 2012 R2 and Windows Server 2012
- Windows Server 2012 R2
- Windows Server 2012
- Installing IIS 8.5 on Windows Server 2012 R2
- New in IIS 8.5
- Before You Begin
- Install IIS 8.5 on Windows Server 2012 R2
- Install IIS 8.5 using the Server Manager
- Install IIS 8.5 for the first time in the Server Manager
- Install additional IIS 8.5 role services in the Server Manager
- Uninstall IIS 8.5 using the Server Manager
- Install IIS 8.5 from the Command Line
- Install IIS 8.5 using DISM
- Install IIS 8.5 using PowerShell
- Uninstall IIS 8.5 using PowerShell
- Modules in IIS 8.5
- Feature Dependencies
Installing Windows Server 2012
Applies To: Windows Server 2012, Windows Server 2012 R2
This document provides information about installing the Windows Server 2012 operating system, including any known issues that you may need to work around before starting an installation. It also provides information that you can use to troubleshoot problems that may occur during the installation. For information about serious known issues that you may need to work around after installation is complete, see the release notes, available at the same location as this document.
Setup works in several stages. You will be prompted for some basic information, and then Setup will copy files and restart the computer. Setup concludes by presenting a menu for Initial Configuration Tasks, which you can use to configure your server for your specific needs.
Preinstallation information
System requirements
The following are estimated system requirements for the Windows Server 2012. If your computer has less than the «minimum» requirements, you will not be able to install this product correctly. Actual requirements will vary based on your system configuration and the applications and features you install.
Processor
Processor performance depends not only on the clock frequency of the processor, but also on the number of processor cores and the size of the processor cache. The following are the processor requirements for this product:
- Minimum: 1.4В GHz 64-bit processor
The following are the estimated RAM requirements for this product:
- Minimum: 512 MB
Disk space requirements
The following are the estimated minimum disk space requirements for the system partition.
Minimum: 32 GB
Be aware that 32 GB should be considered an absolute minimum value for successful installation. The system partition will need extra space for any of the following circumstances: If you install the system over a network. Computers with more than 16 GB of RAM will require more disk space for paging, hibernation, and dump files.
Other requirements
You also need to have the following:
Super VGA (800 x 600) or higher-resolution monitor
Keyboard and MicrosoftВ® mouse (or other compatible pointing device)
Internet access (fees may apply)
Important information for x64-based operating systems
Ensure that you have updated and digitally signed kernel-mode drivers for Windows ServerВ 2012
If you install a Plug and Play device, you may receive a warning if the driver is not digitally signed. If you install an application that contains a driver that is not digitally signed, you will not receive an error during Setup. In both cases, Windows Server 2012 will not load the unsigned driver.
If you are not sure whether the driver is digitally signed, or if you are unable to boot into your computer after the installation, use the following procedure to disable the driver signature requirement. This procedure enables your computer to start correctly, and the unsigned driver will load successfully.
To disable the signature requirement for the current boot process:
Restart the computer and during startup, press F8.
Select Advanced Boot Options.
Select Disable Driver Signature Enforcement.
Boot into WindowsВ® and uninstall the unsigned driver.
Before you start Setup
Before you install Windows Server 2012, follow the steps in this section to prepare for the installation.
Disconnect UPS devices. If you have an uninterruptible power supply (UPS) connected to your destination computer, disconnect the serial cable before running Setup. Setup automatically attempts to detect devices that are connected to serial ports, and UPS equipment can cause issues with the detection process.
Back up your servers. Your backup should include all data and configuration information that is necessary for the computer to function. It is important to perform a backup of configuration information for servers, especially those that provide network infrastructure, such as Dynamic Host Configuration Protocol (DHCP) servers. When you perform the backup, be sure to include the boot and system partitions and the system state data. Another way to back up configuration information is to create a backup set for Automated System Recovery.
Disable your virus protection software. Virus protection software can interfere with installation. For example, it can make installation much slower by scanning every file that is copied locally to your computer.
Provide mass storage drivers. If your manufacturer has supplied a separate driver file, save the file to a floppy disk, CD, DVD, or Universal Serial Bus (USB) flash drive in either the root directory of the media or the amd64 folder. To provide the driver during Setup, on the disk selection page, click Load Driver (or press F6). You can browse to locate the driver or have Setup search the media.
Be aware that Windows Firewall is on by default. Server applications that must receive unsolicited inbound connections will fail until you create inbound firewall rules to allow them. Check with your application vendor to determine which ports and protocols are necessary for the application to run correctly.
Supported upgrade paths
The table below briefly summarizes supported upgrade paths to Windows Server 2012. For more details on upgrade paths, important caveats to upgrade, and additional information about evaluation versions, see https://go.microsoft.com/fwlink/?LinkId=260917.
If you do not see your current version in the left column, upgrading to this release of Windows Server 2012 is not supported.
If you see more than one edition in the right column, upgrade to either edition from the same starting version is supported.
If you are running:
You can upgrade to these editions:
Windows Server 2008 Standard with SP2 or Windows Server 2008 Enterprise with SP2
Windows Server 2012 Standard, Windows Server 2012 Datacenter
Windows Server 2008 Datacenter with SP2
Windows Server 2012 Datacenter
Windows Web Server 2008
Windows Server 2012 Standard
Windows ServerВ 2008В R2 Standard with SP1 or Windows ServerВ 2008В R2 Enterprise with SP1
Windows Server 2012 Standard, Windows Server 2012 Datacenter
Windows ServerВ 2008В R2 Datacenter with SP1
Windows Server 2012 Datacenter
Windows Web ServerВ 2008В R2
Windows Server 2012 Standard
Copyright
This document is provided “as-is”. Information and views expressed in this document, including URL and other Internet Web site references, may change without notice.
This document does not provide you with any legal rights to any intellectual property in any Microsoft product. You may copy and use this document for your internal, reference purposes.
В©2012 Microsoft Corporation. All rights reserved.
Microsoft, Active Directory, Hyper-V, MS-DOS, Windows, WindowsВ NT, Windows Server, and Windows Vista are either registered trademarks or trademarks of Microsoft Corporation in the United States and/or other countries.
This product contains graphics filter software; this software is based in part on the work of the Independent JPEG Group.
All other trademarks are property of their respective owners.
Install and Deploy Windows Server 2012 R2 and Windows Server 2012
Applies To: Windows Server 2012, Windows Server 2012 R2
Use the articles in this section to learn how to install and deploy Windows Server 2012 R2 and Windows Server 2012.
.jpeg)
Did you know that Microsoft Azure provides similar functionality in the cloud? Learn more about Microsoft Azure virtualization solutions.
Create a hybrid virtualization solution in Microsoft Azure:
— Create and upload a Windows Server VHD to AzureВ
Windows Server 2012 R2
Windows Server 2012 R2 Update
This topic summarizes the features included in the Windows Server 2012 R2 Update. Related updates have also been released for Windows 8.1 and Windows 8.1 RT.
System Requirements and Installation Information for Windows Server 2012 R2
This document provides information about installing the Windows Server 2012 R2 operating system, including important steps to take prior to installation, supported upgrade paths for the release, and information about installing versions distributed as virtual hard disk (VHD) files.
Release Notes: Important Issues in Windows Server 2012 R2
These release notes address the most critical issues and information about the Windows Server 2012 R2 operating system.
Upgrade Options for Windows Server 2012 R2
This document summarizes key information about the supported upgrade paths from previously licensed retail versions of Windows Server to Windows Server 2012 R2.
Features Removed or Deprecated in Windows Server 2012 R2
These features and functionalities in Windows Server 2012 R2 have either been removed from the product in the current release or are planned for potential removal in subsequent releases (“deprecated”).
Common Management Tasks and Navigation in Windows
Windows Server 2012 R2 and Windows Server 2012 feature the new Modern user interface. This topic helps you find and open common management tools, create shortcuts to frequently used programs, run programs with elevated privileges, and perform common tasks such signing in and out, restarting, and shutting down computers that are running Windows Server 2012 R2 and Windows Server 2012.
Windows Server 2012
Installing Windows Server 2012
This document provides information about installing the Windows Server 2012 operating system, including any known issues that you might need to work around before starting an installation. It also provides information that you can use to troubleshoot problems that may occur during the installation.
Release Notes: Important Issues in Windows Server 2012
These release notes address the most critical issues and information about the Windows Server 2012 operating system. For information about by-design changes, new features, and fixes in this release, see documentation and announcements from the specific feature teams.
Evaluation Versions and Upgrade Options for Windows Server 2012
This document summarizes key information about evaluation versions of Windows Server 2012, including where to obtain them, the limits on their use, and how to convert them to full retail versions. It also summarizes the supported upgrade paths from previously licensed retail versions of Windows Server to Windows Server 2012.
Windows Server Installation Options
This document summarizes the differences between the installation options available for Windows Server 2012, including the features that are installed with each option, the management options available after installation, and how to switch between the installation options during use.
Server Core and Full Server Integration Overview
In Windows Server 2012, the Server Core installation option is no longer an irrevocable selection that is made during setup. An administrator now has the flexibility to change to a Server Core installation or a full, GUI-based installation as needed, after operating system installation is finished.
Configure and Manage Server Core Installations
This collection of topics provides the information needed to install and deploy Server Core servers; install, manage, and uninstall server roles and features; and manage the server locally or remotely. It also includes a quick reference table of common tasks and the commands for accomplishing them locally on a Server Core server.
Features Removed or Deprecated in Windows Server 2012
This is a list of features and functionalities in Windows Server 2012 that have either been removed from the product in the current release or are planned for potential removal in subsequent releases. The list is intended for IT pros who are updating operating systems in a commercial environment.
Common Management Tasks and Navigation in Windows
Windows 8 and Windows Server 2012 feature the new Windows user interface. This topic helps you find and open common management tools, create shortcuts to frequently used programs, run programs with elevated user rights, and perform common tasks such as signing in and out, restarting, and shutting down computers that are running Windows Server 2012 and Windows 8.
Installing IIS 8.5 on Windows Server 2012 R2
This document describes how to install Internet Information Services (IIS) 8.5 on Windows ServerВ® 2012 R2. IIS is the Web server role in Windows Server 2012 R2. The Windows Server 2012 R2 operating system has all the IIS features needed to support the hosting of Web content in production environments. Windows 8 also includes IIS features, but feature availability depends on the operating system version.
You can use the procedures in this document to install IIS 8.0 or IIS 8.5.
The Web server has a modular design that enables you to customize a server by adding or removing modules to meet your specific needs. The Install IIS 8.5 on Windows Server 2012 R2 section describes how to install modules, and the Modules in IIS 8.5 section below describes the functionality that each module provides and which modules are installed by default.
New in IIS 8.5
IIS 8.5 includes several new features not found in IIS 8.0 or lower:
- Enhanced logging. An administrator can enable the logging of additional custom fields from request or response headers, or from server variables.
- Logging to event tracing for Windows. An administrator can enable the sending of logging information to Event Tracing for Windows (ETW).
- Dynamic Website activation. If there are a large number of configured sites (100 or greater, by default), the service will not activate any of the sites when the service is started.
- Idle Worker Process Page-Out. An administrator can enable an idle worker process to be suspended rather than terminated.
For more information on these features, see What’s New in IIS 8.5.
For information on new features in IIS 8.0, see What’s New in IIS 8.0.
Before You Begin
Ensure that you have administrative user rights on the computer on which you plan to install IIS 8.5. Note that by default, you do not have administrative user rights if you are logged on as a user other than as the built-in administrator, even if you were added to the local Administrators group on the computer.
Log on either to the built-in administrator account, or explicitly invoke applications as the built-in administrator by using the runas command-line tool.
You can run runas /user:administrator cmd.exe so that every application you run from that command line will be elevated, eliminating the need to use the runas syntax from that command line.
If you are logged on to an account other than the built-in local administrator account, you may see the following security alert dialog box.

Install IIS 8.5 on Windows Server 2012 R2
IIS is one of the server roles on Windows Server 2012 R2, named Web Server (IIS). You can use the following to install IIS:
- The Server Manager user interface in Windows Server 2012 R2
- A command-line installation using DISM (Deployment Image Servicing and Management)
- A command-line installation using PowerShell cmdlets
IIS can also be installed on Windows 8 through the Turn Windows features on or off dialog box from the Programs and Features settings of the Control Panel.
Install IIS 8.5 using the Server Manager
Server Manager provides a single dashboard to install or uninstall server roles, role services, and features. Server Manager also gives an overview of all currently installed roles and features.
When you install IIS 8.5 using the Windows Server 2012 R2 Server Manager, the steps you perform are different when you install IIS for the first time, as opposed to when you add roles, services, or features to an existing IIS installation. The two procedures are provided below. Different procedures are also used to add and remove roles, role services, and features. You cannot add and remove from the same UI
For more information on how to run the installation wizards in Server Manager, see Install or Uninstall Roles, Role Services, or Features.
Install IIS 8.5 for the first time in the Server Manager
When the Web Server (UI) role is chosen for the first time in the Add Roles and Features Wizard in Server Manager, the basic components and services needed for IIS are automatically selected. The following procedure will install Internet Information Services on a running physical server when IIS has not already been installed. To change an existing installation of IIS, perform the next procedure, Install additional role services for IIS. These two procedures involve different steps.
Open Server Manager by clicking the Server Manager icon on the desktop.
In the Server Manager window, with the Dashboard and Quick Start selected, click Add roles and features, or click the Manage menu, and then click Add Roles and Features. The Add Roles and Features Wizard will start with a Before You Begin page. The wizard asks for verification of the following:
- The administrator account has a strong password.
- The network settings, such as IP addresses, are configured.
- The most current security updates from WindowsВ® Update are installed.
On the Before You Begin page, click Next.
On the Installation Type page, select Role-based or feature-based installation to configure a single server. Click Next.

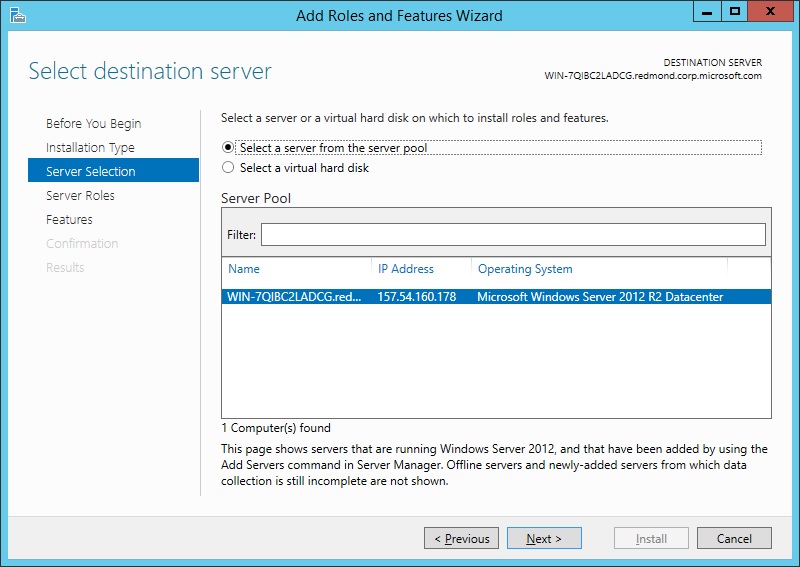
On the Server Selection page, select Select a server from the server pool, and then select a server; or select Select a virtual hard disk server, select a server to mount the VHD on, and then select a VHD file. Click Next.
To connect to the virtual hard disk, the virtual machine must be turned off and disconnected. If you select a VHD file from a network share, that share must grant Read and Write permissions to the computer (local system) account of the server that you selected to mount the VHD (user-only account access is not sufficient).
Servers in a server pool will be available only if they have been added by the Add other servers to manage command in Server Manager.

On the Server Roles page, select Web Server (IIS).
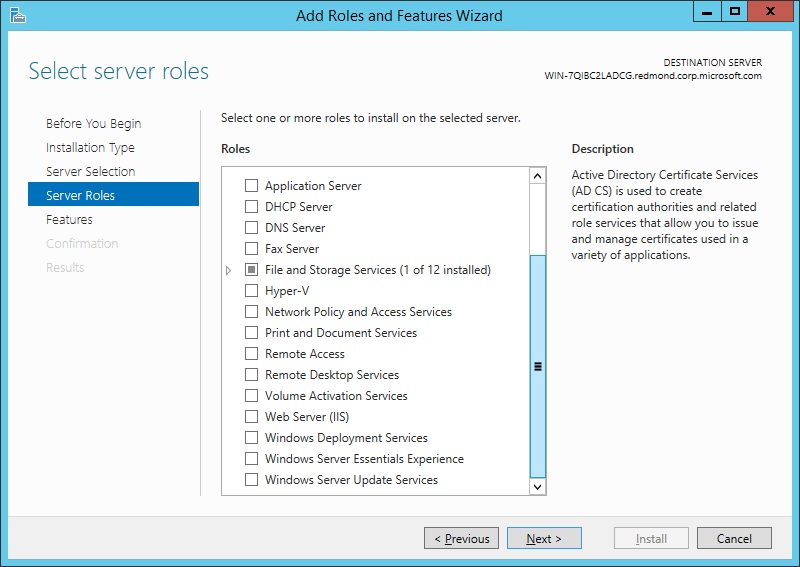
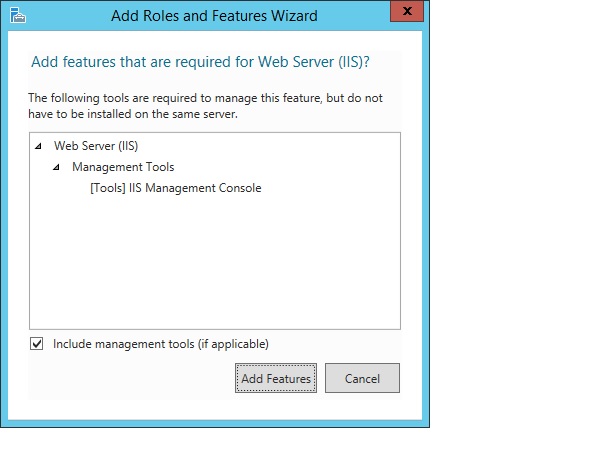
In the Add Roles and Features wizard, click Add Features if you want to install the IIS Management Console. If you do not want to install the Management Console, uncheck Include management tools (if applicable), and then click Continue.
On the Server Roles page, click Next.
The features required for the default role services of Management Tools and IIS Management Console will be preselected in the Features page.
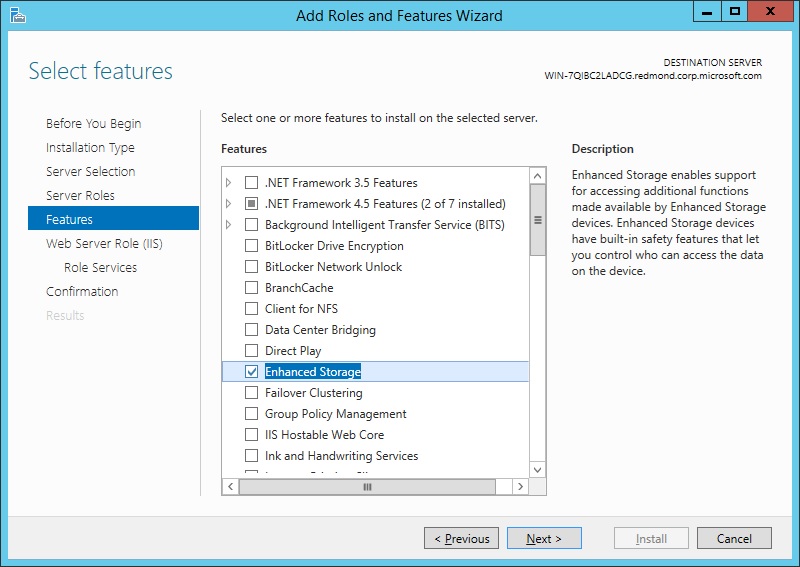
On the Features page, select any features that you would like to install, and then click Next. Note that you do not need to select any features on this page to install IIS. IIS setup will select the features that are required.
On the Web Server Role (IIS) page, click Next.
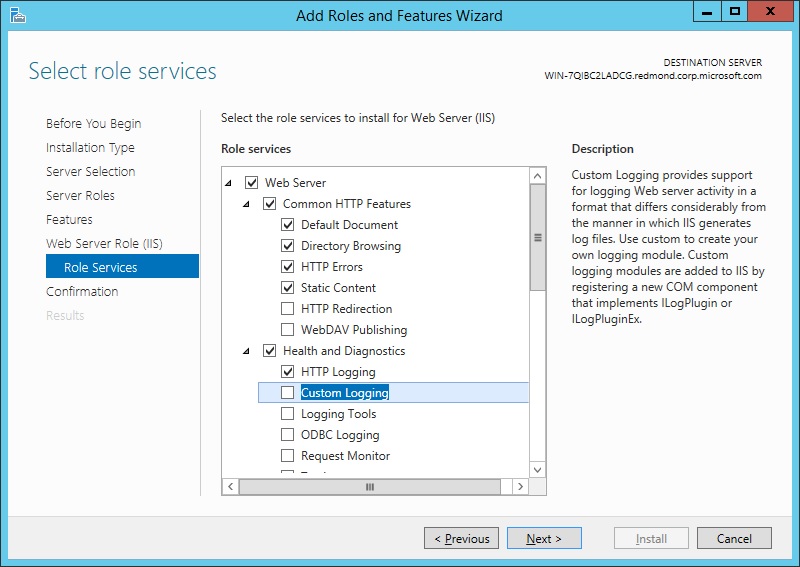
On the Role Services page, select any additional role services that you want to install.
When you install IIS for the first time by selecting Web Server (IIS), you will get at least the default installation that includes a minimum set of role services. You can see at this point that those default services are preselected on the Server Roles page. For a list of the server roles available, and which roles are installed by default, see Modules in IIS 8.5. You will have the chance to select more role services later in this procedure.
You can also deselect role services that were selected by default when you selected Web Server. However, at least one role service must be selected for Web Server to be selected and installed.
If you selected a role service that requires other role services or features to be installed, a page will be opened indicating the role services or features to be installed. Leave Include management tools (if applicable) selected to select the install management tools associated with the server role. You may not need the management tools on the destination server if you plan to manage the role remotely. Click Add Features to add the required role services or features.
After you have added the role services that you need on the Role Services page, click Next.
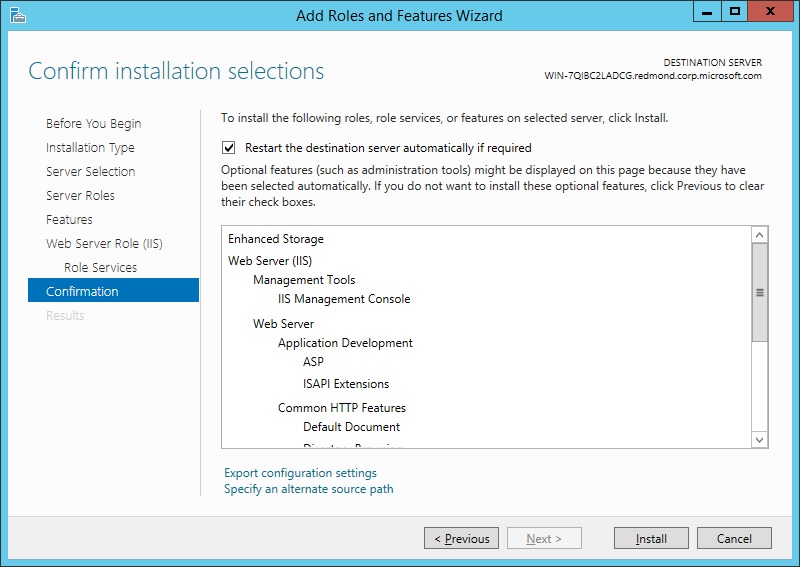
On the Confirmation page, verify the role services and features that are selected. Select Restart the destination server automatically if required to restart the destination server if the settings need to take immediate effect. To save the configuration information to an XML-based file that you can use for unattended installations with Windows PowerShell, select Export configuration settings, move to the appropriate path in the Save As dialog box, enter a file name, and then click Save.
When you are ready to start the installation process on the Confirmation page, click Install.
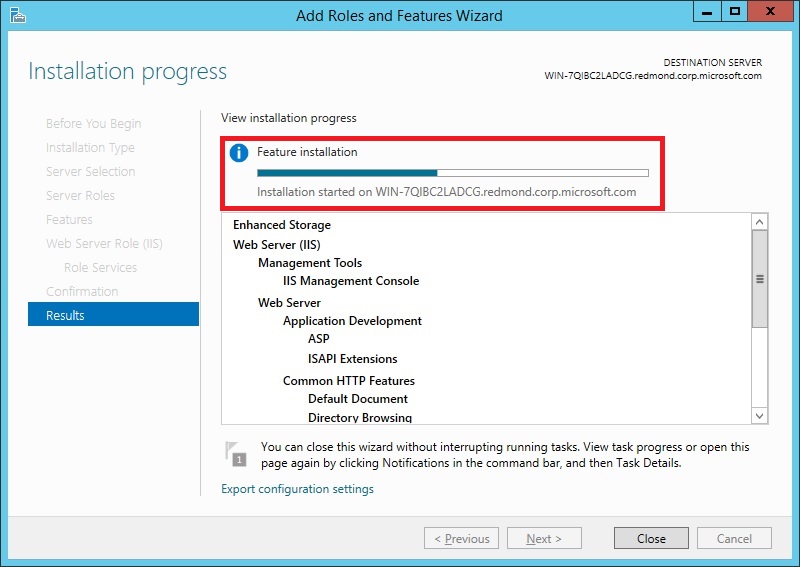
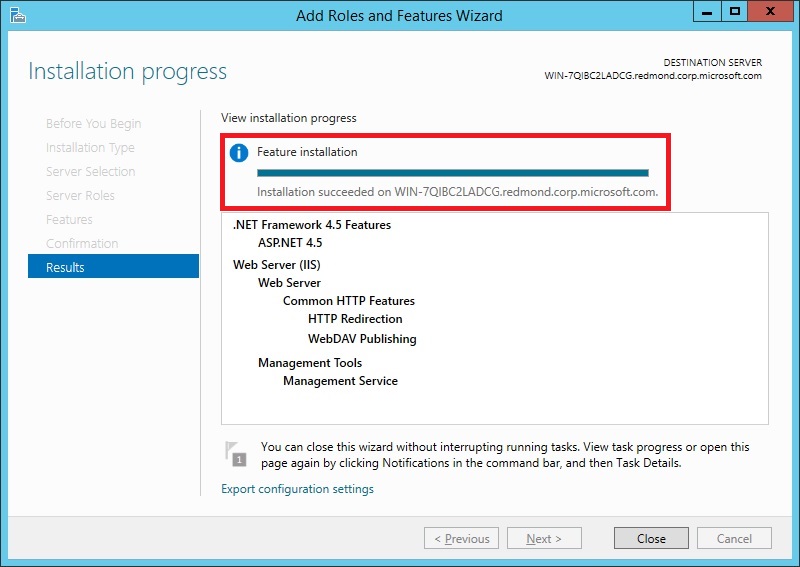
The Installation Progress page is displayed. You can close the wizard without interrupting running tasks. You can view task progress or open the page again by clicking Notifications in the notification area, and then clicking Task Details.
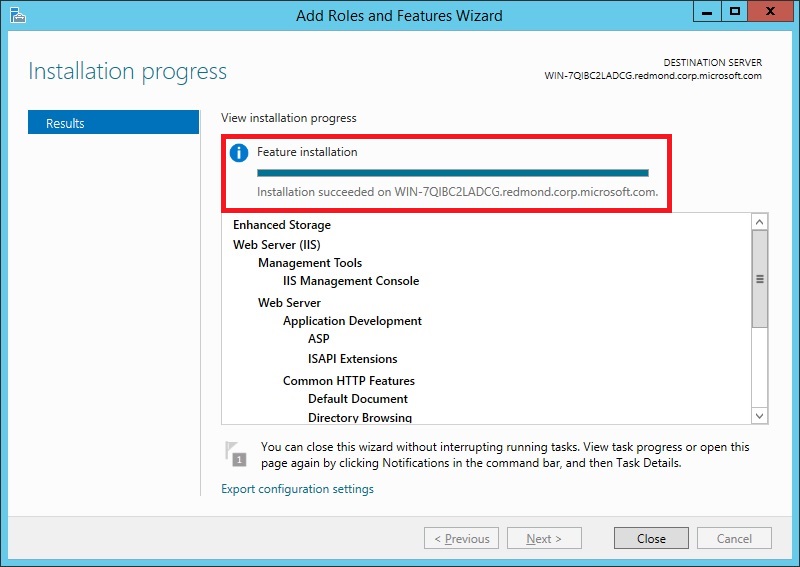
On the Results page, verify that the installation succeeds, and then click Close.
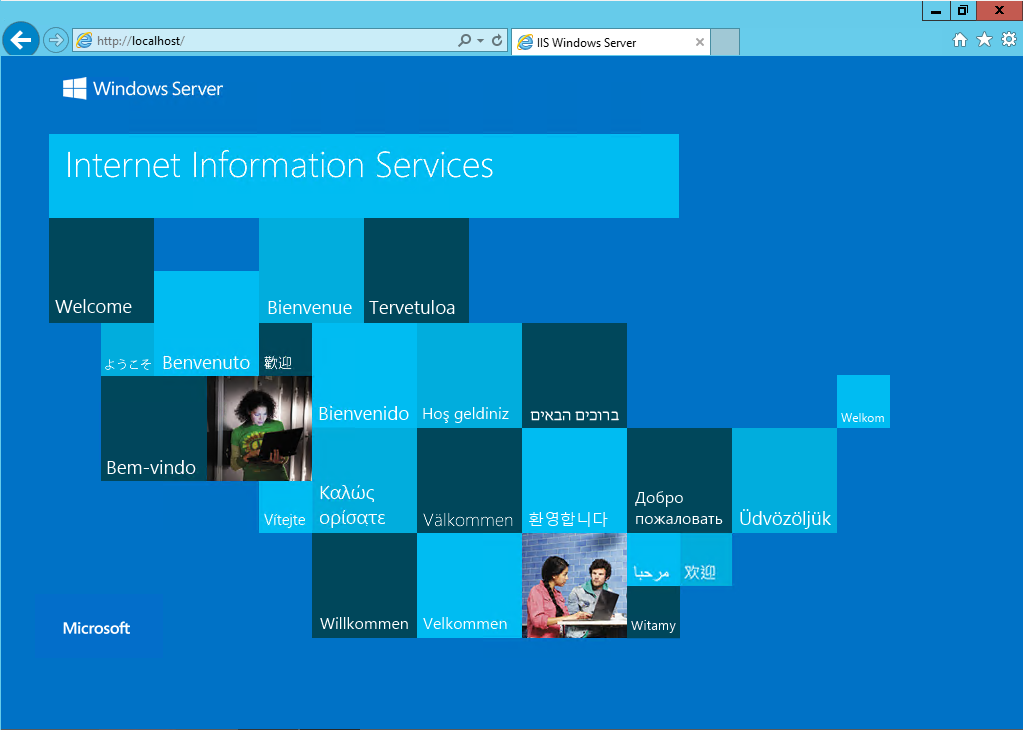
Confirm that the Web server works by opening a Web browser, and verifying that the following default Web page is displayed when you use the http://localhost address.
Install additional IIS 8.5 role services in the Server Manager
After you have installed the Web Server role on a running physical server for the first time, you can run through the installation process again to install additional roles, role services, and features.
Open Server Manager by clicking the Server Manager icon on the desktop.
In the Server Manager window, with the Dashboard and Quick Start selected, click Add roles and features, or click the Manage menu, and then click Add Roles and Features. The Add Roles and Features wizard will start with a Before You Begin page. The wizard asks for verification of the following:
- The administrator account has a strong password.
- The network settings, such as IP addresses, are configured.
- The most current security updates from WindowsВ® Update are installed.
On the Before You Begin page, click Next.
On the Installation Type page, select Role-based or feature-based installation to configure a single server. Click Next.

On the Server Selection page, select Select a server from the server pool, and then select a server; or select Select a virtual hard disk server, select the server to mount the VHD on, and then select the VHD file. Click Next.
To connect to the virtual hard disk, the virtual machine must be turned off and disconnected. If you select a VHD file from a network share, that share must grant Read and Write permissions to the computer (local system) account of the server that you selected to mount the VHD (user-only account access is not sufficient).
Servers in a server pool will be available only if they have been added by the Add other servers to manage command in the Server Manager.
On the Server Roles page, Web Server (IIS) will be selected when IIS 8.0 has already been installed. If Web server (IIS) is not selected, perform the procedure in Install IIS 8.5 for the first time in the Server Manager.
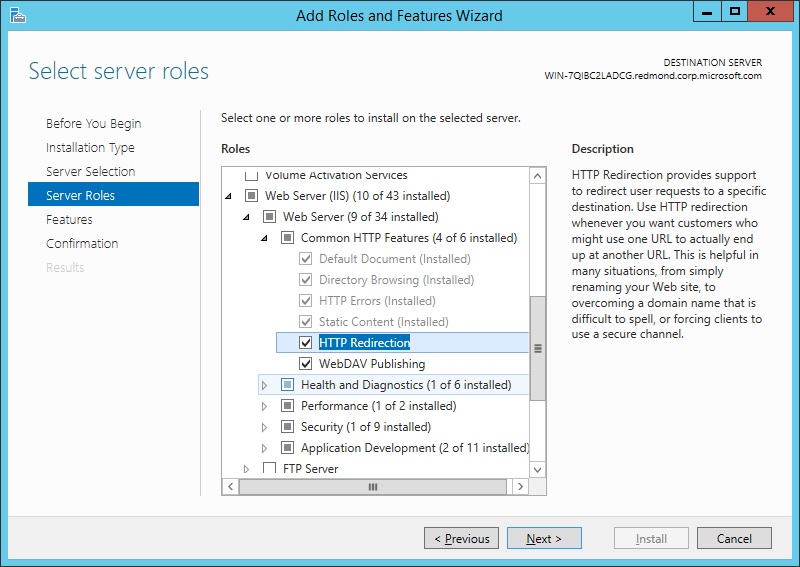
On the Server Roles page, open the Web Server (IIS) tree until you see a role service that you want to install. Select the role service.
Those roles, services, and features that have already been installed will be identified by «Installed» in parentheses after the name, and the name will be grayed out. To remove a role, service, or feature, see Uninstall IIS 8.5 Using the Server Manager. Note, however, that you can expand the lower-level entries under a node even when the node is grayed out.
For a list of the server roles that are available, and which roles are installed by default, see Modules in IIS 8.5 below.
If the role service that you selected requires other role services or features to be installed, an Add Features page will be opened listing those required role services or features. Leave Include management tools (if applicable) selected to select the install management tools associated with the server role. You may not need the management tools on the destination server if you plan to manage the role remotely. Click Add Features to add the required role services or features to the installation.

If you need any additional role services, repeat steps 6 and 7.
Add only the modules that are necessary to minimize the IIS installation footprint and the attack surface.
When you have selected all required role services, and their dependencies, on the Server Roles page, click Next.
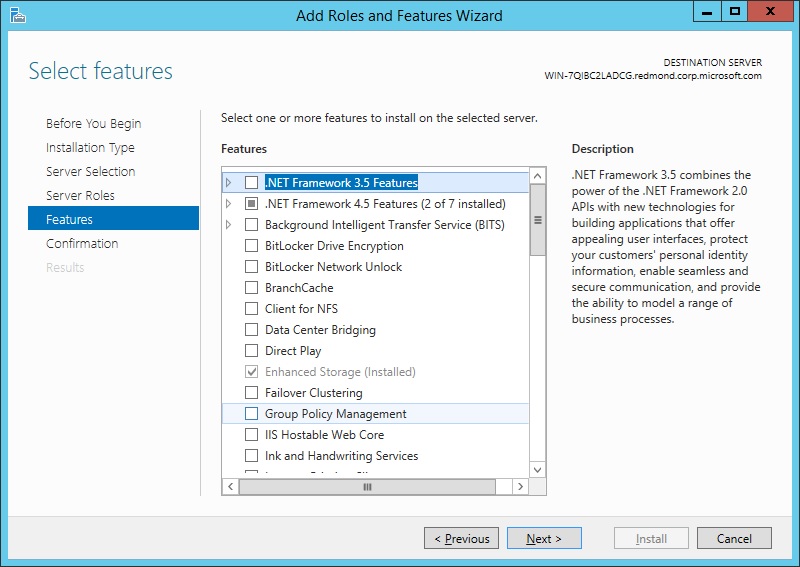
On the Features page, select any features that you need to be installed. Any features required to be installed for role services that you selected in step 6 will already be selected. Click Next.
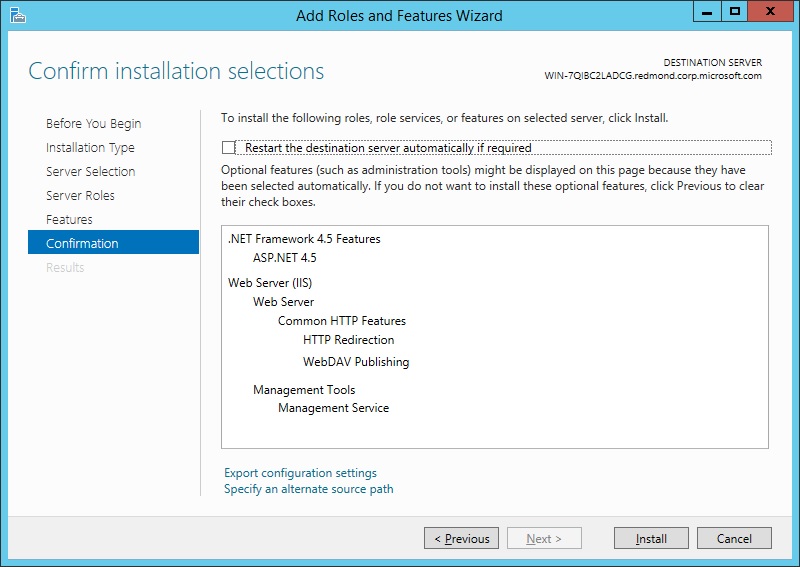
On the Confirmation page, verify the role services and features that are selected. Select Restart the destination server automatically if required to restart the destination server if the settings need to take immediate effect. To save the configuration information to an XML-based file that you can use for unattended installations with Windows PowerShell, select Export configuration settings, move to the appropriate path in the Save As dialog box, enter a file name, and then click Save.
When you are ready to start the installation process on the Confirmation page, click Install.
The Installation Progress page is displayed. You can close the wizard without interrupting running tasks. You can view task progress or open the page again by clicking Notifications in the notification area, and then clicking Task Details.

On the Results page, verify that the installation succeeds, and then click Close.
Confirm that the Web server works by opening a Web browser, and verifying that the following default Web page when you use the http://localhost address.

Uninstall IIS 8.5 using the Server Manager
In the Add Roles and Features wizard of Server Manager, you cannot delete existing features that have already been installed. To delete roles and features, use the Remove Roles and Features wizard of Server Manager. You can remove an individual role, role service, or feature by unchecking it in the wizard, or you can uninstall all of IIS by unchecking the IIS Web Server Role.
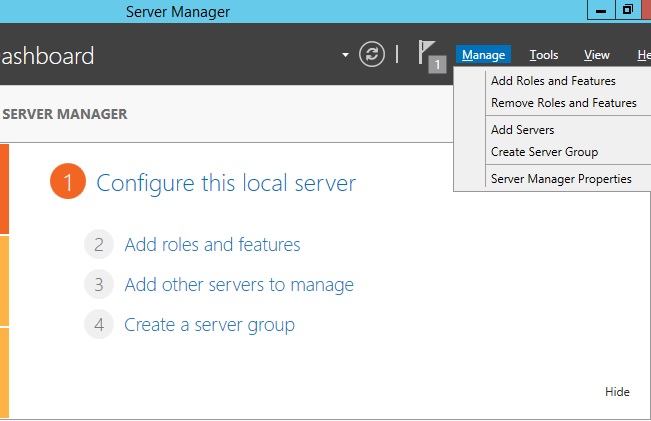
Open Server Manager by clicking the Server Manager icon on the desktop.
Click Manage at the top of the Server Manager, and then click Remove Roles and Features.
On the Before you begin page, click Next.
On the Server Selection page, select the server from the server pool, and then click Next.

On the Remove Server Roles page, clear the check box of any server role or role service that you would like to remove.
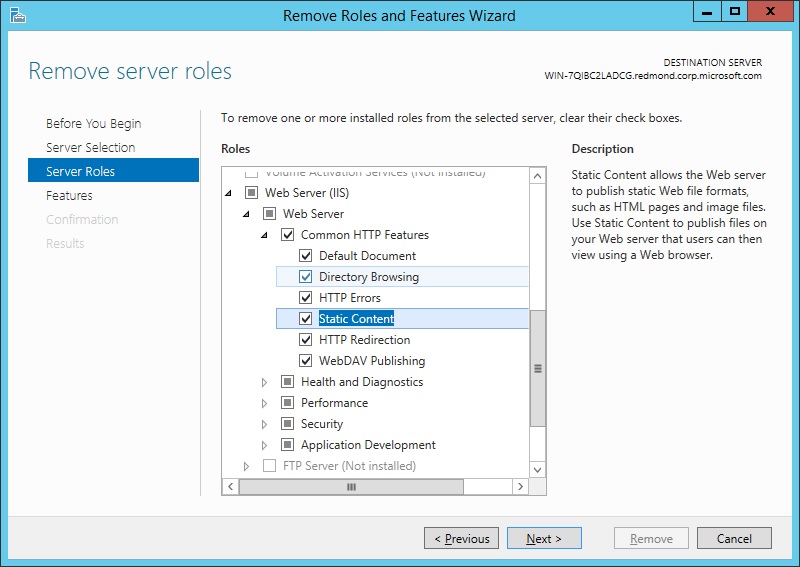
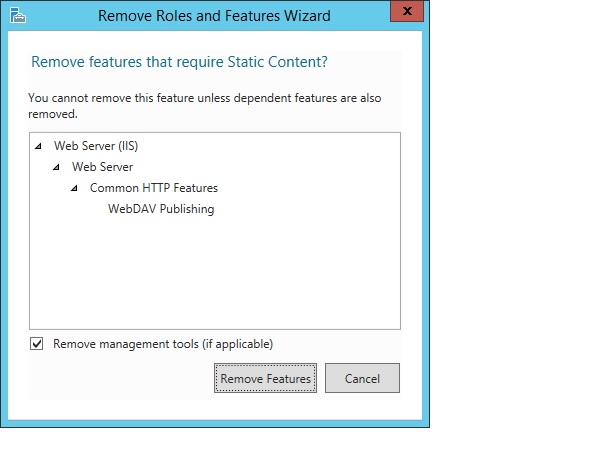
If you uncheck a role service that has feature dependencies, the Remove Features dialog box will be displayed showing the dependencies. Click Remove Features to remove them. You can remove all of IIS by unchecking Web Server (IIS).
On the Remove Server Roles page, select any other role or role service that you want to remove, and then click Next.
On the Features page, uncheck any feature that you would like to remove. If you uncheck a feature that has feature dependencies, a dialog box will be displayed showing the dependencies. Click Remove Features to remove them. On the Features page, click Next.

On the Confirmation page, verify that the roles, role services, and features to be removed are correct, and then click Remove.
It is recommended that you do a restart if you are prompted to do so, unless you have other activities that you want to do before the restart takes place. A restart is especially important when you remove roles, role services, or features.

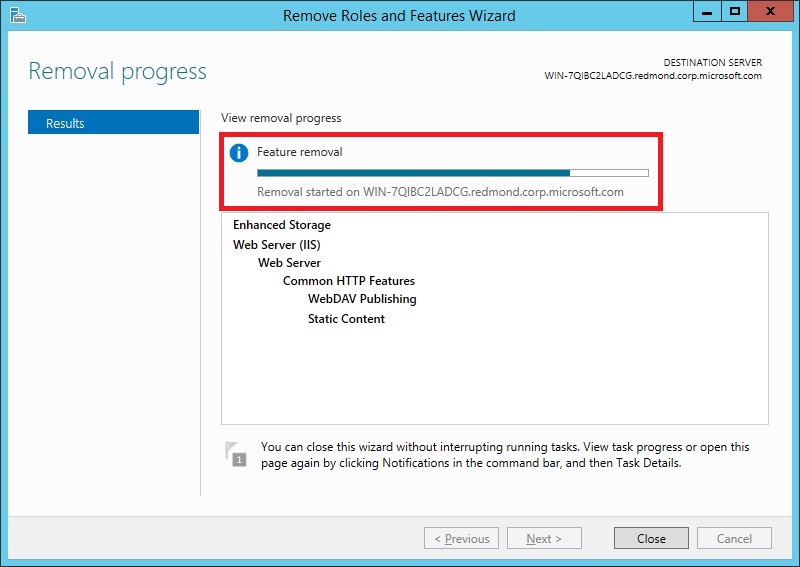
The Removal Progress page is displayed. You can close the wizard without interrupting running tasks. You can view task progress or open the page again by clicking Notifications in the notification area, and then clicking Task Details.
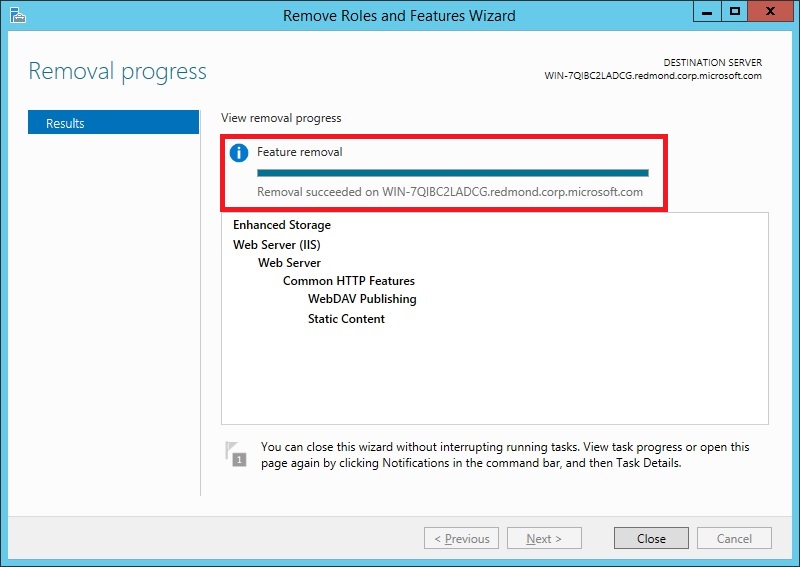
On the Results page, click Close.
Restart the destination server to finish removing features.
Install IIS 8.5 from the Command Line
You can install IIS 8.5 from the command line using DISM or PowerShell. Note that DISM and PowerShell have different namespaces for installation parameters, so the parameter names used in their commands will be different. For more information, see Modules in IIS 8.5.
Pkgmgr.exe has been deprecated. Use DISM instead for scripts installing IIS 8.5.
Install IIS 8.5 using DISM
Automating the installation of IIS by using unattended scripts is very useful if you need to deploy multiple Web servers and want to ensure that each of the Web servers is set up with identical components and services. In Windows Server 2012 R2, DISM is used for unattended scripts, letting you install or uninstall optional features from a command prompt or scripts. To use DISM, you must make sure you have administrative user rights on the computer. For more information about DISM, see DISM Overview
If you do not explicitly include in the DISM code a feature that the IIS installation has a dependency on, the installation will fail, and will not generate an error message. For a list of dependencies required, see Feature Dependencies.
For a full list of the DISM parameters corresponding to IIS roles, services, and features, see Modules in IIS 8.5.
The following script will install all roles, role services, and features of IIS 8.5, getting the full IIS installation that includes all available feature packages. If there are roles, role services, or features that you do not need, you should edit the script to include only those that you require. The order of the commands in the DISM script does not matter. The entire script will be handed off to the engine and treated as one transaction. To install IIS 8.5 with a script, type the following on one line in an elevated command prompt.
Install IIS 8.5 using PowerShell
You can use the following PowerShell cmdlets to install all of IIS 8.5:
To install only specific features, list them in the PowerShell cmdlet, as in the following example:
The following points apply to running the PowerShell cmdlets:
- The cmdlet requires elevation. You must be running a Windows PowerShell session as an administrator to run the cmdlet.
- The cmdlet does not install management tools for roles, role services, and features by default. You must add the IncludeManagementTools parameter to the cmdlet to do so.
For a full list of the PowerShell parameters corresponding to IIS 8.5 roles, services, and features, with more information, see Modules in IIS 8.5. The following lists all these parameters.
- Web-Server
- Web-WebServer
- Web-Security
- Web-Filtering
- Web-Cert-Auth
- Web-IP-Security
- Web-Url-Auth
- Web-Windows-Auth
- Web-Basic-Auth
- Web-Client-Auth
- Web-Digest-Auth
- Web-CertProvider
- Web-Common-Http
- Web-Http-Errors
- Web-Dir-Browsing
- Web-Static-Content
- Web-Default-Doc
- Web-Http-Redirect
- Web-DAV-Publishing
- Web-Performance
- Web-Stat-Compression
- Web-Dyn-Compression
- Web-Health
- Web-Http-Logging
- Web-ODBC-Logging
- Web-Log-Libraries
- Web-Custom-Logging
- Web-Request-Monitor
- Web-Http-Tracing
- Web-App-Dev
- Web-Net-Ext
- Web-Net-Ext45
- Web-ASP
- Web-Asp-Net
- Web-Asp-Net45
- Web-CGI
- Web-ISAPI-Ext
- Web-ISAPI-Filter
- Web-WebSockets
- Web-AppInit
- Web-Includes
- Web-Ftp-Server
- Web-Ftp-Service
- Web-Ftp-Ext
- Web-Mgmt-Tools
- Web-Mgmt-Console
- Web-Mgmt-Compat
- Web-Metabase
- Web-WMI
- Web-Lgcy-Mgmt-Console
- Web-Lgcy-Scripting
- Web-Scripting-Tools
- Web-Mgmt-Service
Uninstall IIS 8.5 using PowerShell
You can use the PowerShell cmdlet UnInstall-WindowsFeature to uninstall IIS 8.5. Run get-help Install-WindowsFeature at a PowerShell command line to see the syntax of the cmdlet. The following points apply to running the cmdlet:
- The cmdlet requires elevation. You must be running a Windows PowerShell session as an administrator to run the cmdlet.
- The cmdlet does not uninstall management tools for roles, role services, and features by default. You must add the IncludeManagementTools parameter to the cmdlet to do so.
Modules in IIS 8.5
IIS modules are individual role services that the server uses to process requests. The following table shows which modules are available to be installed in the Web server, which are installed by default, which role the role service is included in, the parameter used in DISM or PowerShell to install them, and a brief description of the functionality that they provide.
An asterisk (*) in the table below denotes a role or role service that is installed by default when the Web Server (IIS) role is installed.
| Role | Role Service | DISM Parameter | PowerShell Parameter | Functionality |
|---|---|---|---|---|
| Web Server Role | IIS-WebServerRole | Web-Server | Provides support for HTML Web sites and optional support for ASP.NET, ASP, and Web server extensions, enabling you to host an internal or external Web site or create Web-based applications. | |
| Web Server* | IIS-WebServer | Web-WebServer | Provides support for HTML Web sites and optional support for ASP.NET, ASP, and Web server extensions, enabling you to host an internal or external Web site or create Web-based applications. | |
| Common HTTP Features* | IIS-CommonHttpFeatures | Web-Common-Http | Supports basic HTTP functionality, such as delivering standard file formats and configuring custom server properties. | |
| Default Document* | IIS-DefaultDocument | Web-Default-Doc | Enables you to configure a default file for the Web server to return when users do not specify a file in a request URL. | |
| Directory Browsing* | IIS-DirectoryBrowsing | Web-Dir-Browsing | Enables users to see the contents of a directory on a Web server when they do not specify a file in a request URL and default documents are either disabled or not configured. | |
| HTTP Errors* | IIS-HttpErrors | Web-Http-Errors | Enables you to customize the error messages that are returned to the users’ browsers when the Web server detects a fault condition, improving the user experience. | |
| Static Content* | IIS-StaticContent | Web-Static-Content | Enables the Web server to publish static Web file formats, such as HTML pages and image files that can be viewed using a Web browser. | |
| HTTP Redirection | IIS-HttpRedirect | Web-Http-Redirect | Enables the Web server to redirect user requests that are sent to a specific destination. | |
| WebDAV Publishing | IIS-WebDAV | Web-DAV-Publishing | Web Distributed Authoring and Versioning. Enables you to publish files to and from a Web server by using the HTTP protocol, working through most firewalls without modification. | |
| Health and Diagnostics* | IIS-HealthAndDiagnostics | Web-Health | Provides an infrastructure to monitor, manage, and troubleshoot the health of Web servers, sites, and applications. | |
| HTTP Logging* | IIS-HttpLogging | Web-Http-Logging | Provides logging of Web site activity for the server, in addition to the logging provided by the operating system. | |
| Custom Logging | IIS-CustomLogging | Web-Custom-Logging | Enables you to create a custom logging module that performs logging of Web server activity in a format that differs from the logging normally performed by IIS. | |
| Logging Tools | IIS-LoggingLibraries | Web-Log-Libraries | Provides an infrastructure to manage Web server logs and automate common logging tasks. | |
| ODBC Logging | IIS-ODBCLogging | Web-ODBC-Logging | Provides an infrastructure that supports logging Web server activity to an ODBC-compliant database, enabling you to programmatically display and manipulate logging data on an HTML page. | |
| Request Monitor | IIS-RequestMonitor | Web-Request-Monitor | Provides an infrastructure to monitor Web application health by capturing information about HTTP requests. | |
| Tracing | IIS-HttpTracing | Web-Http-Tracing | Provides an infrastructure to diagnose and troubleshoot Web applications, including poor performance and authentication-related failures. | |
| Performance* | IIS-Performance | Web-Performance | Provides an infrastructure to enable more efficient use of bandwidth by performing compression of static and/or dynamic content. | |
| Static Content Compression* | IIS-HttpCompressionStatic | Web-Stat-Compression | Provides an infrastructure to configure HTTP compression of static content. | |
| Dynamic Content Compression | IIS-HttpCompressionDynamic | Web-Dyn-Compression | Provides an infrastructure to configure HTTP compression of dynamic content. | |
| Security* | IIS-Security | Web-Security | Provides an infrastructure for securing the Web server from users and requests, using one of multiple authentication methods. | |
| Request filtering* | IIS-RequestFiltering | Web-Filtering | Enables screening of all incoming requests to the server, and filters the requests based upon rules set by the administrator. | |
| Basic Authentication | IIS-BasicAuthentication | Web-Basic-Auth | An authentication method in which users are prompted to supply credentials that are transmitted unencrypted across the network. | |
| Centralized SSL Certificate | IIS-CertProvider | Web-CertProvider | An authentication method that uses SSL server certificates that are managed centrally using a file share. | |
| Client Certificate Mapping Authentication | IIS-ClientCertificateMappingAuthentication | Web-Client-Auth | An authentication method that uses client certificates to authenticate users, using Active Directory to offer one-to-one certificate mappings across multiple Web servers. | |
| Digest Authentication | IIS-DigestAuthentication | Web-Digest-Auth | An authentication method that sends a password hash to a Windows domain controller to authenticate users, especially useful if users who must be authenticated will access the Web site from behind firewalls and proxy servers. | |
| IIS Client Certificate Mapping Authentication | IIS-IISCertificateMappingAuthentication | Web-Cert-Auth | An authentication method that uses client certificates to authenticate users, using IIS to offer one-to-one or many-to-one certificate mapping. | |
| IP and Domain Restrictions | IIS-IPSecurity | Web-IP-Security | An authentication method that enables you to enable or deny content based upon the originating IP address or the domain name of the request. | |
| URL Authorization | IIS-URLAuthorization | Web-Url-Auth | An authentication method that enables you to create URL authorization rules that restrict access to Web content. | |
| Windows Authentication | IIS-WindowsAuthentication | Web-Windows-Auth | An authentication method that enables administrators in a Windows domain to take advantage of the domain infrastructure for authenticating users, a low-cost authentication solution for internal Web sites. | |
| Application Development | IIS-ApplicationDevelopment | Web-App-Dev | Provides an infrastructure for developing and hosting Web applications, useful for creating Web content and extending the functionality of IIS. | |
| .NET Extensibility 3.5 | IIS-NetFxExtensibility | Web-Net-Ext | Enables managed code developers to change, add, and extend Web server functionality in the entire request pipeline, the configuration, and the UI. | |
| .NET Extensibility 4.5 | IIS-NetFxExtensibility45 | Web-Net-Ext45 | Enables managed code developers to change, add, and extend Web server functionality in the entire request pipeline, the configuration, and the UI. | |
| Application Initialization | IIS-ApplicationInit | Web-AppInit | Enables you to perform expensive Web application initialization tasks before serving Web pages. | |
| ASP | IIS-ASP | Web-ASP | Provides a server-side scripting environment for building Web sites and Web applications, especially for existing applications. | |
| ASP.NET 3.5 | IIS-ASPNET | Web-Asp-Net | Provides a server-side object-oriented programming environment for building Web sites and Web applications using managed code. | |
| ASP.NET 4.5 | IIS-ASPNET45 | Web-Asp-Net45 | Provides a server-side object-oriented programming environment for building Web sites and Web applications using managed code. | |
| CGI | IIS-CGI | Web-CGI | Defines how a Web server passes information to an external program. | |
| ISAPI Extensions | IIS-ISAPIExtensions | Web-ISAPI-Ext | Internet Server Programming Interface Extensions. Provides support for dynamic Web content development. | |
| ISAPI Filters | IIS-ISAPIFilter | Web-ISAPI-Filter | Internet Server Programming Interface Filters. Enables you to extend or change the functionality provided by IIS, reviewing every request made to the Web server and processing the appropriate requests. | |
| Server Side Includes | IIS-ServerSideIncludes | Web-Includes | A scripting language used to dynamically generate HTML pages, using script that is run on the server before the page is delivered to the client. | |
| WebSocket Protocol | IIS-WebSockets | Web-WebSockets | Provides communication channels for server applications created with IIS 8.x and ASP.NET 4.5. | |
| FTP Server | IIS-FTPServer | Web-Ftp-Server | Enables the transfer of files between a client and a server, using either an FTP client or an FTP-enabled Web browser. | |
| FTP Service | IIS-FTPSvc | Web-Ftp-Service | Enables FTP publishing on a Web server. | |
| FTP Extensibility | IIS-FTPExtensibility | Web-Ftp-Ext | Enables support for FTP extensibility features such as customer providers, ASP.NET users, or IIS Manager users. | |
| IIS Hostable Web Core (IIS 8.0, not IIS 8.5) | IIS-HostableWebCore | Web-WHC | Enables you to write custom code that will host core IIS functionality in your own application that serves HTTP requests and uses its own applicationHost.config and root Web.config configuration files. | |
| Management Tools* | IIS-WebServerManagementTools | Web-Mgmt-Tools | Provides an infrastructure for managing a Web server that runs IIS 7.0 or later. | |
| IIS Management Console* | IIS-ManagementConsole | Web-Mgmt-Console | Provides an infrastructure for managing an IIS 7.0 or later Web server, local or remote, using a user interface. | |
| IIS 6 Management Compatibility | IIS-IIS6ManagementCompatibility | Web-Mgmt-Compat | Provides forward compatibility for applications and scripts that use the IIS 6 APIs, Admin Base Object (ABO) and Active Directory Service Interface (ADSI). | |
| IIS 6 Metabase Compatibility | IIS-Metabase | Web-Metabase | Provides an infrastructure for querying and configuring the Metabase, so that you can run applications and scripts migrated from earlier versions of IIS that use Admin Base Object (ABO), and Active Directory Service Interface (ADSI). | |
| IIS 6 Management Console | IIS-LegacySnapIn | Web-Lgcy-Mgmt-Console | Provides an infrastructure for administration of remote IIS 6.0 servers. | |
| IIS 6 Scripting Tools | IIS-LegacyScripts | Web-Lgcy-Scripting | Enable you to continue to use scripts built to manage IIS 6 in IIS 7.0 or later, especially if your applications and scripts use ActiveX Data Objects (ADO) or Active Directory Service Interface (ADSI). | |
| IIS 6 WMI Compatibility | IIS-WMICompatibility | Web-WMI | Provides Windows Management Instrumentation (WMI) scripting interfaces to programmatically manage and automate tasks for an IIS 8.0 or later Web server. | |
| IIS Management Scripts and Tools | IIS-ManagementScriptingTools | Web-Scripting-Tools | Provides an infrastructure to programmatically manage an IIS 7.0 or later Web server by using commands in a command window or by running scripts. | |
| Management Service | IIS-ManagementService | Web-Mgmt-Service | Enables the Web server to be managed remotely from another computer using IIS Manager. |
Feature Dependencies
The following table shows which role services and features must be installed for the role service or features in the table row to be installed.
The Add Roles and Features Wizard and Remove Roles and Features Wizard of Server Manager take care of dependencies by prompting you to add dependencies when adding a role service or feature, or to remove dependencies when removing a role service or feature. However, when you install IIS using DISM, you need to include in the DISM code any dependency that a role service or feature being installed has, or the installation will fail, and you may not receive an indication why it failed.


