- Cygwin
- Installing and Updating Cygwin Packages
- Installing and Updating Cygwin for 64-bit versions of Windows
- Installing and Updating Cygwin for 32-bit versions of Windows
- Signing key transition
- General installation notes
- Q: How do I add a package to my existing Cygwin installation?
- Q: Is there a command-line installer?
- Q: Why not use apt, yum, my favourite package manager, etc.?
- Q: How do I install everything?
- Install cygwin from windows
- Chapter 2. Setting Up Cygwin
- Internet Setup
- Download Source
- Selecting an Install Directory
- Local Package Directory
- Connection Method
- Choosing Mirrors
- Choosing Packages
- Download and Installation Progress
- Shortcuts
Cygwin
Get that Linux feeling — on Windows
Installing and Updating Cygwin Packages
Installing and Updating Cygwin for 64-bit versions of Windows
Run setup-x86_64.exe any time you want to update or install a Cygwin package for 64-bit windows. The signature for setup-x86_64.exe can be used to verify the validity of this binary.
Installing and Updating Cygwin for 32-bit versions of Windows
Run setup-x86.exe any time you want to update or install a Cygwin package for 32-bit windows. The signature for setup-x86.exe can be used to verify the validity of this binary.
Signing key transition
See this mail for more details.
General installation notes
When installing packages for the first time, the setup program does not install every package. Only the minimal base packages from the Cygwin distribution are installed by default, which takes up about 100 MB.
Clicking on categories and packages in the setup program package installation screen allows you to select what is installed or updated.
Individual packages like bash, gcc, less, etc. are released independently of the Cygwin DLL, so the Cygwin DLL version is not useful as a general Cygwin release number. The setup program tracks the versions of all installed components and provides the mechanism for installing or updating everything available from this site for Cygwin.
Once you’ve installed your desired subset of the Cygwin distribution, the setup program will remember what you selected, so re-running it will update your system with any new package releases.
On Windows Vista and later, the setup program will check by default if it runs with administrative privileges and, if not, will try to elevate the process. If you want to avoid this behaviour and install under an unprivileged account just for your own usage, run setup with the --no-admin option.
Q: How do I add a package to my existing Cygwin installation?
A: Run the setup program and select the package you want to add.
Tip: if you don’t want to also upgrade existing packages, select ‘Keep’ at the top-right of the package chooser page.
Q: Is there a command-line installer?
A: Yes and no. The setup program understands command-line arguments which allow you to control its behavior and choose individual packages to install. While this provides some functionality similar to such tools as apt-get or yum it is not as full-featured as those package managers.
Q: Why not use apt, yum, my favourite package manager, etc.?
A: The basic reason for not using a more full-featured package manager is that such a program would need full access to all of Cygwin’s POSIX functionality. That is, however, difficult to provide in a Cygwin-free environment, such as exists on first installation. Additionally, Windows does not easily allow overwriting of in-use executables so installing a new version of the Cygwin DLL while a package manager is using the DLL is problematic.
Q: How do I install everything?
A: You do not want to do this! This will install an enormous number of packages that you will never use, including debuginfo and source for every package.
If you really must do this, clicking on the «Default» label next to the «All» category to change it to «Install» will mark every Cygwin package for installation. Be advised that this will download and install tens of gigabytes of files to your computer.
Install cygwin from windows
Для того, чтобы в среде Eclipse можно было компилировать C/C++ приложения для Android, понадобится среда окружения Cygwin [1], где есть необходимая утилита make.
[Установка CygWin]
Запустите на выполнение setup-x86.exe или setup-x86_64.exe [1] в зависимости от версии Вашей Windows. На скриншотах показаны шаги выбора в мастере установки. Выберите Install from Internet, каталог установки c:\cygwin, папку для сохранения временных файлов c:\temp, тип подключения к Интернет, адрес сервера, откуда будут скачиваться пакеты.
Выберите для установки пакеты Devel/make и Shells/bash.
Запустите установку и дождитесь её окончания.
[Проверка работоспособности CygWin]
Выполните в командной строке команду:

В Вашей операционной системе может быть установлено несколько программ, которые могут использовать утилиту make. К примеру, это могут быть Atmel Studio 6, Visual Studio, MinGW, WinAVR и другие тулчейны. Какая из утилит make запустится в ответ на ввод команды make, зависит от переменной окружения PATH, где указаны пути поиска запускаемых программ. Утилита make из пакета Cygwin находится в папке c:\cygwin\bin, поэтому если хотите, чтобы запускалась именно эта версия make, то проверьте наличие пути c:\cygwin\bin в составе переменной PATH. Содержимое переменной PATH можно посмотреть командой консоли set PATH. На скриншоте показан пример такого вывода.
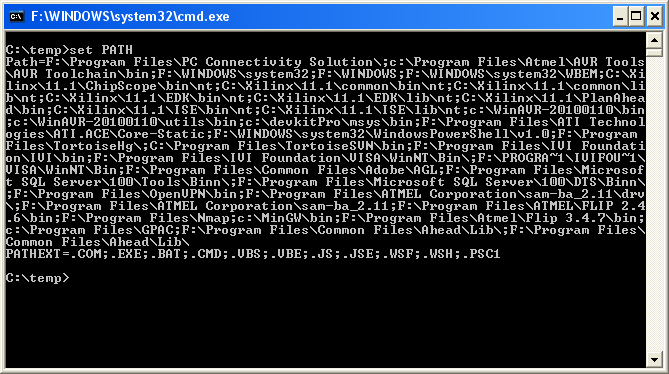
Как можете увидеть на примере этого скриншота, в данном случае переменная PATH не содержит пути c:\cygwin\bin, поэтому будет запускаться утилита make из каталога c:\Program Files\Atmel\AVR Tools\AVR Toolchain\bin (этот путь присутствует в переменной PATH, и стоит первым по порядку). Поэтому будьте внимательны!
Переменную PATH можно настроить через Мой компьютер -> Свойства -> Дополнительно -> Переменные среды.
При запуске make из окна терминала Cygwin Terminal запустится утилита make из каталога c:\cygwin\bin:

[Настройка переменных окружения bash-шелла Cygwin]
Все переменные окружения Windows автоматически импортируются в переменные окружения bash. Однако есть некоторая проблема, связанная с пробелами в именах путей Windows. Такие пути требуют особого внимания, и для их корректного преобразования в пути cygwin требуется специальная настройка.
Для разработки под Android нужно, чтобы были доступны утилиты JDK, SDK, NDK, Ant, которые находятся обычно в путях, обозначенных переменными окружения Windows: JAVA_HOME, ANDROID_SDK, ANDROID_NDK, ANT_HOME соответственно. Если в путях переменных окружения есть пробелы, то такие переменные требуют специального экспорта в окружение bash.
В каталоге c:\cygwin\home\имя_пользователя\ находится файл .bash_profile, в котором делаются основные настройки рабочего окружения среды bash Cygwin. Для настройки переменных окружения, связанных с путями поиска утилит JDK, SDK, NDK, Ant, добавьте в конец файла .bash_profile следующие строки:
Команда export назначает указанное значение строковой переменной окружения. Это значение вырабатывает утилита cygpath, которая принимает в качестве параметра значение старой переменной окружения Windows. Обратите внимание, что строка с опциями для запуска команды cygpath обрамлена символом ` , который служит для выделения запускаемой команды в конфиге. Не переgутайте ` с другими символами ‘ и «», это очень важно.
Если после внесения указанных изменений в файл .bash_profile запустить окно терминала Cygwin, то в переменных окружения bash появятся переменные $JAVA_HOME, $ANDROID_SDK, $ANDROID_NDK, $ANT_HOME, которые будут иметь корректные пути cygwin. Вот пример такого пути для переменной $JAVA_HOME:
Chapter 2. Setting Up Cygwin
Table of Contents
Internet Setup
To install the Cygwin net release, go to https://cygwin.com/ and run either setup-x86.exe to install the 32 bit version of Cygwin, or setup-x86_64.exe to install the 64 bit version of Cygwin. This will download a GUI installer which can be run to download a complete cygwin installation via the internet. Follow the instructions on each screen to install Cygwin.
The setup.exe installer is designed to be easy for new users to understand while remaining flexible for the experienced. The volunteer development team is constantly working on setup.exe ; before requesting a new feature, check the wishlist in the Git README . It may already be present in the Git version!
On Windows Vista and later, setup.exe will check by default if it runs with administrative privileges and, if not, will try to elevate the process. If you want to avoid this behaviour and install under an unprivileged account just for your own usage, run setup.exe with the —no-admin option.
Since the default value for each option is the logical choice for most installations, you can get a working minimal Cygwin environment installed by simply clicking the Next button at each page. The only exception to this is choosing a Cygwin mirror, which you can choose by experimenting with those listed at https://cygwin.com/mirrors.html. For more details about each of page of the setup.exe installation, read on below. Please note that this guide assumes that you have a basic understanding of Unix (or a Unix-like OS). If you are new to Unix, you will also want to make use of other resources.
Download Source
Cygwin uses packages to manage installing various software. When the default Install from Internet option is chosen, setup.exe creates a local directory to store the packages before actually installing the contents. Download from Internet performs only the first part (storing the packages locally), while Install from Local Directory performs only the second (installing the contents of the packages).
The Download from Internet option is mainly for creating a base Cygwin package tree on one computer for installation on several machines with Install from Local Directory ; copy the entire local package tree to another machine with the directory tree intact. For example, you might create a C:\cache\ directory and place setup.exe in it. Run setup.exe to Install from Internet or Download from Internet , then copy the whole C:\cache\ to each machine and instead choose Install from Local Directory .
Though this provides some basic mirroring functionality, if you are managing a large Cygwin installation, to keep up to date we recommend using a mirroring tool such as wget . A helpful user on the Cygwin mailing list created a simple demonstration script to accomplish this; search the list for mkcygwget for ideas.
Selecting an Install Directory
The Root Directory for Cygwin (default C:\cygwin ) will become / within your Cygwin installation. You must have write access to the parent directory, and any ACLs on the parent directory will determine access to installed files.
The Install For options of All Users or Just Me should always be left on the default All Users , unless you do not have write access to HKEY_LOCAL_MACHINE in the registry or the All Users Start Menu. This is true even if you are the only user planning to use Cygwin on the machine. Selecting Just Me will cause problems for programs such as crond and sshd . If you do not have the necessary permissions, but still want to use these programs, consult the Cygwin mailing list archives about others’ experiences.
Local Package Directory
The Local Package Directory is the cache where setup.exe stores the packages before they are installed. The cache must not be the same folder as the Cygwin root. Within the cache, a separate directory is created for each Cygwin mirror, which allows setup.exe to use multiple mirrors and custom packages. After installing Cygwin, the cache is no longer necessary, but you may want to retain the packages as backups, for installing Cygwin to another system, or in case you need to reinstall a package.
Connection Method
The Direct Connection method of downloading will directly connect. If your system is configured to use a proxy server or auto-configuration scripts, the Use System Proxy Settings method uses those settings. Alternatively, you can manually enter proxy settings into the Use HTTP/FTP Proxy section.
Choosing Mirrors
Since there is no way of knowing from where you will be downloading Cygwin, you need to choose at least one mirror site. Cygwin mirrors are geographically distributed around the world; check the list at https://cygwin.com/mirrors.html to find one near you. You can select multiple mirrors by holding down CTRL and clicking on each one. If you have the URL of an unlisted mirror (for example, if your organization has an internal Cygwin mirror) you can add it.
Choosing Packages
For each selected mirror site, setup.exe downloads a small text file called setup.bz2 that contains a list of packages available from that site along with some basic information about each package which setup.exe parses and uses to create the chooser window. For details about the format of this file, see the setup.exe homepage.
The chooser is the most complex part of setup.exe . Packages are grouped into categories, and one package may belong to multiple categories (assigned by the volunteer package maintainer). Each package can be found under any of those categories in the hierarchical chooser view. By default, setup.exe will install only the packages in the Base category and their dependencies, resulting in a minimal Cygwin installation. However, this will not include many commonly used tools such as gcc (which you will find in the Devel category). Since setup.exe automatically selects dependencies, be careful not to unselect any required packages. In particular, everything in the Base category is required.
You can change setup.exe ‘s view style, which is helpful if you know the name of a package you want to install but not which category it is in. Click on the View button and it will rotate between Category (the default), Full (all packages), and Pending (only packages to be installed, removed or upgraded). If you are familiar with Unix, you will probably want to at least glance through the Full listing for your favorite tools.
Once you have an existing Cygwin installation, the setup.exe chooser is also used to manage your Cygwin installation. Information on installed packages is kept in the /etc/setup/ directory of your Cygwin installation; if setup.exe cannot find this directory it will act as if you have no Cygwin installation. If setup.exe finds a newer version of an installed package available, it will automatically mark it to be upgraded. To Uninstall , Reinstall , or get the Source for an existing package, click on Keep to toggle it. Also, to avoid the need to reboot after upgrading, make sure to close all Cygwin windows and stop all Cygwin processes before setup.exe begins to install the upgraded package.
To avoid unintentionally upgrading, use the Pending view to see which packages have been marked for upgrading. If you don’t want to upgrade a package, click on the new version number to toggle it until it says Keep . All packages can be set to stay at the installed version by pressing the Keep button in the top right part of the chooser window.
A previous version of each package is usually available, in case downgrading is required to avoid a serious bug in the current version of the package. Packages also occasionally have testing (or «experimental») versions available. Previous and experimental versions can be chosen by clicking on the package’s New column until the required version appears.
All available experimental packages can be selected by pressing the Exp in the top right part of the chooser window. Be warned, however, that the next time you run setup.exe it will try to replace all old or experimental versions with the current version, unless told otherwise.
Download and Installation Progress
First, setup.exe will download all selected packages to the local directory chosen earlier. Before installing, setup.exe performs a checksum on each package. If the local directory is a slow medium (such as a network drive) this can take a long time. During the download and installation, setup.exe shows progress bars for the current task and total remaining disk space.
Shortcuts
You may choose to install «Cygwin Terminal» shortcuts on the Desktop and/or Start Menu. These shortcuts run mintty , which will start your default shell as specified in /etc/passwd .


