- Ubuntu dig command not found – How to install dig on Ubuntu
- Ubuntu dig command not found
- Getting rid of “-bash: dig: command not found” on Ubuntu
- How to install dig on Ubuntu Linux
- How do I use dig command on Ubuntu?
- A tip about finding package names on Ubuntu
- Conclusion
- linux-notes.org
- Установка dig в CentOS
- 10 основных команд dig
- How to Install and Use dig and nslookup Commands in Linux
- Installing dig & nslookup in CentOS/RHEL
- Installing dig & nslookup on Debian / Ubuntu
- Installing dig & nslookup on ArchLinux
- Using the dig command
- Using the nslookup Command
- If You Appreciate What We Do Here On TecMint, You Should Consider:
- How to Install and Use DIG on Debian 9
- Installing DIG on Debian 9:
- Basics of dig:
- Changing Name Server:
- Dig the MX Records with dig:
- Dig the NS records using dig:
- Dig All the Information About a Domain Name with dig:
- dig Short Output:
- Getting Help with dig:
Ubuntu dig command not found – How to install dig on Ubuntu
Ubuntu dig command not found
Please note that vivek@nixcraft-asus:
$ is the shell prompt. The shell prompt normally ends in a $ sign. So type all commands after vivek@nixcraft-asus:
You may get the following error when you run dig command:
vivek@nixcraft-asus:
$ dig www.cyberciti.biz
vivek@nixcraft-asus:
$ dig +short myip.opendns.com @resolver1.opendns.com
Try to locate the dig with type command:
vivek@nixcraft-asus:
$ type -a dig
Display your PATH settings on Linux with help of echo command:
vivek@nixcraft-asus:
Getting rid of “-bash: dig: command not found” on Ubuntu
BIND (Berkeley Internet Name Domain) is an implementation of the DNS (Domain Name System) protocols. BIND includes a DNS server (named), which resolves host names to IP addresses; a resolver library and tools for verifying that the DNS server is operating properly. However, bind is not installed by default including the dig command.
You must install dnsutils package on an Ubuntu based system. It contains a collection of utilities (such as dig command and other) for querying DNS name servers to find out information about internet hosts. These tools will provide you with the IP addresses for given host names, as well as other information about registered domains and network addresses.
How to install dig on Ubuntu Linux
You must install dnsutils if you need to get information from DNS name servers. Use the apt command or apt-get command:
vivek@nixcraft-asus:
$ sudo apt update
vivek@nixcraft-asus:
$ sudo apt install dnsutils
How do I use dig command on Ubuntu?
The syntax is as follows:
dig Hostname
dig DomaiNameHere
dig @DNS-server-name Hostname
dig @DNS-server-name IPAddress
dig @DNS-server-name Hostname|IPAddress type
For example:
vivek@nixcraft-asus:
$ dig www.cyberciti.biz
vivek@nixcraft-asus:
$ dig @1.1.1.1 bash.cyberciti.biz
vivek@nixcraft-asus:
$ dig @1.1.1.1 MX cyberciti.biz
vivek@nixcraft-asus:
$ dig @1.1.1.1 AAAA cyberciti.biz
dig command installed on an Ubuntu Linux and displaying dns output of a query
- No ads and tracking
- In-depth guides for developers and sysadmins at Opensourceflare✨
- Join my Patreon to support independent content creators and start reading latest guides:
- How to set up Redis sentinel cluster on Ubuntu or Debian Linux
- How To Set Up SSH Keys With YubiKey as two-factor authentication (U2F/FIDO2)
- How to set up Mariadb Galera cluster on Ubuntu or Debian Linux
- A podman tutorial for beginners – part I (run Linux containers without Docker and in daemonless mode)
- How to protect Linux against rogue USB devices using USBGuard
Join Patreon ➔
A tip about finding package names on Ubuntu
Want to find out which package owned dig command on a Ubuntu Linux 6/7? Try:
vivek@nixcraft-asus:
Conclusion
And there you have it, dig command installed and working correctly on a Ubuntu. You can use the same command on a Ubuntu 16.04 or earlier or latest version to install dig command.
🐧 Get the latest tutorials on Linux, Open Source & DevOps via
Источник
linux-notes.org
Установка dig в CentOS
dig (сокращено от «domain information groper») — прога DNS-клиента, дающая юзеру интерфейс командной строки для обращения к системе DNS. Позволяет прописывать различные типы запросов и запрашивать произвольно указываемые сервера. Это аналог проги nslookup и dig содержится в комплекте DNS сервера BIND.
Чтобы установить dig на CentOS нужно выполнить:
После установки можно пользоваться этой утилиткой, например вот так:

Установка dig в CentOS, пример использования
10 основных команд dig
1. Запрос домена.»A» записи
; > DiG 9.8.2rc1-RedHat-9.8.2-0.10.rc1.el6_3.2 > yahoo.com
;; global options: +cmd
;; Got answer:
;; ->>HEADER
Команда dig выполняется для поиска «А» записи для домена yahoo.com. Dig команда считывает с /etc/resolv.conf запросы к DNS-серверу, перечисленные в нем.
Давайте поймем вывод команды:
Строки, начинающиеся с «;» — это комментарии.
Первая строка говорит нам версию dig (9.8.2).
Далее, dig показывает заголовок ответа который получил от DNS-сервера
В данном случае это запрос для «A» записи yahoo.com. «IN » означает, что это Интернет поиск (в классе Интернет).
Раздел говорит нам что yahoo.com имеет IP-адрес 72.30.38.140
Наконец есть некоторая статистика о запросе. Вы можете отключить эту статистику с помощью опции + nostats.
2. Запрос домена записи «А» + (short ) короткий вывод
По умолчанию dig довольно многословен (много выводит всего). Один из способов сократить вывод заключается в использовании варианта с «+short» который будет резко сокращать вывод, как показано ниже.
99.130.13.44
72.30.38.144
124.136.254.169
Примечание: По умолчанию dig ищет «А» записи указанного домена но можно указать другие записи также. Запись MX или Mail Exchange говорит почтовым серверам как производить маршрут для электронной почты домена. Аналогично TTL, SOA и др.
3. Запросы MX-записи для домена
Запросы разных типов ресурса DNS записи.
4. Запросы SOA записи для домена
5. Запросы TTL записей для домена
6. Только запрос и ответ
7. Запросы ALL DNS-записей
8. Посмотреть обратный DNS
9. Запросы к нескольким отчетам DNS
Конкретные запросы DNS а именно запросы для нескольких веб-сайта (для MX, NS и т.д. записей).
dig yahoo.com mx +noall +answer redhat.com ns +noall +answer
10. Создать файл .digrc
Создать файл .digrc в $HOME/.digrc и сохранить параметры dig по умолчанию.
11. Как определить серверы имен, связанных с доменом?
12. Как выглядит делегация в моей зоне?
dig linux-notes.org +trace
13. Какое значение в кэше отдает resolver?
dig google.com @8.8.8.8
14. Вывод синхронизированы ли зоны со всеми NS?
SOA bella.ns.cloudflare.com. dns.cloudflare.com. 2016847280 10000 2400 604800 3600 from server 173.245.58.74 in 33 ms.
SOA bella.ns.cloudflare.com. dns.cloudflare.com. 2016847280 10000 2400 604800 3600 from server 173.245.59.194 in 33 ms.
Если вы заинтересованы только в сравнении с серийным номером, можно отфильтровать нежелательное и отсортировать результаты и так же удалить все дубликаты строк:
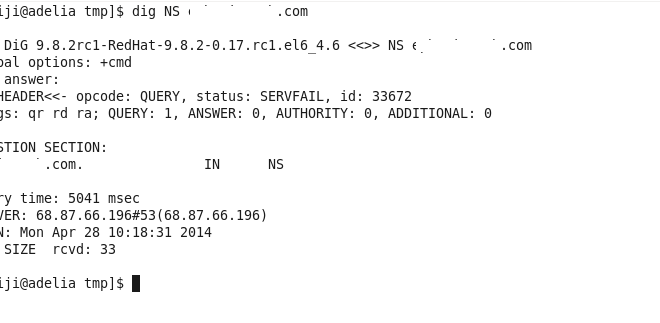
Итак, теперь вы знаете, около трех кодов ошибок DNS: NXDOMAIN, REFUSED и NOERROR. Есть другие коды возврата DNS (коды состояния), которые объясняются следующим образом:
NOERROR (RCODE:0): DNS Query completed successfully — DNS запрос выполнен успешно.
FORMERR (RCODE:1): DNS Query Format Error — DNS ошибка формата на запрос.
SERVFAIL (RCODE:2): Server failed to complete the DNS request — Серверу не удалось завершить запрос DNS.
NXDOMAIN (RCODE:3): Domain name does not exist — Доменное имя не существует.
NOTIMP (RCODE:4): Function not implemented — Функция не реализована.
REFUSED (RCODE:5): The server refused to answer for the query — сервер отказался отвечать на запрос.
YXDOMAIN (RCODE:6): Name that should not exist, does exist — Имя, которое не должно существовать, существует.
XRRSET (RCODE:7): RRset that should not exist, does exist — RRset который не должен существовать, существует.
NOTAUTH (RCODE:9): Server not authoritative for the zone — Сервер не является авторитетным для зоны.
NOTZONE (RCODE:10): Name not in zone — Имя не в зоне.
В этой статье «Установка dig в CentOS» постарался рассказать как установить и как пользоваться утилитой dig.
Источник
How to Install and Use dig and nslookup Commands in Linux
In this article, you will learn how to install the dig command and nslookup command on Linux. These commands are used for network troubleshooting and gathering information about domain names.
Dig, short for Domain Information Gopher, is a DNS lookup utility used for probing DNS servers and troubleshooting problems associated with DNS servers. Due to its ease of use, system administrators rely on the tool to troubleshoot DNS issues.
Nslookup is used for handling DNS lookups and displays crucial information such as MX records, and the IP address associated with a domain name.
Newer Linux system ship both dig and nslookup utilities by default. However, older Linux systems may not. The two come bundled inside the bind-utils package.
Let’s see how we can install DNS troubleshooting utilities in Linux.
On this page:
Installing dig & nslookup in CentOS/RHEL
On Red Hat Linux /CentOS, install dig and nslookup using the dnf command.
![]() Install Bind-Utils in CentOS
Install Bind-Utils in CentOS
Upon successful installation, verify the version using the command below.
![]() Check Dig Command Version
Check Dig Command Version
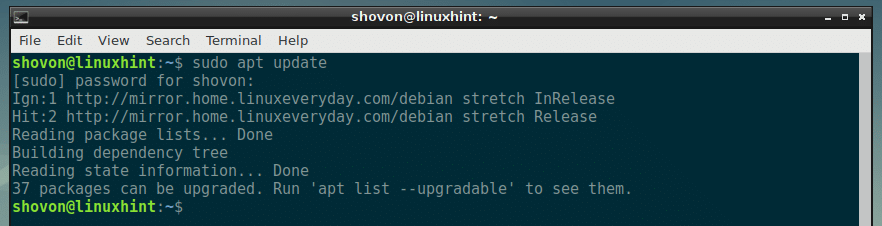
Installing dig & nslookup on Debian / Ubuntu
On Debian and any of its derivatives including Debian, the installation is done using the apt command.
![]() Install DNS Utils in Debian and Ubuntu
Install DNS Utils in Debian and Ubuntu
Again, to verify the installation, run the command.
![]() Check dig Version in Debian and Ubuntu
Check dig Version in Debian and Ubuntu
Installing dig & nslookup on ArchLinux
For ArchLinux, the command for installing dig and nslookup will be.
![]() Install dns-utils Arch Linux
Install dns-utils Arch Linux
To check the version of dig installed, run.
![]() Check dig Version in Arch Linux
Check dig Version in Arch Linux
Using the dig command
dig command can be used to query a domain name and retrieve information as shown:
The command displays a host of information such as the version of the dig command utility, the DNS server, and its corresponding IP address.
Sample Output
To get more specific and display only the IP of the domain name append the +short argument as shown:
To check the MX record of the domain name run.
Using the nslookup Command
To retrieve information about a domain name using the nslookup utility, use the following command.
Sample Output
Conclusion
In this article, you learned how to install dig and nslookup command utilities in different Linux distributions and also the basic usage of the commands. We do hope that you can now comfortably install the utilities when confronted with a system without them.
If You Appreciate What We Do Here On TecMint, You Should Consider:
TecMint is the fastest growing and most trusted community site for any kind of Linux Articles, Guides and Books on the web. Millions of people visit TecMint! to search or browse the thousands of published articles available FREELY to all.
If you like what you are reading, please consider buying us a coffee ( or 2 ) as a token of appreciation.

We are thankful for your never ending support.
Источник
How to Install and Use DIG on Debian 9
DIG is mainly used by DNS server administrators to verify whether the DNS server is working correctly.
In this article, I will show you how to install DIG on Debian 9 and use DIG. Let’s get started.
Installing DIG on Debian 9:
DIG is a part of dnsutils package. DIG is not installed by default on Debian 9 Stretch. The good news is that it is really easy to install as it is available in the official package repository of Debian 9.
First update the APT package repository cache with the following command:

The APT package repository cache should be updated.
Now install dnsutils package with the following command:

Now press y and then press .

dnsutils should be installed.
Now to check whether the dig command is available and working correctly, run the following command:
As you can see, dig is available and working correctly.

In the next sections, I will show you how to use dig.
Basics of dig:
The basic usage of dig command is to lookup a DNS address. By default, on Debian 9, dig uses the /etc/resolv.conf file to find out which DNS server to use.
This is what the /etc/resolv.conf file looks like. To change the DNS server, just change the IP address of the nameserver as marked in the screenshot below. In my case, it is 192.168.10.1, which is the IP address of my router.

Now to use dig to lookup the DNS information of the DNS name of google.com, run the following command:
As you can see, a lot of DNS data is printed on the screen. The marked section shows that the domain name google.com has these IP addresses. A domain name can have multiple IP addresses. It is mainly used for the load balancing purpose.
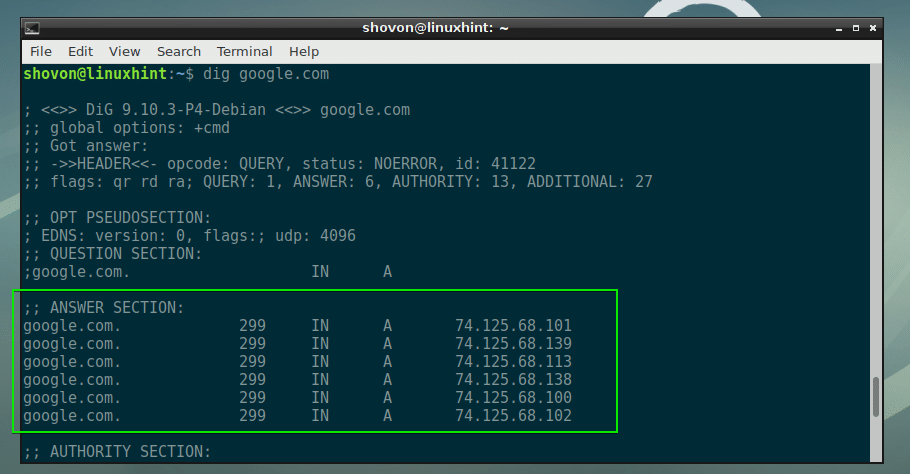
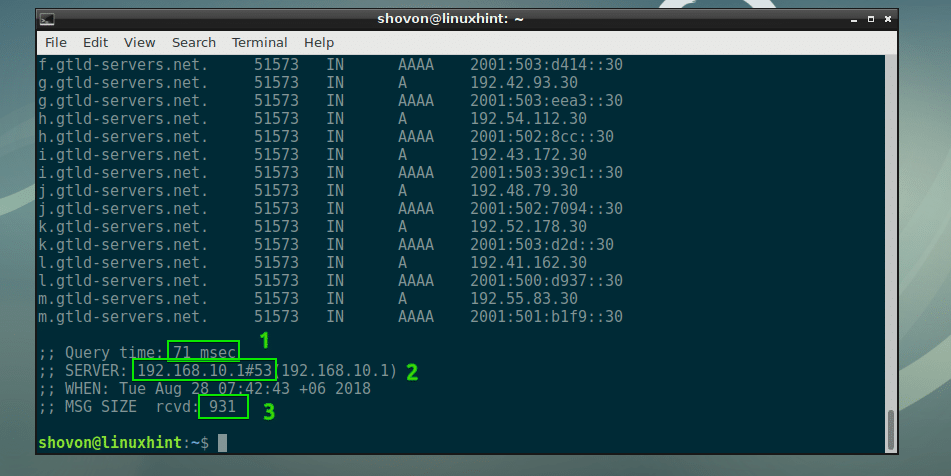
If you scroll down, you will see the how many milliseconds you needed (Query time) to resolve the domain name google.com. In my case, it was 71 milliseconds (msec). It varies depending on your geographical location and the name server you used.
You can also see which name server was used for the query. In my case, it is the name server in my /etc/resolv.conf, which is 192.168.10.1. The port of the DNS server is by default is 53.
The DNS response size or MSG SIZE is 931 bytes as you can see. These are important information that you may need to troubleshoot or test your DNS server configurations.
That’s basically how you use dig. In the next sections, I will show you different things you can do with dig.
Changing Name Server:
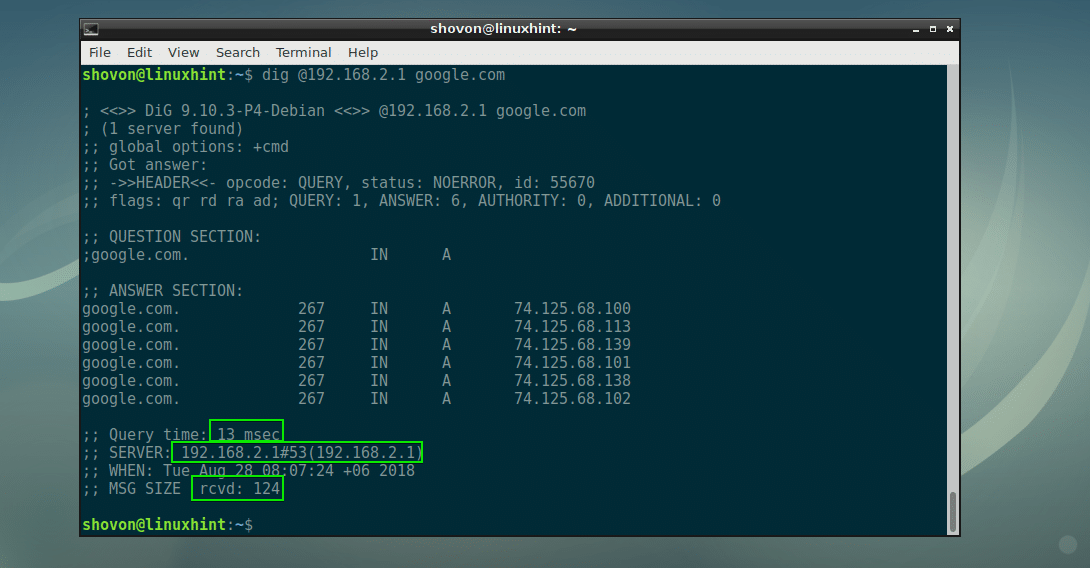
When you’re testing your DNS server, you may not want to set it in the /etc/resolv.conf until you know it works for sure. You can tell dig which name server to use as follows:
NOTE: Replace nameserver with the DNS server that you want dig to use.
Let’s say, we want dig to use the DNS server 192.168.2.1, then the command would be:

As you can see, the same information is returned. The Query time is now 13 milliseconds, and the SERVER is changed to 192.168.2.1. The MSG SIZE is also 124 bytes.
Dig the MX Records with dig:
You can find the MX records (used in email servers) of a domain name with dig with the following command:

As you can see in the marked section of the screenshot below, these are the email addresses associated with the domain google.com.

Dig the NS records using dig:
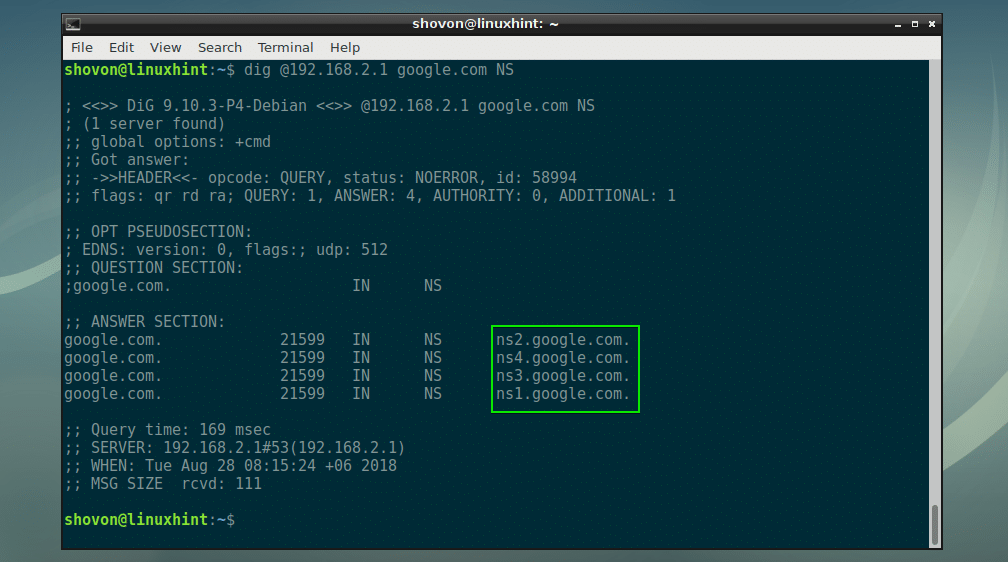
You can find the name servers associated with the domain name google.com with dig with the following command:

As you can see in the marked section of the screenshot below, these are the name servers associated with the domain google.com.
Dig All the Information About a Domain Name with dig:
You can find out all the information about a domain name google.com with dig with the following command:

As you can see, all the DNS records (A, AAAA, MX, NS, TXT, SOA etc) for google.com is printed on the screen.

dig Short Output:
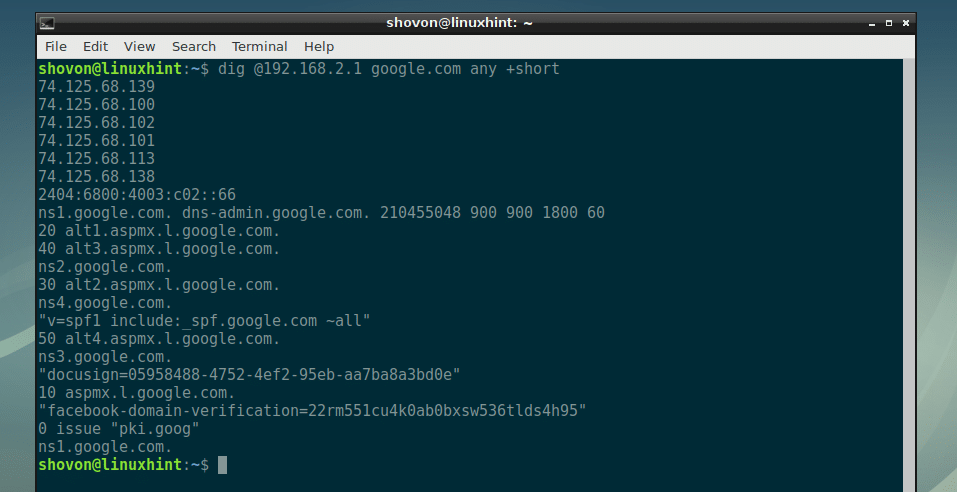
All the dig commands we ran earlier printed a lot of information in a nicely formatted text. But if you would rather see a short output, just add +short at the end of your dig command as follows:

As you can see, only the DNS records are printed. You have to determine which is what in this list as it has no indication as to which is an A record, which is an MX record etc. But if you look closely for a little bit, you will be able to figure out which is what record very easily. For example, all the IPv4 addresses are A records. All the IPv6 addresses are AAAA records. All the lines that start with a number and then a Fully Qualified Domain Name (FQDN) are MX records. All the lines that have text between quotes are TXT records. All the lines that start with ns*.google.com are NS records.
A line that has two FQDN and 5 numbers separated by space (ns1.google.com. dns-admin.google.com. 210455048 900 900 1800 60) is a SOA record.
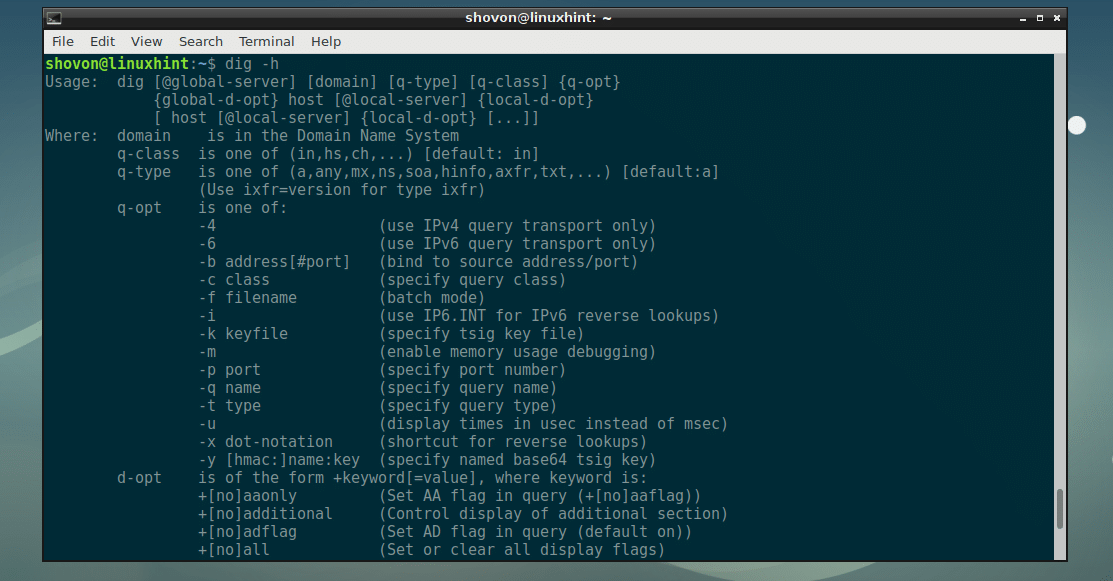
Getting Help with dig:
dig command has a lot of options. It is out of the scope of this article to show them all. You can run the following command to find out what options are available and what they do:

So that’s how you install and use dig on Debian 9 Stretch. Thanks for reading this article.
Источник


