- Docker Desktop for Mac user manual
- Preferences
- General
- Resources
- Advanced
- File sharing
- Proxies
- Network
- Docker Engine
- Command Line
- Kubernetes
- Reset
- Software Updates
- Dashboard
- Add TLS certificates
- Add custom CA certificates (server side)
- Add client certificates
- Directory structures for certificates
- Docker на macOS
- Использование MacOS машины как хоста
- Современный способ (Docker for Mac)
- Старый способ (Docker Toolbox)
- Другой гипервизор
- Использование облачных сервисов и управление через Docker API
- Другая машина (VPS, VDS, любой «соседний» ПК на Linux или ВМ)
- IaaS Azure, AWS, OpenStack и прочие
- Дополнительные драйверы для docker-machine
- Автодополнение Docker для шелла
- Homebrew
- Только установка docker (CLI), docker-machine, docker-compose
Docker Desktop for Mac user manual
Estimated reading time: 16 minutes
Welcome to Docker Desktop! The Docker Desktop for Mac user manual provides information on how to configure and manage your Docker Desktop settings.
For information about Docker Desktop download, system requirements, and installation instructions, see Install Docker Desktop.
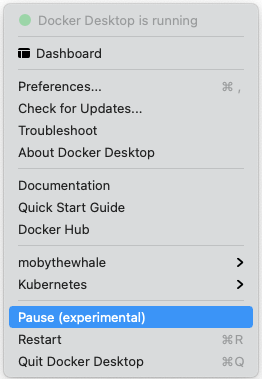
Preferences
The Docker Preferences menu allows you to configure your Docker settings such as installation, updates, version channels, Docker Hub login, and more.
Choose the Docker menu  > Preferences from the menu bar and configure the runtime options described below.
General

On the General tab, you can configure when to start and update Docker:
Automatically check for updates: By default, Docker Desktop is configured to check for newer versions automatically. If you have installed Docker Desktop as part of an organization, you may not be able to update Docker Desktop yourself. In that case, upgrade your existing organization to a Team plan and clear this checkbox to disable the automatic check for updates.
Start Docker Desktop when you log in: Automatically starts Docker Desktop when you open your session.
Include VM in Time Machine backups: Select this option to back up the Docker Desktop virtual machine. This option is disabled by default.
Use gRPC FUSE for file sharing: Clear this checkbox to use the legacy osxfs file sharing instead.
Send usage statistics: Docker Desktop sends diagnostics, crash reports, and usage data. This information helps Docker improve and troubleshoot the application. Clear the check box to opt out.
Show weekly tips: Displays useful advice and suggestions about using Docker.
Open Docker Desktop dashboard at startup: Automatically opens the dashboard when starting Docker Desktop.
Use Docker Compose V2: Select this option to enable the docker-compose command to use Docker Compose V2. For more information, see Docker Compose V2.
Resources
The Resources tab allows you to configure CPU, memory, disk, proxies, network, and other resources.
Advanced
On the Advanced tab, you can limit resources available to Docker.
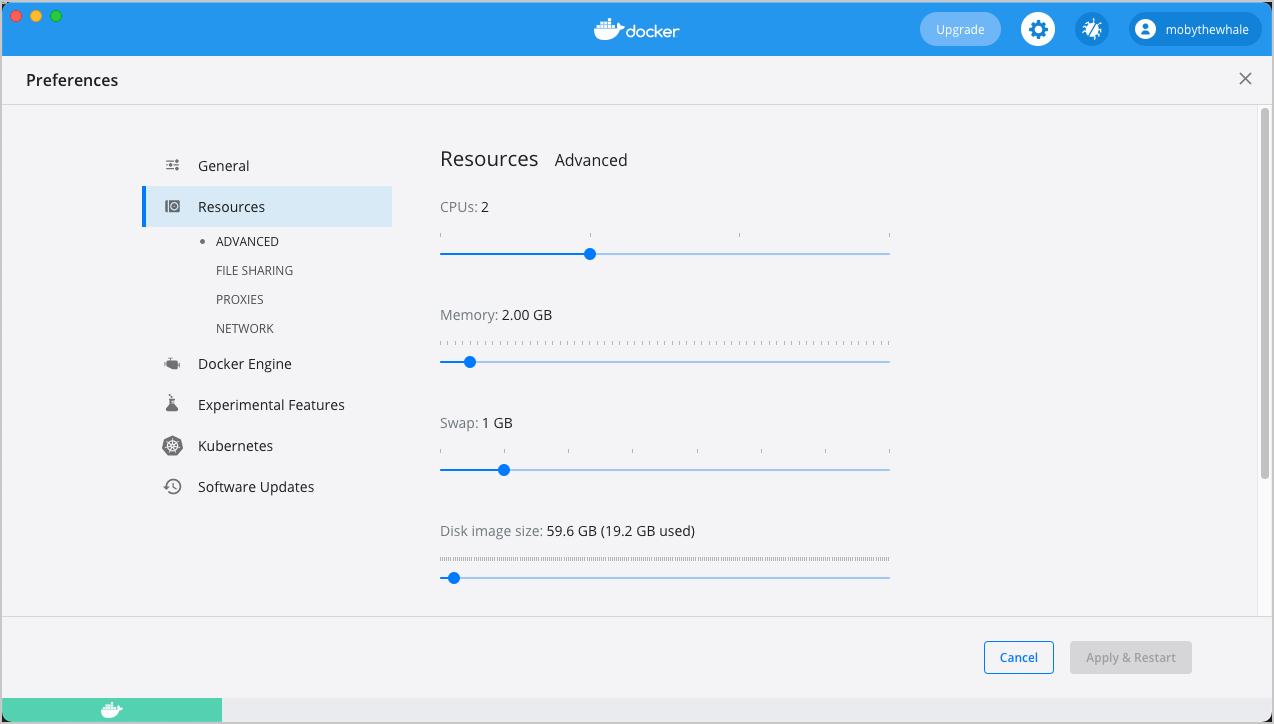
Advanced settings are:
CPUs: By default, Docker Desktop is set to use half the number of processors available on the host machine. To increase processing power, set this to a higher number; to decrease, lower the number.
Memory: By default, Docker Desktop is set to use 2 GB runtime memory, allocated from the total available memory on your Mac. To increase the RAM, set this to a higher number. To decrease it, lower the number.
Swap: Configure swap file size as needed. The default is 1 GB.
Disk image size: Specify the size of the disk image.
Disk image location: Specify the location of the Linux volume where containers and images are stored.
You can also move the disk image to a different location. If you attempt to move a disk image to a location that already has one, you get a prompt asking if you want to use the existing image or replace it.
File sharing
Use File sharing to allow local directories on the Mac to be shared with Linux containers. This is especially useful for editing source code in an IDE on the host while running and testing the code in a container. By default the /Users , /Volume , /private , /tmp and /var/folders directory are shared. If your project is outside this directory then it must be added to the list. Otherwise you may get Mounts denied or cannot start service errors at runtime.
File share settings are:
Add a Directory: Click + and navigate to the directory you want to add.
Apply & Restart makes the directory available to containers using Docker’s bind mount ( -v ) feature.
Tips on shared folders, permissions, and volume mounts
Share only the directories that you need with the container. File sharing introduces overhead as any changes to the files on the host need to be notified to the Linux VM. Sharing too many files can lead to high CPU load and slow filesystem performance.
Shared folders are designed to allow application code to be edited on the host while being executed in containers. For non-code items such as cache directories or databases, the performance will be much better if they are stored in the Linux VM, using a data volume (named volume) or data container.
If you share the whole of your home directory into a container, MacOS may prompt you to give Docker access to personal areas of your home directory such as your Reminders or Downloads.
By default, Mac file systems are case-insensitive while Linux is case-sensitive. On Linux, it is possible to create 2 separate files: test and Test , while on Mac these filenames would actually refer to the same underlying file. This can lead to problems where an app works correctly on a Mac (where the file contents are shared) but fails when run in Linux in production (where the file contents are distinct). To avoid this, Docker Desktop insists that all shared files are accessed as their original case. Therefore, if a file is created called test , it must be opened as test . Attempts to open Test will fail with the error No such file or directory . Similarly, once a file called test is created, attempts to create a second file called Test will fail. For more information, see Volume mounting requires file sharing for any project directories outside of /Users .)
Proxies
Docker Desktop detects HTTP/HTTPS Proxy Settings from macOS and automatically propagates these to Docker. For example, if you set your proxy settings to http://proxy.example.com , Docker uses this proxy when pulling containers.
Your proxy settings, however, will not be propagated into the containers you start. If you wish to set the proxy settings for your containers, you need to define environment variables for them, just like you would do on Linux, for example:
For more information on setting environment variables for running containers, see Set environment variables.
Network
You can configure Docker Desktop networking to work on a virtual private network (VPN). Specify a network address translation (NAT) prefix and subnet mask to enable Internet connectivity.
Docker Engine
The Docker Engine page allows you to configure the Docker daemon to determine how your containers run.
Type a JSON configuration file in the box to configure the daemon settings. For a full list of options, see the Docker Engine dockerd commandline reference.
Click Apply & Restart to save your settings and restart Docker Desktop.
Command Line
On the Command Line page, you can specify whether or not to enable experimental features.
Experimental features provide early access to future product functionality. These features are intended for testing and feedback only as they may change between releases without warning or can be removed entirely from a future release. Experimental features must not be used in production environments. Docker does not offer support for experimental features.
For a list of current experimental features in the Docker CLI, see Docker CLI Experimental features.
You can toggle the experimental features on and off in Docker Desktop. If you toggle the experimental features off, Docker Desktop uses the current generally available release of Docker Engine.
You can see whether you are running experimental mode at the command line. If Experimental is true , then Docker is running in experimental mode, as shown here. (If false , Experimental mode is off.)
Kubernetes
Docker Desktop includes a standalone Kubernetes server that runs on your Mac, so that you can test deploying your Docker workloads on Kubernetes. To enable Kubernetes support and install a standalone instance of Kubernetes running as a Docker container, select Enable Kubernetes.
For more information about using the Kubernetes integration with Docker Desktop, see Deploy on Kubernetes.
Reset
On Docker Desktop Mac, the Restart Docker Desktop, Reset to factory defaults, and other reset options are available from the Troubleshoot menu.
For information about the reset options, see Logs and Troubleshooting.
Software Updates
The Software Updates section notifies you of any updates available to Docker Desktop. You can choose to download the update right away, or click the Release Notes option to learn what’s included in the updated version.
If you are on a Docker Team or a Business subscription, you can turn off the check for updates by clearing the Automatically Check for Updates checkbox in the General settings. This will also disable the notification badge that appears on the Docker Dashboard.
Dashboard
The Docker Desktop Dashboard enables you to interact with containers and applications and manage the lifecycle of your applications directly from your machine. The Dashboard UI shows all running, stopped, and started containers with their state. It provides an intuitive interface to perform common actions to inspect and manage containers and existing Docker Compose applications. For more information, see Docker Desktop Dashboard.
Add TLS certificates
You can add trusted Certificate Authorities (CAs) (used to verify registry server certificates) and client certificates (used to authenticate to registries) to your Docker daemon.
Add custom CA certificates (server side)
All trusted CAs (root or intermediate) are supported. Docker Desktop creates a certificate bundle of all user-trusted CAs based on the Mac Keychain, and appends it to Moby trusted certificates. So if an enterprise SSL certificate is trusted by the user on the host, it is trusted by Docker Desktop.
To manually add a custom, self-signed certificate, start by adding the certificate to the macOS keychain, which is picked up by Docker Desktop. Here is an example:
Or, if you prefer to add the certificate to your own local keychain only (rather than for all users), run this command instead:
Note: You need to restart Docker Desktop after making any changes to the keychain or to the
/.docker/certs.d directory in order for the changes to take effect.
For a complete explanation of how to do this, see the blog post Adding Self-signed Registry Certs to Docker & Docker Desktop for Mac.
Add client certificates
You can put your client certificates in
When the Docker Desktop application starts, it copies the
/.docker/certs.d folder on your Mac to the /etc/docker/certs.d directory on Moby (the Docker Desktop xhyve virtual machine).
You need to restart Docker Desktop after making any changes to the keychain or to the
/.docker/certs.d directory in order for the changes to take effect.
The registry cannot be listed as an insecure registry (see Docker Engine. Docker Desktop ignores certificates listed under insecure registries, and does not send client certificates. Commands like docker run that attempt to pull from the registry produce error messages on the command line, as well as on the registry.
Directory structures for certificates
If you have this directory structure, you do not need to manually add the CA certificate to your Mac OS system login:
The following further illustrates and explains a configuration with custom certificates:
You can also have this directory structure, as long as the CA certificate is also in your keychain.
To learn more about how to install a CA root certificate for the registry and how to set the client TLS certificate for verification, see Verify repository client with certificates in the Docker Engine topics.
Источник
Docker на macOS
Немного о консольных составляющих
docker — утилита, общающаяся через сокет с хостом Docker ( docker daemon ). Является клиентом.
docker-machine — средство для управления машинами с Docker, а так же их создания. Расширярется так называемыми драйверами.
docker-compose — утилита для определения и выполнения кросс-контейнерных приложений. Позволяет объединить и настроить связку отдельных приложений в контейнерах, например, для веб-сервера: nginx, MySQL, PHP.
Использование MacOS машины как хоста
Самый очевидный способ использования Docker на Mac, учитывая, что Docker может создавать контейнеры только на ядре Linux, это использование виртуальной машины. Уже самые первые Mac на платформе Intel позволяли использовать паравиртуализацию и аппаратное ускорение для запуска виртуальных машин, но родного гипервизора не было: различные производители ПО, вроде VMware и Parralells заняли нишу гипервизоров на MacOS. Конечно же, было еще и бесплатное решение от Oracle (Virtual Box), но оно не такое удобное. В любом случае эти гипервизоры были сделаны в виде расширения ядра и порой были не очень стабильны. Начиная с Yosemite Apple добавили Hypervisor.framework, представляющий из себя API для создания HVM (аппаратных виртуальных машин). Сложно назвать это средство полноценным гипервизором, но первое достаточно массовое решение на нем — xhyve и Veertu. xhyve — гипервизор, портированный с FreeBSD и позволяет запускать Linux-машины.
До появления Hypervisor.framework и проекта xhyve предлагалось запускать Docker в виртуальной машине, используя гипервизор Virtual Box или любой другой (при помощи утилиты docker-machine у которой есть свои «драйверы», позволяющие автоматизировать создание, запуск и работу с виртуальными машинами) из предложенных. Это legacy-решение, но оно до сих пор поддерживается.
Современное же решение – это запуск виртуальной машины с использованием встроенного в MacOS процесса виртуализации. Docker назвали его HyperKit и его кодовая база практически полностью основана на проекте xhyve.
Старый способ (Docker Toolbox), как и драйверы для многих гипервизоров, разворачивают в стороннем гипервизоре образ ОС Boot2Docker.
Современный способ (Docker for Mac)
Данный способ поддерживает только Yosemite 10.10.3 и старше, но рекомендуется El Capitan и выше. Используется HyperKit, встроенная в MacOS виртуализация.
Установка проста и описана на странице Docker for Mac. Необходимо скачать DMG-контейнер, перетащить его содержимое и запустить Docker. Будут установлены консольные утилиты (docker, docker-machine, docker-compose), а также графическая оболочка для управления виртуальной машиной, в которой запущен Docker и бета-версия официальной графической утилиты для управления контейнерами Kitematic. Сразу же после этого можно использовать Docker в полную силу.
Старый способ (Docker Toolbox)
Установка так же простая и описана на странице Docker Toolbox. Установщик сам установит все необходимое, в том числе и гипервизор Oracle VirtualBox. Управлять можно с приложения Kitematic и терминала. Специально сделан шорткат, который можно найти в Launchpad и который позволит подключиться к виртуальной машине. Его же необходимо будет запустить в первый раз, так как он сам сделает виртуальную машину и настроит ее. Далее можно подключаться просто с терминала, выполнив вначале eval $(docker-machine env dev) , после чего можно общаться с docker посредством команды docker .
Рекомендуется настроить виртуальную машину Virtual Box так, чтобы она имела статический IP адрес, но была за NAT. В таком случае можно будет запускать контейнер через docker-machine или VBoxManage , либо с графического интерфейса, после чего работать с ней с обычного терминала.
Другой гипервизор
Для использования другого гипервизора необходимо установить комплект консольных утилит (docker, docker-mahine, docker-compose[^*]). Сделать это можно, установив Docker любым из способов, описанных выше, либо установив консольные утилиты через Homebrew. Кроме того, если уже установлен Virtual Box и Homebrew, то установив через него утилиты можно сделать виртуальные машины для Docker и управлять самим Docker.
[^*]: Необязателен для использования, зависит от поставленной задачи.
Чтобы создать виртуальную машину через docker-machine необходимо изучить документацию к необходимому драйверу. Для тех, что присутствуют по умолчанию, можно посмотреть в официальной документации Docker. Например, для создания виртуальной машины в VMware Fusion необходимо выполнить
После чего для для управления через docker необходимо выполнить
Чтобы точно знать, что мы управляем нужной машиной всегда можно набрать
Использование облачных сервисов и управление через Docker API
Другая машина (VPS, VDS, любой «соседний» ПК на Linux или ВМ)
Чтобы управлять Docker на любой другой машине необходимо воспользоваться драйвером Generic. Он позволит добавить через SSH с ключом или паролем любую машину в реестр docker-toolbox для удобства дальнейшего подключения через утилиту docker .
Почитать по управлению с по мощью драйвера можно в отдельной статье.
IaaS Azure, AWS, OpenStack и прочие
Используя необходимый драйвер в docker-machine можно создать виртуальную машину с Docker на практически любом популярном IaaS сервисе.
Для примера разберем MS Azure в отдельной статье.
Дополнительные драйверы для docker-machine
Если хочется использовать Docker с xhyve или же Parallels, Vultr, то можно поставить драйверы их Homebrew.
Автодополнение Docker для шелла
Чтобы было наиболее удобно управлять Docker имеет смысл установить автодополнение для шела. К сожалению, в версии для Mac оно не поставляется ни в одном варианте.
Homebrew
Если еще не установлен менеджер пакетов brew, то стоит его установить.
/usr/bin/ruby -e «$(curl -fsSL https://raw.githubusercontent.com/Homebrew/install/master/install)»
Лучше использовать шел ZSH. Он легко расширяется модулями и для него больше хороших модулей автодополнения. <==Почитать про устновку можно в отдельной статье==>.
Установить автодополнение для docker, docker-machine, docker-compose не составит труда.
brew install docker-completion docker-machine-completion docker-compose-completion
После установки чтобы автодополнение работало проще всего открыть новую вкладку терминала и проверить работоспособность.
Для установки автодополнения для шела bash необходимо выполнить после установки с Homebrew.
Только установка docker (CLI), docker-machine, docker-compose
Используя Homebrew можно установить указанные выше утилиты для управления docker на любой виртуальной (иди другой) машине без лишних утилит. Можно добавить машину в docker-machine и легко получить к ней доступ через команду eval $(docker-machine env machinename) , после чего управлять ей через docker .
Copyright © 2017 Александр Пинегин aka Bloody Foxy
Источник


