- Установка PHP-расширений в Ubuntu для полноценной работы WordPress и плагинов
- Обновляем расширение Intl в PHP 7 на Linux Ubuntu 16.04
- Ну и зачем это?
- Поиск решения
- Версии ICU
- Решение
- Установка PHP и модулей на Ubuntu/Debian
- Nginx, Php-Fpm и что это вообще?
- Почему timeout для curl в php необходим
- Угадайте самый медленный фреймворк. И это не Laravel
- Curl в PHP
- Сессии в PHP — часть первая для Чайников
- IoT Highload: особенности и подводные камни
- Nginx, Php-Fpm и что это вообще?
- Почему timeout для curl в php необходим
- Угадайте самый медленный фреймворк. И это не Laravel
- Curl в PHP
- Сессии в PHP — часть первая для Чайников
- IoT Highload: особенности и подводные камни
- How to Install PHP Extensions from Source
- Free JavaScript Book!
- Booting the VM
- Prepping the Environment
- Ubuntu
- Fedora
- Installing Extensions
- Installing a bundled extension
- Installing a third party extension
- Enabling and Testing
- Removing Extensions
- Conclusion
Установка PHP-расширений в Ubuntu для полноценной работы WordPress и плагинов
В большинстве статей по самостоятельной настройке веб-сервера опущен один очень важный момент — установка расширений для PHP, без которых тот же WordPress нормально работать не будет. Применительно к Вордпрессу список необходимых расширений PHP сильно зависит от того какие плагины Вы будете использовать, ниже будет приведен не полный список, но покрывающий 99% потребностей WordPress и достаточный для большинства случаев. Я установил на VPS Ubuntu 16.04 далее примеры команд для этой версии Линукс.
Устанавливать расширения удобнее всего из консоли (терминала), для установки минимально необходимого набора выполните команду:
sudo apt-get install php-curl php-gd php-mbstring php-mcrypt php-xml php-xmlrpc php-mcrypt php-curl php-gd
Обратите внимание что эта команда установить расширения для текущей версии PHP, на данный момент это 7.0, если например Вы используете пятую версию PHP, то нужно использовать другую команду:
sudo apt-get install php5-curl php5-gd php5-mbstring php5-mcrypt php5-xml php5-xmlrpc php5-mcrypt php5-curl php5-gd
Просмотреть установленные расширения можно командой:
sudo dpkg —list | grep php
После установки расширений может потребоваться перезапуск веб-сервера apache:
sudo /etc/init.d/apache2 restart
Список расширений PHP которые может использовать WordPress и его плагины:
php-mysql — нужно для работы с базами данных, как правило устанавливается автоматически вместе с PHP.
php-ctype — необходимо установить если получаете ошибку Fatal error: Call to undefined function ctype_digit() in /wp-admin/includes/file.php
php-dom — не обязательное, может понадобиться если у Вас Windows-хостинг
php-exif — для работы с мета-данными фотографий
php-gd — для обработки изображений
php-iconv — конвертация строки из одной кодировки в другую
php-json — для поддержки JSON
php-posix — используется в классе WP_Filesystem_Direct
php-mbstring — для обработки строк, для работы обязательно
php-simplexml — не обязательное
php-zip, php-zlib — для работы с архивами, если необходимо
Если Вы используете виртуальный хостинг и у Вас нет возможности самостоятельно управлять сервером и устанавливать необходимые программы и расширения, зайдите в панель управления хостингом, большинство из них предоставляют возможность активировать нужные для работы расширения PHP, например вот так выглядят настройки в Cpanel:

Здесь можно выбрать нужную версию PHP и изменить список активных расширений, на картинке указан набор галочек при котором работают практически все плагины WordPress, у меня их установлено несколько десятков на все случаи жизни и все они нормально работают.
Источник
Обновляем расширение Intl в PHP 7 на Linux Ubuntu 16.04
Программисты делятся на два типа: консерваторы, для которых переход на новую версию равносилен перелёту на другую планету (если читаешь это из Windows XP — поздравляю, это ты); и Викторы Цои, чьи сердца и глаза требуют перемен, и обновляют всё и вся при первой возможности. Если ты второго типа, и у тебя уже стоит последняя версия PHP на последней LTS версии Ubuntu, но покоя не даёт то, что расширение Intl использует устаревшую версию библиотеки ICU, или тебе просто понравились картинки из «Аватара» — добро пожаловать под кат! (Картинок больше не будет.)
Ну и зачем это?
Библиотека ICU с каждым релизом добавляет поддержку стандартов транслитерации для различных языков, добавляет новые функции и возможности, фиксит баги. Пока неизвестно, по какой причине PHP нерегулярно обновляет ICU в расширении Intl. Поэтому приходится всё брать в свои руки.
Поиск решения
Быстрый поиск по гуглу не дал внятных решений. Детальный тоже. В общем и целом пэхэпэшным программистам по барабану, какую версию ICU использует Intl. Но только не нашим! Отчаявшись искать в англоязычном сегменте интернета, совершенно случайно набрёл на запись русского блогера Сергея Стоянова, где он объясняет процесс обновления ICU в PHP 5 для Ubuntu 14.04. В PHP 7 процесс сильно отличается, но общая последовательность действий остаётся такой же: удаляем Intl; собираем новую версию ICU; устанавливаем Intl, ткнув его носом, где искать ICU; включаем Intl в PHP; открываем шампанское. Также сильно помогли комментарии к статье (особенно комментарий Антона Минина и его shell скрипт).
Версии ICU
Проверить последнюю версию ICU можно на их официальном сайте. На данный момент (февраль 2018) последний релиз — 60.2.
Чтобы проверить, какую версию ICU использует php7.0-intl, напиши в терминале и прокрути до списка установленных модулей. Найди там раздел, озаглавленный «intl». У меня там было:
Internationalization support => enabled
version => 1.1.0
ICU version => 55.1
ICU Data version => 55.1
Мягко говоря, не айс — версия 55.1 была выпущена в первой половине 2015-го, и с тех пор успела обновиться ещё 5 раз. Нужно же что-то делать!
Решение
Internationalization support => enabled
version => 1.1.0
ICU version => 60.2
ICU Data version => 60.2
Источник
Установка PHP и модулей на Ubuntu/Debian
PHP
В Debian и Ubuntu есть несколько вариантов работы php: как модуль apache и как php-fpm. Первый вариант удобен тем, кому придется использовать не только сам PHP, но и возможности Apache, такие как .htaccess. Второй же вариат удобен например для Yii или Laravel.
Установка PHP 5 как модуля Apache:
Установка PHP 7 как модуля Apache:
Установка PHP 5 как PHP-FPM:
Установка PHP 7 как PHP-FPM
Модули
В Debian и Ubuntu зачастую установка модулей PHP не требует каких-то сложных манипуляций. Для того, чтобы посмотреть, что Вы можете поставить прямо сейчас, нужно сделать:
Давайте для примера установим GD для работы с изображениями:
Либо php-fpm, смотря, что используете Вы:
Чтобы посмотреть список модулей php, который прямо сейчас подключен, можно запустить:
Nginx, Php-Fpm и что это вообще?
Что такое php-fpm и зачем он нужен более-менее посещаемым проектам? Какие неприятности несет в себе переход с apache на fpm? Какие проблемы решает реально, а какие — надуманно?

Почему timeout для curl в php необходим
Использование cURL в PHP имеет свою не очень приятную особенность — вечная блокировка процесса

Угадайте самый медленный фреймворк. И это не Laravel
Есть распространенное мнение, что Laravel почти самый медленный фреймворк, что даже его название нужно читать медленно и только одним пользователем на 1 ядро CPU. Но к счастью, это не так
Curl в PHP
Curl — это библиотека для работы с URL. Она интегрирована во множество языков, в том числе и в PHP.
Сессии в PHP — часть первая для Чайников
Вводная статья о том, как использовать сессии в PHP

IoT Highload: особенности и подводные камни
Особенности серверных приложений, работающих с сетью IoT-устройств на практике и в теории
Nginx, Php-Fpm и что это вообще?
Что такое php-fpm и зачем он нужен более-менее посещаемым проектам? Какие неприятности несет в себе переход с apache на fpm? Какие проблемы решает реально, а какие — надуманно?
Почему timeout для curl в php необходим
Использование cURL в PHP имеет свою не очень приятную особенность — вечная блокировка процесса
Угадайте самый медленный фреймворк. И это не Laravel
Есть распространенное мнение, что Laravel почти самый медленный фреймворк, что даже его название нужно читать медленно и только одним пользователем на 1 ядро CPU. Но к счастью, это не так
Curl в PHP
Curl — это библиотека для работы с URL. Она интегрирована во множество языков, в том числе и в PHP.
Сессии в PHP — часть первая для Чайников
Вводная статья о том, как использовать сессии в PHP
IoT Highload: особенности и подводные камни
Особенности серверных приложений, работающих с сетью IoT-устройств на практике и в теории
Источник
How to Install PHP Extensions from Source
Free JavaScript Book!
Write powerful, clean and maintainable JavaScript.
Sometimes it’s hard to know which PHP extensions you’ll need before you install PHP. In cases where you need to add extensions later on, you might get lucky and the extension could be in the repository of the OS you’re using. It might just be a simple sudo apt-get install php5-intl away. In other cases, however, you might need to install it from source – Phalcon is one such case, but it makes the procedure extremely simple by introducing vendor support, shortcuts and pre-written instructions for your OS to carry out. What if there’s no such thing for other extensions, though?
In this tutorial, we’ll go through installing some custom extensions on Linux systems (and OS X – the process is nearly identical). The procedure is very similar to what we already did on Nitrous.io, but adapted for local environments – more specifically, Laravel Homestead. You can easily derive installation instructions from this tutorial and apply them to other distros.
Booting the VM
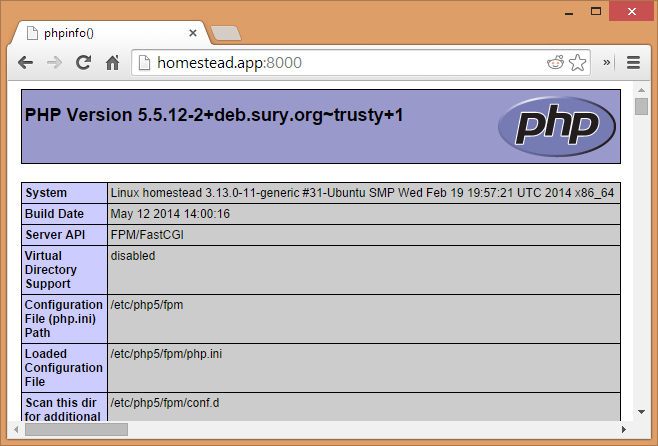
If you haven’t already, read the Homestead post linked above and get it up and running. Immediately after running a new Homestead box, you should be able to do this:
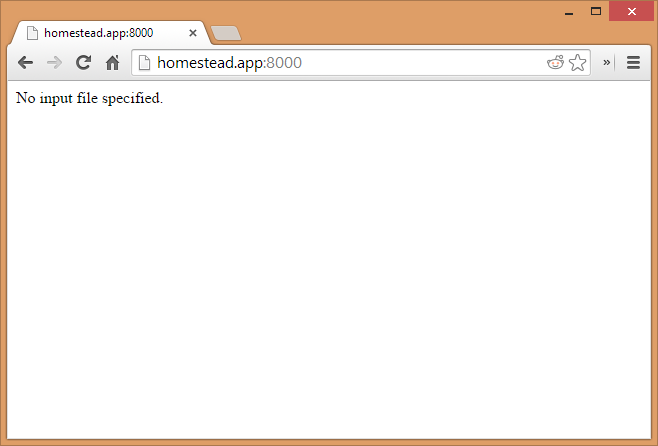
That’s perfectly fine, this happens because the folder that’s mounted by default actually doesn’t contain any files yet. Now vagrant ssh into the VM, and execute the following commands:
This creates a valid PHP Info file in the path that Homestead is set to by default. Refreshing the URL will now produce a PHPInfo screen:
Prepping the Environment
To build extensions from source, we need the PHP dev tools installed on our machine, as well as a compiler that can produce the extension file. Here’s how you install these prerequisites on various operating systems:
Ubuntu
Fedora
If you’re using the most recent Homestead, all these tools will already be installed for you. With everything prepared, let’s start installing extensions.
Installing Extensions
There are two types of extensions you can install: bundled with PHP but not installed by default, and third party extensions. Third party extensions like Phalcon usually make the installation process much easier by providing shortcuts, as they don’t have to comply to certain traditions bundled PHP extensions are bound by.
First, let’s move into the home folder on the vm: cd
. In there, make a downloads folder, and cd into it. When installing a bundled extension, you’ll need the source code of PHP on your machine, preferably one matching your current version. The version Homestead uses is 5.5.12, so I’ll be downloading that one:
I’m using the Belgian mirror above, feel free to use that one or any other from the download archives.
To see the sources of all bundled extensions, go into the ext folder inside the unarchived PHP source code folder and do a list with ls .
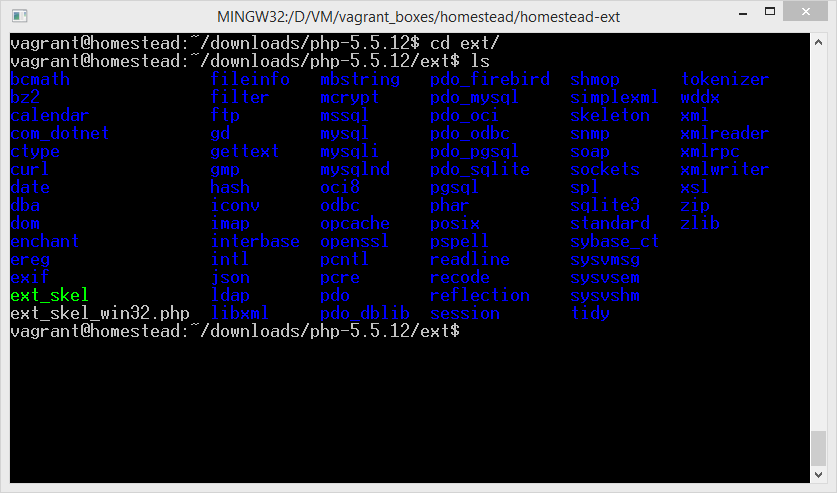
Installing a bundled extension
First, we’ll install the PHP-intl extension if you don’t have it installed already. If you do, that’s fine – the installation procedure you’ll see below is identical for every bundled PHP extension. The intl extension is for internationalization – read more here if you’re interested.
Seeing as the intl extension needs the ICU library as a prerequisite (as stated in the requirements), let’s install that first.
Under other distributions, the installation instructions may vary. It’s best if you refer to the ICU site or your individual distribution’s docs for this step.
Once ICU is installed, do the following while still in the ext folder:
Let’s explain what’s going on.
- phpize prepares the extension’s folder for compliation. It allows you to do the subsequent commands by creating a configure file, and basically making the extension’s folder “think” it’s PHP itself. The procedure after phpize is, in fact, identical to what you would do when installing PHP from source – only in this case, just a fragment of PHP is compiled and prepared for use with the already compiled and installed PHP.
- ./configure —enable-intl configures the environment for compilation. It prepares everything the compiler will need to craft the intl.so file which we’ll be using. The enable-intl flag is necessary even though we’re in the intl folder because the folder, effectively, thinks it is PHP, and we need to help it live that illusion. This command tells it: “Ok, you’re PHP’s source code. Now compile and install with the intl extension.”, when in fact, it’s the only part that can be installed from this folder.
- make will compile the sources into intl.so , placing the file into the very folder you’re currently in, under the modules subfolder.
- sudo make install will move this file into the current PHP installation’s extensions folder.
All we need to do now is enable the extension by having php.ini consume it. We’ll do that later, let’s compile a third party extension first.
Installing a third party extension
We’ll be installing Mongo as a third party extension. There are binary distributions available for Mongo which make installation simpler, but let’s do it manually for the sake of education. We’ll assume you already have the actual Mongo installed, and are thus focusing only on the PHP extension. If you don’t have Mongo installed, refer to their installation docs.
This has built our mongo.so file, and placed it into the extensions folder of our PHP installation. We’ll enable it in the next section.
Enabling and Testing
To see if the compiled .so files are indeed in our PHP extensions folder, list out its contents:
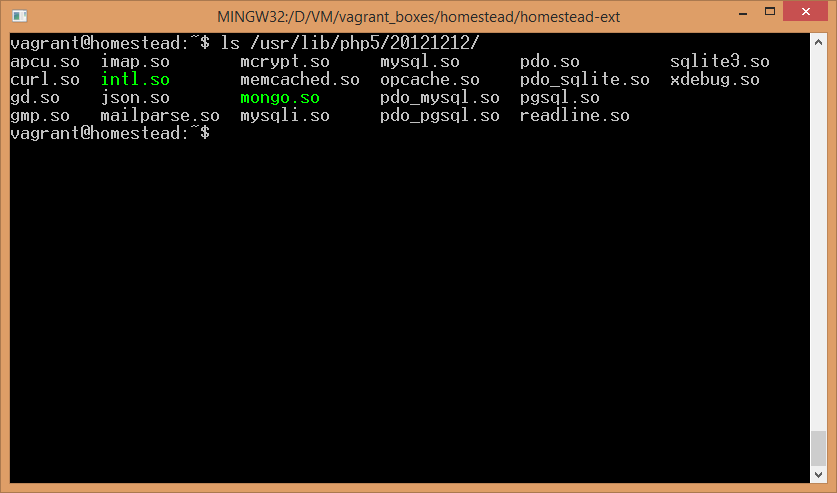
As you can see, there they are, highlighted in bright green.
To enable them, we need to tell php.ini about them. There are several ways to do this:
- You can put the lines extension=mongo.so and extension=intl.so directly into php.ini . This works, and is a perfectly valid approach in most cases.
- You can create a separate ini file for each of these, put them in a folder that gets auto-included after php.ini is loaded, and maintain separation and isolation of php.ini that way. This approach is healthier, though harder to accomplish.
- You can combine 2) and the default tools for enabling PHP mods. Homestead uses this approach, and so will we.
This folder is the repository of all such individual ini files. Create two new files here:
These commands created two new ini files, each for one of the extensions we’ve previously built. As they are now in the mods-available folder, we can use the already available php5enmod (short for PHP enable mod) command line tool.
Note: If you don’t have the php5enmod tool, symlinking the ini files into the conf.d folder of various php runtimes will do the trick:
The reason why there’s four entries is that we have the command line version of PHP and the FPM version of PHP. Each uses its own php.ini file, and each loads its own conf.d folder for extensions – hence, we need to add both extensions to both PHP versions if we want the extensions available all-around. Use this approach only if you don’t have the php5enmod tool.
Finally, let’s restart nginx and php-fpm to load these changes.
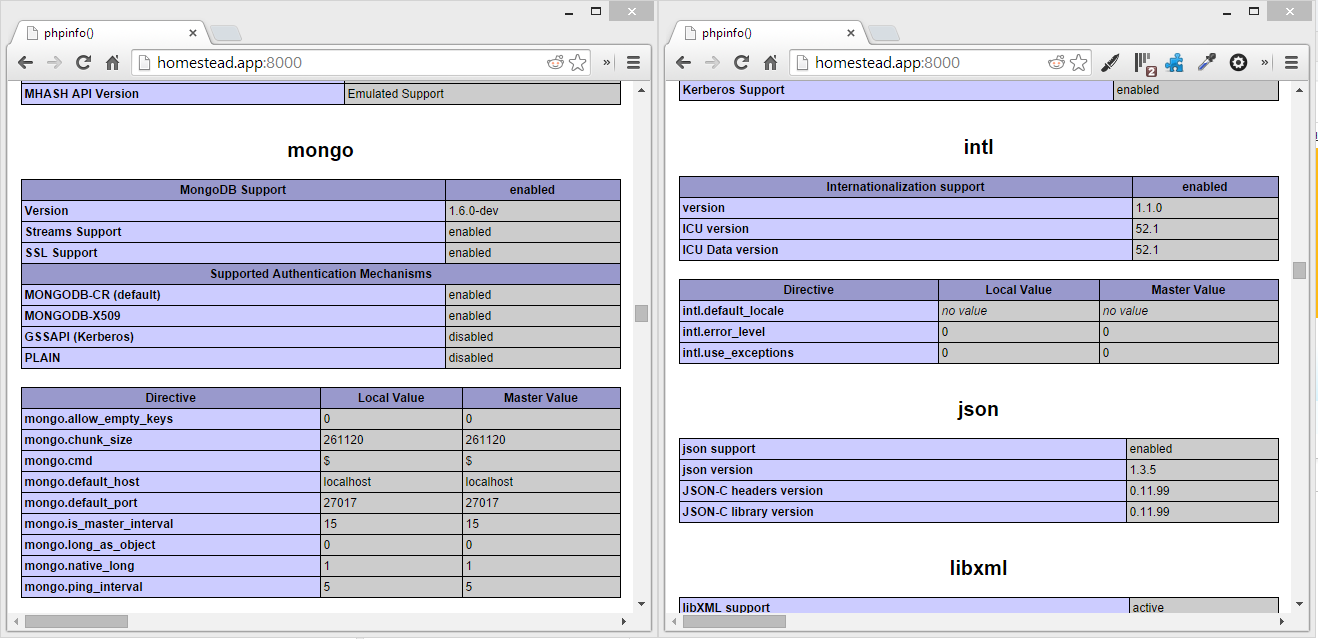
To see if we’ve got them installed, refresh the PHPinfo screen from before and search for mongo and intl respectively.
Removing Extensions
To remove extensions, there’s no need to delete any actual files unless you’re really low on space. You can do it in three ways:
- Run php5dismod if you have the tool available. It’s the opposite of the php5enmod tool mentioned above. The .so files will stay in place, and the ini files will remain in mods-available , they just won’t load because their symlinks will be removed from the fpm and cli conf.d folders.
- Remove the symlinks manually. E.g. sudo rm /etc/php5/cli/conf.d/mongo.ini
- If you enabled the extensions by putting them directly into the php.ini files, remove those lines from the php.ini files, or better yet, comment them so that they remain accessible for further use should you ever change your mind.
Conclusion
As you can see, installing extensions from source is extremely simple, even if there are no precise instructions and even if the extension isn’t supported by an OS’s official repository. The next time you need to add an extension into your PHP installation on a *nix system (this tutorial applies to OS X as well), refer back to this post for a refresher.
Please leave your feedback below, and let me know if you’re confused by a specific extension and would like help with installing it.
Источник


