- Client Installation
- Contents
- Getting
- Choosing the right download
- Installer version
- Zip version
- Source code version
- Downloading FileZilla
- Choosing the appropriate version
- Downloading the file
- Saving and running
- Installing on Windows
- With installer version
- Possible Confirmation prompts
- License agreement
- Installing for me or all users?
- Choosing components
- Install location
- Start menu shortcuts
- Finishing installation
- With zip version
- Installing on Mac OS X
- Covered Top of FileZilla-Window by MacOS-Menu
- Installing on GNU/Linux and other Unix(-like) systems
- Compiling FileZilla from source
- Running
- Как пользоваться Filezilla
- Как пользоваться Filezilla?
- 1. Установка FileZilla
- 2. Интерфейс
- 3. Подключение к серверу
- 4. Загрузка файлов
- 5. Редактирование файлов
- 6. Поиск файлов
- 7. Другие действия с файлами
- 8. Настройка FileZilla
- Выводы
Client Installation
This documentation attempts to explain installation of the FileZilla FTP and SFTP Client.
FileZilla comes in three versions. There is an installer version that offers ease of installation and uninstallation for novice users, a zipped version for people that don’t like installers or have special needs, and then for the advanced user there is a source version which lets you take a look at, modify and/or compile the source code of FileZilla.
Don’t worry if you find this confusing, I’ll get back to each of them in depth later in this document and try to help you choose which one you need.
Contents
Getting
IMPORTANT NOTE: It is _strongly_ recommended that you only download FileZilla from the official source to avoid viruses and spyware. There have been unofficial versions of FileZilla that contained viruses and spyware on sites like download.com, so don’t use them! Also, I recommended to always get the latest version of FileZilla regardless of which version this documentation or the download page was based on!
Choosing the right download
As I said earlier, there are three different FileZilla versions you can download. Basically they are all the same, they are just presented to you differently. I will now try to explain each of them before we start downloading FileZilla in the next section.
Installer version
As a novice user the installer version is the safe and easy choice. With this version you only need to download the file, run it and the program will get installed by itself. If you don’t know which version to get, this is probably the one you want. However, if you don’t have sufficient rights to install programs on the computer you are using (e.g. at work or at school) the zip version is the way to go. If you’ve already decided to go for the installer version, you can go directly to downloading.
Note: The installer version is not available for Linux or Mac.
Zip version
If you have special needs, don’t have sufficient rights to install programs or don’t like installers, the zip version is there for you. A zip-file is a file that contains files inside of it. They are packed into one file and you need to unpack (unzip) them to use them. To do this you need a zip program (or if you are running Windows XP there’s a simple unzipper included in the operating system). If you need such a program I can recommend the free and open source based program 7-zip.
TIP: If you want to put FileZilla on a USB stick so you can take your copy of FileZilla with all its settings wherever you go, the zip version is the best bet. Note there are additional steps required to make it portable.
Source code version
This is for the advanced user who wants to take a look at or modify the source code of FileZilla. You can find compiling instructions on this wiki. The page is outdated and incomplete but it’ll give you a general idea. You will have to check out the forum (Main forum) to get more information.
Downloading FileZilla
By now you should have made up your mind on which version you want to download. If not, go back to choosing the right download and make a decision.
Choosing the appropriate version
Now it’s time to head over to the download section. Click this link (if you right-click it and choose Open in new window you can still follow this guide while downloading) and then wait for the page to load.
Still remember which version you want to get? You now need to download the correct file, the download page will help you with this. Choose between installer, zip or source code version. Next, click the link you want.
Downloading the file
You will now get to a new page which should look something like the picture below:
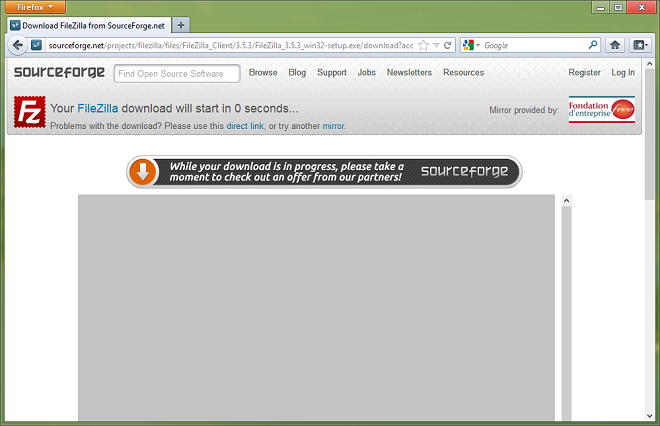
If the download does not start automatically after a few seconds, click on the link labeled direct link.
Sometimes the mirror chosen for the download is unavailable. You can select a different mirror by clicking on Select a different mirror.
Saving and running
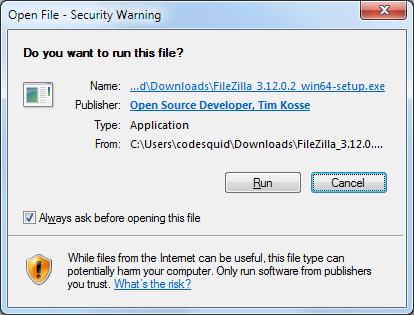
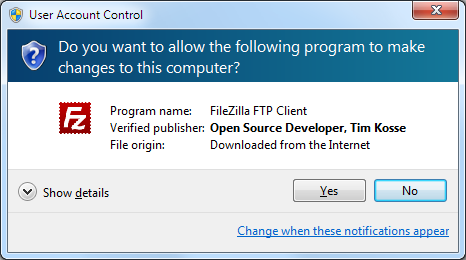
Depending on which browser you are using you will (normally) see a window where you can decide what to do with the file you are downloading. The easiest way is just to hit run or open and the file will download and then be run. As FileZilla does not contain a software signature/certificate, you might get some warning messages telling you that you are running a potentially dangerous file downloaded from the Internet, but let me assure you, Sourceforge is a reliable download source and it shouldn’t be any problem. If you are familiar with how to save the file and would like to do that, go ahead. Just remember to save it where you can easily find it afterwards and then open it from there 🙂 On Windows Vista, 7 or 8, you might need to confirm an additional UAC prompt to start the installer.
Hopefully after the file downloads you will have started the FileZilla installer if you went for the installer version or opened the zip file in a zip program for any other version. In the next section I’ll help you through the installation process.
Installing on Windows
With installer version
Please note: All screenshots are from Windows 8. Yours may look different, but the functionality is the same.
Make sure that the user account which is being used for the installation has administrative rights that allow the installation of software.
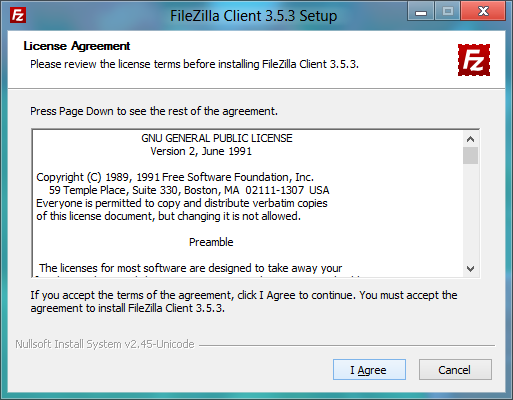
Possible Confirmation prompts
Depending on OS settings and version, it is possible that one or both of the following confirmation prompts appear:
License agreement
Hopefully you should now see the following window where you will have to accept the terms of the license agreement to continue. Read through it and click «I Agree» if you do.
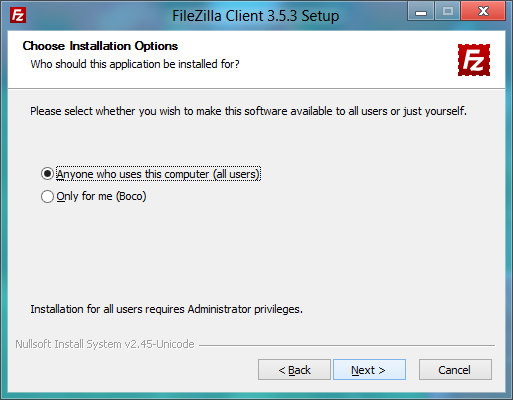
Installing for me or all users?
You will now have to decide if you want to install only for your user account or if FileZilla should be accessible by every user on the machine. This mainly affects where the Start Menu icons are placed. Installing for all users needs administrative privileges, and every user will have his/her own settings.
Choosing components
Next you need to choose which parts of the FileZilla client you want to install. If you hover your mouse over a choice, FileZilla will show you a description of the item. Here is the window:
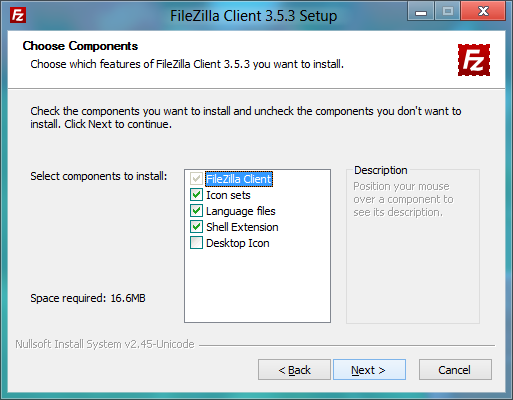
Go through all of them and just check/uncheck the stuff you want. Select additional languages if you want FileZilla in another language than English. Icon sets let you choose different looks for FileZilla’s icons (they are partly user contributed). The shell extension integrates FileZilla into the Windows Explorer. Most users will go with what’s selected by default here. When you’re all finished, click Next.
Two small notes regarding the shell extension:
1. Installing or removing requires full administrative privileges.
2. Though FileZilla for Windows is only available as 32bit build, it contains a shell extension for both the 32bit and 64bit shell.
Install location
The next window will ask you where to install the program. If you don’t have any special needs, click Next.
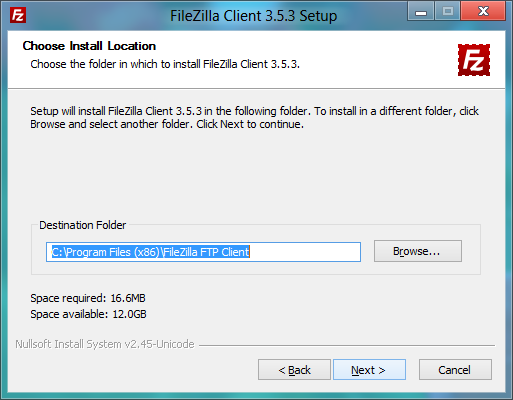
The default path is to install into your «Program Files» directory on 32bit Windows, and into «Program Files (x86)» on 64bit Windows. Please, if you are migrating from FileZilla 2, do NEVER, EVER install into the same directory as FileZilla 2! FileZilla 3 is not an upgrade to FileZilla 2, and merging both directories creates a mess.
Start menu shortcuts
Here, you will be asked what you want to name the folder with the shortcuts to FileZilla inside. The default name «FileZilla FTP Client» should be good for most people. You can also choose not to install these shortcuts.
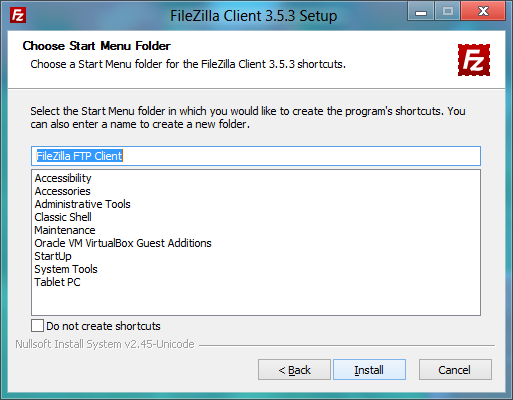
Note to Windows 8 users: In Windows 8, MS has removed the Start Menu, but if you install the one from ClassicShell you will get your Start menu icons back.
Finishing installation
When you click Install, FileZilla will get installed.

If no errors occur it should complete in some seconds.
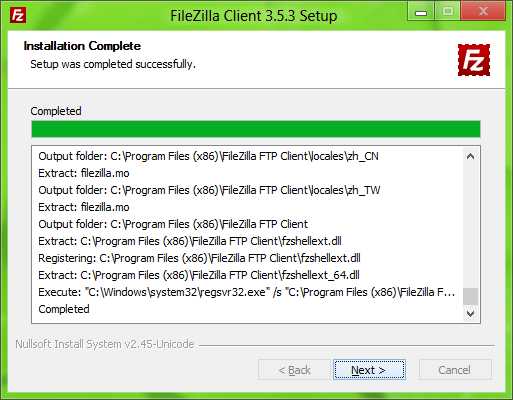
When it’s done, click Next to finish the installation.
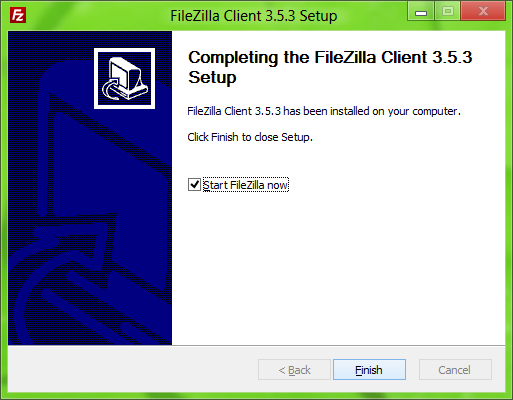
Congratulations, you’ve now successfully installed the FileZilla Client and can now move on to running!
Windows Vista/7/8 users: Note that if you select to start FileZilla from the installer, it inherits the installer permissions. In other words, it starts elevated from the installer, while from the Start Menu it does not. Basically, elevation does have influence on how the shell extension works and which directories are writable. Many users have posted into the forum why something works directly after installation, but fails later on. Now you know a possible cause.
With zip version
Installation with the zip version is very simple as long as you know how to work with zip files and can manage general file and directory handling in Windows. Basically you just extract (unzip) the downloaded file to a folder on your disk, e.g. «C:\Program Files\FileZilla FTP Client\» and then just start FileZilla with the filezilla.exe file afterwards. Please note that this action requires Elevation on Windows Vista/7/8! It might be a good idea to make a shortcut to this file on your desktop/start menu/quick launch so that you can easily access it.
To create a portable installation of FileZilla on a USB stick or any other portable storage, you first have to extract the ZIP file contents to that location. Then, you must create a file named «fzdefaults.xml» in the same directory as the FileZilla executable. There’s an example file in the «./docs» subdirectory you can use as template. Follow the included instructions in the example file to set the config location to a relative path on your portable device.
Installing on Mac OS X
Please note that the official binaries for FileZilla require OS X 10.9 or greater.
To install FileZilla, simply download the appropriate file to your computer.
If you have downloaded the FileZilla package using Safari, it will be automatically extracted. You might have to manually extract the archive if you’re using a different browser. To start FileZilla, simply doubleclick the extracted application bundle.
Covered Top of FileZilla-Window by MacOS-Menu
When you start FileZilla in the Finder, then you will see that the window of FileZilla is covered by the top menu. You may find it difficult to move the window, because you cannot click on the covered top of the FileZilla-window. Tip: You can resolve this problem by changing the resolution of your screen and then change it back to the original resolution (during the resolution change, OSX re-checks that all windows are properly oriented).
Installing on GNU/Linux and other Unix(-like) systems
It is recommended that you use the package manager of your distribution.
If you’re using GNU/Linux, you can also try using the precompiled binaries. After extracting the files to any location (location does not matter, FileZilla can detect its own installation prefix), you can start the program using the filezilla executable in the bin/ subdirectory. Please note that due to differences in distributions, the provided binaries might not work on your system.
Alternatively you can also compile FileZilla from source.
Compiling FileZilla from source
You can find compiling instructions on this wiki. If you have questions regarding the compilation have a look at the forums.
Running
FileZilla is simply run by double-clicking the FileZilla.exe file (default location for Windows: «C:\Program Files\FileZilla FTP Client\FileZilla.exe») or one of the shortcuts on the desktop or in the start menu that you may have created during the installation of FileZilla. There are command line arguments you can use.
At the first start of each version a short version introduction appears (unless you use Kiosk Mode 2).
For an example screenshot of a first start, click here: FileZilla First start
Источник
Как пользоваться Filezilla
Протокол FTP в наши дни очень часто используется многими веб-мастерами и разработчиками для загрузки файлов на сервера, управления файлами сайтов и решения других подобных задач. Такой популярности этот протокол набрал потому, что он прост в использовании и не требует особых знаний устройства и команд операционных систем Linux.
Один из самых популярных FTP клиентов, который используется множеством пользователей различных платформ, включая Windows, MacOS и даже Linux. Эта программа позволяет очень просто подключаться к удаленному серверу, выполнять там нужные действия, например, редактировать файлы, загружать их или скачивать, а также удобно просматривать файловую систему. В этой статье мы рассмотрим как пользоваться FileZilla для решения своих задач.
Как пользоваться Filezilla?
Перед тем как мы перейдем непосредственно к решению задачи, нужно сначала установить программу.
1. Установка FileZilla
В большинстве современных дистрибутивов Linux эту программу можно установить из официальных репозиториев. Например, для установки программы в Ubuntu используйте такую команду:
sudo apt install filezilla
А в RedHat или CentOS:
sudo yum install filezilla
Для других дистрибутивов команда установки будет отличаться только пакетным менеджером. В Windows можно получить программу, скачав установочный пакет из официального сайта. После установки вы сможете найти утилиту в главном меню. Кстати говоря, для Linux тоже есть бинарная версия на официальном сайте.

2. Интерфейс
Сразу после запуска программы вы увидите такое окно. В небольшом диалоговом окне утилита сообщает информацию о версии и ссылки на документацию:
 Это окошко можно закрыть. Дальше рассмотрим интерфейс главного окна программы:
- Меню — находится в самой верхней части окна;
- Панель инструментов — она находится сразу под меню и содержит различные инструменты для управления состоянием программы;
- Панель авторизации — сразу под панелью инструментов находится четыре поля для ввода данных авторизации на сервере;
- Панель команд — чуть ниже находится текстовое поле, в котором будут выводиться все команды, отправленные на сервер и их результат;
- Менеджер файлов — еще ниже окно разделено на две части. С левой стороны менеджер файлов локального компьютера, с правой — файлы на удаленном сервере;
- Статус бар — в самом низу находится статус бар, в котором отображается прогресс загрузки или скачивания файлов, а также количество успешных скачиваний и скачиваний, которые завершились ошибкой.
 Все эти инструменты нам придется использовать чтобы управлять программой.
3. Подключение к серверу
Первое что необходимо сделать — это подключиться к удаленному серверу. Для этого укажите такие параметры:
- ip сервера — айпи адрес или имя домена, на котором запущен FTP сервер, в нашем примере мы будем использовать один из тестовых серверов;
- имя пользователя — ваш пользователь или anonimous для анонимного доступа;
- пароль — пароль вашего пользователя, можно оставить пустым для анонимного доступа;
- порт — если FTP сервер запущен не на стандартном порту, его нужно указать здесь.
После этого нужно нажать «Быстрое подключение». Программа спросит нужно ли запоминать пароль. Чтобы опция запоминать стала активной необходимо сначала выбрать «Не запоминать», а затем снова «Запоминать»:
 Затем, в следующий раз вам больше не нужно будет вводить пароль. Достаточно только нажать на треугольник рядом с кнопкой и выбрать нужный сервер, подключение filezilla выполнится автоматически.
Когда подключение filezilla будет установлено, в правой части окна появляться папки и файлы, которые находятся на сервере. Обратите внимание, это окно тоже разделено на две части, папки находятся в верхней, а в нижней файлы вместе с папками.
 4. Загрузка файлов
 4. Загрузка файлов
Один из самых частых способов применения FileZilla — это загрузка файлов на удаленный сервер. Для этого просто выберите нужный файл, откройте для него контекстное меню и выберите «Закачать на сервер»:
 Точно таким же образом можно отправить на сервер несколько файлов. Просто отметьте их с помощью клавиши Ctrl или мышкой, а затем откройте контекстное меню и выберите «Закачать на сервер»:
 Обратите внимание, что прогресс загрузки для каждого из файлов отобразится в нижней части окна программы. Когда работа будет завершена, вы сможете найти свои файлы на сервере. Скачать файлы с удаленного сервера вы можете точно таким же способом, только отличие в том, что нужно работать в правой панели и название кнопки будет «Скачать».
5. Редактирование файлов
Одна из полезных возможностей FileZilla, которых нет в других программах — это редактирование файлов. Вы можете редактировать файлы как на локальном компьютере, так и на удаленном. Для этого просто выберите нужный файл и в контекстном меню для него выберите «Открыть»:

 Дальше откроется текстовый редактор, где вы можете внести все необходимые изменения. После того как вы завершите, сохраните файл и закройте редактор. FileZilla спросит вас нужно ли загрузить новый файл на сервер:

 В обоих окнах соглашайтесь.
6. Поиск файлов
Мы не всегда точно знаем где находится тот или иной файл. Программа поддерживает возможность поиска и это может помочь пользоваться FileZilla в некоторых ситуациях. Чтобы найти файл по имени, размеру и дате в структуре каталогов сервера или локального компьютера. Чтобы начать поиск кликните по инструменту с нарисованным биноклем. В открывшемся окне нужно ввести параметры поиска:
 Вы можете выбрать такие параметры, как «Имя», «Размер», «Дата» и «Путь». После того как нужные критерии будут установлены, нажмите «Искать». В этом же окне программа отобразит обнаруженные файлы.
7. Другие действия с файлами
С помощью клиента FileZilla вы можете выполнять все стандартные действия с файлами на удаленном сервере. Возможно использование FileZilla для создания каталогов, создания файлов, переименования и даже изменения прав доступа. Все эти возможности доступны из контекстного меню файла.
8. Настройка FileZilla
Не всегда нас будут устраивать стандартные возможности программы. Тогда может понадобиться настройка FileZilla. Чтобы открыть настройки, откройте меню «Редактирование», затем выберите «Настройки».
Первое что нас будет интересовать, это режим передачи файлов. Существуют два режима:
- Активный — сервер подключается к клиенту и скачивает файл;
- Пассивный — клиент сам подключается к серверу, затем идет передача файла.
Как вы понимаете, если компьютер подключен к интернету через NAT, то активный режим работать не будет. В программе по умолчанию используется пассивный. Эту настройку можно поменять на вкладке FTP:

На вкладке sFTP находятся настройки специфичные для этого протокола, например, вы можете добавить ключи, которые будут использоваться для шифрования:
 На вкладке «Передачи» можно настроить количество файлов, которые передаются одновременно, а также указать максимальную скорость с которой может выполняться передача файла FileZilla:
 На вкладке «Правка файлов» вы можете выбрать редактор, который будет использоваться при редактировании:
Выводы
 Выводы
В этой статье мы рассмотрели как пользоваться FileZilla client для управления файлами на удаленном сервере по FTP. Это отличная утилита, которая позволяет выполнить все необходимые действия, причем намного проще, чем с помощью консольных клиентов. С ней довольно просто разобраться, особенно после этой инструкции. Если у вас остались вопросы, спрашивайте в комментариях!
Источник


