- Установка GNU C (gcc) для Windows (MinGW)
- Материал из биософт-м
- Все локально
- Откуда взялось
- mingw-get
- Проверяем
- Лицензия
- WindowsInstall
- Contents
- Windows Installation [ edit ]
- Binary Installers [ edit ]
- Current Windows Status [ edit ]
- Windows Porting Issues [ edit ]
- Installation Options [ edit ]
- Building on Windows with Native Tools [ edit ]
- MinGW/MSYS [ edit ]
- Cygwin [ edit ]
- Chocolatey [ edit ]
- WSL | Ubuntu [ edit ]
- Known Windows Build Issues [ edit ]
- Solarian Programmer
- My programming ramblings
- Getting started with GSL — GNU Scientific Library on Windows, macOS and Linux
- Posted on January 26, 2020 by Paul
Установка GNU C (gcc) для Windows (MinGW)
Материал из биософт-м
| ! | Данная информация предназначена только только для IT-специалистов по системной интеграции модулей БИОСОФТ-М. (см. Руководства пользователя к программным продуктам) |
Компилятор нужно было приготовить так, чтобы архив просто записать в
что бы он работал без всяких глобальных настроек системы. Мобильно, удобно для переноса между компами. Ниже приведена правильная последовательность действий дающая такой результат.
Все локально
Базовый MinGW не требует никаких обязательных настроек системы, реестра, путей и т.п., даже если иное вы прочитаете на их сайте.
Я специально отделяю эту инсталляцию от других возможных инсталляций GCC в системе. Она не вызывает конфликта ни с QT ни с SDK для контроллеров.
Они требуют прописывать PATH, я делаю это не системно а локально в компиляционных скриптах. Так мы точно знаем какой компилятор откуда запустился.
Откуда все взялось знать не обязательно.
Откуда взялось
Исходное скачивание проводится на компе с интернетом.
Я не хочу менять никаких системных настроек. Хочу, чтобы компилятор копировался на другие компы и был готов к работе без всяких подготовительных процедур.
Предупреждаю, что эта процедура может привести к скачиванию более новых версий и соответственно к несовместимости с какими то исходниками отлаженными под то что выдано выше.
mingw-get
Распаковываем в C:\MinGW.
Запускаем cmd.exe и пишием:
- C:>cd C:\MinGW\bin
- C:\MinGW\bin>mingw-get.exe update
(далее текущая директория C:\MinGW\bin подразумевается)
- mingw-get.exe install mingwrt
- mingw-get.exe install w32api
- mingw-get.exe install binutils
- mingw-get.exe install gcc
- mingw-get.exe install g++
- mingw-get.exe install mingw32-make
Проверяем
- создаем C:\MinGW\bin\test
- создаем C:\MinGW\bin\test\test.cpp
- создаем C:\MinGW\bin\test\testgcc.bat
- запускаем testgcc.bat и получаем:
- должен появится a.exe, запускаем, убеждаемся что MessageBox() сработал.
По мининимуму больше ничего не нужно. Компиляцию будет организовывать Jam.
Лицензия
Мы не поставляем ни GCC ни MinGW ни как часть наших инсталляций, ни как неотъемлемую часть SDK. Они не являются составляющей частью наших продуктов ни в каком виде. Если какая либо поставка утилит будет включать GCC или MinGW то все связанные с ними исходники требуемые лицензиями и копия лицензии приложены и либо доступны для скачивания с нашего сайта либо входят в поставляемый архив.
WindowsInstall
Contents
Windows Installation [ edit ]
Binary Installers [ edit ]
There are a few different unofficial GNU Radio binary installers that are maintained by the community:
1) Geof Nieboer’s installer hosted at gcndevelopment.com. This is a binary installer for 64-bit Windows 7/8/10 that includes all dependencies for Windows, a custom python distro, commonly used SDR drivers, and several OOT blocks.
2) Radioconda installer. This binary installer tends to be the most up-to-date but currently includes fewer SDR drivers and OOT modules. It utilizes the conda package/environment manager and provides easy access to thousands of Python and other packages that are not strictly related to GNU Radio. This also lets you stay up-to-date without having to re-install. Since this provides the same conda-forge packages available without the installer, the conda install guide might be useful for additional instructions, including how to build OOT modules from source.
3) Pothos SDR development environment installer. This binary installer includes GNU Radio, Pothos, CubicSDK, and other tools. It has historically been updated about once or twice per year.
Current Windows Status [ edit ]
Installing core GNU Radio and USRP on Windows is becoming more routine. Many OoT modules may still require compiling locally. Please report any success or failures. Patches and enhancements are especially welcome!
Windows Porting Issues [ edit ]
Considerable effort has been put into making the GNU Radio code portable among various operating systems, but there are several reasons why it cannot be «simply» compiled and run under Windows:
- The build and install procedures are based on Linux scripts and tools
- Several third-party libraries are used, each with its own, often system-dependent, installation procedure
- Most GNU Radio applications must interface to hardware (e.g., a sound card or USRP) which require system-dependent drivers and installation procedures
- Because GNU Radio is written as an extension to Python, there are potential problems on Windows if different runtime libraries are used for GNU Radio and Python
The following sections show how these issues can be addressed.
Installation Options [ edit ]
GNU Radio is designed to be flexible. It has a number of modules, capabilities, and options that can be enabled or disabled to suit the needs of the user, and the user can add custom blocks or modules to the system.
To support this flexibility, it comes with a set of files and scripts to be used with GNU software build tools (sh, make, autoconf, automake, etc.). These tools use Linux-like commands and filenames that are not normally available on Windows systems.
Fortunately, we are not the first to face this problem, and several solutions exist. These are presented in order of increasing difficulty:
Building on Windows with Native Tools [ edit ]
Ettus Application note [1] describes how to build from source. Similar is a post at [2] for OOT modules.
Powershell scripts are now available at https://www.github.com/gnieboer/gnuradio_windows_build_scripts that fully automate the build process for GNURadio 3.7.9.2+. A few build dependencies are required (MSVC 2015, Git, Doxygen, CMake, Perl, Wix) but all are free. The script has two options:
- Build all dependencies from source (including python itself)
- Download a prebuilt custom dependency package and then build only GNURadio and a few OOT modules on top.
The binary installers described above are built with these scripts. They ensure that all dependencies are built with the same toolchain against the same runtime libraries, and handle the patches and configuration «tweaks» needed to build them on Windows.
If option 1 is desired, note that to build scipy, the non-free Intel Fortran compiler is required, gfortran cannot build objects that can link with MSVC C objects. If you do not have said compiler, the scripts will download pre-compiled wheels instead.
More information on the build process is available on the GitHub repo readme, and also at http://www.gcndevelopment.com/gnuradio.
MinGW/MSYS [ edit ]
MinGW (http://www.mingw.org/) provides GNU compilers and Window-specific header files for compiling native Windows applications.
MSYS (http://www.mingw.org/msys.shtml) is a companion set of Linux-like commands, shell, and build tools.
MinGW does not include a Linux programming interface; programs should be smaller and faster than with Cygwin (in theory), but will require more Windows-specific code.
MSYS is intended primarily as a build environment, making it more compact than Cygwin.
Because there is no Linux API emulation, GNU Radio built with MinGW should be used with standard Windows versions of Python and the third-party libraries.
MinGW does not provide as much support as Cygwin for installing third-party libraries, but in many cases precompiled binaries are available.
For detailed installation instructions using MinGW and MSYS see Installing GNU Radio with MinGW.
Cygwin [ edit ]
Cygwin (http://www.cygwin.com/) is a Linux-like environment for Windows.
It provides the Linux-like shell, file naming, and build tools we need and also makes it easy to install many of the third-party libraries required by GNU Radio. It also provides a Linux programming interface (API); this is not required by GNU Radio, but it lets us use the better-tested Linux versions of some functions.
Because the Linux API uses its own C runtime library, it is best to use Cygwin versions of Python and the third-party libraries when building GNU Radio with Cygwin.
For detailed installation instructions using Cygwin see Installing GNU Radio with Cygwin.
Chocolatey [ edit ]
To quote from the [|https://chocolatey.org/ Chocolatey homepage]: Chocolatey NuGet is a Machine Package Manager, somewhat like apt-get, but built with Windows in mind..
There are packages for gnuradio (and its dependencies) available in a separate repository (currently the best known source is: https://github.com/ariovistus/chocolatey-packages)
To install, open an Administrative command line session and run:
Now you need to install a source which has the recipes for gnuradio and dependents. The easiest method is to clone the chocolatey-packages from the github repository listed above (https://github.com/ariovistus/chocolatey-packages), then add the local source from within an Administrative command line session:
Create the numpy package:
Create the gnuradio package:
Now install the gnuradio package:
Follow the command prompts.
WSL | Ubuntu [ edit ]
Enable WSL from windows features.
Install Ubuntu from Microsoft Store.
Using the Ubuntu terminal, install gnuradio as you would on linux [3]
Install additional package «libgtk-3-dev»
Install an X server, either VcXsrv [4] or Xming [5] as WSL does not come with an X server. VcXsrv is recommended as it is open source and self-contained instead of being tied to Cygwin, whereas Xming «asks for donations» to the developer as a dubious «sale» for non-existent support.
Launch VcXsrv, making sure to select «Disable access control» option in the Extra settings so that any application can export to X11.
Edit bashrc to set up the display by adding the following line at the bottom of the file
Restart the Ubuntu terminal and run
Known Windows Build Issues [ edit ]
So far, we have workarounds for all reported problems:
Solarian Programmer
My programming ramblings
Getting started with GSL — GNU Scientific Library on Windows, macOS and Linux
Posted on January 26, 2020 by Paul
In this article, I will show you how to install GSL — the GNU Scientific Library on Windows, macOS and Linux, and how to compile and run a simple GSL program. GSL is a C library for numerical computations. You can use GSL for example to solve a linear system of equations, to fit a curve to a set of points, for numerical integration, statistical calculations and so on. You can find a detailed description of GSL capabilities in the GSL reference manual.
This article is split in a few parts:
I recommend that you read the install part for your OS and the part that shows how to use GSL to solve a linear system of equations.
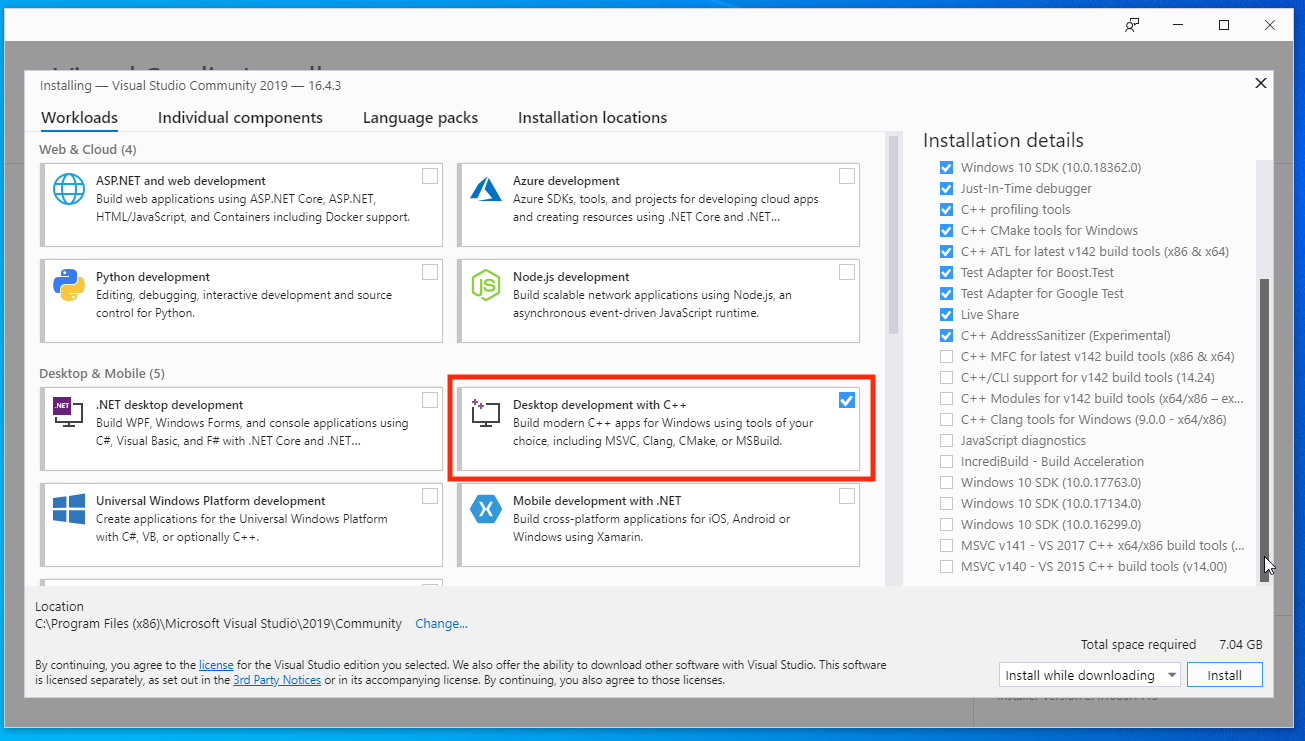
For Windows, I recommend that you first install Visual Studio 2019. Make sure that you install the proper Visual Studio and not Visual Studio Code which is an entirely different product. Once the Visual Studio installer starts, check the Desktop development with C++ workload:
Next, install git for Windows from https://git-scm.com/. If you are not familiar with git, just accept the defaults suggested by the installer.
Finally, we are going to install vcpkg which is a C++ library manager that will let us install GSL. I will install vcpkg in a folder on my C drive, feel free to install it in a different location, just avoid paths with empty spaces. Open a PowerShell window (PowerShell is already installed on Windows, you can find it in the Start menu):
Next, we are going to use git to get the latest vcpkg version:
After the above command finishes, go to the vcpkg folder, bootstrap and integrate vcpkg:
At this point, you can use the vcpkg command to install any of the available C++ libraries. You can find the complete list of available libraries in the ports folder from the vcpkg installation. Once you use vcpkg to install a library, it will be available in your Visual Studio C++ projects.
Let’s install GSL with vcpkg:
The above command will build and install GSL for 32 and 64 bits Visual Studio projects.
Next time when you want to install a C++ library that is available in the vcpkg ports, remember to open a PowerShell window and navigate to the where you’ve installed vcpkg. vcpkg is not added to the system path, so you need to be in the vcpkg folder in order to be able to use it.
As a side note, a library installed with vcpkg is directly available in your msbuild projects (the ones created by default by Visual Studio). If you want to create a CMake project, you will need to add the include folders and libraries to the CMake project.
Now, that you have GSL installed, start Visual Studio and create a new C++ console project. You can remove the hello world C++ code that is generated by the compiler and write your C++ GSL program, see the GSL usage part of the article for an example.
On macOS, I recommend that you install the Command Line Tools which will give you the Clang C++ compiler and also installs a bunch of useful utilities like make, git, vim and so on. Open a Terminal and write:
just follow the installer suggestions to get the Command Line Tools.
Once the Command Line Tools are installed, we need to install the Homebrew package manager which will let us install GSL:
At this point, you should be able to use the brew command to install GSL and CMake:
Now, that you have GSL installed, open your preferred C++ editor (if you don’t have one, a good suggestion is Visual Studio Code) and write a C++ GSL program, see the GSL usage part of the article for an example.
For Linux, I will exemplify the installation part on a Debian based system.
Let’s start by installing a C++ toolchain. Open a Terminal and write:
Next, install GSL with:
By default GSL will use a GSL built version of BLAS which is a library for basic vector and matrix operations. If you have access to a a highly tuned BLAS version, like the one provided with MKL, I suggest to use it. Alternatively, you can install libatlas, which is not as fast a MKL, but it is usually faster than the BLAS version that is include with GSL. You can install libatlas with:
Now, that you have GSL installed, open your preferred C++ editor (if don’t have one, a good suggestion is Visual Studio Code) and write a C++ GSL program, see the GSL usage part of the article for an example.
In this part of the article, I will show you how to use GSL to solve a linear system of equation:
Let’s start by including the necessary header files and filling the above A matrix and b vector with some values. For simplicity, we are going to use some random hard coded values. I will leave it as an exercise for the reader to discover how to use GSL to fill A and b with random numbers:
Next, we are going to use GSL views to access the data from the above two arrays:
You can, optionally, print the vector and matrix values using gsl_vector_fprintf and gsl_matrix_fprintf, e.g.:
Please note, that a matrix is printed in the order that is stored in memory, row by row.
In order to solve the above system with GSL we first need to decompose the matrix A into the LU form and pass the decomposed matrix to the GSL linear solver:
Please note that we allocate memory for the solution vector x and a permutation of the rows of the matrix A during the LU decomposition. Since GSL is a C library, we need to release the allocated memory manually when it is not needed. Another observation is that the original values of the matrix A are destroyed during the decomposition and replaced with the values of the decomposition.
Here is entire program:
This is how you can compile the above program on a Linux machine:
and on a macOS machine:
Here is an example of what I see on a Linux machine when I build and run the above program:
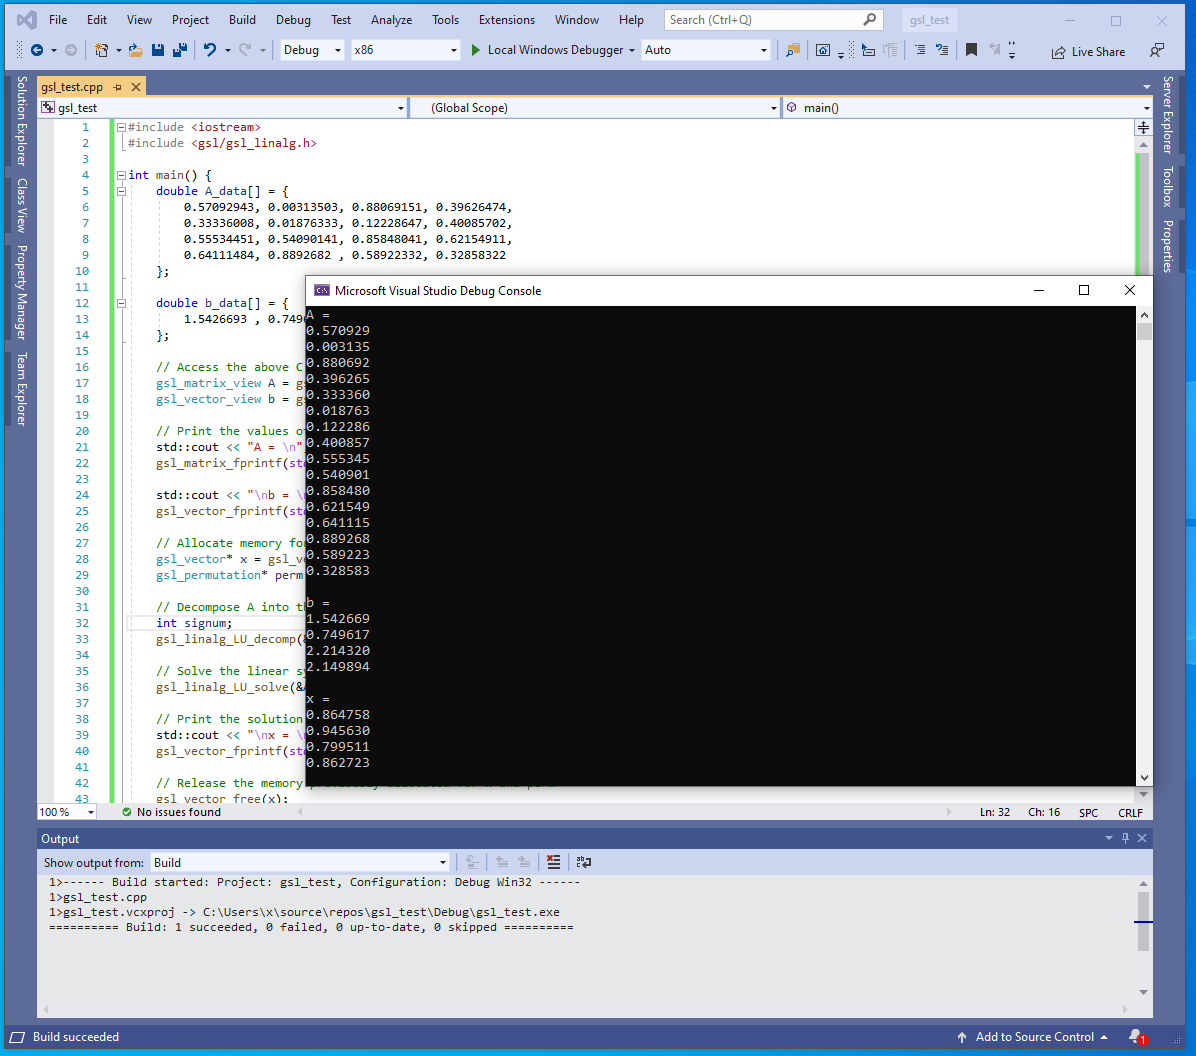
For Windows, create a new C++ console application and replace the C++ code generated by Visual Studio with the above C++ program. Since we’ve installed GSL with vcpkg, Visual Studio knows where to find the include files and with what library to link the project, all you have to do is build and run the program.
Here is an example of what I see on a Windows machine:
In the last part of the article, I will show you how to create a portable C++ and GSL CMake based project that can be used on Windows, macOS and Linux. This is useful if you are interested in running the same project on multiple operating systems.
I will assume that you have a folder named gsl_tests with a C++ program named gsl_test.cpp that contains the code presented in the previous section. In the same folder create a new file named CMakeLists.txt with the next content:
For Linux and macOS, open a Terminal and navigate to the gsl_tests folder:
You should end up with an executable named gsl_demo in the build folder.
For Windows, go to the Start menu, find the Visual Studio 2019 menu and from it start x64 Native Tools Command Prompt for VS 2019. From the above Command Prompt navigate to where you’ve placed the gsl_tests folder. Here, I will assume for simplicity, that you have the folder gsl_tests in C:\DEV and that your vcpkg installation is also in C:\DEV:
At this point, you can build the project from the same Command Prompt with:
and you should end up with an executable named gsl_demo.exe inside the Release folder.
Alternatively, open C:\DEV\gsl_tests\build in Windows Explorer, right click on gsl_demo.sln and chose to open it with Visual Studio 2019. You should see a list of projects, right click on the one named gsl_demo and make it the default one than build it. At this point, you can run the code as usual with CTRL + F5, F5 or from the Debug menu.
As a side note, latest Visual Studio installer should install cmake for you. If you get an error when trying to use cmake with the above instructions, first check that you are using a proper Visual Studio command prompt. If you still can’t find cmake, you can install it from https://cmake.org/, just be sure to add it to the Windows path.
If you need to learn about Linear Algebra, I would recommend reading Linear Algebra and Learning from Data by Gilbert Strang:
If you want to learn more about C++17 I would recommend reading C++17 in Detail by Bartlomiej Filipek:


