- how2: Using GPG on macOS without GPGTools
- GPG Setup
- Connecting to GitHub
- Troubleshooting
- GnuPG: Безопасная почта для Win, Mac и *nix
- Скачивание
- Установка
- Создание ключей
- Использование
- Переписка
- Финал
- GPGTools
- One simple package with everything you need, to protect your emails and files.
- GPG Mail
- GPG Keychain
- GPG Services
- MacGPG
- GPG Suite at a glance
- It’s all about the keys
- Create your own key
- Upload your key to a key server so your friends can find it
- Already an expert?
- See all your keys
- The toolbar
- More options
- Add additional email addresses
- Write secure messages with Mail
- The lock button
- The sign button
- Choose between PGP and S/MIME
- Receive secure messages with Mail
- Signed messages
- Encrypted or signed attachments
- Sometimes things go wrong
- Find out what went wrong
- How to use GnuPG for encrypting files on MacOS
- Configuration Files
- Cerb
- Introduction
- Installing Software
- Install Homebrew
- Install GPG
- Enable GUI for passphrase entry
- Generating GPG keys
- Generate master key
- Set secure preferences on key
- Add GPG subkey for Cerb
- Export keys for safe storage
- Remove passphrase for using with Cerb
- Delete master key from local keyring
- Export subkey for using with Cerb
- Using your newly created GPG key with Cerb
- Importing via your browser
- Importing via command line
- Publishing your public key
- Using Keybase
- Using MIT’s public key server
- Using Symantec’s public key server
- Using Key-server.io’s public key server
- Links to further reading
how2: Using GPG on macOS without GPGTools
I don’t like GPGTools. I want GPG on macOS. Every tutorial has some obsolete part. Here’s what I did.
GPGTools installs a lot of things that I don’t want to use. I just want to sign my commits on GitHub and save my GPG key in macOS keychain.
There are two main dependencies to achieve that, gnupg contains the GPG tools to generate keys and sign things, as well as an agent to do agent things; and pinentry-mac which is the part of GPGTools that prompts for your key password and stores it on the OS keychain.
GPG Setup
Before anything, install homebrew.
After that, install the dependencies:
Then, let’s generate your first key. I recommend using RSA and RSA, a key size of 4096, and not having the key expire. Remember to choose a strong password.
Now you need to configure gpg-agent to use pinentry-mac by creating a file
Then, sign a test message so pinentry-mac can store your password in the keychain:
This should open a dialog prompting your password. Remember to check “Save in Keychain”.
Connecting to GitHub
First, copy your private key to add to GitHub:
Second, configure your git environment to use signed commits. I’ve done it globally. First obtain your public GPG keys:
Then configure git:
And finally, commit something with the-S argument to make sure it’s signed:
Troubleshooting
Things you can try if things are not working:
Источник
GnuPG: Безопасная почта для Win, Mac и *nix
 GnuPG (GNU Privacy Guard ) — открытая реализация PGP, совместимая со стандартами OpenPGP ( RFC 2440 ). GnuPG позволяет шифровать, расшифровывать, подписывать и верифицировать электронные сообщения при помощи пар ключей ( RSA по-умолчанию ). Наиболее частое применение GnuPG — в шифровании электронной почты и проверки подписи файлов, выложенных для скачивания. Но есть возможность использовать и в других протоколах: например, PSI (Jabber-клиент) поддерживает GnuPG и позволяет поточно шифровать переговоры.
Рассмотрим установку и первичную настройку GnuPG для трёх ОС: Windows, Mac OS X и Linux.
Подразумевается, что читатель имеет достаточные знания для того, чтобы выполнить несколько команд в консоли ОС (CMD/Terminal/xterm соответственно).
Скачивание
Windows: GPG4Win — готовая сборка GnuPG + GUI + Claws-Mail.
Mac OS X: Установить GPG Suite
Linux: В зависимости от вашего дистрибутива. Ключевое слово — gnupg2.
В связи с многообразием клиентов под *nix, расписывать установку для каждого — бесполезно.
Список клиентов, поддерживающих GNUPG — тут.
Установка
Windows: Стандартная установка. Не забываем поставить галочку около «Claws Mail».
Mac OS X: Устанавливаем GPG Suite.
Linux: В зависимости от дистрибутива и почтового клиента :)l.
Создание ключей
Запускаем терминал (cmd.exe/Terminal/xterm).
Для ОС Windows делаем cd «Папка_Куда_установлена_GPG4Win» (C:\Program Files\GNU\GnuPG\ по умолчанию )
Для всех: выполняем команду gpg2 —gen-key
Вам зададут несколько вопросов.
2048 должно хватить. Просто жмём Enter.
Через какое время ключ будет считаться недействительным? Жмите «Enter» 🙂 Пусть будет вечным.
Далее жмём «Y». И отвечаем на 3 вопроса.
Real Name: — вводим своё имя латинскими буквами (напр. Vasily Pupkin ).
Email: — вводим e-mail (напр. v.pupkin@gmail.com)
Comment: — что угодно, от названия фирмы до ника )
Если всё правильно — жмём «O».
Теперь нас спросят пароль для ключа. Вводим 2 раза один и тот-же (или 2 раза жмём Enter для ключа без пароля).
Несколько секунд… И ключ готов! Ура! )
Проверяем: gpg2 —list-keys
pub 2048R/5C35B909 2010-01-31
uid Vasily Pupkin
sub 2048R/40ADD978 2010-01-31
Использование
Windows: Запускаем Claws-Mail. Подключаем аккаунт почты (тот, для которого создавали ключ! ).
Идём в настройки-модули, проверяем, что там есть модуль GPG.
Теперь, создаём сами себе сообщение и выбираем Параметры->Зашифровать.
Кстати, можем сразу создать новые ключи для другой учетной записи — Настройки-Настройки учетной записи-Модуль-GPG-Генерировать новую пару ключей
Mac OS X: Запускаем Mail, создаём новое сообщение, видим галочки «Signed» и «Encryped». Можем выбрать ключ для подписи/шифрования. Для 10.6 и Claws-mail аналогично Windows.
Linux:В зависимости от клиента. Для Claws-Mail аналогично Windows.
Переписка
Для переписки с абонентом необходимо иметь его публичный ключ. Свой ключ можно получить командой gpg2 -a —export ваш e-mail.
Импортировать чужой — gpg2 —import файл ключа
Финал
Вот собственно, и всё. Удачного Вам шифрования )
Если хотите проверить — пишите мне (не забывайте прикладывать свой публичный ключ аттачем ).
Мой ключ — тут.
Удачи!
Источник
GPGTools
One simple package
with everything you need,
to protect your emails and files.
By downloading, you agree to our Terms of Distribution
Use GPG Suite to encrypt, decrypt, sign and verify files or messages. Manage your GPG Keychain with a few simple clicks and experience the full power of GPG easier than ever before.
GPG Mail
integrates the full power of GPG seamlessly into macOS Mail. Protecting your emails has never been so simple.
GPG Keychain
allows you to manage your OpenPGP keys. Create new keys, modify existing ones and import your colleagues’ keys from a key server.
GPG Services
integrates the power of GPG into almost any application via the macOS Services context menu. It allows you to encrypt/decrypt, sign/verify text selections, files, folders and much more.
MacGPG
is the underlying encryption engine of GPG Suite. If you are familiar with the command line, you can use its raw powers. Based on the latest version of GnuPG.
GPG Suite at a glance

It’s all about the keys
To use GPG to encrypt and verify mails or files you and your friends need GPG keys.
GPG Keychain lets you manage your own keys and find and import keys of your friends.
Create your own key
Enter your name and the email address you want to use your key with and you are ready to go.
You don’t have to bother with more advanced settings, we set good defaults for you.
Upload your key to a key server so your friends can find it
When creating a key, you have the option to upload it to a key server, which makes it very easy for your friends to find and import it.
Already an expert?
When creating a key, you can enable the advanced view, which lets you choose key size, expiration date and algorithm to use for your keys. Have full control over your keys.
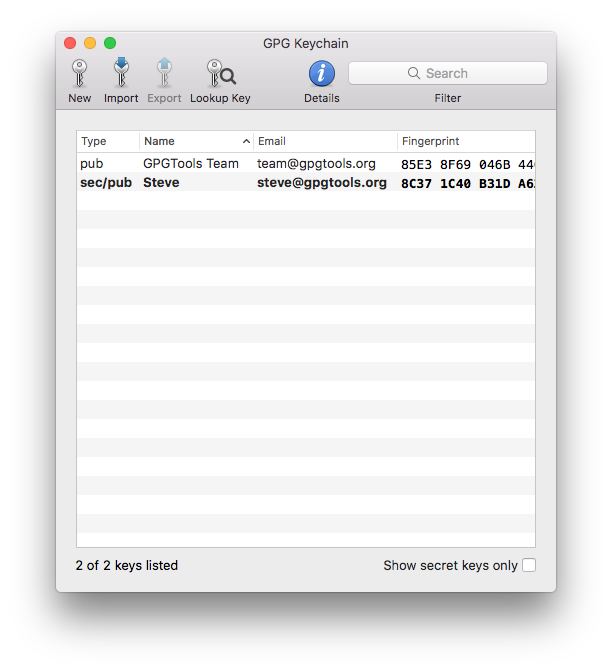
See all your keys
The main window of GPG Keychain shows you all your keys and the keys of your friends.
Enable the «Show secret keys only» checkbox, to see only the keys you created.
The toolbar
gives you quick access to the most important actions. Create a new key, import or export an existing key, or search for a specific key using the search field.
More options
Select a key and right-click on it to bring up a context menu, letting you send your key to a key server, update or manage the details of your key.
Add additional email addresses
Select your key and press the info button in the toolbar to add additional email addresses.
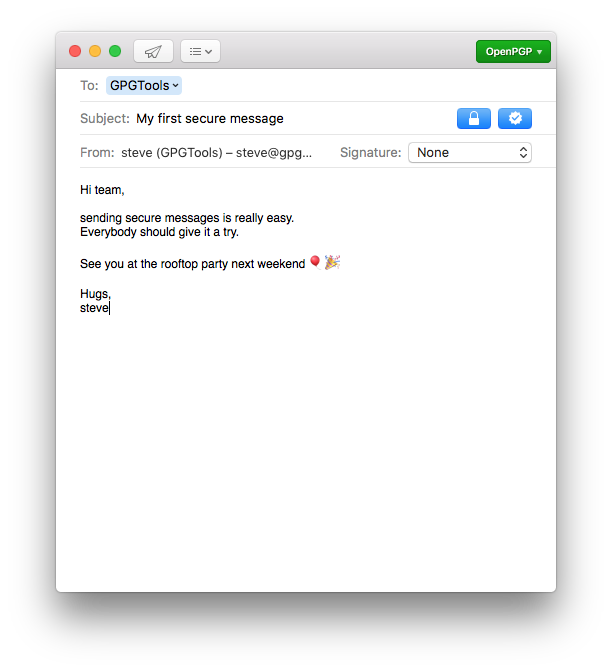
Write secure messages with Mail
After installing GPG Suite, you’ll see two new buttons when writing a new email: the lock button and the sign button next to it.
The lock button
Activate the lock button to encrypt an email. Only you and the recipient will be able to read the contents of your message. Toggle between encrypting and not encrypting your email pressing ⌥ ⌘ Y.
The sign button
Activate the sign button to sign an email. The recipient will be able to tell, that the email came from you and whether or not it was tampered with in any way.
Toggle between signing and not signing your email pressing ⌥ ⌘ X.
Choose between PGP and S/MIME
Using the security method indicator in the upper right corner, you can quickly switch between PGP and S/MIME. This is very handy if you use both.
Press ⌥ ⌘ P to activate PGP or ⌥ ⌘ S to activate S/MIME.
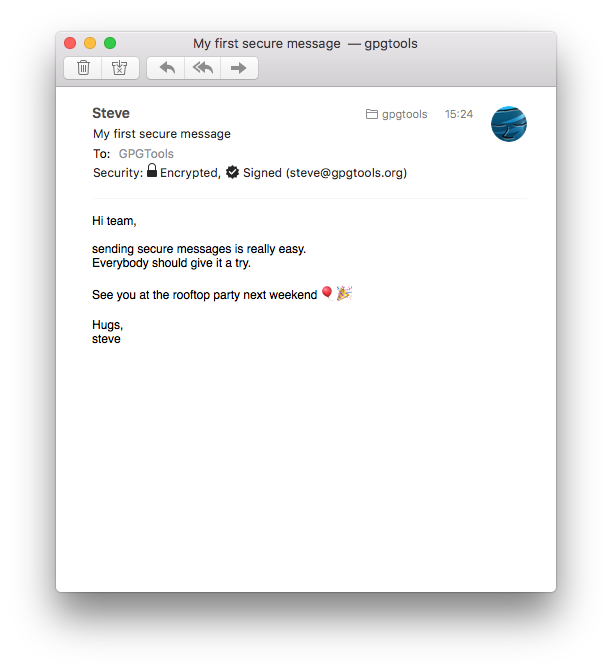
Receive secure messages with Mail
The «Security:» header will tell you, if the message you’ve received was signed or encrypted.
If the message was successfully decrypted, you’ll see an open lock. If the signature of the message is valid, you’ll see a star icon with a checkmark.
Make sure to click «Details» to see the security header.
Signed messages
will show the email address associated with your friend’s key that was used to sign this message.
Click on the signature icon to see more infos regarding the key and signature.
Encrypted or signed attachments
If the message contains encrypted or signed attachments, they will be automatically decrypted and verified. The attachments will look like any other non-encrypted attachments to you, while still being protected.

Sometimes things go wrong
It might happen that someone encrypted a mail for another recipient but mistakenly sent it to you and so you’re not able to read it. Or a signed message you’re receiving was modified without your knowledge. Or anything else could have gone wrong. In these cases we’re trying to be as helpful as possible by providing good explanations of what happened.
Find out what went wrong
Whenever we detect that something’s not right, you’ll see a banner with an error message, letting you know what the problem is.
To get detailed information about a problem, click on «Show Details» which contains a better description of the problem and possible solutions to it.
Источник
How to use GnuPG for encrypting files on MacOS
GnuPG is an implementation of OpenPGP standard.
People use it for public-private key encryption.
It is one of the tools that Edward Snowden used to uncover the secrets of the NSA.
GnuPG is a complex tool.
I will only show you how to use it for file encryption without using keys.
And i will show some configuration files to make commands more simple.
I assume you know how to use a Unix console and have Homebrew package manager installed.
First you should install GnuPG with Homebrew:
Exit fullscreen mode
This will install GnuPG version 2.2.19
Exit fullscreen mode
You should be able to see something like this:
Exit fullscreen mode
Now we can use GnuPG.
I have a text file named test.txt .
It contains this text:
Exit fullscreen mode
To encrypt test.txt file i will use this command:
Exit fullscreen mode
This command will ask you a password and create an encrypted version of test.txt file and save as test.asc file.
-c means use symmetric cipher so you will enter a password for that file.
—armor is for a readable ascii output so you can easily copy/paste it.
—cipher-algo AES256 is for using AES-256 cipher. (U.S. government using it so why not)
—no-symkey-cache means GnuPG will not remember password. If you don’t enter this —decrypt command won’t ask your passphrase.
—output test.asc means save encrypted file as test.asc
Now i have test.asc (encrypted test.txt ).
It contains this text:
Exit fullscreen mode
As you can see it is readable but meaningless.
This is because of the —armor option we added to the command.
To decrypt test.asc file i will use this command:
Exit fullscreen mode
This command will ask you the password you used and if it is correct it will create a decrypted file as test1.txt .
Now i have test1.txt .
It contains this text:
Exit fullscreen mode
Configuration Files
There are some configuration files im using.
I will show you how to create these files.
These configuration files are not neccessary but they are shortening the commands i use everyday.
GnuPG creates a folder for itself.
It is normally in your $HOME folder named .gnupg .
It contains caches, your keyrings, your configuration files.
So go there and create a file named gpg.conf .(if it doesn’t exists)
Write these in gpg.conf :
Exit fullscreen mode
Now create another configuration file named gpg-agent.conf .(gpg-agent comes with gnupg installation)
Write these in gpg-agent.conf :
Exit fullscreen mode
Now actually you should restart your pgp-agent program.
Kill it with this command:
Exit fullscreen mode
It will launch automatically when you call gpg .
If it doesn’t you can run this command to launch it:
Exit fullscreen mode
But i think you won’t need it.
Anyway now we don’t need to add any options. We can simply run our command like this:
Exit fullscreen mode
This command will automatically create a file named test.txt.asc with cipher aes-256 , also in ascii format and won’t remember the password .
To decrypt it simply enter this command:
Exit fullscreen mode
It will create a decrypted file as text.txt .
This is one of the ways to use GnuPG.
As i said before it does so much more.
You can look for more info here at GnuPG
Источник
Cerb
Introduction
To automatically decrypt a received encrypted message in Cerb, you need to have the corresponding private key in your keyring. If you receive an encrypted message that can’t be decrypted, Cerb will leave the encrypted content as an attachment on the message that you can decrypt offline. This is the most secure option, but the content of the message won’t be readable or searchable within Cerb.
If you want automatic decryption of messages, you need to consider the security implications of leaving your private key on the server. At the minimum, we recommend that you create a subkey following the steps documented here so you won’t be storing your master key on the server.
If you are running Linux or Windows, the instructions below can be used with some modifications. We will release platform specific guides for them in the future.
Installing Software
Install Homebrew
This guide assumes you use Homebrew to install packages on your Mac. If that isn’t the case, Homebrew is a package manager (similar to RPM or deb on Linux) that makes it easy to install software on your Mac. Please visit http://brew.sh and follow the instructions to install it.
Install GPG
To generate your keys, you need to install GnuPG (aka GPG). GPG is a free software alternative to the closed source commercial PGP. To install GPG with Homebrew, it’s as simple as:
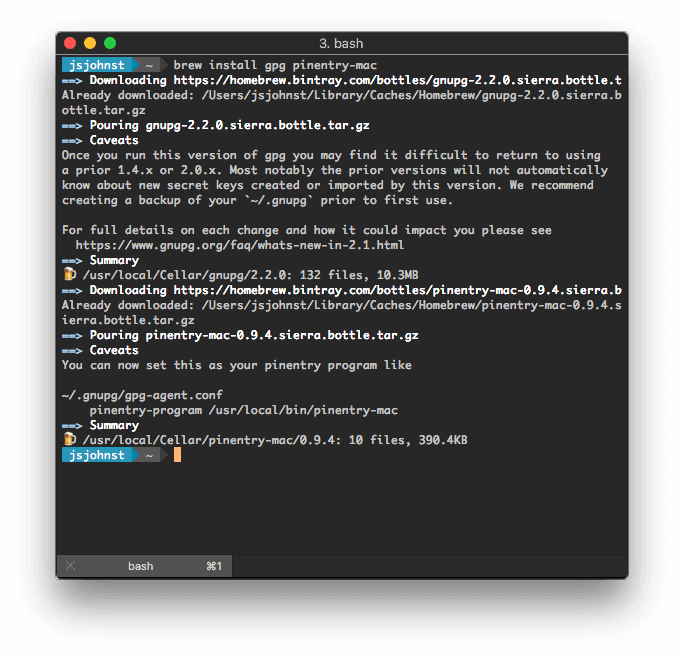
Enable GUI for passphrase entry
You might have noticed we installed two things, GPG and something called pinentry-mac. Pinentry-mac is a tool which prompts with a native dialog box for your GPG key passphrase and also allows you to store the password in your Mac’s Keychain. As Homebrew helpfully prompted after installing pinentry-mac, we now need to enable it.
While pinentry-mac allows you to save your passphrase, in the interest of security you shouldn’t.
To enable it, you first need to run GPG to have it setup its directory structure.
This can be accomplished by simply running:
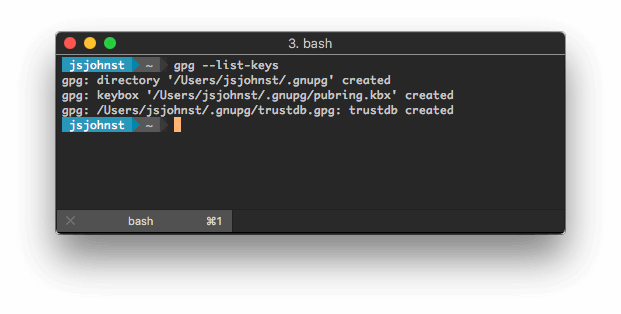
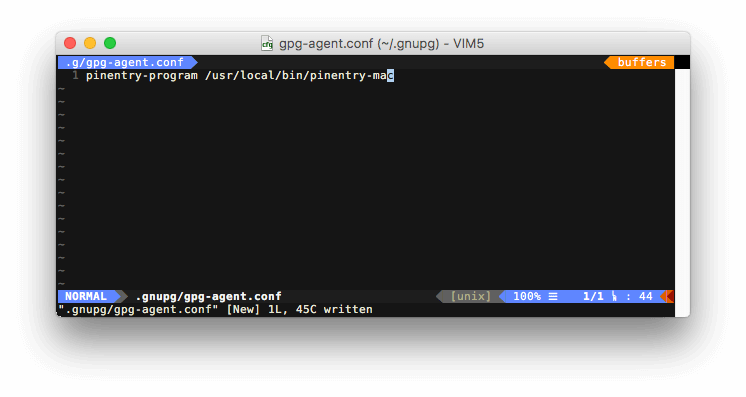
You don’t have any keys in your keyring yet. Let’s fix that in a moment. After getting GPG to create its directory structure, we now need to enable pinentry-mac. We do this by editing the file $HOME/.gnupg/gpg-agent.conf . You can use VIM (or a text editor of your choice) as shown below:
Or you can accomplish the same thing by running this:
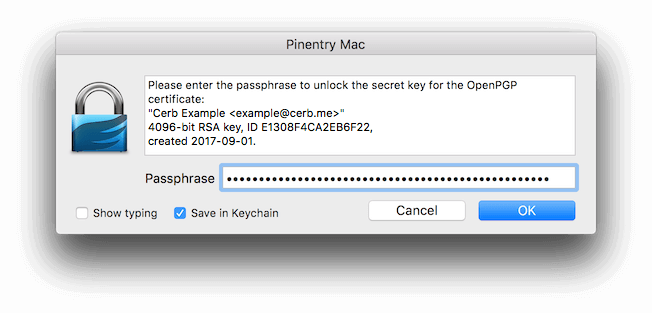
After setting pinentry-mac up, when GPG prompts you for a passphrase, you’ll see something like this:
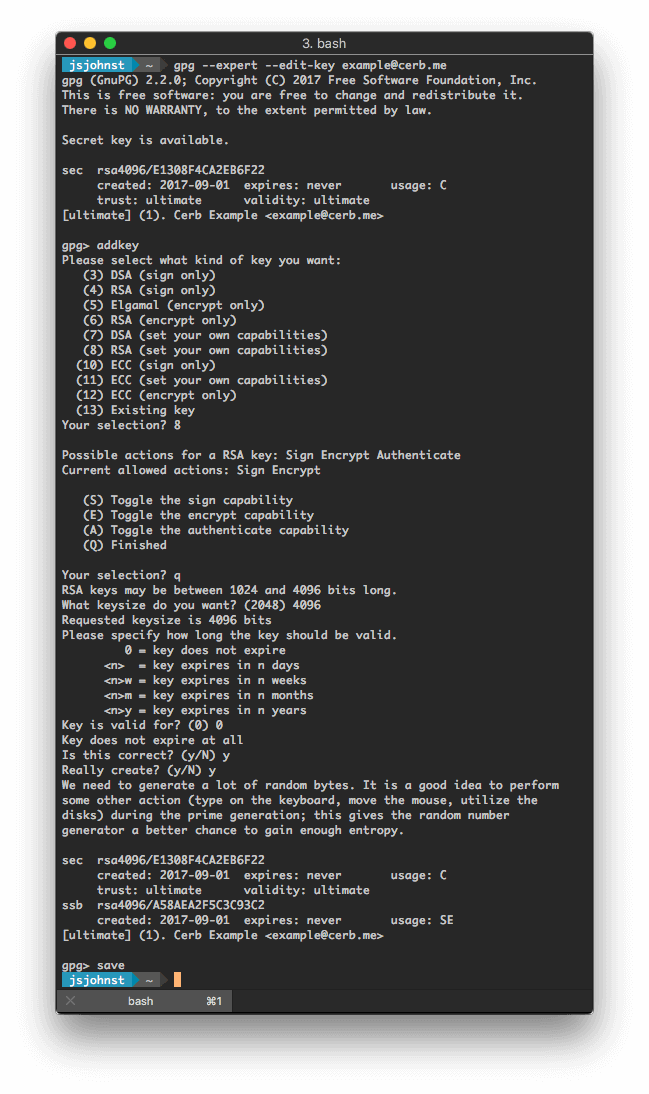
Generating GPG keys
Now that you have GPG installed, we need to generate the keys which are used for encrypted email. Following best practices, we will be generating a master key and then a subkey for usage by Cerb. This way if your subkey is ever compromised, it’s a simple process to revoke and replace it. The master key you should protect as you would your bank password.
Generate master key
We will be removing the Sign and Encrypt capabilities from the master key forcing usage of subkeys for those operations. This limits the damage that can be done if the master key is ever compromised.
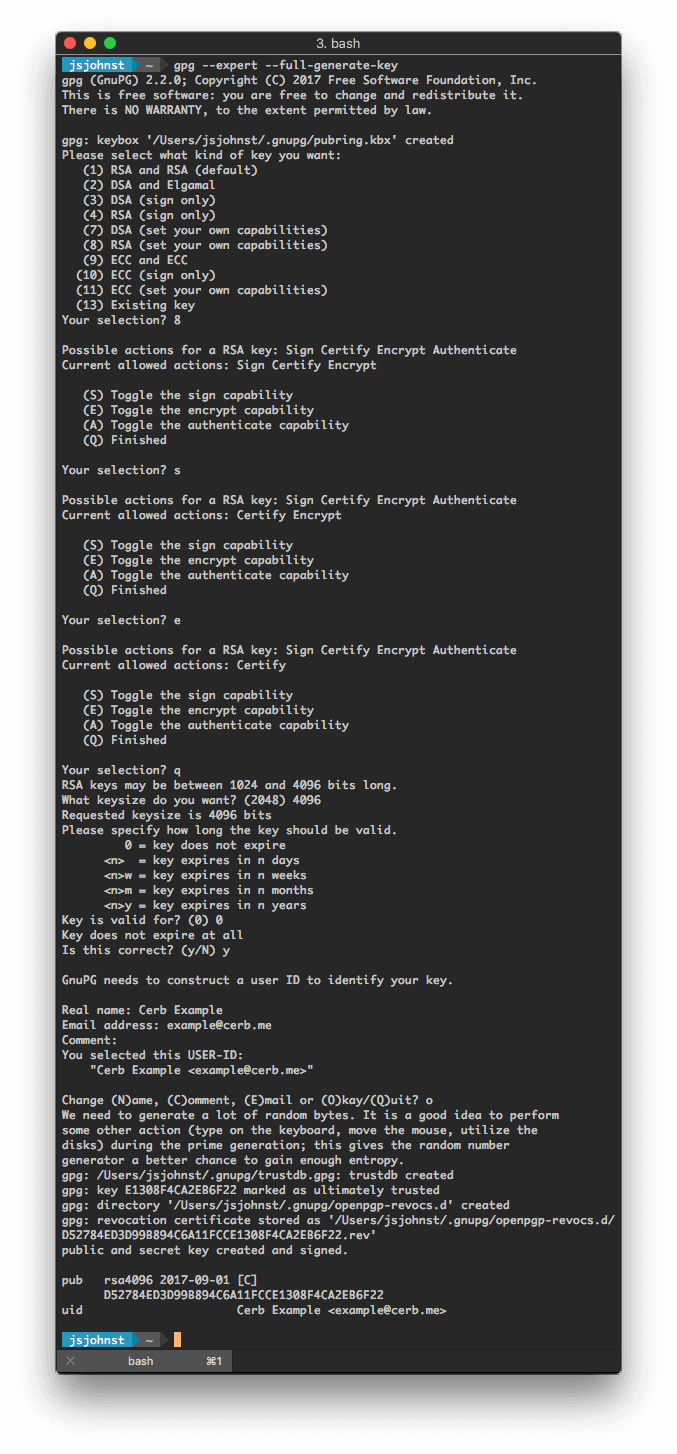
To generate the master key, follow these steps:
- To start the process:
- When prompted for what kind of key, pick option: (8) RSA (set your own capabilities) .
- Next you want to toggle off the sign and encrypt capabilities from the key.
- When prompted for capabilities, type s and hit enter to toggle off the Sign capability.
- Next type e and hit enter to toggle off the Encrypt capability.
- Confirm that the current allowed actions only lists Certify , then type q and hit enter to finish setting capabilities.
- Now you are prompted for how long the RSA key should be. Type 4096 to set the highest security that GPG currently supports.
- For expiration, we suggest picking 0 so the key doesn’t expire.
- Now GPG needs to know who this key is for. For the Real Name, we suggest picking the same “friendly name” you use for outgoing email from Cerb.
- Next provide the email address you want to use for receiving encrypted email.
- We will reference this email as YOUR@EMAIL.com for the remainder of this guide.
- If you’d like to enter a comment for the key, you can do so next. Otherwise hit enter to skip it.
- If everything looks good at this point, hit o for Okay.
- You will now be prompted for your master key passphrase. Please ensure this is a secure password that you have not used anywhere else.
If you are unsure about any of the above, the screenshot below shows the entire key creation process.
Set secure preferences on key
Now that your master key is created, we want to set the preferences on the key to ensure current best practices.
- To edit the key, you need to run:
- Paste in the following to set the preferences:
- Type y to confirm.
- Type save to save and exit.

Add GPG subkey for Cerb
Now that you have your master key, we need to create the subkey used for Encrypt and Sign in Cerb. The process for this is similar to what you have already done before.
- To add the subkey, you need to first run:
- At the prompt, type addkey .
- Choose option: (8) RSA (set your own capabilities) as before.
- Unlike before, the capabilities are already set the way we want (“Sign Encrypt”), so type q to finish capability selection.
- Type 4096 as previously done for the keysize.
- Next, we suggest using 0 for no expiration as before.
- Confirm y at the next two prompts.
- After entering your passphrase, your subkey is now created.
- Type save to quit and exit.
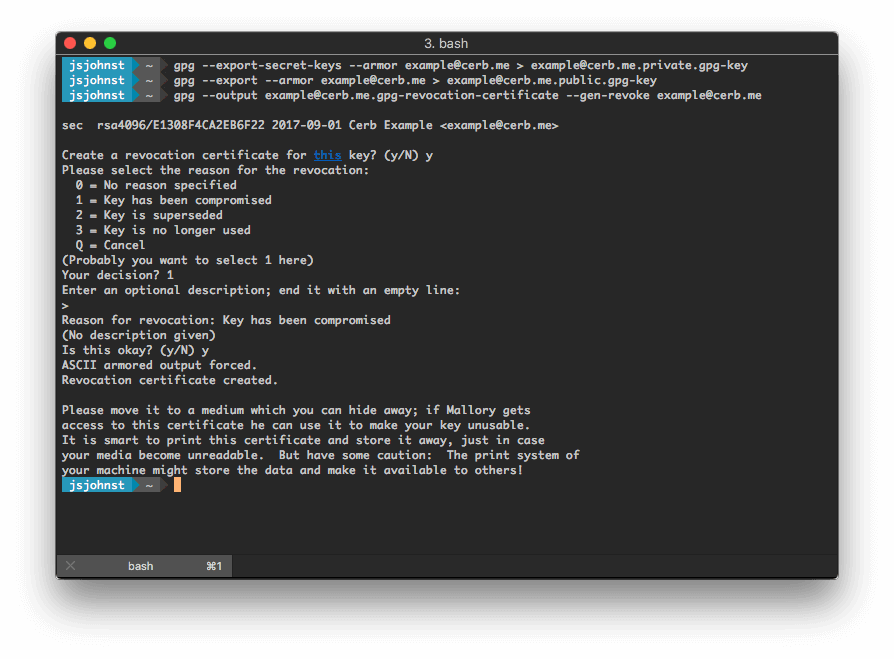
Export keys for safe storage
This step is critical to the safety of your GPG keys. If you don’t do this, your keys could be forever lost or worse.
To export your private key, run the following replacing YOUR@EMAIL.com in both places with your email address used when creating the key.
We will also export the public key to keep with the private key:
Next, we will create a revocation certificate for the key in case it is ever compromised:
Follow the prompts to create the revocation certificate. For reason, we suggest 1 = Key has been compromised and you can hit enter on the description line (it’s not needed).
Now that we have these three files created, back them up on a USB drive and put in a very safe place (safety deposit box is a common suggestion). After copying them to a USB drive, we highly recommend deleting the file ending in .private.gpg-key and .gpg-revocation-certificate immediately. You do not need to delete the file ending in .public.gpg-key as we will use it later.
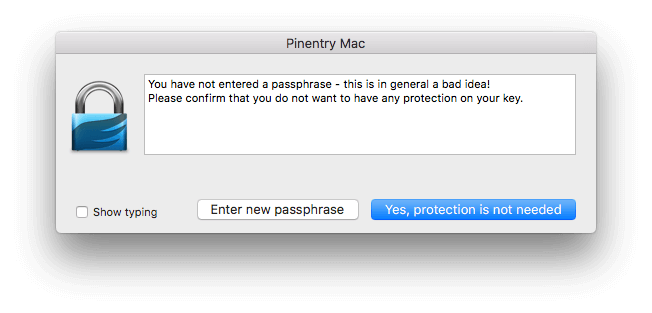
Remove passphrase for using with Cerb
Now that the master key is preserved safely, we need to remove the passphrase for using your GPG key with Cerb. This isn’t a standard process, so GPG is persistent in making sure it’s what you really want to do.
- Edit the key as before via:
- At the prompt, type passwd .
- You will first be prompted for your existing passphrase.
- When prompted for a new passphrase, hit enter.
- When prompted, pick “Yes, protection is not needed”.
- The above two steps repeat multiple times, keep repeating until they stop asking.
- Type quit at the prompt to finish.
The screenshots below illustrate the process and the prompts you must acknowledge.


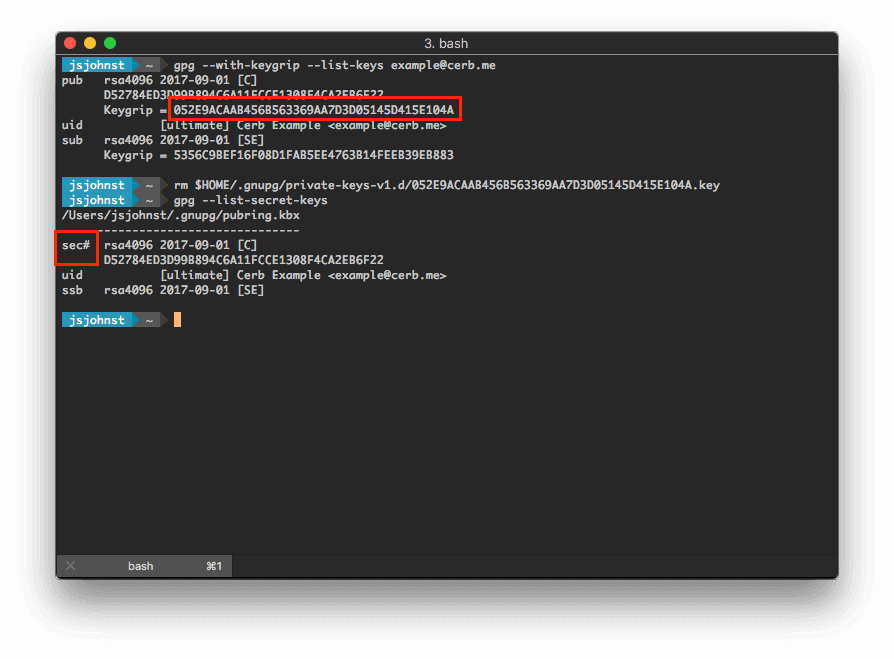
Delete master key from local keyring
Now that your GPG keys are backed up and currently not secured by a password, we need to delete the master key locally for security reasons.
- First we need to get the keygrip for the master key so we know what to delete:
- Take note of the first Keygrip = line in the output, consult the below screenshot as needed.
- Now that you have the key grip, you need to use it to delete the master key locally from your keyring:
- Finally we want to make sure it’s really gone:
As shown in the below screenshot, make sure that there is a # after sec at the beginning of the 3rd line. This indicates that the master key is offline as it should be.
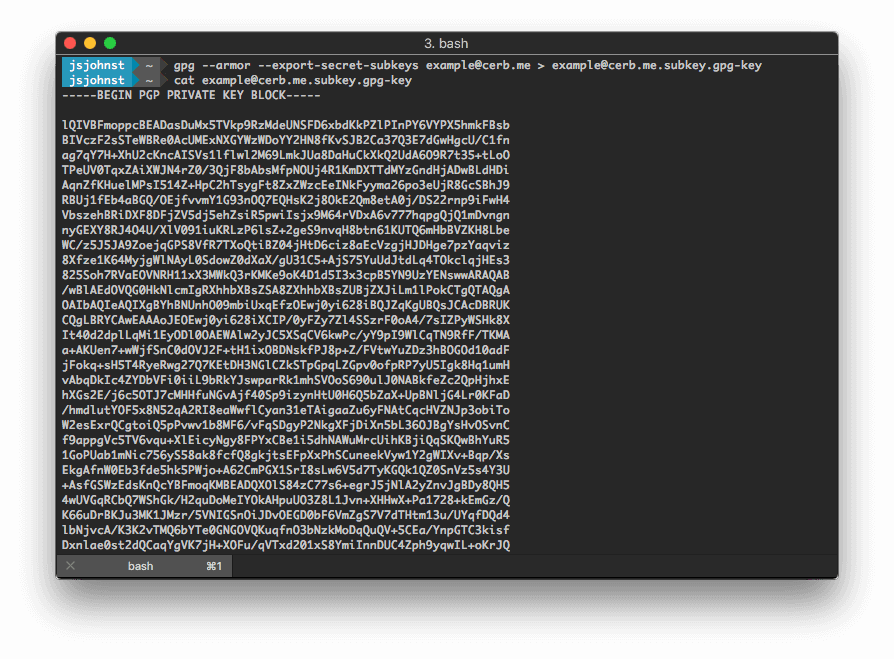
Export subkey for using with Cerb
With all that out of the way, we need to export the subkey we created to use it with Cerb. Run this in a Terminal to export the subkey:
You will use the contents of this file to enable Cerb to decrypt encrypted email sent to it in the next step.
Using your newly created GPG key with Cerb
There are two methods for importing your subkey into Cerb. We recommend importing it via your browser for simplicity.
Importing via your browser
Cerb 8.1.0 doesn’t have a direct way to add GPG private keys, but thankfully GPG treats them the same for purposes of importing.
- Navigate to Search В» Public Keys.
- Add a new record by clicking on the (+) above the worklist.

- For the name, enter in YOUR@EMAIL.com private subkey or similar.
- Paste in the contents of the exported private subkey as generated previously.
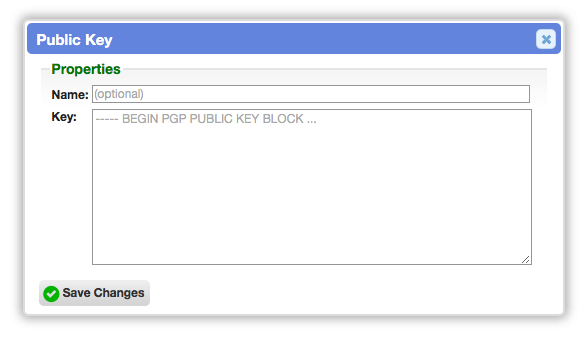
Skip over the next step and jump ahead to Publishing your public key.
Importing via command line
To import via command line, you first need to connect via SSH to the server where Cerb is hosted. If you are a Cerb Cloud customer, this isn’t possible so you will need to use the above instructions to do it via your browser.
- Change into the directory where you have Cerb installed.
- Tell GPG where to find the keystore used by Cerb:
- Check to see if you have existing private keys:
- Import the subkey you created previously:
- Verify the key exists now and that the master key is offline as before:

Publishing your public key
Now that you have Cerb setup to receive encrypted email, you need to tell the world about your public key so they can encrypt emails to you. There are a number of different public key servers commonly used, so we recommend submitting to them all for coverage.
You’ll need your public key to do this, so if you don’t still have it from the Export keys for safe storage step earlier, you can re-export it now with:
Using Keybase
We highly recommend using a service like Keybase, which not only verifies the email address of a public key, but also allows the key owner to prove their identity by verifying ownership of domain names, profiles on various services (e.g. Twitter, GitHub), Bitcoin wallets, etc.
As the setup is a bit more involved than the below three options and subject to change, we recommend visiting https://keybase.io/ and following their guide.
You can also import public keys from Keybase right into Cerb.
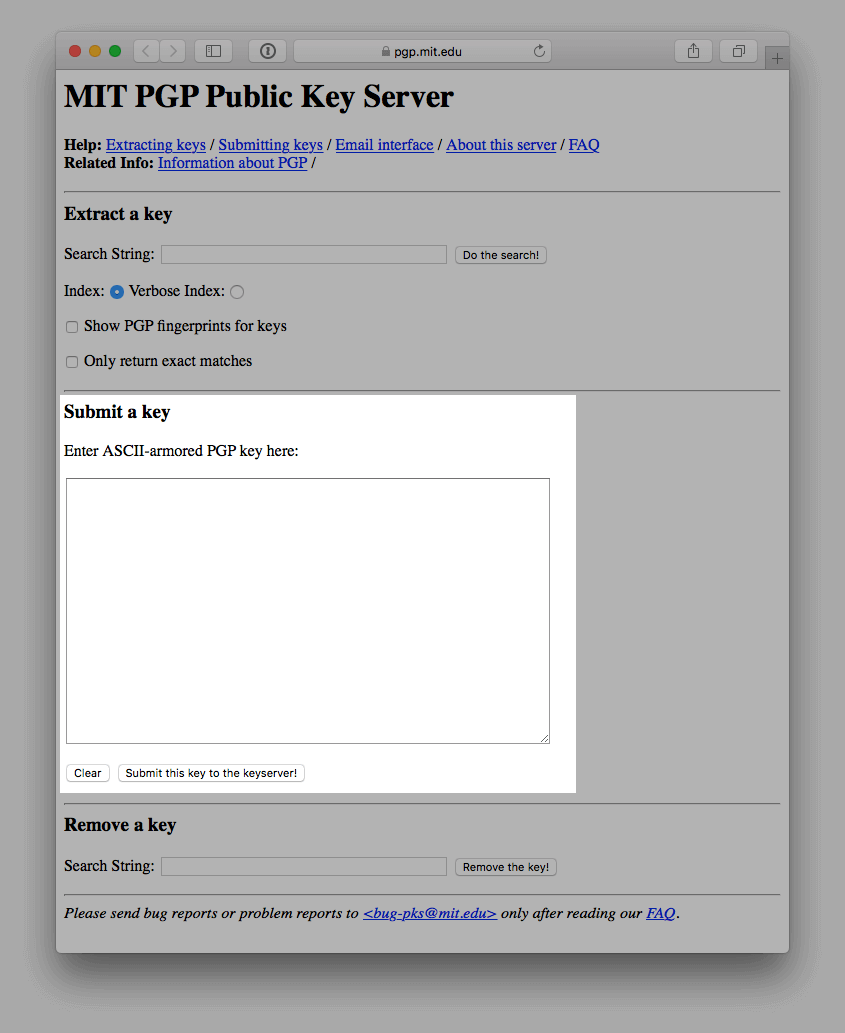
Using MIT’s public key server
MIT’s public key server is accessible at https://pgp.mit.edu. The screenshot below shows where to submit your public key:
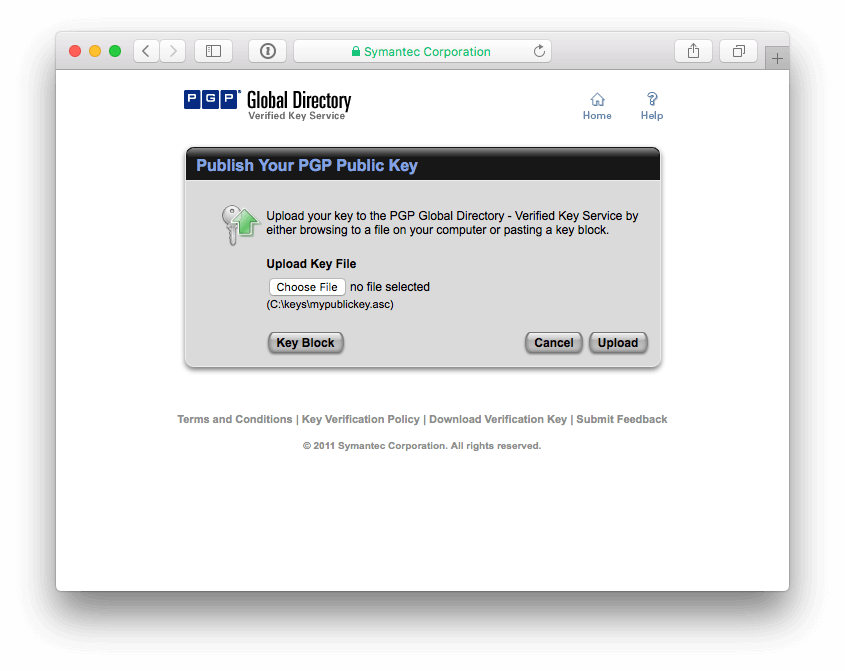
Using Symantec’s public key server
Symantec’s public key server is accessible at https://keyserver.pgp.com.
To submit a key to them, visit the Submit Key page and upload your key there as shown in the screenshot below.
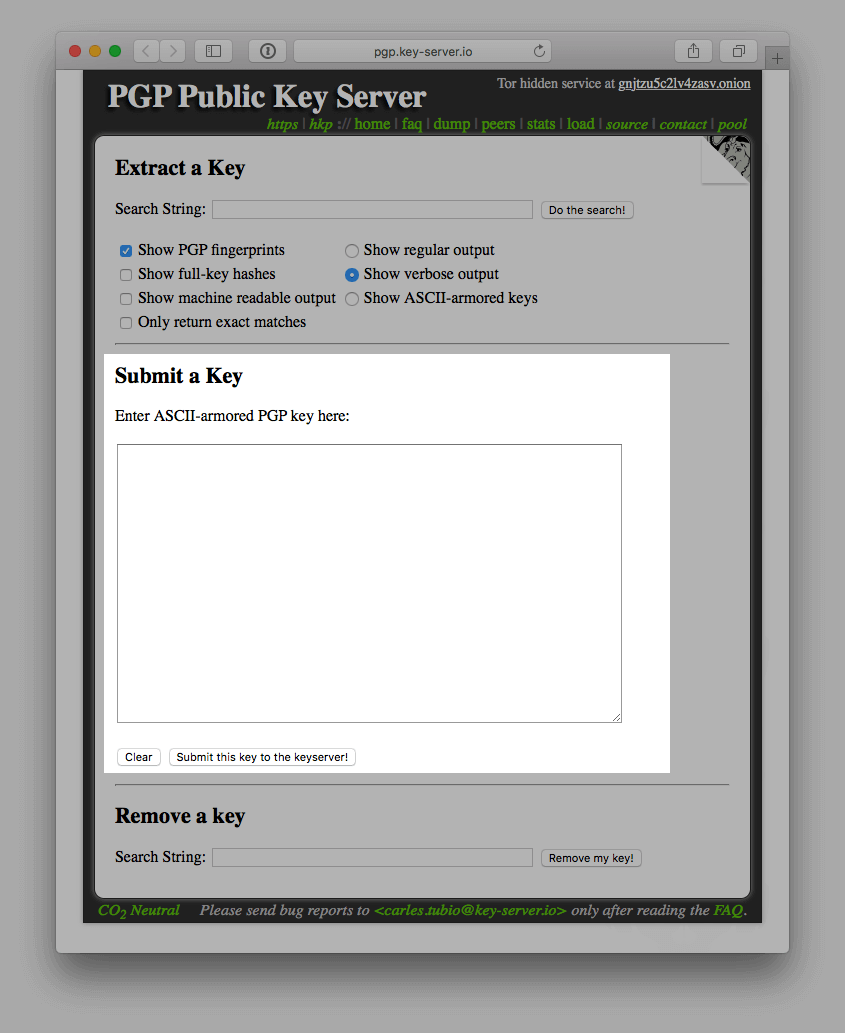
Using Key-server.io’s public key server
Key-server.io’s public key server is accessible at http://pgp.key-server.io. The screenshot below shows where to submit your public key:
Links to further reading
Links on how to setup setup storage of your private key on a popular hardware device:
Источник


