- How to install graphics drivers in Linux Mint
- Check current driver for graphics cards
- Install nvidia driver via Driver Manager
- Install latest nvidia driver via PPA
- Install driver for AMD graphics cards via Driver Manager
- Install latest AMD driver via PPA
- Updating your kernel
- Final words
- Установка видеокарт Intel в linux
- Материал из Пингвиньи радостей
- Содержание
- Драйвер VESA
- Драйвер INTEL
- Настройка отдельных видеокарт
- Установка видеокарт в linux
- Материал из Пингвиньи радостей
- Содержание
- Текстовый режим видеокарт
- Обзор графических режимов
- Графический режим VESA
- Поддержка аппаратного ускорения
- Configure Graphics Cards
- Содержание
- Identifying Available Drivers
- Installing a Driver
- Force Reinstall a Driver
- Identifying Installed Drivers
- Removing Installed Drivers
- PRIME GPU offloading
- Nvidia Optimus
- Configure The Resolution/Refresh Rate
- Configure X Screen settings (OpenGL Settings, Antialiasing, X Server XVideo)
- Nvidia settings for special cases
- nvidia-prime
- Bumblebee
How to install graphics drivers in Linux Mint
The modern Linux distributions have out of the box terrific support for most of the available hardware components, like graphics cards, printers and WiFi adapters. But it is always possible that the setup procedure doesn’t come up directly with the correct or most optimized drivers. In this tutorial I will show you how to install graphics drivers in Linux Mint.
Check current driver for graphics cards
When you installed Linux Mint and you actually see icons and colors and text on your display you would probably think that the operating system installed the correct driver for your graphics card. And the chances are that the correct driver has indeed been installed, but it is always best to have a look if the that’s is actually the case or maybe some generic driver has been chosen that will not give you the maximum feasible performance. To see what choices the operating system made for your graphics card you can first do the following:
1) Connect your computer via a network cable or via Wifi.
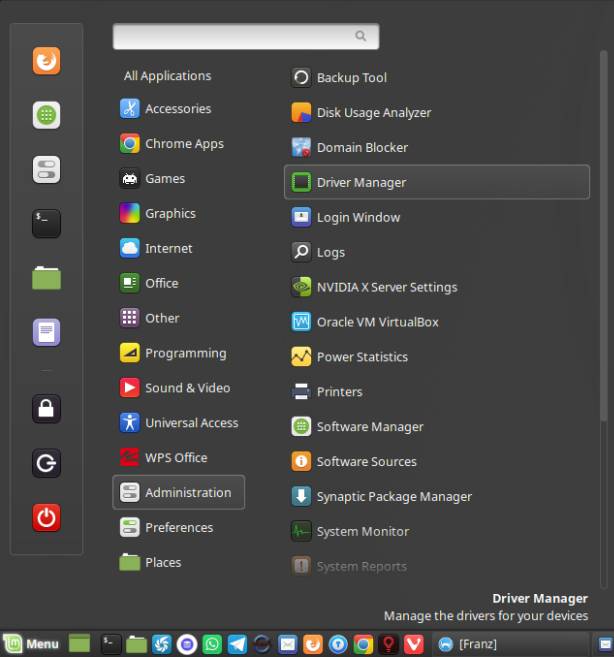
2) Open the applications menu.
3) Choose Driver Manager under the Administration category and enter your password.
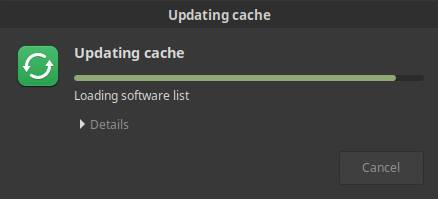
First a cache update takes place, so the most recent software list will be gathered.
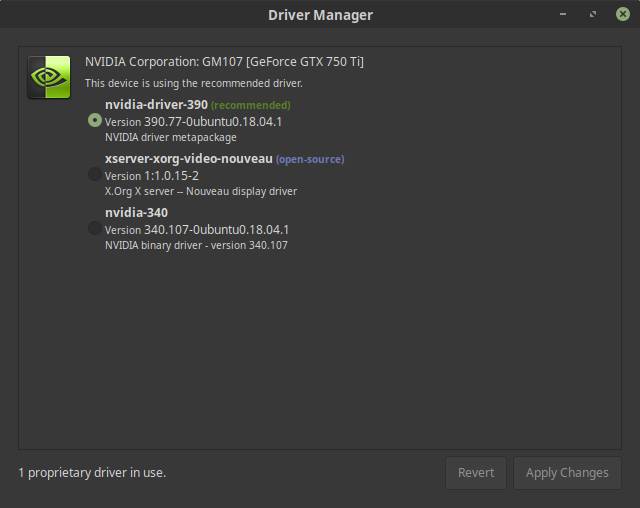
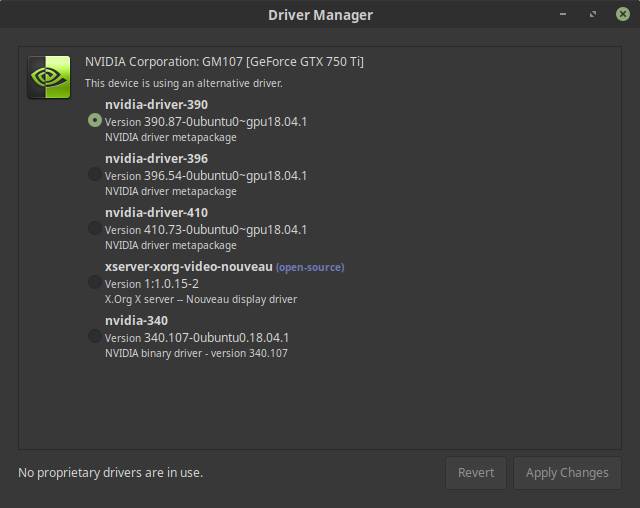
After the standard cache update takes place, Driver Manager displays an overview of device components that require a driver. Now probably both open source and proprietary drivers will be shown for your graphics card.
Install nvidia driver via Driver Manager
As the previous image shows the operating system recognizes a GTX 750 Ti graphics card and gives you the option to install an open source driver or a proprietary nvidia driver.
1) Choose the recommended driver (indicated with highest number and Recommended).
2) Click on Apply changes.
Install latest nvidia driver via PPA
When you have a very new graphics card it is possible that the Driver Manager will not give you the most recent driver. A sign for that is if the Driver Manager only shows an open source option for your graphics card. But also in the before mentioned example of the GFX 750 Ti, which is already a couple of years old, there are newer drivers available. You can check if there is a newer version on the nvidia drivers page.
1) Go to the nvidia driver page.
2) Fill in your product type, product series, product and operating system.
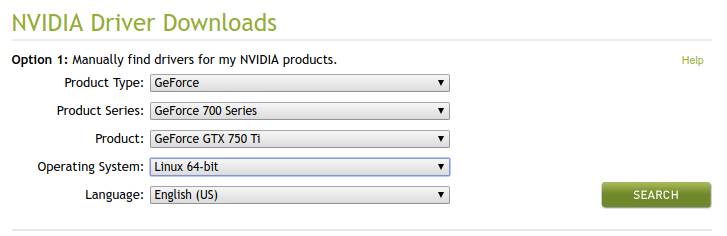
3) Click on search.
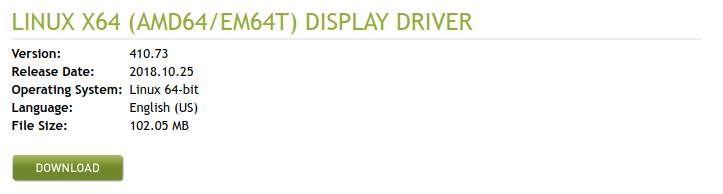
Here we see that there is a newer driver (410), as the driver that was available in the previous example was version 390.
The most convenient way to get access to the newer driver is not by installing the driver from the nvidia website, but by using the PPA (Personal Package Archive) “ppa:graphics-drivers”. Although I said in earlier tutorials that I want to stay away as much as possible from the command line, now we actually need it.
To add the PPA do the following:
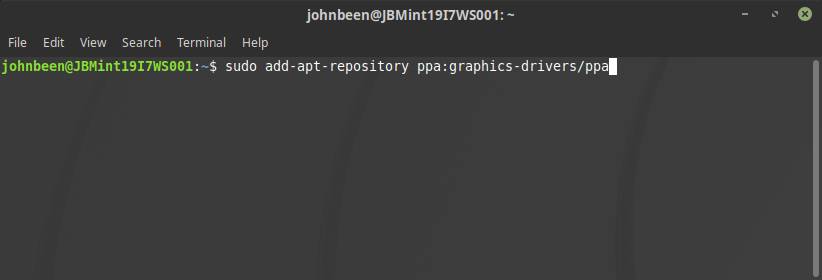
1) Open a terminal via Ctrl + Alt + T or by search for terminal in the applications menu search bar.
2) type the following command in the terminal and hit enter:
sudo add-apt-repository ppa:graphics-drivers/ppa
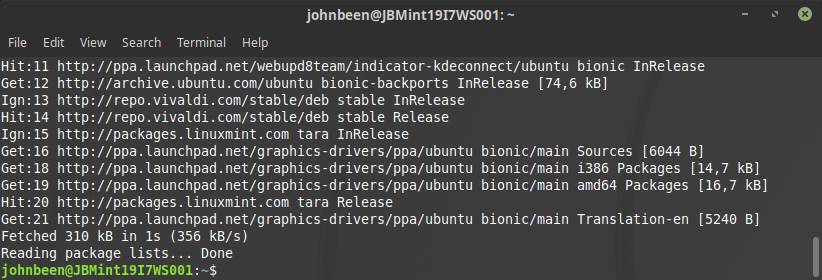
3) You will get the message “Press Enter to continue or Ctrl+C to cancel”. Hit enter to continue.
4) When the command has been finished type in the terminal the following command and hit enter:
sudo apt-get update
When the command has been finished you can set the correct driver.
5) Open the applications menu.
6) Choose Driver Manager under the Administration category and enter your password.
Now you will see that there are more driver alternatives available, including the newest nvidia-driver-410.
7) Select the newest driver, in this case 410, and click Apply Changes.
8) When changes have been applied click on Restart…
After your computer has been restarted the newest driver should be active.
Install driver for AMD graphics cards via Driver Manager
If you have an AMD graphics card and you did the steps in the first paragraph “Check current driver for graphics cards” then your graphics card probably has been recognized and gives you the option to install an open source driver or a proprietary AMD driver, indicated with fglrx.
1) Choose the recommended driver (indicated with highest number and Recommended indicator).
2) Click on Apply changes.
Install latest AMD driver via PPA
Although your AMD graphics card will probably work fine out of the box in Linux Mint, there could be different reasons to install a more recent driver. It is possible to install AMD proprietary drivers that can be downloaded from the AMD drivers page, but in Linux it is a bit of a tricky process. Much easier is to add the available PPA to your operating system.
To add the PPA do the following:
1) Open a terminal via Ctrl + Alt + T or by search for terminal in the applications menu search bar.
2) type the following command in the terminal and hit enter:
sudo add-apt-repository ppa:oibaf/graphics-drivers

You will get the message “Press Enter to continue or Ctrl+C to cancel”.
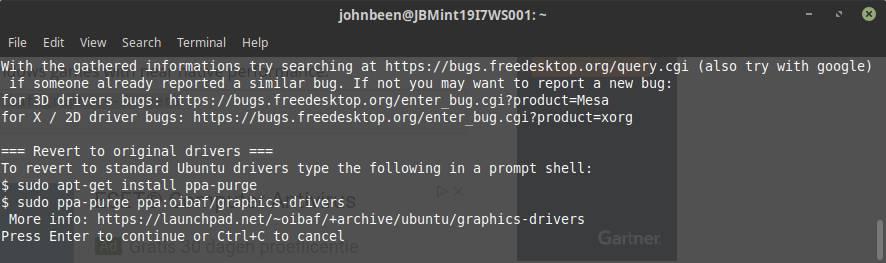
3) Hit enter to continue.
4) When the command has been finished type in the terminal the following command and hit enter:
sudo apt-get update
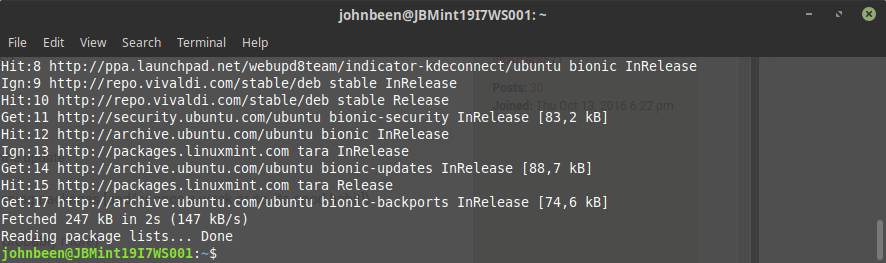
When the command has been finished you can set the correct driver.
5) Open the applications menu.
6) Choose Driver Manager under the Administration category and enter your password.
Now you will see that there are more driver alternatives available.
7) Select the newest driver and click Apply Changes.
8) When changes have been applied click on Restart…
After your computer has been restarted the newest graphics driver should be active.
Updating your kernel
Another option to have better driver support is probably not the first thing you’ve thought about, namely upgrading to a newer kernel. If you are already on a recent release of your distribution, you probably already have very up to date drivers, but if you are using for example Linux Mint 17, which was released in May 2014, it is based on an old kernel. When you use an old Linux Mint distribution you can upgrade to the most recent version. If you are already on the most recent version you can still upgrade the kernel, as new kernels are released frequently and often contains driver updates. Upgrading a kernel deserves a completely separate tutorial, so I mention it here for information only.
Final words
Although people have the tendency to always want the newest and greatest, with everything it is advisable to think first about why you actually want to update to the latest drivers or the most recent Linux distribution or the most recent application. If it is not broken don’t fix it, is a frequently recurring saying. If your current distribution recognizes your graphics card out of the box and everything works fine, just be happy. But only if it doesn’t work properly or if you have specific performance related or feature related requirements for your graphics card, of course than you should try to setup the latest drivers. Or as I wrote in the previous paragraph, it maybe is safer to upgrade the Linux kernel, as there are newer graphics driver already available.
Источник
Установка видеокарт Intel в linux
Материал из Пингвиньи радостей
Содержание
Статья с описанием установки видеокарт Intel в Linux
Как правило видеокарты Intel это встроенные в материнскую плату графические адаптеры, поддерживающие работу как в текстовом так и в графическом режимах. Для запуска видеокарты в текстовом режиме (в режиме консоли) не требуется дополнительных действий. Для использования графического режима требуется установка/настройка X-сервера и активизация драйверов. В графическом режиме видеокарты Intel поддерживают как 2D так и 3D ускорение графики.
Поддержка работы видеокарты в графическом режиме осуществляется пакетом Xorg. Подключение установленных драйверов и настройка видеокарты осуществляется в файле конфигурации — /etc/X11/xorg.conf. Если драйвер видеокарты в файле конфигурации не указан или самого файла нет вовсе, операционная система (например от debian squeeze и выше) самостоятельно определит и установит совместимый драйвер.
Для включения графических режимов видеокарт Intel могут быть использованы драйвера vesa и intel.
Драйвер VESA
Видеокарты Intel поддерживают работу в графическом режиме vesa. Описание настройки X-сервера и файла конфигурации /etc/X11/xorg.conf в режиме vesa приведено в статьях Xorg и Установка видеокарт в linux.
Некоторые часто используемые команды
Драйвер INTEL
Специальный драйвер intel, включённые в поставку Xorg, обеспечивают поддержку графического ускорения видеокарт Intel.
Для установки драйвера intel на примере операционной системы debian squeeze
- устанавливается драйвер intel
- добавляется в файл конфигурации /etc/X11/xorg.conf секция
- перезапускается X-сервер, а в случае изменения настроек KMS — перезапускается рабочая станция целиком
- проверяется ускорение 3D с помощью пакета Mesa-utils
Настройка отдельных видеокарт
В таблице приведены ссылки на статьи в википедии с описание настройки отдельных видеокарт Intel
Источник
Установка видеокарт в linux
Материал из Пингвиньи радостей
Содержание
Статья с описанием установки видеокарт Linux
Статья содержит общие элементы описания установки видеокарт в Linux.
Описание настройки отдельных типов видокарт приведено в статьях
- Установка ATI в linux — статья об установке и настройке видеокарт ATI/RADEON
- Установка nVidia в linux — статья об установке и настройке видеокарт nVidia
- Установка видеокарт Intel в linux — статья об установке и настройке видеокарт Intel
(Как правило) Видеокарты могут работать в текстовом режиме, в графическом режиме с поддержкой 2D/3D ускорения, в том числе на уровне аппаратного ускорения.
Текстовый режим видеокарт
Для запуска операционной среды linux в текстовом режиме (режим командной строки) дополнительных действий не требуется.
Обзор графических режимов
Поддержка графических режимов в linux обеспечивается пакетом Xorg. Настройка видеокарты в xorg осуществляется в файле конфигурации X-сервера — /etc/X11/xorg.conf. В данном файле (в Section «Device») указываются драйвера видеокарты. (Как правило) C конкретной видеокартой могут быть совместимы различные драйвера обеспечивающие различный уровень аппаратного ускорения. Например универсальный драйвер vesa или специфичные video-ati для ati/radeon и nouveau для nVidia. Если драйвер видеокарты в файле конфигурации не указан или этот файл отсутствует вовсе, операционная система (например debian squeeze) самостоятельно определит и установит (наилучший) совместимый драйвер из доступных в системе.
Графический режим VESA
Драйвер vesa может быть использован, если видеокарта поддерживает стандарт VESA. (На текущий момент) Нам неизвестны видеокарты не поддерживающие данный стандарт. Последние версии драйвера vesa (например в debian squeeze с xorg версии 7.5) обеспечивают поддержку и 2D/3D ускорения.
Для подключения драйвера
- устанавливаем пакет xserver-xorg-video-vesa содержащий драйвер xorg-vesa
- добавляем в файл конфигурации X-сервера/etc/X11/xorg.conf секцию
- перезапускаем X-сервер / менеджер дисплея
Поддержка аппаратного ускорения
Поддержка аппаратного ускорения, как правило, может быть обеспечена драйверами изготовителя. Часто это самая простая или единственная возможность. Но бывают случаи, когда изготовитель «забросил» поддержку определённой видеокарты или предлагает драйвера для «другой» операционной среды. В этом случаев ускорение может быть достигнуто с помощью драйверов включённых в поставку Xorg. Поэтому способы поддержки аппаратного ускорения для разных моделей видеокарт даже для одного изготовителя могут серьзёно различаться.
Источник
Configure Graphics Cards
Содержание
Where installing the full version of Manjaro (i.e. complete with a pre-installed desktop environment, codecs, and software applications), the mhwd command will be automatically run by the GUI and CLI installer to automatically detect your graphics card and install the most appropriate driver for it. Whether free or proprietary drivers are installed will depend on your initial choice of using free or nonfree graphics drivers to boot up. Otherwise, it will be necessary to run the mhwd command manually as part of the post-installation process for the minimalistic NET-Edition of Manjaro.
For Beginners, it is recommended to use «Hardware Detection» in Manjaro Settings Manager to change or install new graphics drivers.
For intermediate and advanced users, it is also possible to use the mhwd command to install, re-install, and remove installed graphics drivers at any time, as illustrated below.
This is the recommended method for the detection and installation of graphics drivers. The syntax for the automated installation method is:
A breakdown of the command used for the automated method is as follows:
- -a: Automatically detect and install the appropriate driver
- [pci or usb]: Install the appropriate driver for devices connected internally via pci, or externally via usb (again, mhwd currently only supports pci connections at this stage in its development)
- [free or nonfree]: Install either free drivers (e.g. provided by the Linux community), or nonfree drivers (e.g. provided by hardware manufacturers)
- 0300: Identify that a driver is to be installed for a graphics card (0300 is the ID for graphics cards. As the mhwd command develops, new ids will be used for other hardware devices).
For example, the following command would result in the automatic detection and installation of the best available proprietary driver for a pci-connected graphics card:
Otherwise, the following command would result in the automatic detection and installation of the best available free driver for a pci-connected graphics card:
Taking a do-it-yourself approach is itself relatively easy and straightforward using the mhwd command. This should be undertaken in two stages:
1. Identify the appropriate driver to be installed, and then
2. Install the driver
Identifying Available Drivers
Prior to manually installing a graphics driver, it will be necessary to identify what drivers are available for your system. To list the appropriate drivers available, the basic syntax is:
Using this command without the additional options will list basic information for all the available drivers for devices connected to your system. All drivers graphics card drivers will have the prefix (video-) in their name. The basic information provided for all listed drivers will be:
- Name
- Version
- Free or proprietary, and
- PCI or USB connection
A more detailed list of installed drivers can be obtained by entering:
A detailed list will provide the following information:
- Name
- Version
- PCI or USB connection
- Description
- Priority
- Free or proprietary
- Dependencies
- Conflicts
- Class ID (e.g. ‘0300’ for graphics card drivers), and
- Vendor ID
In addition, using the —pci filter in the following example will list detailed information for only the drivers available for devices (e.g. graphics cards) using an internal PCI connection:
Installing a Driver
To install a driver for a graphics card, the syntax is:
A breakdown of the command used to manually install a driver is as follows:
- -i: Install a driver
- [pci]: Install a driver for a device connected internally via pci (e.g. graphics cards)
- [name of driver]: The name of the driver to be installed
For example, to install the proprietary nvidia graphics card driver, the following command would be used:
Force Reinstall a Driver
To force the re-installation of an existing driver without removing it first, the syntax is:
For example, to force the re-installation of a previously installed nvidia graphics card driver, the following command would be used:
On occasion it may be necessary to remove an installed graphics card driver. Similarly to manually installing a graphics card driver, two steps should be undertaken for removal:
1. Identify the installed driver
2. Remove the identified driver
After all, it would be somewhat difficult to remove an installed driver if you don’t know what it’s called!
Identifying Installed Drivers
To identify and list Manjaro’s installed drivers — including the graphics driver to be removed, the syntax is:
Using this command without the additional options will list the basic information of all the drivers currently installed on your system. Once again, all drivers for graphics cards will have the prefix (video-) in their name. As with listing drivers available for your system, the -d option used in the following command will list detailed information:
This information may prove useful to determine any otherwise unforeseen consequences or problems upon removing a driver. And again, it is also possible to filter your list of installed drivers by whether they are used on hardware connected via pci or usb. In this instance, a detailed list will be generated only for installed drivers used on hardware with a PCI connection:
One other way of reporting drivers installed andin use is using the inxi tool.
Removing Installed Drivers
To remove an installed driver, the syntax is:
For example, to remove the installed driver for a nvidia graphics card (connected internally via pci), the following command would be used:
You can check configuration with:
And if needed fix issues with:
Make sure the path to xorg config file is valid.
Note about ati, xorg file and login artifacts or kicad: if you get artifacts upon logging in or if kicad rendering and zooming is slow, try adding [Option «EXAPixmaps» «off»] in the «Device» section of xorg config file. See here.
PRIME GPU offloading
If your hardware includes more than one GPU card you can make use of PRIME offloading. PRIME is a technology used to manage hybrid graphics found on recent desktops and laptops (Optimus for NVIDIA, AMD Dynamic Switchable Graphics for Radeon). PRIME detects both cards and automatically selects Intel card by default; using the more powerful discrete graphics card, when called, for more demanding applications.
In Manjaro this will automatically be available for hybrid graphics systems using intel/modesetting for the integrated card and free drivers (AMDGPU or Nouveau) for the dGPU.
You may choose to run a program with a specific GPU, prepending the application’s command with DRI_PRIME=x, where x is the card priority number.
For example, to run an application using the second card prepend the application command with DRI_PRIME=1
To use the 1st card (usually when the CPU has an embedded GPU, this is used)
If you want to always run some application with the discrete gpu, you may copy that application’s .desktop file to
/.local/share/applications/ and edit the «Exec» property
Some applications (usually games like steam) may have an embedded option to specify the command line, where it is preferred to use this way.
For example, in Steam, select a game — that you want to run using your discrete Nvidia card — from the Library page of the Steam client, right-click, and select Properties. Click the SET LAUNCH OPTIONS. button and specify for the command line options followed by the default launch hook %command%.
To use the dGPU by default see Reverse Prime
If you have a Nvidia card, you have the option to use the proprietary (closed source = non-free) drivers instead of the open source (free) nouveau driver.
For Legacy/older nvidia cards, Manjaro maintains older drivers for compatibility. In these cases the driver name is different, instead of nvidia it is nvidia-390xx or nvidia340xx, whether in nvidia-only or bumblebee mhwd driver configuration.
When you install the non-free driver, mhwd includes a Nvidia utility «Nvidia Settings Utility» that can help you configure several settings. You can find this utility in your GUI Applications Menu or start it from a terminal
If you are using bumblebee, the nvidia utility needs a special command
Nvidia Optimus
For Optimus laptops or dual GPU hardware with intel and nvidia GPUs, you have three options to utilize the card driver usage at your preference or your hardware capabilities.
When you install Manjaro with the non-free option selected from Grub menu, or when you use automatic driver installation, PRIME or bumblebee is installed by default, depending on support for your GPU, PRIME being preferred. In these cases, the mhwd driver is named «video-hybrid-intel-nvidia-***xx-prime» or «video-hybrid-intel-nvidia-***xx-bumblebee».
Configure The Resolution/Refresh Rate
1. Start nvidia-settings utility
2. Change resolution and refresh rate in ‘X Server Display Configuration’ tab.
3. Hit the ‘Save to X Configuration File’ button and save to /etc/X11/mhwd.d/nvidia.conf
4. Now start your terminal and enter the following command to complete the process:
Configure X Screen settings (OpenGL Settings, Antialiasing, X Server XVideo)
1. Start nvidia-settings utility
2. Change settings in X Server XVideo Settings, OpenGL and Antialiasing, in the ‘X Screen’ tab.
3. Click on ‘nvidia-settings configuration’ tab and click on the ‘Save Current Configuration’ button.
4. Save the .nvidia-settings-rc to the default location specified (/home/[your account name])
5. Edit the .xinitrc file with your preferred text editor. For example, if you use gedit, run this in your terminal:
6. Once opened, add the following line into the configuration file:
Nvidia settings for special cases
In case your monitor is not entering powersave mode (DPMS), try adding `Option «HardDPMS» «true»` in your Xorg monitor section. For example:
nvidia-prime
Manjaro also offers an easy way to use PRIME with proprietary Nvidia drivers.
Simply select and install an ‘nvidia-prime’ profile through MSM or mhwd (such as video-hybrid-intel-nvidia-440xx-prime) and ensure the package nvidia-prime is installed.
Then to use the discrete Nvidia card it works the same as PRIME offloading above but uses a different command. Prepend the application command with prime-run. For example:
Bumblebee
Bumblebee configuration is mainly developed to help minimize laptop battery consumption, since Nvidia usually consumes significant power, while Intel cards are more power efficient. So, bumblebee detects both cards and automatically selects Intel card by default and can use the Nvidia for more demanding applications. For an application to use the Nvidia card, prepend the application command with optirun or primusrun. For example:
If you want to specifically run some application with the nvidia driver, you may edit that application’s .desktop file «Exec» property, or run it in terminal like this
Some applications (usually games like steam) may have an embedded option to specify the command line, where it is preferred to use this way.
For example, in Steam, select a game — that you want to run using your discrete Nvidia card — from the Library page of the Steam client, right-click, and select Properties. Click the SET LAUNCH OPTIONS. button and specify for the command line options followed by the default launch hook %command%.
If you have problems with a bumblebee setup, refer to this Forum Tutorial for advice.
Источник


