- How to install graphics drivers in Linux Mint
- Check current driver for graphics cards
- Install nvidia driver via Driver Manager
- Install latest nvidia driver via PPA
- Install driver for AMD graphics cards via Driver Manager
- Install latest AMD driver via PPA
- Updating your kernel
- Final words
- Установка драйверов для видеокарт от Intel и AMD
- Установка драйверов для видеокарт от NVIDIA
- Проверяем работу Vulkan на Ubuntu, или Linux Mint.
- Включаем поддержку VKD3D (Directx12 под WINE):
- Список видеокарт от AMD поддерживающие Vulkan:
- Список видеокарт от NVIDIA поддерживающие Vulkan:
- Ubuntu Linux Install Nvidia Driver (Latest Proprietary Driver)
- Ubuntu Linux Install Nvidia Driver
- Find out information about your GPU
- Install Nvidia driver using GUI method # 1 on Ubuntu Linux
- Ubuntu Install Nvidia driver using the CLI method # 2
- Updating and installing all security and important updates on Ubuntu
- Installing NVIDIA drivers on Ubuntu
- Verification
- How do I configure the NVIDIA graphics driver?
- A note about ubuntu-drivers command-line method # 3
- Show all driver packages which apply to the current system
- Display all OEM enablement packages which apply to this system
- View all hardware NVidia devices which need drivers, and which packages
- Ubuntu command to install a driver NVidia version 455
- Conclusion
How to install graphics drivers in Linux Mint
The modern Linux distributions have out of the box terrific support for most of the available hardware components, like graphics cards, printers and WiFi adapters. But it is always possible that the setup procedure doesn’t come up directly with the correct or most optimized drivers. In this tutorial I will show you how to install graphics drivers in Linux Mint.
Check current driver for graphics cards
When you installed Linux Mint and you actually see icons and colors and text on your display you would probably think that the operating system installed the correct driver for your graphics card. And the chances are that the correct driver has indeed been installed, but it is always best to have a look if the that’s is actually the case or maybe some generic driver has been chosen that will not give you the maximum feasible performance. To see what choices the operating system made for your graphics card you can first do the following:
1) Connect your computer via a network cable or via Wifi.
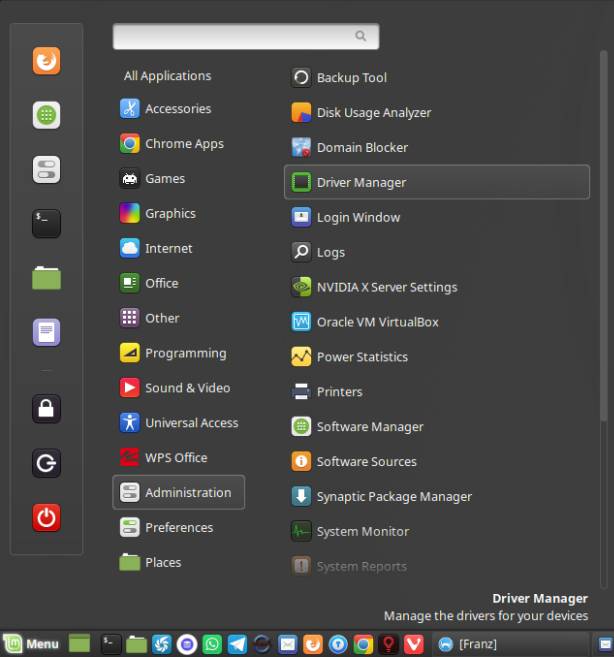
2) Open the applications menu.
3) Choose Driver Manager under the Administration category and enter your password.
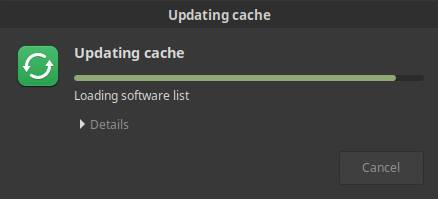
First a cache update takes place, so the most recent software list will be gathered.
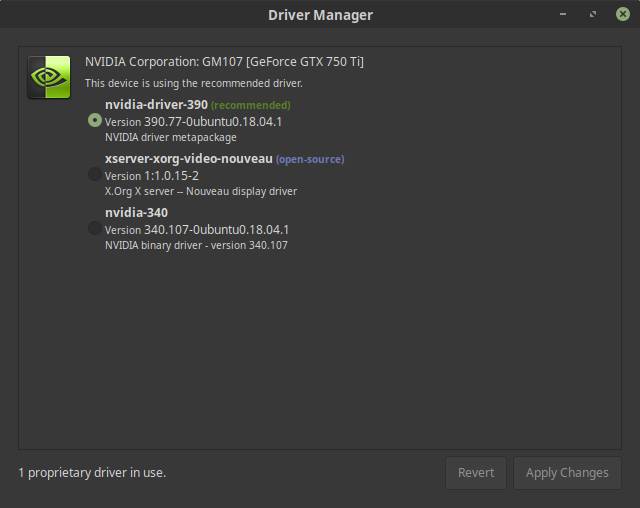
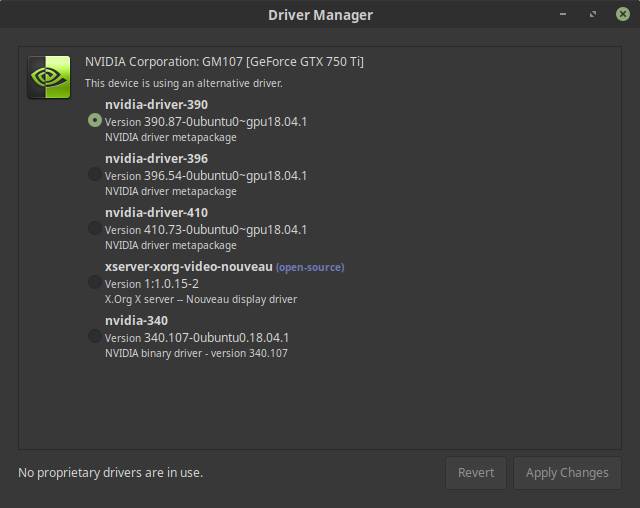
After the standard cache update takes place, Driver Manager displays an overview of device components that require a driver. Now probably both open source and proprietary drivers will be shown for your graphics card.
Install nvidia driver via Driver Manager
As the previous image shows the operating system recognizes a GTX 750 Ti graphics card and gives you the option to install an open source driver or a proprietary nvidia driver.
1) Choose the recommended driver (indicated with highest number and Recommended).
2) Click on Apply changes.
Install latest nvidia driver via PPA
When you have a very new graphics card it is possible that the Driver Manager will not give you the most recent driver. A sign for that is if the Driver Manager only shows an open source option for your graphics card. But also in the before mentioned example of the GFX 750 Ti, which is already a couple of years old, there are newer drivers available. You can check if there is a newer version on the nvidia drivers page.
1) Go to the nvidia driver page.
2) Fill in your product type, product series, product and operating system.
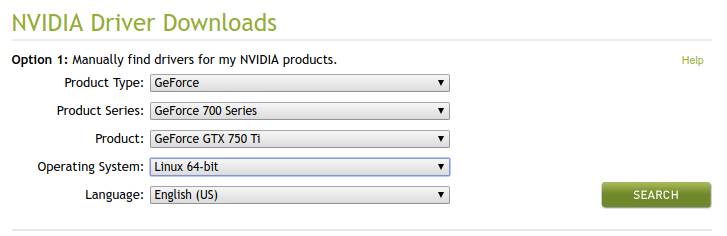
3) Click on search.
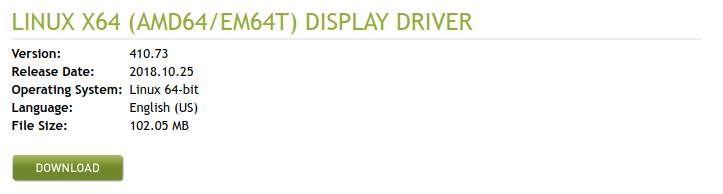
Here we see that there is a newer driver (410), as the driver that was available in the previous example was version 390.
The most convenient way to get access to the newer driver is not by installing the driver from the nvidia website, but by using the PPA (Personal Package Archive) “ppa:graphics-drivers”. Although I said in earlier tutorials that I want to stay away as much as possible from the command line, now we actually need it.
To add the PPA do the following:
1) Open a terminal via Ctrl + Alt + T or by search for terminal in the applications menu search bar.
2) type the following command in the terminal and hit enter:
sudo add-apt-repository ppa:graphics-drivers/ppa
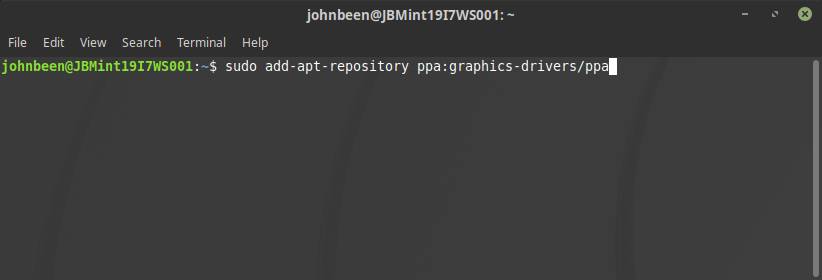
3) You will get the message “Press Enter to continue or Ctrl+C to cancel”. Hit enter to continue.
4) When the command has been finished type in the terminal the following command and hit enter:
sudo apt-get update
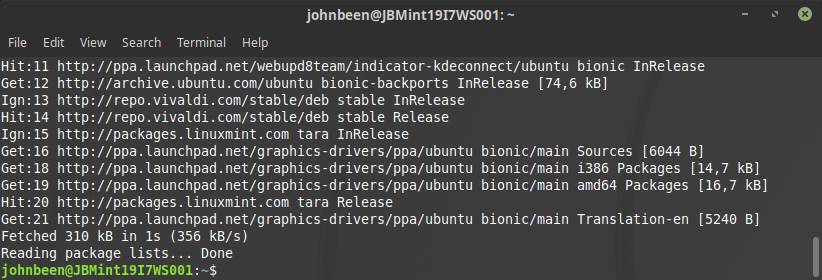
When the command has been finished you can set the correct driver.
5) Open the applications menu.
6) Choose Driver Manager under the Administration category and enter your password.
Now you will see that there are more driver alternatives available, including the newest nvidia-driver-410.
7) Select the newest driver, in this case 410, and click Apply Changes.
8) When changes have been applied click on Restart…
After your computer has been restarted the newest driver should be active.
Install driver for AMD graphics cards via Driver Manager
If you have an AMD graphics card and you did the steps in the first paragraph “Check current driver for graphics cards” then your graphics card probably has been recognized and gives you the option to install an open source driver or a proprietary AMD driver, indicated with fglrx.
1) Choose the recommended driver (indicated with highest number and Recommended indicator).
2) Click on Apply changes.
Install latest AMD driver via PPA
Although your AMD graphics card will probably work fine out of the box in Linux Mint, there could be different reasons to install a more recent driver. It is possible to install AMD proprietary drivers that can be downloaded from the AMD drivers page, but in Linux it is a bit of a tricky process. Much easier is to add the available PPA to your operating system.
To add the PPA do the following:
1) Open a terminal via Ctrl + Alt + T or by search for terminal in the applications menu search bar.
2) type the following command in the terminal and hit enter:
sudo add-apt-repository ppa:oibaf/graphics-drivers

You will get the message “Press Enter to continue or Ctrl+C to cancel”.
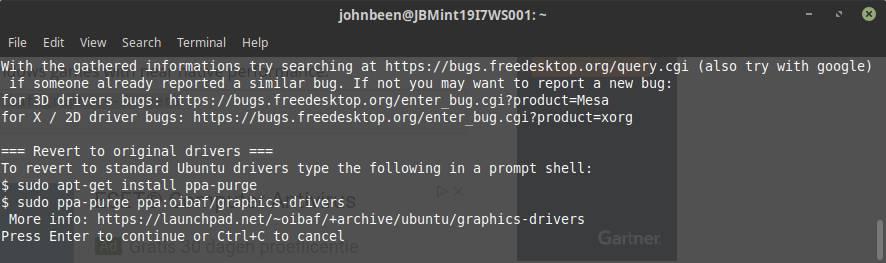
3) Hit enter to continue.
4) When the command has been finished type in the terminal the following command and hit enter:
sudo apt-get update
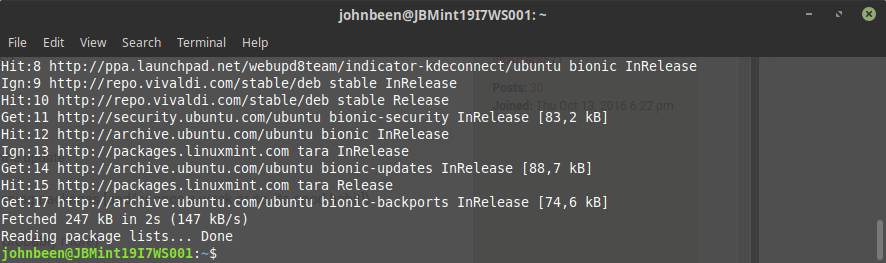
When the command has been finished you can set the correct driver.
5) Open the applications menu.
6) Choose Driver Manager under the Administration category and enter your password.
Now you will see that there are more driver alternatives available.
7) Select the newest driver and click Apply Changes.
8) When changes have been applied click on Restart…
After your computer has been restarted the newest graphics driver should be active.
Updating your kernel
Another option to have better driver support is probably not the first thing you’ve thought about, namely upgrading to a newer kernel. If you are already on a recent release of your distribution, you probably already have very up to date drivers, but if you are using for example Linux Mint 17, which was released in May 2014, it is based on an old kernel. When you use an old Linux Mint distribution you can upgrade to the most recent version. If you are already on the most recent version you can still upgrade the kernel, as new kernels are released frequently and often contains driver updates. Upgrading a kernel deserves a completely separate tutorial, so I mention it here for information only.
Final words
Although people have the tendency to always want the newest and greatest, with everything it is advisable to think first about why you actually want to update to the latest drivers or the most recent Linux distribution or the most recent application. If it is not broken don’t fix it, is a frequently recurring saying. If your current distribution recognizes your graphics card out of the box and everything works fine, just be happy. But only if it doesn’t work properly or if you have specific performance related or feature related requirements for your graphics card, of course than you should try to setup the latest drivers. Or as I wrote in the previous paragraph, it maybe is safer to upgrade the Linux kernel, as there are newer graphics driver already available.
Источник
Установка драйверов для видеокарт от Intel и AMD
Для установки драйверов от Intel и AMD на Ubuntu, или Linux Mint, открываем эмулятор терминала и вбиваем команду:
sudo dpkg —add-architecture i386 && sudo add-apt-repository multiverse && sudo sudo add-apt-repository ppa:kisak/kisak-mesa && sudo apt update && sudo apt upgrade -y && sudo apt install mesa-vulkan-drivers mesa-vulkan-drivers:i386 libvulkan1 libvulkan1:i386 vulkan-utils mesa-utils -y
перезагружаемся… (Если видеокарта поддерживает вулкан, но он не работает, то делаем по инструкции в самом низу данной страницы)
Установка драйверов для видеокарт от NVIDIA
Для установки драйверов от NVIDIA на Ubuntu, или Linux Mint, открываем эмулятор терминала и вбиваем команду:
sudo dpkg —add-architecture i386 && sudo add-apt-repository multiverse && sudo add-apt-repository ppa:graphics-drivers/ppa -y && sudo apt update && sudo apt upgrade -y && sudo apt install libvulkan1 libvulkan1:i386 vulkan-utils software-properties-gtk mesa-utils -y && sudo software-properties-gtk
после окончания процесса установки откроется окно:

Тут выбираем самый свежий драйвер и жмём: Apply Changes. Ждём окончание установки и перезагружаемся…
Проверяем работу Vulkan на Ubuntu, или Linux Mint.
Для проверки, поддерживается и работает ли у Вас Vulkan, введите команду: lspci | grep 3D && vulkaninfo | grep deviceName
test vulkan linux
» data-medium-file=»https://portwine-linux.ru/wp-content/uploads/2020/05/Screenshot_20200509_151548-300×97.png» data-large-file=»https://portwine-linux.ru/wp-content/uploads/2020/05/Screenshot_20200509_151548.png» loading=»lazy» src=»https://portwine-linux.ru/wp-content/uploads/2020/05/Screenshot_20200509_151548.png» alt=»test vulkan linux» width=»683″ height=»220″ srcset=»https://portwine-linux.ru/wp-content/uploads/2020/05/Screenshot_20200509_151548.png 683w, https://portwine-linux.ru/wp-content/uploads/2020/05/Screenshot_20200509_151548-300×97.png 300w, https://portwine-linux.ru/wp-content/uploads/2020/05/Screenshot_20200509_151548-450×145.png 450w» sizes=»(max-width: 683px) 100vw, 683px»/>
В местах выделенным красным цветом, должны быть одни и те же видеокарты (если это ноутбук, то дискретные). Если у Вас команда ничего не выдает, то можно проверить другим способом, запустив:
vkcube (Должен запуститься вращающийся кубик LunarG)
Включаем поддержку VKD3D (Directx12 под WINE):
sudo add-apt-repository ppa:cybermax-dexter/vkd3d -y && sudo apt-get update && sudo apt upgrade -y && sudo apt install libvkd3d1 libvkd3d1:i386 vkd3d-demos -y
Проверяем vkd3d: gears-vkd3d
Список видеокарт от AMD поддерживающие Vulkan:
Список видеокарт от NVIDIA поддерживающие Vulkan:
Источник
Ubuntu Linux Install Nvidia Driver (Latest Proprietary Driver)
Ubuntu Linux Install Nvidia Driver
The procedure to install proprietary Nvidia GPU Drivers on Ubuntu 16.04 / 17.10 / 18.04 / 18.10 / 20.04 LTS is as follows:
- Update your system running apt-get command
- You can install Nvidia drivers either using GUI or CLI method
- Open “Software and Updates” app to install install Nvidia driver using GUI
- OR type “ sudo apt install nvidia-driver-455 ” at the CLI
- Reboot the computer/laptop to load the drivers
- Verify drivers are working
Let us see all commands in details.
Find out information about your GPU
Naturally, you can only install Nvidia driver if you have Nvidia GPU in your system. Type the hwinfo command/lshw command to find out info about your GPU:
$ hwinfo —gfxcard —short
OR
$ sudo lshw -C display
See “Linux Find Out Graphics Card Installed In My System” for more info.
Install Nvidia driver using GUI method # 1 on Ubuntu Linux
- No ads and tracking
- In-depth guides for developers and sysadmins at Opensourceflare✨
- Join my Patreon to support independent content creators and start reading latest guides:
- How to set up Redis sentinel cluster on Ubuntu or Debian Linux
- How To Set Up SSH Keys With YubiKey as two-factor authentication (U2F/FIDO2)
- How to set up Mariadb Galera cluster on Ubuntu or Debian Linux
- A podman tutorial for beginners – part I (run Linux containers without Docker and in daemonless mode)
- How to protect Linux against rogue USB devices using USBGuard
Join Patreon ➔
Ubuntu Install Nvidia driver using the CLI method # 2
Open the termial application and search for nvidia drivers using the apt command or apt-get command:
$ apt search nvidia-driver
OR use the apt-cache command to search package:
$ apt-cache search nvidia-driver
Updating and installing all security and important updates on Ubuntu
Do not skip the following two commands as you must apply all pending security updates:
$ sudo apt update
$ sudo apt upgrade
Installing NVIDIA drivers on Ubuntu
Let us install the nvidia-driver-390 package:
$ sudo apt install nvidia-driver-390
At this time, the latest tested proprietary drive version is 460. We can install that one as follows on Ubuntu Linux 20.04 LTS:
$ sudo apt install nvidia-driver-460
Reboot the Linux with help of either reboot or shutdown command:
$ sudo reboot
Now go to the driver verification step.
Verification
How do I configure the NVIDIA graphics driver?
The nvidia-settings command start a GUI tool for configuring the NVIDIA graphics driver. This is useful to see all GPU info or configure multiple external screen/monitors connected to your system. Open the terminal and type the following commands:
$ nvidia-settings
If you wish to save settings start it as follows:
$ sudo nvidia-settings
A note about ubuntu-drivers command-line method # 3
We can also change drivers without the use of the X GUI/Windows desktop. For these purposes, Ubuntu comes with a unique command called ubuntu-drivers to manage binary drivers for NVidia and other devices. This is an alternative to the apt command/apt-get command we used earlier.
Show all driver packages which apply to the current system
$ sudo ubuntu-drivers list
Outputs from my Thinkpad X1E laptop:
Display all OEM enablement packages which apply to this system
$ sudo ubuntu-drivers list-oem
View all hardware NVidia devices which need drivers, and which packages
$ sudo ubuntu-drivers devices
Here is what we see:
Ubuntu command to install a driver NVidia version 455
Warning : You can use only one method. If you use an earlier GUI or apt CLI method, do not try the following command. I have observed broken systems if you mixed various methods on the same system. Stick with one method.
Let us install recommended driver automatically:
sudo ubuntu-drivers install
Conclusion
You learned three different ways to install Nvidia Driver on Ubuntu 18.04 and 20.04 LTS Linux desktop or server. Unmistakably, the GUI method is simple and easy to use. The CLI method is useful for server installation, and the ubuntu-drivers command-line method is recommended for a fresh installation or OEM system like Dell XPS 13 and others. The For more info, see the official Nvidia Unix/Linux driver page online.
🐧 Get the latest tutorials on Linux, Open Source & DevOps via
| Category | List of Unix and Linux commands |
|---|---|
| Documentation | help • mandb • man • pinfo |
| Disk space analyzers | df • duf • ncdu • pydf |
| File Management | cat • cp • less • mkdir • more • tree |
| Firewall | Alpine Awall • CentOS 8 • OpenSUSE • RHEL 8 • Ubuntu 16.04 • Ubuntu 18.04 • Ubuntu 20.04 |
| Linux Desktop Apps | Skype • Spotify • VLC 3 |
| Modern utilities | bat • exa |
| Network Utilities | NetHogs • dig • host • ip • nmap |
| OpenVPN | CentOS 7 • CentOS 8 • Debian 10 • Debian 8/9 • Ubuntu 18.04 • Ubuntu 20.04 |
| Package Manager | apk • apt |
| Processes Management | bg • chroot • cron • disown • fg • glances • gtop • jobs • killall • kill • pidof • pstree • pwdx • time • vtop |
| Searching | ag • grep • whereis • which |
| Shell builtins | compgen • echo • printf |
| Text processing | cut • rev |
| User Information | groups • id • lastcomm • last • lid/libuser-lid • logname • members • users • whoami • who • w |
| WireGuard VPN | Alpine • CentOS 8 • Debian 10 • Firewall • Ubuntu 20.04 |
Comments on this entry are closed.
when you inevitably run into an error at reboot following the cli explanation at the top of this guide do the following:
use the magic trouble shooter
ctrl + F1 through F7
then:
sudo apt-get purge nvidia*
when you’ve logged in:
sudo ubuntu-drivers autoinstall
autoinstall will inspect your hardware for the recommended drivers, install and set up user and group permissions.
NONE OF THIS WORKS. The options on the “Additional Drivers” tab are all greyed. None of the command line options will get past a message saying:
“Media change: please insert the disc labeled
“‘Ubuntu 20.10 _Groovy Gorilla_ – Release amd64 (20201022)’
“in the drive ‘/cdrom/’ and press [Enter]”
The machine does not have a disc drive and there is no such disk. I installed from a USB stick. How the hell do I get my second screen back? When I first installed Kubuntu a few months ago it just found the screen without effort.
You need to remove CDROM as package source. Open GUI app app “Software & Update”. Make sure you enable “Downloadable from the Internet”. Do not put CDROM. Then go to “Other Software” and disable all “CDrom with” options. Then save everything and you can now install them from the Internet. See:
Choose nvidia-driver-390 (proprietary, tested) and click on the Apple Changes button
I think there is no APPLE button…..
Just install nvidia drivers for my linux using apt command. worked perfectly on HP laptop.
I can’t believe it was that simple
Me too. It was very easy. I always click nixCraft tutorial. I am visiting this site since last 10 years or more.
I have an error after installing drivers with the second method (CLI).
My NVIDIA graphic card is a GeForce GT 630, and I have installed the following driver: nvidia-driver-460
When I try to do the verification step, I receive the following error;
egonzalez@pc-despacho:
$ nvidia-smi
NVIDIA-SMI has failed because it couldn’t communicate with the NVIDIA driver. Make sure that the latest NVIDIA driver is installed and running.
i do not know how to solve this 🙁
Reboot the system to load and get updated NVIDIA driver.
Rebooting didn’t resolve the error:
“NVIDIA-SMI has failed because it couldn’t communicate with the NVIDIA driver. Make sure that the latest NVIDIA driver is installed and running.”
Changing the driver versions (multiple versions multiple times) and rebooting every time didn’t resolve it.
Bull. You saved my ass. Worked a treat.
This post is really awesome. You save my time. I have trouble installing the 3090 driver. However, I solved my problem by following your post. Thank you so much!!
I agree. +1 for providing upto date information for developer like me who just started with Ubuntu Linux. Worked perfectly on my Dell XPS 15 laptop.
Источник


