- Add language packs to a Windows 10 multi-session image
- Prerequisites
- Create a content repository for language packages and features on demand
- Create a custom Windows 10 Enterprise multi-session image manually
- Create a custom Windows 10 Enterprise multi-session image automatically
- Finish customizing your image
- Enable languages in Windows settings app
- Next steps
- Как установить русский язык в Windows 10 — 2 способа
- Особенности установки русского языка в Windows
- Как установить русский язык интерфейса в Windows 10 (1 способ)
- Русификация Windows 10 (2 способ)
- Выводы статьи
- Добавление языковых пакетов в многосеансовый образ Windows 10 Add language packs to a Windows 10 multi-session image
- Предварительные требования Prerequisites
- Создание репозитория содержимого для языковых пакетов и компонентов по требованию Create a content repository for language packages and features on demand
- Создание пользовательского многосеансового образа Windows 10 Enterprise вручную Create a custom Windows 10 Enterprise multi-session image manually
- Автоматическое создание пользовательского многосеансового образа Windows 10 Enterprise Create a custom Windows 10 Enterprise multi-session image automatically
- Завершение настройки образа Finish customizing your image
- Включение языков в приложении «Параметры Windows» Enable languages in Windows settings app
- Следующие шаги Next steps
Add language packs to a Windows 10 multi-session image
Windows Virtual Desktop is a service that your users can deploy anytime, anywhere. That’s why it’s important that your users be able to customize which language their Windows 10 Enterprise multi-session image displays.
There are two ways you can accommodate the language needs of your users:
- Build dedicated host pools with a customized image for each language.
- Have users with different language and localization requirements in the same host pool, but customize their images to ensure they can select whichever language they need.
The latter method is a lot more efficient and cost-effective. However, it’s up to you to decide which method best suits your needs. This article will show you how to customize languages for your images.
Prerequisites
You need the following things to customize your Windows 10 Enterprise multi-session images to add multiple languages:
An Azure virtual machine (VM) with Windows 10 Enterprise multi-session, version 1903 or later
The Language ISO, Feature on Demand (FOD) Disk 1, and Inbox Apps ISO of the OS version the image uses. You can download them here:
If you use Local Experience Pack (LXP) ISO files to localize your images, you will also need to download the appropriate LXP ISO for the best language experience
An Azure Files Share or a file share on a Windows File Server Virtual Machine
The file share (repository) must be accessible from the Azure VM you plan to use to create the custom image.
Create a content repository for language packages and features on demand
To create the content repository for language packages and FODs and a repository for the Inbox Apps packages:
On an Azure VM, download the Windows 10 Multi-Language ISO, FODs, and Inbox Apps for Windows 10 Enterprise multi-session, version 1903/1909, and 2004 images from the links in Prerequisites.
Open and mount the ISO files on the VM.
Go to the language pack ISO and copy the content from the LocalExperiencePacks and x64\langpacks folders, then paste the content into the file share.
Go to the FOD ISO file, copy all of its content, then paste it into the file share.
Go to the amd64fre folder on the Inbox Apps ISO and copy the content in the repository for the inbox apps that you’ve prepared.
If you’re working with limited storage, only copy the files for the languages you know your users need. You can tell the files apart by looking at the language codes in their file names. For example, the French file has the code «fr-FR» in its name. For a complete list of language codes for all available languages, see Available language packs for Windows.
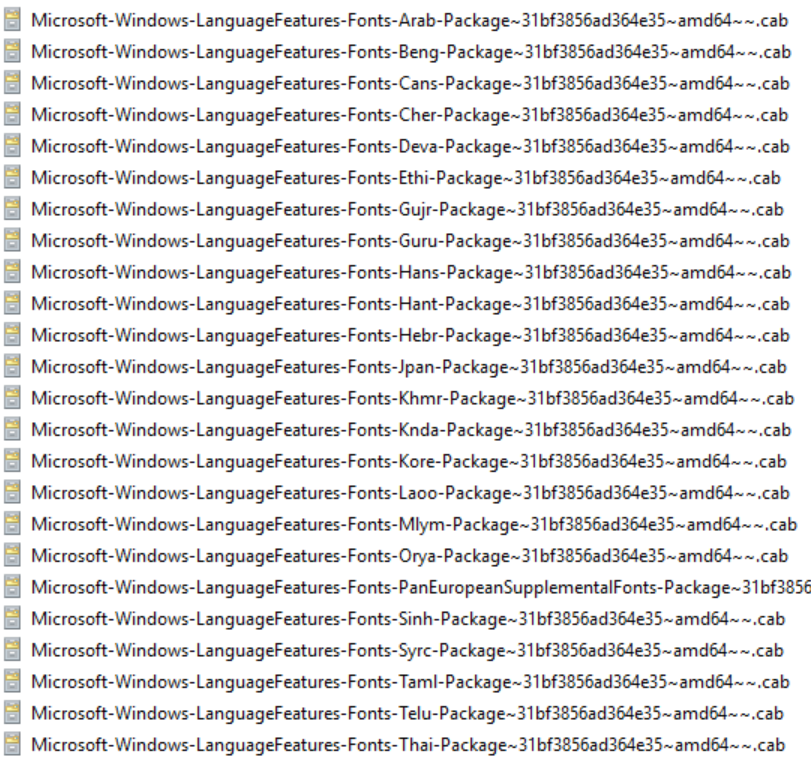
Some languages require additional fonts included in satellite packages that follow different naming conventions. For example, Japanese font file names include “Jpan.»
Set the permissions on the language content repository share so that you have read access from the VM you’ll use to build the custom image.
Create a custom Windows 10 Enterprise multi-session image manually
To create a custom Windows 10 Enterprise multi-session image manually:
- Deploy an Azure VM, then go to the Azure Gallery and select the current version of Windows 10 Enterprise multi-session you’re using.
- After you’ve deployed the VM, connect to it using RDP as a local admin.
- Make sure your VM has all the latest Windows Updates. Download the updates and restart the VM, if necessary.
- Connect to the language package, FOD, and Inbox Apps file share repository and mount it to a letter drive (for example, drive E).
Create a custom Windows 10 Enterprise multi-session image automatically
If you’d rather install languages through an automated process, you can set up a script in PowerShell. You can use the following script sample to install the Spanish (Spain), French (France), and Chinese (PRC) language packs and satellite packages for Windows 10 Enterprise multi-session, version 2004. The script integrates the language interface pack and all necessary satellite packages into the image. However, you can also modify this script to install other languages. Just make sure to run the script from an elevated PowerShell session, or else it won’t work.
The script might take a while depending on the number of languages you need to install.
Once the script is finished running, check to make sure the language packs installed correctly by going to Start > Settings > Time & Language > Language. If the language files are there, you’re all set.
After adding additional languages to the Windows image, the inbox apps are also required to be updated to support the added languages. This can be done by refreshing the pre-installed apps with the content from the inbox apps ISO. To perform this refresh in a disconnected environment (no Internet Access from the VM possible), you can use the following PowerShell script sample to automate the process.
The inbox apps included in the ISO aren’t the latest versions of the pre-installed Windows apps. To get the latest version of all apps, you need to update the apps using the Windows Store App and perform an manual search for updates after you’ve installed the additional languages.
When you’re done, make sure to disconnect the share.
Finish customizing your image
After you’ve installed the language packs, you can install any other software you want to add to your customized image.
Once you’re finished customizing your image, you’ll need to run the system preparation tool (sysprep).
Open an elevated command prompt and run the following command to generalize the image:
Stop the VM, then capture it in a managed image by following the instructions in Create a managed image of a generalized VM in Azure.
You can now use the customized image to deploy a Windows Virtual Desktop host pool. To learn how to deploy a host pool, see Tutorial: Create a host pool with the Azure portal.
Enable languages in Windows settings app
Finally, after you deploy the host pool, you’ll need to add the language to each user’s language list so they can select their preferred language in the Settings menu.
To ensure your users can select the languages you installed, sign in as the user, then run the following PowerShell cmdlet to add the installed language packs to the Languages menu. You can also set up this script as an automated task or logon script that activates when the user signs in to their session.
After a user changes their language settings, they’ll need to sign out of their Windows Virtual Desktop session and sign in again for the changes to take effect.
Next steps
If you have any other questions about Windows 10 Enterprise multi-session, check out our FAQ.
Как установить русский язык в Windows 10 — 2 способа
Русификация Windows необходима, если на компьютере установлена операционная система на иностранном языке. Ситуации могут быть разными: компьютер куплен заграницей (естественно, там нет русского языка), пользователь самостоятельно установил на ПК операционную систему на английском (или любом другом) языке и т. д.
К сожалению, не все в совершенстве владеют иностранными языками. Поэтому, пользователю для полноценной работы потребуется установить русский язык на Windows для того, чтобы изменить язык интерфейса Windows.
Как изменить язык Windows на русский? Для этого необходимо скачать и установить в операционную русский языковой пакет для локализации системы. После завершения установки языкового пакета, Windows будет работать на русском языке.
Особенности установки русского языка в Windows
В этой статье мы рассмотрим процесс русификации Windows 10. Процесс загрузки и установки русского языкового пакета проходит непосредственно из настроек системы: с помощью онлайн и офлайн установки.
Русификация Windows 7 и Windows 8.1 проходит по следующему алгоритму (в Windows 10 подобный порядок действий):
- скачайте русский языковой пакет, запустив загрузку из настроек системы, или перейдя по ссылке https://support.microsoft.com/ru-ru/help/14236/language-packs ;
- установите русский языковой пакет;
- войдите в настройки Windows, выберите русский язык в качестве основного языка операционной системы;
- перезагрузите компьютер.
В данной статье я расскажу, как изменить язык Windows 10 на русский в операционной системе Windows 10 LTSB (Windows 10 Enterprise LTSB), которая по умолчанию не имеет русского языка интерфейса. В других редакциях Windows 10 процесс русификации проходит аналогичным образом.
Как установить русский язык интерфейса в Windows 10 (1 способ)
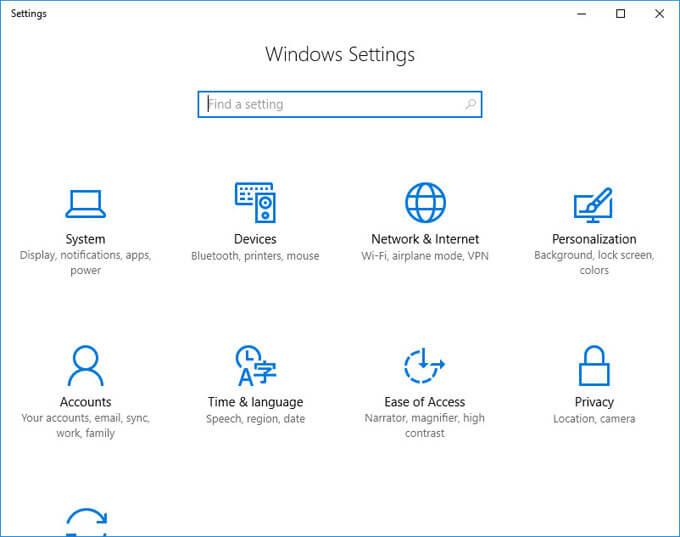
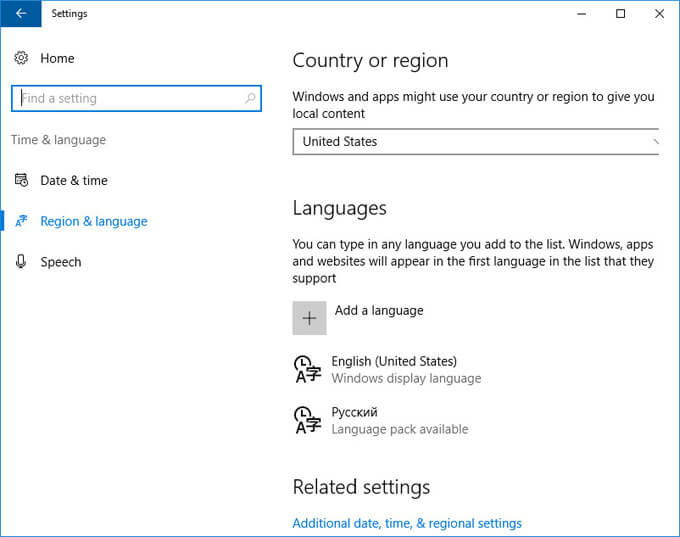
В операционной системе Windows 10 войдите в меню «Пуск», нажмите на «Setting» (Параметры). В окне выбора параметров «Setting», выберите раздел «Time & language» (Время и язык).
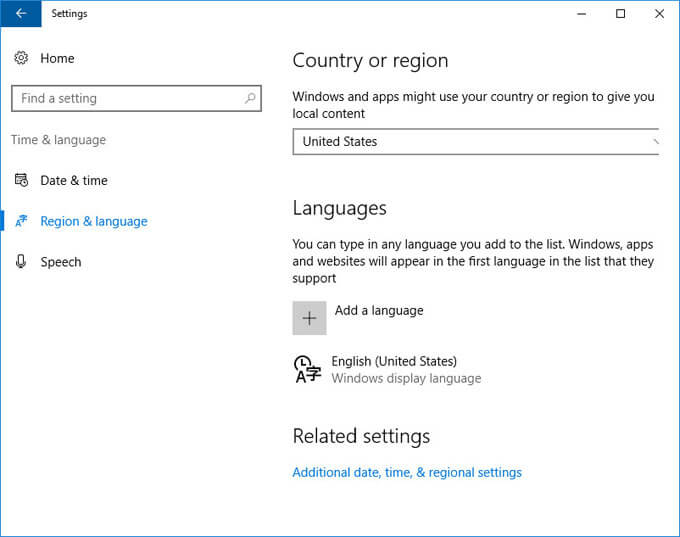
В окне настроек откройте «Region & language» (Регион и язык). В разделе «Languages» (Языки) нажмите на кнопку «Add a language» (Добавление языка).
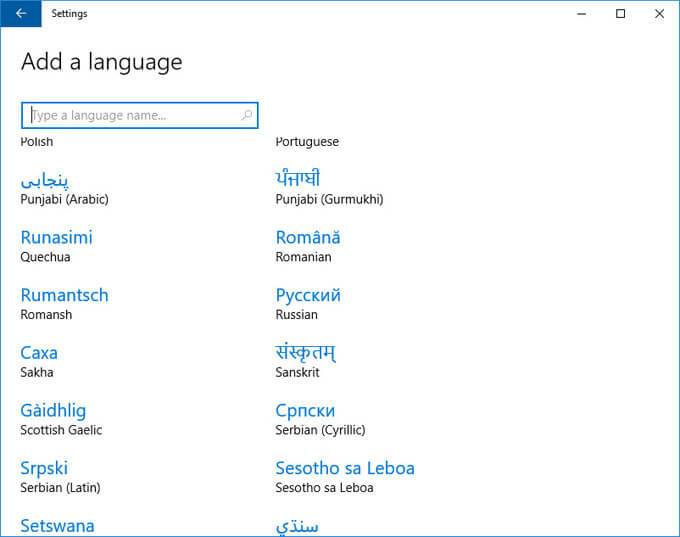
В окне «Add a language» выберите русский язык (Русский, Russian).
После этого, русский язык появится в списке добавленных языков на втором месте. Русский язык еще не скачан и не установлен в Windows.
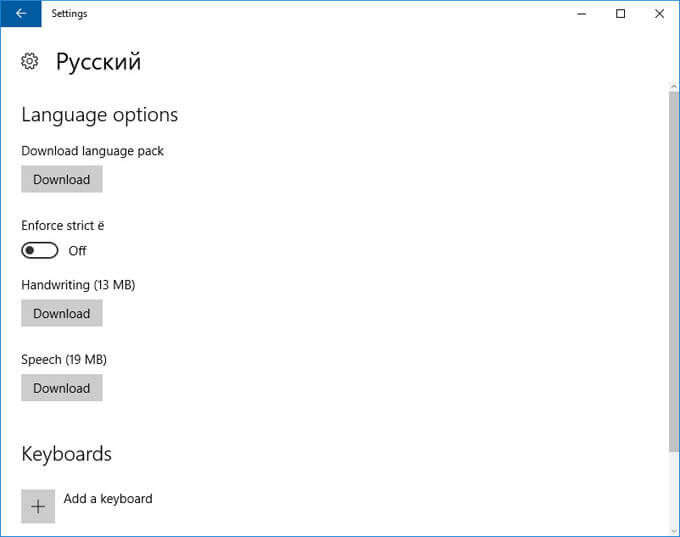
Выделите «Русский», в языковой области появятся три кнопки. Нажмите на кнопку «Options» (Параметры).
После этого, откроется окно настроек русских языковых параметров. Здесь предлагается скачать русский языковой пакет для Windows 10, включить полную поддержку буквы «ё» (по умолчанию эта функция отключена в русских сборках Windows), скачать голосовой пакет, добавить клавиатуру.
Нажмите на кнопку «Download» для загрузки и установки русского языка.
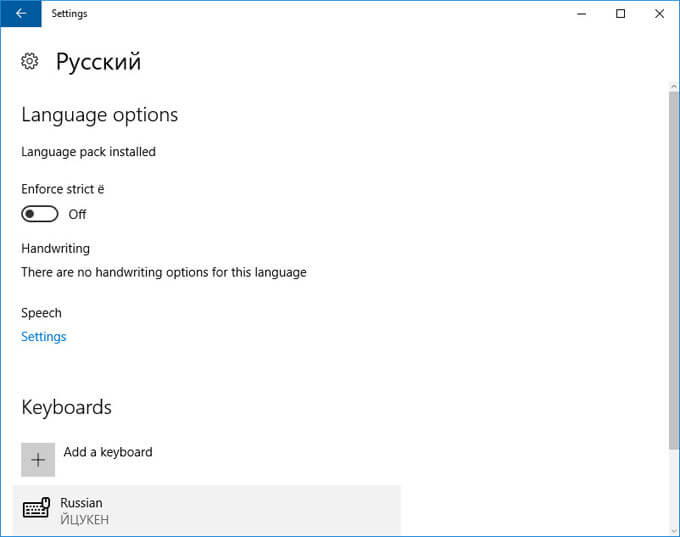
После этого начнется загрузка и инсталляция русского языкового пакета на компьютер. Этот процесс займет некоторое время.
После завершения установки русского языка, в языковых настройках появится сообщение: «Language pack installed» (Языковой пакет установлен).
Войдите в «Region & language», выделите «Русский», нажмите на кнопку «Set as default» (Использовать как основной язык).
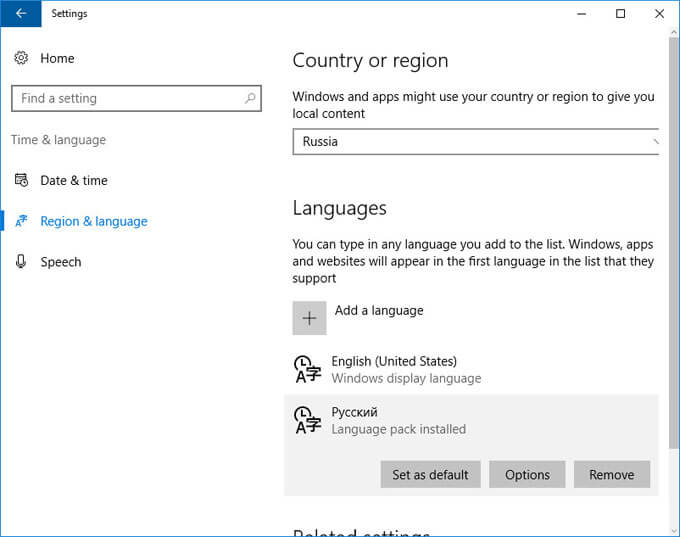
После этого, русский язык переместиться на первое место в списке поддерживаемых языков. Это значит, что русский язык будет использован по умолчанию в операционной системе Windows 10.
Перезагрузите компьютер. После запуска, вы увидите, что интерфейс Windows 10 работает на русском языке.

Далее по желанию, измените время и прочие региональные стандарты.
Русификация Windows 10 (2 способ)
Для второго варианта установки русского языка в Windows 10 понадобится предварительно скачанный русский языковой пакет. Локализованный языковой пакет в виде файла с расширением «.cab», должен подходить под версию и разрядность операционной системы, установленной на компьютере системы.
- Войдите в меню «Пуск», запустите командную строку от имени администратора.
- В окне интерпретатора командной строки введите команду «lpksetup» (без кавычек), нажмите на клавишу «Enter».
- В открывшемся окне нажмите на кнопку «Install display languages».
- В следующем окне необходимо выбрать путь к ранее скачанному на компьютер русскому языковому пакету. С помощью кнопки «Browse» выберите файл с расширением «.cab», а затем нажмите на кнопку «Next».
- Далее примите условия лицензионного соглашения.
- Затем начнется процесс установки русского языка на компьютер.
- После завершения установки языкового пакета, войдите в параметры системы, в окне «Setting», в опции «Region & language», в разделе «Languages» нажмите на кнопку «Add a language», а затем в открывшемся окне выберите русский язык.
- Возвратитесь в настройки «Region & language», под пунктом русского языка вы увидите сообщение «Language pack installed» (языковой пакет установлен).
- Выделите «Русский», а затем нажмите на появившуюся кнопку «Set as default» (Использовать как основной язык). Русский язык переместится в начало списка установленных языков.
- Перезагрузите компьютер.
- Операционная система Windows 10 загрузится на русском языке.
Выводы статьи
Если на компьютере установлена ОС Windows на иностранном языке, пользователь может установить русский язык на Windows 10 для того, чтобы изменить язык интерфейса операционной системы на родной или желаемый язык.
Добавление языковых пакетов в многосеансовый образ Windows 10 Add language packs to a Windows 10 multi-session image
Виртуальный рабочий стол Windows — это служба, которую пользователи могут развертывать в любое время в любом месте. Windows Virtual Desktop is a service that your users can deploy anytime, anywhere. Поэтому важно, чтобы пользователи могли настраивать, на каком языке отображается многосеансовый образ Windows 10 Enterprise. That’s why it’s important that your users be able to customize which language their Windows 10 Enterprise multi-session image displays.
Существует два способа, которым можно удовлетворять языковые потребности пользователей: There are two ways you can accommodate the language needs of your users:
- Создавайте выделенные пулы узлов с настроенным образом для каждого языка. Build dedicated host pools with a customized image for each language.
- Помещайте пользователей с различными требованиями к языку и локализации в одном пуле узлов, но настраивайте свои образы, чтобы убедиться, что они могут выбрать нужный язык. Have users with different language and localization requirements in the same host pool, but customize their images to ensure they can select whichever language they need.
Последний метод является гораздо более эффективным и экономичным. The latter method is a lot more efficient and cost-effective. Тем не менее, вам нужно решить, какой метод лучше подходит для ваших нужд. However, it’s up to you to decide which method best suits your needs. В этой статье показано, как настроить языки для образов. This article will show you how to customize languages for your images.
Предварительные требования Prerequisites
Чтобы настроить многосеансовые образы Windows 10 Enterprise для добавления нескольких языков, необходимо выполнить следующие действия. You need the following things to customize your Windows 10 Enterprise multi-session images to add multiple languages:
Виртуальная машина Azure с многосеансовой поддержкой Windows 10 Enterprise, версия 1903 или более поздняя An Azure virtual machine (VM) with Windows 10 Enterprise multi-session, version 1903 or later
ISO-файл языка ISO, функция по запросу (FOD) и папка «Входящие» для приложений версии ОС, используемой в образе. The Language ISO, Feature on Demand (FOD) Disk 1, and Inbox Apps ISO of the OS version the image uses. Их можно загрузить здесь: You can download them here:
ISO-язык: Language ISO:
FOD диск 1 ISO: FOD Disk 1 ISO:
ISO-файл входящих приложений: Inbox Apps ISO:
Если для локализации образов вы используете ISO-файлы с локальным пакетом поддержки (ЛКСП), вам также потребуется скачать соответствующий ЛКСП ISO для лучшего языкового интерфейса. If you use Local Experience Pack (LXP) ISO files to localize your images, you will also need to download the appropriate LXP ISO for the best language experience
Общая папка службы файлов Azure или общая папка на виртуальной машине файлового сервера Windows An Azure Files Share or a file share on a Windows File Server Virtual Machine
Общая папка (репозиторий) должна быть доступна из виртуальной машины Azure, которую вы планируете использовать для создания пользовательского образа. The file share (repository) must be accessible from the Azure VM you plan to use to create the custom image.
Создание репозитория содержимого для языковых пакетов и компонентов по требованию Create a content repository for language packages and features on demand
Чтобы создать репозиторий содержимого для языковых пакетов и Фодс, а также репозиторий для пакетов входящих приложений, выполните следующие действия. To create the content repository for language packages and FODs and a repository for the Inbox Apps packages:
На виртуальной машине Azure Скачайте многоязыковые приложения для Windows 10, Фодс и входящие, для образов Windows 10 Корпоративная с несколькими сеансами, версии 1903/1909 и 2004, используя ссылки в предварительных требованиях. On an Azure VM, download the Windows 10 Multi-Language ISO, FODs, and Inbox Apps for Windows 10 Enterprise multi-session, version 1903/1909, and 2004 images from the links in Prerequisites.
Откройте и подключите ISO-файлы на виртуальной машине. Open and mount the ISO files on the VM.
Перейдите к ISO-образу языкового пакета и скопируйте содержимое из папок локалекспериенцепаккс и x64 \ лангпаккс , а затем вставьте содержимое в общую папку. Go to the language pack ISO and copy the content from the LocalExperiencePacks and x64\langpacks folders, then paste the content into the file share.
Перейдите в ISO-файл FOD, скопируйте все его содержимое, а затем вставьте его в общую папку. Go to the FOD ISO file, copy all of its content, then paste it into the file share.
Перейдите в папку amd64fre в формате ISO «Входящие приложения» и скопируйте содержимое в репозиторий для подготовленных Вами входящих вами приложений. Go to the amd64fre folder on the Inbox Apps ISO and copy the content in the repository for the inbox apps that you’ve prepared.
Если вы работаете с ограниченным объемом хранилища, копируйте файлы только для тех языков, которые вам нужны пользователям. If you’re working with limited storage, only copy the files for the languages you know your users need. Файлы можно указать отдельно, взглянув на коды языка в именах файлов. You can tell the files apart by looking at the language codes in their file names. Например, французский файл содержит код «fr-FR» в его имени. For example, the French file has the code «fr-FR» in its name. Полный список кодов языков для всех доступных языков см. в разделе Доступные языковые пакеты для Windows. For a complete list of language codes for all available languages, see Available language packs for Windows.
Для некоторых языков требуются дополнительные шрифты, содержащиеся в вспомогательных пакетах, которые соответствуют различным соглашениям об именовании. Some languages require additional fonts included in satellite packages that follow different naming conventions. Например, имена файлов японского шрифта включают «Жпан». For example, Japanese font file names include “Jpan.»

Задайте разрешения для общей папки репозитория содержимого языка, чтобы у вас был доступ на чтение с виртуальной машины, которая будет использоваться для создания пользовательского образа. Set the permissions on the language content repository share so that you have read access from the VM you’ll use to build the custom image.
Создание пользовательского многосеансового образа Windows 10 Enterprise вручную Create a custom Windows 10 Enterprise multi-session image manually
Для создания пользовательского многосеансового образа Windows 10 Enterprise вручную выполните следующие действия. To create a custom Windows 10 Enterprise multi-session image manually:
- Разверните виртуальную машину Azure, перейдите в коллекцию Azure и выберите текущую версию многосеансовой версии Windows 10 Enterprise, которую вы используете. Deploy an Azure VM, then go to the Azure Gallery and select the current version of Windows 10 Enterprise multi-session you’re using.
- После развертывания виртуальной машины подключитесь к ней, используя RDP в качестве локального администратора. After you’ve deployed the VM, connect to it using RDP as a local admin.
- Убедитесь, что на виртуальной машине установлены все последние обновления Windows. Make sure your VM has all the latest Windows Updates. При необходимости скачайте обновления и перезапустите виртуальную машину. Download the updates and restart the VM, if necessary.
- Подключитесь к репозиторию файлового пакета, FOD и папке «Входящие приложения» и подключите его к букве диска (например, на диске E). Connect to the language package, FOD, and Inbox Apps file share repository and mount it to a letter drive (for example, drive E).
Автоматическое создание пользовательского многосеансового образа Windows 10 Enterprise Create a custom Windows 10 Enterprise multi-session image automatically
Если вы предпочитаете устанавливать языки с помощью автоматизированного процесса, можно настроить сценарий в PowerShell. If you’d rather install languages through an automated process, you can set up a script in PowerShell. Приведенный ниже пример сценария можно использовать для установки языковых пакетов для испанского (Испания), французского (Франция) и китайского (КНР) языков и вспомогательных пакетов для многосеансовой версии Windows 10 Enterprise, версия 2004. You can use the following script sample to install the Spanish (Spain), French (France), and Chinese (PRC) language packs and satellite packages for Windows 10 Enterprise multi-session, version 2004. Сценарий интегрирует пакет интерфейса языка и все необходимые вспомогательные пакеты в образ. The script integrates the language interface pack and all necessary satellite packages into the image. Однако этот скрипт также можно изменить для установки других языков. However, you can also modify this script to install other languages. Просто убедитесь, что сценарий запущен из сеанса PowerShell с повышенными привилегиями, или в противном случае он не будет работать. Just make sure to run the script from an elevated PowerShell session, or else it won’t work.
Сценарий может занять некоторое время в зависимости от числа языков, которые необходимо установить. The script might take a while depending on the number of languages you need to install.
После завершения выполнения скрипта убедитесь, что языковые пакеты правильно установлены, перейдя к > параметру > время запуска & > язык. Once the script is finished running, check to make sure the language packs installed correctly by going to Start > Settings > Time & Language > Language. Если языковые файлы установлены, все они будут установлены. If the language files are there, you’re all set.
После добавления дополнительных языков в образ Windows также необходимо обновить Входящие приложения для поддержки добавленных языков. After adding additional languages to the Windows image, the inbox apps are also required to be updated to support the added languages. Это можно сделать, обновив предварительно установленные приложения содержимым из ISO-файла входящих приложений. This can be done by refreshing the pre-installed apps with the content from the inbox apps ISO. Чтобы выполнить это обновление в отключенной среде (нет доступа к Интернету из виртуальной машины), можно использовать следующий пример сценария PowerShell для автоматизации процесса. To perform this refresh in a disconnected environment (no Internet Access from the VM possible), you can use the following PowerShell script sample to automate the process.
Входящие в состав ISO приложения не являются последними версиями предварительно установленных приложений Windows. The inbox apps included in the ISO aren’t the latest versions of the pre-installed Windows apps. Чтобы получить последнюю версию всех приложений, необходимо обновить приложения с помощью приложения для Магазина Windows и выполнить поиск обновлений вручную после установки дополнительных языков. To get the latest version of all apps, you need to update the apps using the Windows Store App and perform an manual search for updates after you’ve installed the additional languages.
Когда все будет готово, не забудьте отключить общую папку. When you’re done, make sure to disconnect the share.
Завершение настройки образа Finish customizing your image
После установки языковых пакетов можно установить любое другое программное обеспечение, которое нужно добавить в пользовательский образ. After you’ve installed the language packs, you can install any other software you want to add to your customized image.
После завершения настройки образа необходимо запустить средство подготовки системы (Sysprep). Once you’re finished customizing your image, you’ll need to run the system preparation tool (sysprep).
Чтобы запустить Sysprep, выполните следующие действия. To run sysprep:
Откройте командную строку с повышенными привилегиями и выполните следующую команду, чтобы обобщать образ: Open an elevated command prompt and run the following command to generalize the image:
Закройте виртуальную машину, а затем запишите ее в управляемом образе, следуя инструкциям в статье Создание управляемого образа универсальной виртуальной машины в Azure. Stop the VM, then capture it in a managed image by following the instructions in Create a managed image of a generalized VM in Azure.
Теперь можно использовать настроенный образ для развертывания пула узлов виртуальных рабочих столов Windows. You can now use the customized image to deploy a Windows Virtual Desktop host pool. Сведения о развертывании пула узлов см. в разделе учебник. Создание пула узлов с портал Azure. To learn how to deploy a host pool, see Tutorial: Create a host pool with the Azure portal.
Включение языков в приложении «Параметры Windows» Enable languages in Windows settings app
Наконец, после развертывания пула узлов необходимо добавить язык в список языков каждого пользователя, чтобы он мог выбрать предпочитаемый язык в меню Параметры. Finally, after you deploy the host pool, you’ll need to add the language to each user’s language list so they can select their preferred language in the Settings menu.
Чтобы пользователи могли выбрать установленные языки, войдите в систему от имени пользователя, а затем выполните следующий командлет PowerShell, чтобы добавить установленные языковые пакеты в меню языки. To ensure your users can select the languages you installed, sign in as the user, then run the following PowerShell cmdlet to add the installed language packs to the Languages menu. Этот сценарий также можно настроить как автоматизированную задачу или сценарий входа, который активируется при входе пользователя в сеанс. You can also set up this script as an automated task or logon script that activates when the user signs in to their session.
После того как пользователь изменит параметры языка, ему потребуется выйти из сеанса виртуальных рабочих столов Windows и снова войти, чтобы изменения вступили в силу. After a user changes their language settings, they’ll need to sign out of their Windows Virtual Desktop session and sign in again for the changes to take effect.
Следующие шаги Next steps
Если вы хотите узнать об известных проблемах, связанных с языковыми пакетами, см. статью Добавление языковых пакетов в Windows 10, версия 1803 и более поздние версии: известные проблемы. If you’re curious about known issues for language packs, see Adding language packs in Windows 10, version 1803 and later versions: Known issues.
Если у вас есть вопросы о многосеансовой среде Windows 10 Enterprise, ознакомьтесь с вопросами иответами. If you have any other questions about Windows 10 Enterprise multi-session, check out our FAQ.


