- Как установить заголовочные файлы ядра в Linux
- Установка заголовочных файлов ядра в Debian, Ubuntu или Linux Mint
- Установка заголовочных файлов ядра в Fedora, CentOS или RHEL
- Невозможно найти пакет linux-kernel-devel
- 1 ответ
- Ubuntu Documentation
- Disclaimer
- Reasons for compiling a custom kernel
- Reasons for NOT compiling a custom kernel
- Tools you’ll need
- Get the kernel source
- Option A) Use git
- Option B) Download the source archive
- Option C) Download the source package
- Modify the source for your needs
- Build the Kernel(s)
- Build Method A: Build the kernel (when source is from git repository, or from apt-get source)
- Alternate Build Method (B): The Old-Fashioned Debian Way
- Install the new kernel
- Rebuilding »linux-restricted-modules»
Как установить заголовочные файлы ядра в Linux
Когда вы компилируете драйвер устройства как модуль ядра, вам необходимы установленные заголовочные файлы ядра. Также они требуются, если вы собираете пользовательское приложение, которое взаимодействует напрямую с ядром. При установке заголовочных файлов ядра, необходимо убедиться, что их версия совпадает с версией ядра установленного в системе.
Если версия вашего ядра не менялась после установки дистрибутива, или вы обновляли его с использованием системного менеджера пакетов (то есть apt-get, aptitude или yum) из системных репозиториев, то заголовочные файлы вы также можете установить с помощью пакетного менеджера. Однако если вы скачивали исходный код ядра и компилировали его самостоятельно, то заголовочные файлы необходимо устанавливать с помощью команды make.
Здесь мы предполагаем, что ваше ядро установлено из основного системного репозитория вашего дистрибутива, и вы хотите установить соответствующие заголовочные файлы ядра.
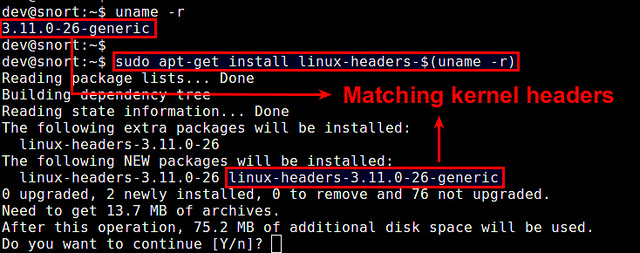
Установка заголовочных файлов ядра в Debian, Ubuntu или Linux Mint
Если вы не компилировали ядро вручную, то можете установить соответствующие заголовочные файлы ядра с помощью команды apt-get.
Сначала проверьте, не установлены ли уже требуемые заголовочные файлы с помощью команды:
Теперь установите заголовочные файлы, как показано ниже.
Проверьте, что установка прошла успешно.
По умолчанию в Debian, Ubuntu или Linux Mint заголовочные файлы находятся в /usr/src.
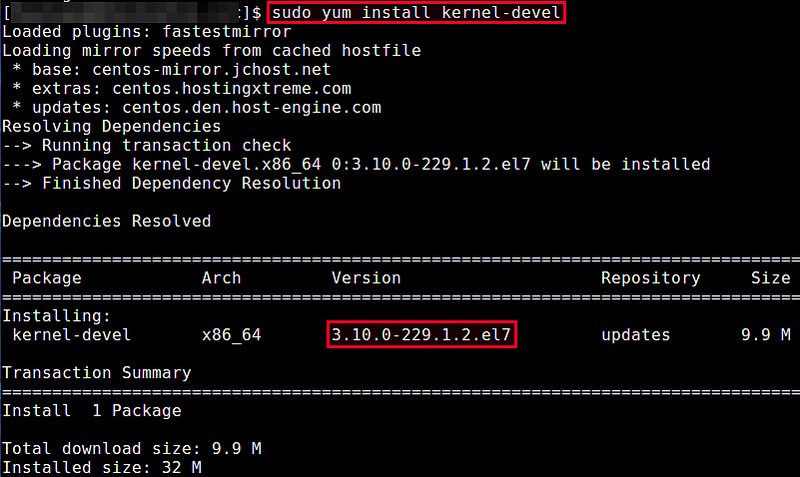
Установка заголовочных файлов ядра в Fedora, CentOS или RHEL
Если вы не обновляли ядро вручную, то можете установить соответствующие заголовочные файлы ядра с помощью команды yum.
Сначала проверьте, не установлены ли уже требуемые заголовочные файлы. По умолчанию заголовочные файлы ядра расположены в /usr/src/kernels/.
Если подходящих заголовочных файлов не установлено, вы можете установить их с помощью команды yum. Она автоматически найдет подходящий пакет.
Если заголовочные файлы ядра, установленные с помощью вышеприведенной команды, не соответствуют установленному в системе ядре, значит оно устарело. В этом случае обновите ядро системы до последней версии с помощью приведенной ниже команды. После обновления необходимо перезагрузить систему.
Теперь проверьте, что установлены заголовочные файлы соответствующей версии с помощью команды:
Источник
Невозможно найти пакет linux-kernel-devel
Я уверен, что есть три другие ссылки, которые сообщают о той же проблеме, я получаю
Я перехожу по этой ссылке, чтобы скомпилировать свое собственное ядро
Инструменты, которые вам понадобятся Для начала вам необходимо установить несколько пакетов. Точные команды для установки этих пакетов зависят от того, какую версию вы используете:
sudo apt-get install linux-kernel-devel fakeroot kernel-wedge build-essential
Когда я пробую вышеупомянутые пакеты, fakroot, kernel-wedge, build-essentail кажутся доступными для терминала, за исключением linux-kernel-devel.
Я пытаюсь установить Hardy на свою Ubuntu 12.04.3 LTS, пока я пытался
Я даже попытался изменить исходный список и добавил строку юниверса в строку ниже.
Что мне здесь не хватает? Почему Ubuntu не может найти пакет? Я подключен к Интернету.
1 ответ
Этот конкретный пакет не упакован в Ubuntu 10.04 и выше. Если вы пытаетесь скомпилировать собственное ядро, правильный способ получить необходимые компоненты в Ubuntu 10.04 и более поздних версиях — выполнить следующие команды:
Hardy — это совершенно другая версия Ubuntu, и ее нельзя установить на другую версию. Если вам нужна Ubuntu 8.04 (Hardy Heron), вам нужно найти ее копию онлайн, скачать ее, а затем записать на CD или DVD.
Тем не менее, 8.04 давно не работает, и мы рекомендуем использовать более новую версию Ubuntu.
Источник
Ubuntu Documentation

Content Cleanup Required
This article should be cleaned-up to follow the content standards in the Wiki Guide. More info.
Needs Updating
This article needs updating to include the latest versions of Ubuntu. More info.
Disclaimer
Building and using a custom kernel will make it very difficult to get support for your system.
While it is a learning experience to compile your own kernel, you will not be allowed to file bugs on the custom-built kernel (if you do, they will be Rejected without further explanation).
Note: This page would need significant cleaning. You may want to refer to Kernel/BuildYourOwnKernel page in Ubuntu wiki instead which is a cleaner and more up-to-date guide to (simple) kernel building
If you have a commercial support contract with Ubuntu/Canonical, this will void such support.
Also note that this page describes how to do things for the Edgy (2.6.17) kernel and newer! Until this kernel source, we did not have any mechanisms in place that would allow people to build their own kernels easily. This was intentional.
This page does NOT describe how to build upstream kernels from kernel.org. This is how to rebuild the actual Ubuntu kernel starting from source.
Reasons for compiling a custom kernel
- You are a kernel developer.
- You need the kernel compiled in a special way, that the official kernel is not compiled in (for example, with some experimental feature enabled).
- You are attempting to debug a problem in the stock Ubuntu kernel for which you have filed or will file a bug report.
- You have hardware the stock Ubuntu kernel does not support.
- You love computers and are curious and interested in hacking on your own GNU/Linux system to learn more about how it works (with the understanding that you’ll need to fix anything you break).
Reasons for NOT compiling a custom kernel
- You merely need to compile a special driver. For this, you only need to install the linux-headers packages.
- You have no idea what you are doing, and if you break something, you’ll need help fixing it. Depending on what you do wrong, you might end up having to reinstall your system from scratch.
- You got to this page by mistake, and checked it out because it looked interesting, but you don’t really want to learn a lot about kernels.
If you want to install a new kernel without compilation, you can use Synaptic, search for linux-image and select the kernel version you want to install.
An easier way is to click on System > Administration > Update Manager, then click on the Check button, and finally click on Apply all updates including the kernel.
Tools you’ll need
To start, you will need to install a few packages. Use a following command line to install precisely the packages needed for the release you are using:
Hardy (8.04):
Note: The package makedumpfile is not available in Hardy.
Lucid (10.04):
Raring (13.04):
Get the kernel source
There are a few ways to obtain the Ubuntu kernel source:
Option A) Use git
Use git — This is for users who always want to stay in sync with the latest Ubuntu kernel source. For your information, detailed instructions on it can be found in the Kernel Git Guide
The git repository does not include necessary control files, so you must build them by:
Option B) Download the source archive
Download the source archive — This is for users who want to rebuild the standard Ubuntu packages with additional patches. Note that this will almost always be out of date compared to the latest development source, so you should use git (option A) if you need the latest patches.
Use a follow command to install the build dependencies and extract the source (to the current directory):
Ubuntu Hardy (8.04)
- Ubuntu modules source may also be needed if you plan to enable PAE and 64 GiB support in the kernel for 32-bit Hardy (8.04). The Ubuntu supplied modules may not be compatible with a PAE enabled kernel.
- The source will be downloaded to a subdirectory inside the current directory.
Ubuntu Karmic Koala (9.10) and newer releases
The source will be downloaded to the current directory as a trio of files (for Lucid, at least) (.orig.tar.gz, .diff.gz, and .dsc) and a sub-directory. For instance, if uname -r returns 2.6.32-25-generic, you’ll obtain linux_2.6.32.orig.tar.gz, linux_2.6.32-25.44.diff.gz, linux_2.6.32-25.44.dsc and the sub-directory linux-2.6.32.
Raring (13.04):
Option C) Download the source package
Download the source package (detailed instructions are further down this page under Alternate Build Method (B): The Old-Fashioned Debian Way) — This is for users who simply want to modify, or play around with, the Ubuntu-patched kernel source. Again, this will not be the most up-to-date (use Option A/git if you need the latest source). Please be aware this is NOT the same as Option B/Download the source archive.
Modify the source for your needs
- For most people, simply modifying the configs is enough. If you need to install a patch, read the instructions from the patch provider to learn how to apply it.
The stock Ubuntu configs are located in debian/config/ARCH/ where ARCH is the architecture you are building for (Starting with Jaunty this is debian.master/config/ARCH/). In this directory there are several files. The config file is the base for all targets in that architecture. Then there are several config.FLAVOUR files that contain options specific to that target. For example, here are the files for 2.6.20, i386:
If you do not find the config files under debian/config, you may find them in your /boot directory (for instance, /boot/config-2.6.22-14-generic) otherwise you should check to see if an alternate location has been specified within debian/debian.env of your kernel source directory.
If you need to change a config option, simply modify the file that contains the option. If you modify just the config file, it will affect all targets for this architecture. If you modify one of the target files, it only affects that target.
After applying a patch, or adjusting the configs, it is always best to regenerate the config files to ensure they are consistent. There is a helper command for this. To regenerate all architectures run:
If you just want to update one architecture, run:
Note: If you don’t have the debian/ directory after using apt-get source, use dpkg-source -x *dsc to extract the sources properly.
For these two commands to work, you need to give the scripts in the debian/scripts/misc and debian/scripts directories execute permission with the following command:
Build the Kernel(s)
There are two listed ways to build the Ubuntu kernel:
Build Method A: Build the kernel (when source is from git repository, or from apt-get source)
- To build the kernel(s) is very simple. Depending on your needs, you may want to build all the kernel targets, or just one specific to your system. However, you also want to make sure that you do not clash with the stock kernels.
Note: Though these outside instructions include making a separate and unique branch of the kernel, unlike here, they include thorough explanations of all necessary steps from start to finish.
These instructions are specific to the git-tree and for the source downloaded via apt-get source, not when downloading the linux-source package from kernel.org
Use this command to build all targets for the architecture you are building on:
debian/rules clean creates debian/control, debian/changelog, and so on from debian.
/* (e.g. debian.master). It is necessary in git trees following git commit 3ebd3729ce35b784056239131408b9a72b0288ef «UBUNTU: [Config] Abstract the debian directory».
The AUTOBUILD environment variable triggers special features in the kernel build. First, it skips normal ABI checks (ABI is the binary compatibility). It can do this because it also creates a unique ABI ID. If you used a git repo, this unique ID is generated from the git HEAD SHA. If not, it is generated from the uuidgen program (which means every time you execute the debian/rules build, the UUID will be different!). Your packages will be named using this ID. (Note that in Intrepid and newer, you will need skipabi=true to skip ABI checks.)
To build a specific target, use this command:
Where FLAVOUR is one of the main flavours of the kernel (e.g. generic)
To build one of the custom flavours (found in debian/binary-custom.d/), use:
As of this documentation, custom flavours include xen and rt.
If you have a more than one processor or more than one core, you can speed things up by running concurrent compile commands. Prepend CONCURRENCY_LEVEL=2 for two processors or two cores; replace ‘2’ with whatever number suits your hardware setup (for Gutsy and later, you can alternatively use DEB_BUILD_OPTIONS=parallel=2).
If you get ABI errors, you can avoid the ABI check with skipabi=true. For example,
To trigger a rebuild, remove the appropriate stamp file from debian/stamps (e.g. stamp-build-server for the server flavour, etc.).
The debs are placed in your the parent directory of the kernel source directory.
If needed, the Ubuntu modules source for Hardy (8.04) can be built in a similar way.
Alternatively, if you need to specify a different kernel than the running one, use
If you get an error, try running this in the kerneldir: (example for the generic flavour)
Alternate Build Method (B): The Old-Fashioned Debian Way
The new Ubuntu build system is great for developers, for people who need the absolute latest bleeding-edge kernel, and people who need to build a diverse set of kernels (several «flavours»). However it can be a little complex for ordinary users. If you don’t need the latest development sources, there is a simpler way to compile your kernel from the linux-source package. As suggested above, all you need for this is:
The last command in the sequence brings you into the top directory of a kernel source tree.
Before building the kernel, you must configure it. If you wish to re-use the configuration of your currently-running kernel, start with
Before you run make menuconfig or make xconfig (which is what the next step tells you to do), make sure you have the necessary packages:
If you would like to see what is different between your original kernel config and the new one (and decide whether you want any of the new features), you can run:
Since the 2.6.32 kernel, a new feature allows you to update the configuration to only compile modules that are actually used in your system:
Then, regardless of whether you’re re-using an existing configuration or starting from scratch:
What about this. ? (which is from the Kernel/BuildYourOwnKernel Page in the section «Modifying the configuration»)
If you re-used the existing configuration, note that Ubuntu kernels build with debugging information on, which makes the resulting kernel modules (*.ko files) much larger than they would otherwise be. To turn this off, go into the config’s «Kernel hacking» and turn OFF «Compile the kernel with debug info».
Now you can compile the kernel and create the packages:
You can enable parallel make use make -j). Try 1+number of processor cores, e.g. 3 if you have a dual core processor:
On a newer kernel, if you only need binary packages and want several builds (while editing the source) to not cause everything to be rebuilt, use:
The *.deb packages will be created in the parent directory of your Linux source directory (in this example, they would be placed in
/src because our Linux source directory is
Install the new kernel
If you want to see the Ubuntu splash screen (or use text mode) before you get to X instead of just a black screen, you’ll want to make sure the framebuffer driver loads:
Now that you’ve told initramfs-tools which modules it should include, and once the build is complete, you can install the generated debs using dpkg:
Similarly, if you have built the Ubuntu module for Hardy (8.04) earlier, install them as follows:
If you use modules from linux-restricted-modules, you will need to recompile this against your new linux-headers package.
Note: In response to the various comments in the remainder of this section: On Ubuntu Precise (12.04) it appears that postinst DOES take care of the initramfs stuff. After installing the package my new kernel booted just fine without following any of the methods below. Someone please correct me if I’m mistaken.
Since Ubuntu Lucid (10.04) the image postinst no longer runs the initramfs creation commands. Instead, there are example scripts provided that will perform the task. These scripts will work for official kernel images as well. For example:
Note: I couldn’t get the above scripts to help in generating an initrd for the kernel — and so the built kernel couldn’t boot; the only thing that worked for me was the recommendation in http://www.debian-administration.org/article/How_Do_I_Make_an_initrd_image, «use initramfs command. It is real solution.»; what I used (after the custom-built kernel’s *.deb’s were installed), was:
Note (Michael): that is because you need to include the right package scripts to build the initrd at package install time. The make-kpkg option is --overlay-dir. By default, make-kpkg uses /usr/share/kernel-package as an overlay directory, which contains the default, uncustomised scripts for a Debian distribution, and not the ones needed for building a Ubuntu kernel.
First copy the default overlay directory to your home directory:
Then install the source of the kernel you are using currently, using the exact package name, e.g.
which will unpack the sources to $HOME/linux-2.6.32. Now copy the control scripts into your new overlay:
And now you can execute make-kpkg with the additional command line option --overlay-dir=$HOME/kernel-package.
Rebuilding »linux-restricted-modules»
The linux-restricted-modules (l-r-m) package contains a number of non-DFSG-free drivers (as well as some firmware and the ipw3945 wireless networking daemon) which, in a perfect world, wouldn’t have to be packaged separately, but which unfortunately are not available under a GPL-compatible license. If you use any of the hardware supported by the l-r-m package, you will likely find that your system does not work as well after switching to a custom kernel. In this case you should try to compile the l-r-m package.
See CustomRestrictedModules on how to rebuild l-r-m (if you use nVidia or ATI binary drivers, you do).
Note: you will need around 8 hours of compilation time and around 10 Gb of hard drive space to compile all kernel flavours and restricted modules.
Further note: There are no l-r-m or linux-restricted-modules packages in Lucid.
Источник


