- How to Install Linux Mint
- Get your new OS going on Windows or Mac
- Straight Installation vs. Dual Booting
- Download a Linux Mint Installer
- Write Linux Mint to a Bootable USB Drive
- The Linux Mint Live Desktop
- Installing Linux Mint
- Установка Linux на Mac
- Шаг 1. Подготовка установочной USB-флешки
- Шаг 2. Раздел диска.
- Шаг 3. Установка Linux Ubuntu
How to Install Linux Mint
Get your new OS going on Windows or Mac
:max_bytes(150000):strip_icc()/acp_casual_headshot-5b59662146e0fb002561f951.jpg)
:max_bytes(150000):strip_icc()/image-5e6611aebe974bb7886a24b5070c834f.jpg)
Installing Linux Mint on your PC or Mac opens up a whole range of new open-source software and capabilities. It involves some initial preparation, but in the end, you’ll find it worth the investment.
The main steps to install Linux Mint on your PC or Mac are as follows:
- Prepare an installer. This is typically a USB drive, although you can also burn it to an optical disc if you’re old school. Note however that most Linux installers these days are larger than a CD-ROM (700 MB), so you’ll need a DVD-R/RW or a thumb drive of the appropriate size. Linux Mint’s installer is nearly 2 GB, so plan ahead.
- Next, boot from the media (USB drive or optical disc) you just created. You may need to adjust your machine’s settings related to boot order, as well as UEFI (more on these later).
- Finally, run the installer once the USB drive boots, and you arrive on a live Mint desktop (but feel free to have a look around first).
:max_bytes(150000):strip_icc()/GettyImages-929810908-363f00e34c214f43a370f6732cb577d1.jpg)
Straight Installation vs. Dual Booting
While there are some computers that come with Linux Mint pre-installed, it’s much more likely you’ll be installing it onto a machine that already has an operating system. There are two approaches you could take: either install it over your existing OS, effectively deleting it, or install it alongside the original OS. Each comes with its own pros and cons.
You should take some time deciding whether or not to install more than one OS on your computer. Some considerations include the following:
- Straight Installation: Before you install Linux Mint over your existing OS, make sure you’ve identified alternatives for all the applications you need. You’ll have no problem finding apps like browsers, office suites, or media players. But if you need a very specific program, you’ll need to run the other OS in a virtual machine. Your computer should have a good deal of RAM (at least 8 GB) to support these two running at once.
- Dual-Booting: Dual-booting is having two OSes installed on the same computer, but only using one of them at a time. This approach sacrifices flexibility; in order to use the apps of one OS, you’ll need to shut down the other. Also, dual-booting requires splitting your hard drive into partitions, effectively cutting off a section of its storage off from each OS.
In this article, we assume you’ll want to use Linux Mint as the only operating system on your computer. If you want to keep another OS in addition to Mint and dual boot, refer to our guides for setting this up on a Mac or a Windows PC. Once you’ve decided on your approach, we can put the installer together.
Download a Linux Mint Installer
:max_bytes(150000):strip_icc()/001-how-to-install-linux-mint-d6b352e467aa4f75a9a1cc54a9b74ed0.jpg)
The most convenient way to prepare an installer for Linux Mint is to download an image and write it to a USB thumb drive. Thumb drives are cheap, and make excellent portable toolkits once your Linux Mint install is done.
Your first step will be to download an install image from the Linux Mint website. There are three different versions of Linux Mint. Although they are all based on the same software core, they each offer a different desktop environment installed by default:
- Cinnamon is a fork of the GNOME Desktop (we compared the Ubuntu Unity desktop and GNOME previously). The Linux Mint developers started once GNOME 3 took a different approach to desktop layout.
- The philosophy of the MATE desktop is similar, although these developers decided to use version 2 of the GNOME desktop as their base.
- XFCE has long been the desktop of choice for older, lower-powered hardware.
A few criteria to consider as you make your decision include the following:
- Layout conventions: All three of these desktops use a familiar layout, which includes an application launcher, taskbar, and system tray. Each also supports desktop icons. But their arrangement is slightly different among them, so check them out and see which one you like best.
- Default Applications: Desktop environments are called such because they aren’t just the background surface that holds your icons. They include utilities like file managers and text editors as well. Check out each option and see if there’s a «must-have» among the apps they provide.
- Aesthetics: The desktop environment represents the look-and-feel through which you’ll interact with your computer. If it’s functional but ugly, the result will be a less-than-ideal experience. Choose a desktop environment you like, keeping in mind that you can install alternate themes.
Once you’ve selected a version, download its ISO file from the Linux Mint site, selecting the 32- or 64-bit version depending on your machine’s processor. Don’t know which one you have? If you’re on a reasonably modern Mac, it will be 64-bit. For Windows, if you’re unsure follow this guide to confirm which of these you’ll need.
Write Linux Mint to a Bootable USB Drive
:max_bytes(150000):strip_icc()/003-how-to-install-linux-mint-d45006c024ac4d72a341b69bc0c215a8.jpg)
Once you have a copy of Linux Mint, you’ll need to write it to a USB drive. This process isn’t as simple as copying the ISO file to the thumb drive. It will basically set the thumb drive up as a bootable hard disk, so your computer can run the operating system from it.
One popular option is the Win32 Disc Imager. We’ve covered this in the past, so you can simply follow these steps to make a bootable Linux Mint thumb drive! Once complete you’ll have an install drive that will boot on PCs protected by the Unified Extensible Firmware Interface (UEFI), which most modern machines use by default. The write process is as easy as selecting the ISO file you downloaded in the Image File field and selecting the drive letter for your USB drive in the Drive drop-down.
:max_bytes(150000):strip_icc()/how-to-install-linux-mint-4173111-15-5b63ddc4c9e77c005065e4cb.jpg)
On macOS, the Etcher,io provides a similarly easy way to burn an image. With just three button presses you select your image, the USB drive, and start the write process.
With the completed installer in hand, it’s time for you to close all those apps and reboot into Linux land.
The Linux Mint Live Desktop
:max_bytes(150000):strip_icc()/004-how-to-install-linux-mint-09141056b1c24406ba86cf5dce92e30f.jpg)
The drive you prepared will boot into a «live» desktop environment. Here, you can try out all the software and features that Linux Mint has to offer. Two things to keep in mind when running a live desktop:
- Firstly, the changes you make (like creating documents) won’t be saved. The next time you use the drive, it will be reset to its original state.
- Also, running an OS from a USB drive is slower than from a hard drive, so don’t judge Linux Mint’s performance based on this experience.
When you’re ready to take the plunge, double-click on the Install Linux Mint icon on the desktop to kick off the process.
Installing Linux Mint
The installer wizard will set up Linux Mint on your machine in just a few steps.
The first step is to select your language – this is the language that the installed OS will use. You can, of course, change this later.
:max_bytes(150000):strip_icc()/005-how-to-install-linux-mint-f609d4a1f6e84dd0ad78803b6dd565c8.jpg)
Next, select your keyboard type. You can use the text box below to ensure keys are registering correctly.
:max_bytes(150000):strip_icc()/006-how-to-install-linux-mint-0164aaac3e954514a5a88919dae8645c.jpg)
The following screen will ask if you want to install proprietary software. You’ll most likely want to select this so you can play different types of media files (like MP3 files).
:max_bytes(150000):strip_icc()/007-how-to-install-linux-mint-6bcf66fd66b241eb9c6b5e9d836baebd.jpg)
The installer will provide you with a couple of options for where it will install Mint. Select Erase disk and install Linux Mint to use your entire hard drive, but be aware that it will then permanently delete everything on that drive. So again, make sure you have all your important data backed up. You can also choose to encrypt your whole OS on this screen or use the Logical Volume Manager (a Linux system for efficiently managing data on the hard drive). Both are safe to either enable or leave disabled, but keep in mind if you encrypt your OS you may experience a minor performance hit.
:max_bytes(150000):strip_icc()/008-how-to-install-linux-mint-44dba16d515f4e43b412587c449d2473.jpg)
If you have another OS (e.g. macOS) on the drive that you want to keep, you’ll need to select the last option, Something else. This will allow you to manually select where Mint will install from among your hard drive’s partitions. Re-visit the guides for dual booting on a Mac or a Windows PC for instructions on which partition you should choose.
At this point, the wizard will ask you a couple more questions while the install starts. First is your timezone, which the installer will probably guess correctly based on your location.
:max_bytes(150000):strip_icc()/009-how-to-install-linux-mint-ca4853906cd240ff95a801fa047b66d9.jpg)
Finally, you’ll be prompted to enter your full name, a user name, a computer name (how it shows up on the local network), and a password. You’ll also have the option to encrypt your personal folder, which you should do if you didn’t encrypt the OS as a whole.
:max_bytes(150000):strip_icc()/010-how-to-install-linux-mint-b7468be194a5465bab2bddb3cbd5b007.jpg)
You can finally relax now while the install finishes. The installer will show you some slides describing features of Linux Mint while things wrap up.
:max_bytes(150000):strip_icc()/how-to-install-linux-mint-4173111-10-5b63b2d846e0fb0025afdba6.jpg)
Once complete, you’ll be prompted to reboot your PC. Press Restart Now, and remove the USB drive with the installer.
:max_bytes(150000):strip_icc()/011-how-to-install-linux-mint-18d3e2ab1b6d43ec8c4a03288a227da7.jpg)
After the restart, you’ll land on a screen where you can log in with the username and password you created earlier.
:max_bytes(150000):strip_icc()/how-to-install-linux-mint-4173111-14-5b63be644cedfd0050c3dd08.jpg)
Congratulations, your Linux Mint desktop is now ready to enjoy!
Источник
Установка Linux на Mac
Давно забыли о Windows? Опостылела OS X? Пришло время задуматься о Linux.
Среди пользователей персональных компьютеров есть категория людей, которые находятся в постоянных поисках лучшего программного обеспечения, более совершенной экосистемы и альтернативной ОС, которая бы сумела удовлетворить их специфические запросы. Сегодняшняя инструкция посвящена установке операционной системы, которая более 30 лет держится особняком. Одни считают ее слишком сложной для понимания, другие со странным именем Linux знакомятся впервые. Но есть и те, кто считает Linux одной из самых безопасных, кастомизируемых и удобных систем в мире. Что ж, вперед за установку!
Шаг 1. Подготовка установочной USB-флешки
Одним из самых важных этапов при установке Linux является подготовка установочной флешки. Несмотря на наличие специализированных утилит, позволяющих создать загрузочный USB-накопитель из графической оболочки, наиболее верным является монтирование образа посредством командной строки и приложения Терминал в OS X.
Первое, что необходимо сделать – загрузить установочный образ Linux с официального сайта. В качестве примера рассмотрим установку дружественной и популярной версии Linux Ubuntu.
1. Откройте страницу загрузки Ubuntu и выберите 64-битную версию ОС (32-битная для Mac попросту не подойдет). Нажмите Download и на следующей страницу выберите пункт Not now, take me to the download.
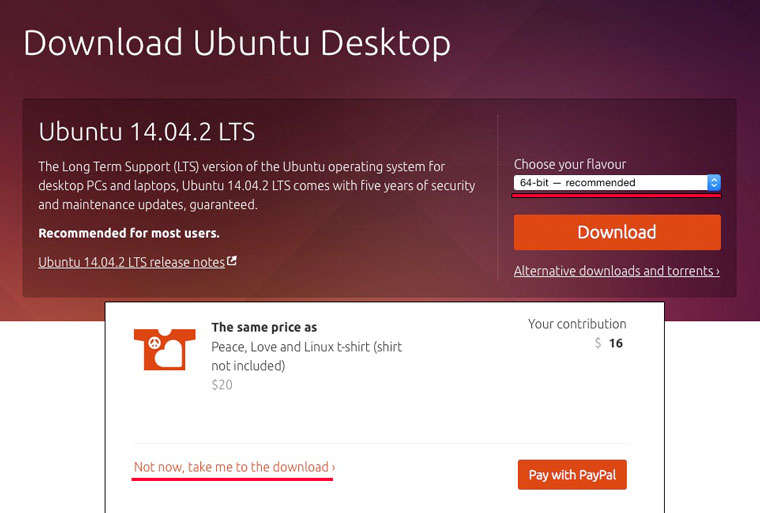
Дистрибутив Ubuntu распространяется абсолютно бесплатно и, таким образом, вы отказываетесь от финансовой поддержки разработчиков, но если вы все же хотите выразить слова благодарности – перетяните соответствующие «долларовые» ползунки на требуемое значение и оплатите результирующую сумму с помощью платежной системы PayPal.
Дождитесь окончания загрузки дистрибутива.
2. Подключите USB-флешку. Для монтирования загрузочного образа подойдет накопитель, размер которого будет не менее 2 ГБ. Все данные, которые в настоящий момент находятся на флешке, будут безвозвратно стерты.
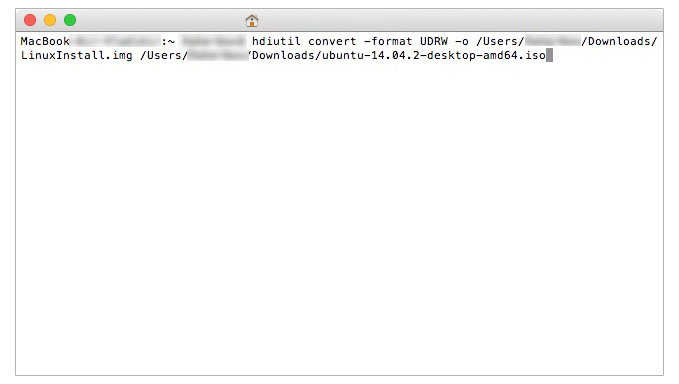
3. Откройте утилиту Терминал. Наша задача – конвертировать скачанный образ ISO в общепринятый в среде Mac IMG/DMG. Для этого нам потребуется запустить выполнение несложной команды.
hdiutil convert -format UDRW -o
По умолчанию все загрузки в среде Mac попадают в папку Загрузки. Для того, чтобы указать путь к скачанному образу наберите в Терминале первую часть команды: hdutil convert -format UDRW -o. Затем перетяните скачанный файл с образом (он имеет расширение ISO) на окно терминала. Автоматически вставится правильный адрес к исходному файлу. Имя файла ubuntu-14.04.2-desktop-amd64.iso можно изменить на любое, скажем, LinuxInstall, но с ОБЯЗАТЕЛЬНЫМ изменением расширения ISO на IMG. Поставьте пробел и вновь перетяните скачанный образ в окно терминала. На этот раз никаких изменений вносить не нужно. Так выглядит введенная команда:
Будьте внимательны: сначала следует указать имя и место размещения директории с получаемым в процессе конвертации образом, а после – с файлом исходником (скачанным дистрибутивом). После ввода команды нажимаем ENTER и ждем пока окончится процесс конвертации.
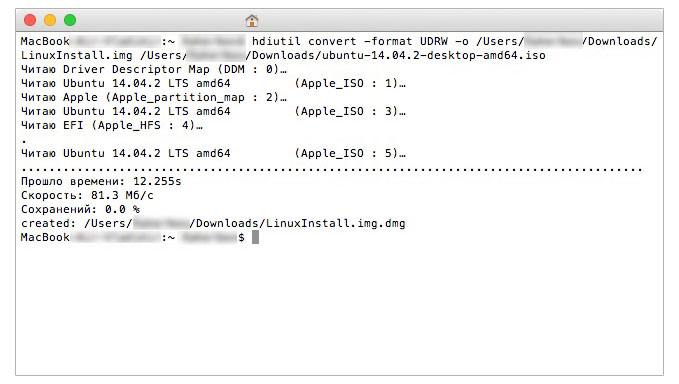
Если после выполнения команды вы увидели строку created с адресом файла в формате DMG – все прошло успешно и можно переходить к следующему этапу.
4. Разворачиваем установочный образ на флешку. После выполнения вышеуказанной команды в папке Загрузки появился новый файл LinuxInstall.img.dmg. Наша задача – развернуть его на флешку. Убедитесь, что USB-накопитель подключен к Mac и в Терминале введите следующую команду:
diskutil list
Результат выполнения команды:
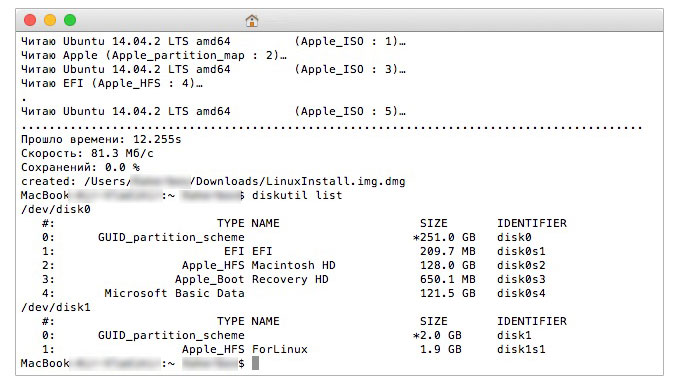
Перед нами открылась картина всех подключенных логических дисков системы. Наша USB-флешка числится под идентификатором disk1 (размер 2 ГБ). Отключим ее с помощью следующей команды:
diskutil unmountDisk /dev/disk1
Disk1 – частный случай и в команде прописывайте имя, под которым флешка значится в вашей системе. После извлечение накопителя приступим к записи конвертированного образа:
sudo dd if=/path/to/downloaded.img of=/dev/rdisk1 bs=1m
Как и в пункте 3 для более быстрого указания директории введите фрагмент команды sudo dd if= после чего перетяните новый образ (с расширением DMG) на окно терминала. Закончите ввод команды. Помните, что rdisk1 может иметь другой порядковый номер и имя, и зависит от конкретно вашей системы. Нажмите ENTER и введите пароль администратора.
В течение последующих нескольких минут в окне терминала не будет происходить никаких процессов. Не спешите закрывать утилиту и беспокоиться о подвисании процесса. Разворачивание образа происходит «в тихом режиме». Дождитесь окончания процесса. Сигналом об окончании разворачивания образа станет сообщение:
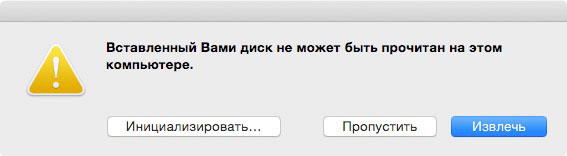
Нажмите Извелчь, но саму флешку из порта не доставайте. Загрузочный накопитель готов.
Шаг 2. Раздел диска.
Для установки операционной системы Linux по-соседству с OS X потребуется создать дополнительный логический раздел диска. Сделать это можно с помощью Дисковой утилиты, являющейся штатным приложением OS X.
Запустите Дисковую утилиту. Подсветите ваш основной винчестер (именно винчестер, не раздел) и откройте вкладку Раздел диска.
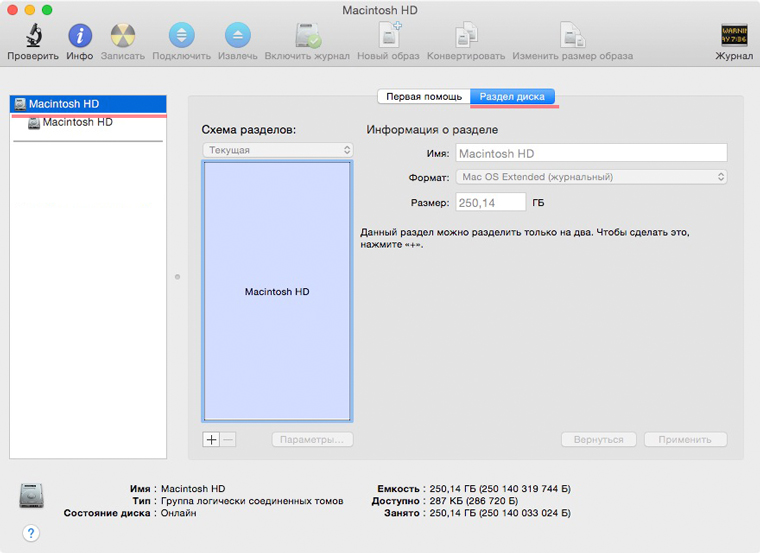
Нажите на знак «+» и установите желаемый размер раздела (для нормальной работы Linux достаточно 10 ГБ; рекомендуем объем – 20 ГБ). Нажмите Применить и дождитесь окончания процесса.
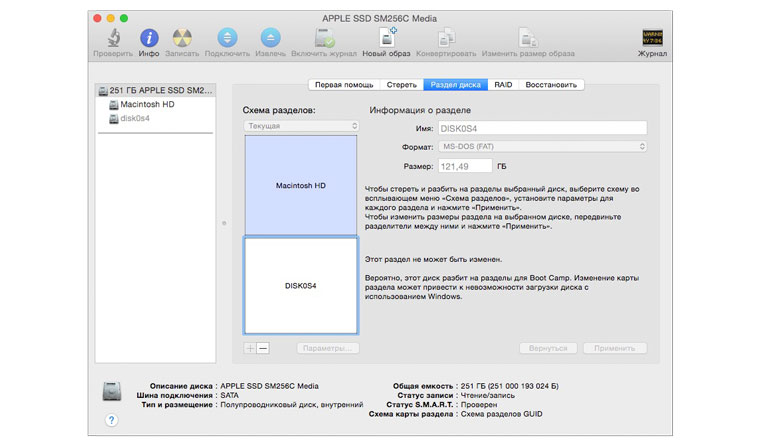
Примечание: Если по какой-либо причине схема разделения недоступна (знак «+/-» серым цветом и не реагирует на нажатия), добавить новый раздел можно из загрузочного меню Mac. Перезагрузите компьютер и сразу после того, как экран загорится белым зажмите клавиши Command + R. Удерживайте до появления системного меню Mac, а затем откройте Дисковую утилиту. Процесс разделения полностью аналогичен с описанным выше.
После разделения диска ОБЯЗАТЕЛЬНО запомните точный размер отделенной логической области в гигабайтах. Перезагружаем компьютер.
Шаг 3. Установка Linux Ubuntu
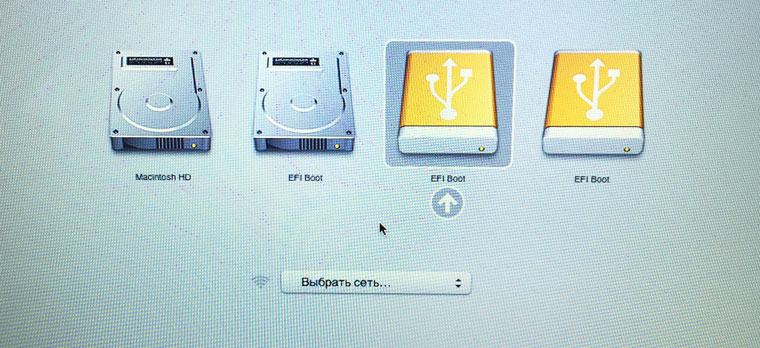
Сразу после того, как началась перезагрузка, зажмите клавишу ALT и дождитесь появления меню с выбором логических дисков, с которых следует произвести установку. Выберите съемный накопитель EFI (первый) и нажмите Enter.
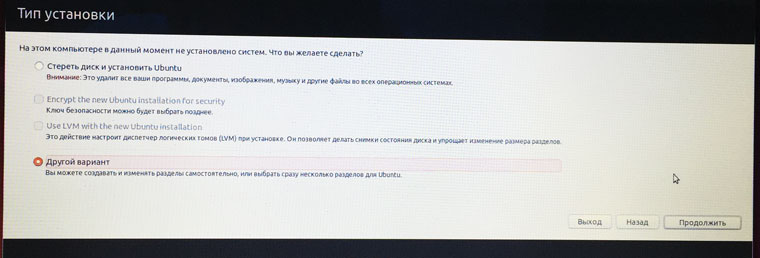
В появившемся установочном меню операционной системы Ubuntu выберите: Установить Ububntu. Начнется подготовительный процесс установки. После выбора требуемого языка и подключения к сети Wi-Fi установщик спросит как именно мы планируем устанавливать систему.
Внимание! Будьте осторожны!Если вы хотите сохранить работоспособность OS X и Linux выбирайте пункт Другой Вариант (выбор пункта Стереть диск и установить Ubuntu приведет к полному форматированию всей структуры диска и удалению ранее созданных разделов, включая раздел с системой OS X).
В открывшемся меню найдите созданный под Linux раздел диска (поможет знание его размера).
Дважды щелкните по требуемому разделу и установите следующие параметры:
- – файловая система Ext2;
– точка монтирования: /;
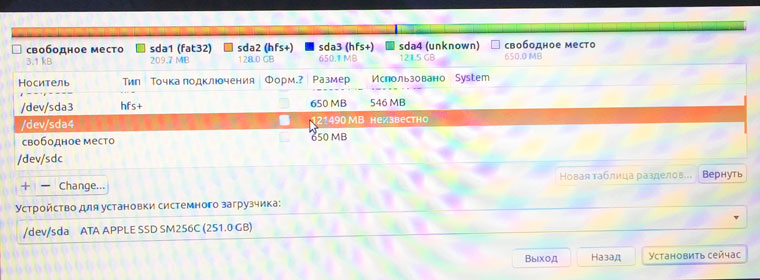
Нажмите ОК и Установить сейчас. Сообщение об отсутствии файла-подкачки проигнорируйте, нажав Продолжить. Начнется установка операционной системы Linux. Возможно однократная перезагрузка Mac. После завершения установки пользователю будет предложено указать имя учетной записи и придумать пароль. Сам процесс инсталяции занимает от 5 до 15 минут.
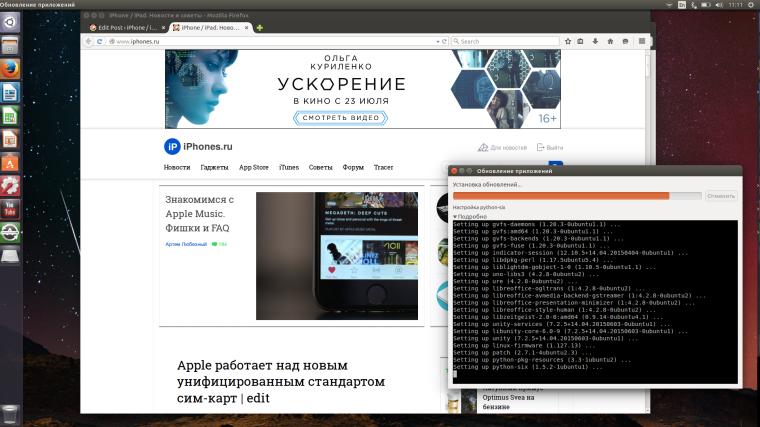
Установка завершена. При включении Mac по умолчанию теперь будет загружаться Linux Ubuntu. Изменить приоритетную систему можно в OS X, перейдя в Настройки – Загрузочный том и подсветив раздел, загрузка которого должна осуществляться в первую очередь.
Источник


