- Upgrading and installation
- Overview
- Upgrading
- Version numbering
- Standard upgrade
- Manual upgrade
- Manual upgrade process
- Using Winbox
- Using FTP
- RouterOS mass upgrade
- RouterOS auto-upgrade
- The Dude auto-upgrade
- The Dude hierarchical upgrade
- License issues
- Suggestions
- Netinstall
- User Interface
- CD Install
- RouterOS Package Types
- List of packages
- Working with packages
- Mikrotik и Linux. Рутина и автоматизация
- Примечание
Upgrading and installation
Do not unplug power while router is being upgraded.
Overview
MikroTik devices are preinstalled with RouterOS, so installation is usually not needed, except in the case where installing RouterOS on an x86 PC. The upgrade procedure on already installed devices is straight forward.
Upgrading
Version numbering
RouterOS versions are numbered sequentially when a period is used to separate sequences, it does not represent a decimal point, and the sequences do not have positional significance. An identifier of 2.5, for instance, is not «two and a half» or «half way to version three», it is the fifth second-level revision of the second first-level revision. Therefore v5.2 is older than v5.18, which is newer.
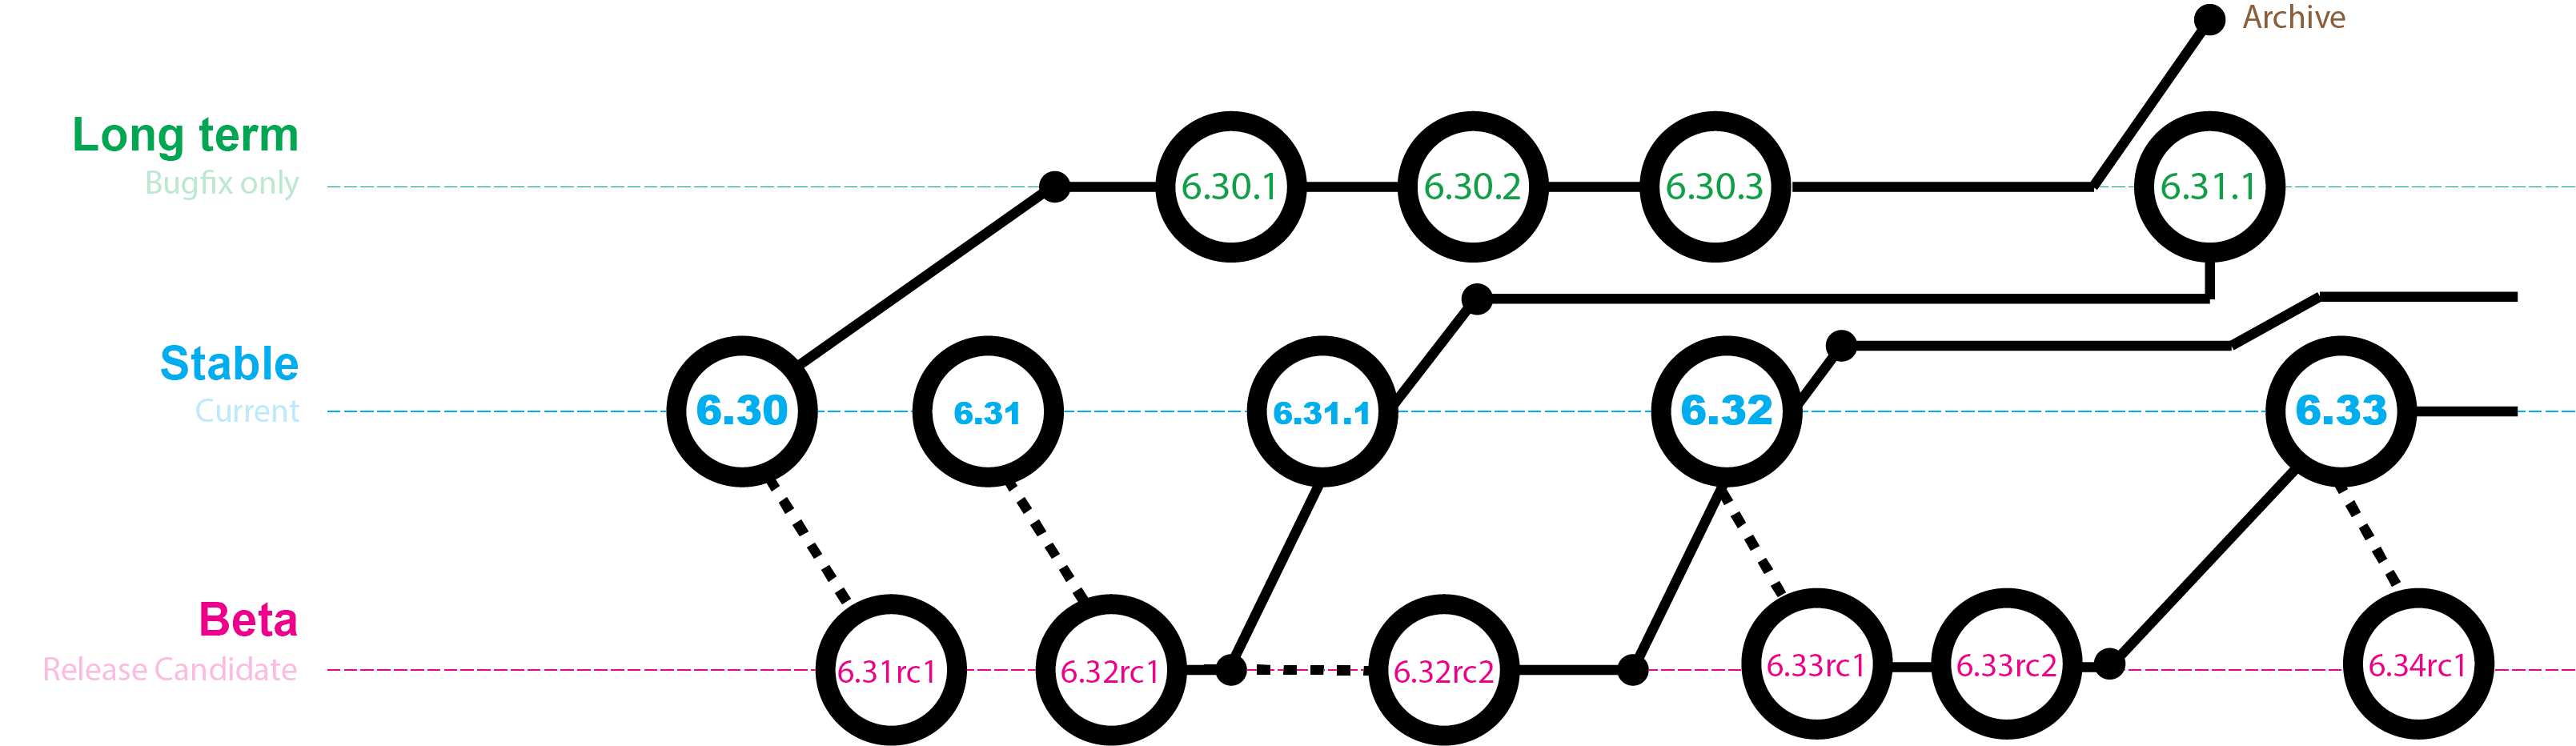
RouterOS versions are released in several «release chains»: Long-term, Stable and Beta. When upgrading RouterOS, you can choose a release chain from which to install the new packages.
- Long term: Released rarely, and includes only the most important fixes, upgrades within one number branch not add new features. When a Stable release has been out for a while and seems to be stable enough, it gets promoted into the Long Term branch, replacing an older release, which is then moved to Archive. This consecutively adds new features.
- Stable: Released every few weeks, includes all tested features and fixes
- Testing: Released every few days, only undergoes basic internal testing, should not be used in production
Standard upgrade
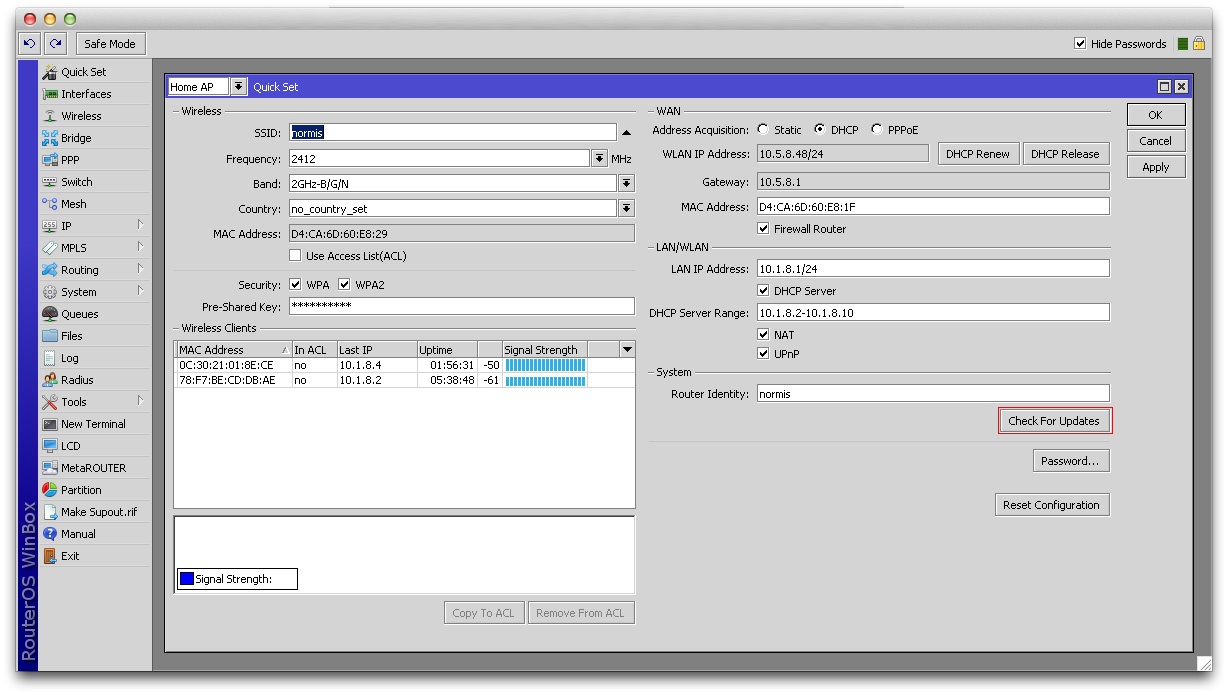
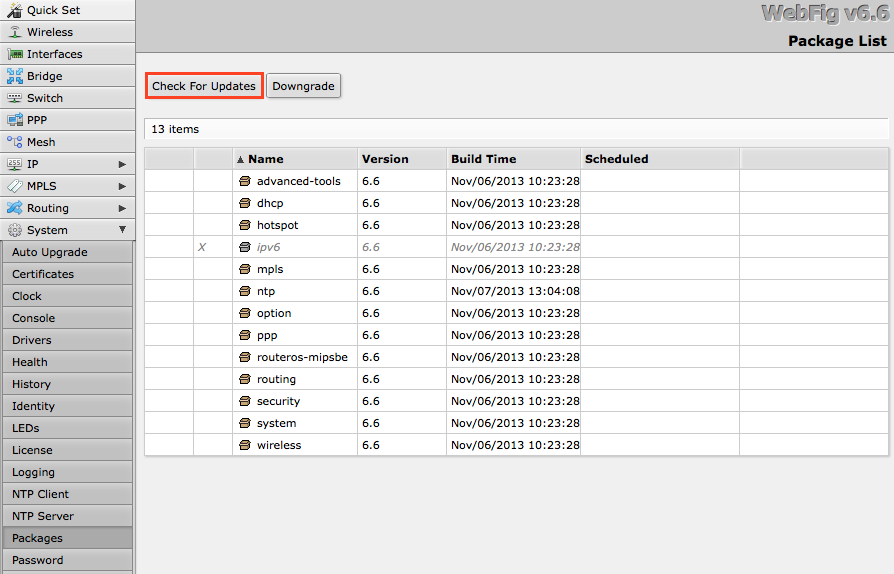
The package upgrade feature connects to the MikroTik download servers and checks if there is a new RouterOS version for your device.
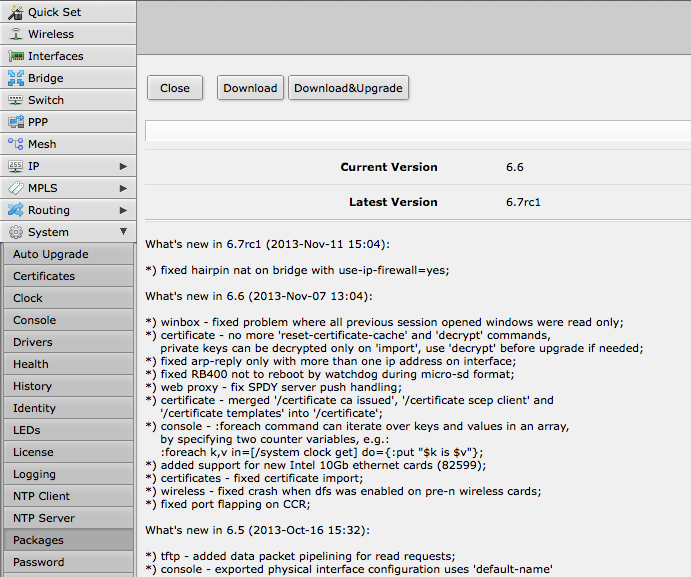
After clicking the Upgrade button in QuickSet or in Packages menu upgrade window will open with current Changelog (if newer version exists) and buttons to download and install latest versions.
By clicking «Download & Upgrade», downloads will start and after successful download will reboot to install downloaded packages. Even if custom packages are installed, downloader will take that into account and download all necessary packages.
Manual upgrade
You can upgrade RouterOS in the following ways:
- Winbox – drag and drop files to the Files menu
- WebFig — upload files from Files menu
- FTP — upload files to root directory
- The Dude – See manual here
RouterOS cannot be upgraded through a serial cable. Only RouterBOOT is upgradeable using this method.
Manual upgrade process
- First step — visit www.mikrotik.com and head to the download page, there choose the type of system you have the RouterOS installed on.
- Download the Combined package, it will include all the functionality of RouterOS:
Using Winbox
Choose your system type, and download the upgrade package. Connect to your router with Winbox, Select the downloaded file with your mouse, and drag it to the Files menu. If there are some files already present, make sure to put the package in the root menu, not inside the hotspot folder! The upload will start.
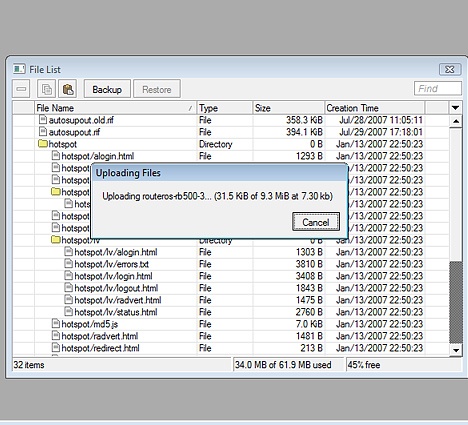
After it finishes — reboot the device. The New version number will be seen in the Winbox Title and in the Packages menu
Using FTP
- Open your favourite FTP program (in this case it is Filezilla), select the package and upload it to your router (demo2.mt.lv is the address of my router in this example). note that in the image I’m uploading many packages, but in your case — you will have one file that contains them all
- if you wish, you can check if the file is successfully transferred onto the router (optional):
- reboot your router for the upgrade process to begin:
- after the reboot, your router will be up to date, you can check it in this menu:
- if your router did not upgrade correctly, make sure you check the log
RouterOS mass upgrade
You can upgrade multiple MikroTik routers within few clicks. Let’s have a look on simple network with 3 routers (the same method works on networks with infinite numbers of routers),
RouterOS auto-upgrade
Sub-menu: /system package update
RouterOS version 6 has new auto upgrade option. RouterOS checks amazon servers for information if new version is available and upgrades after upgrade command is executed. You can automate the upgrade process by running a script in the scheduler:
RouterOS can download software packages from a remote MikroTik router.
- Make one router as a network upgrade central point, that will update MikroTik RouterOS on other routers.
- Upload necessary RouterOS packages to this router (in the example, mipsbe for RB751U and PowerPC for RB1100AHx2).
- Add upgrade router (192.168.100.1) information to a router that you want to update (192.168.100.253), required settings IP address/Username/Password
- Click on refresh to see available packages, download the newest packages and reboot the router to finalize the upgrade.
The Dude auto-upgrade
Dude application can help you to upgrade the entire RouterOS network with one click per router.
- Set type RouterOS and correct password for any device on your Dude map, that you want to upgrade automatically,
- Upload required RouterOS packages to Dude files
- Upgrade RouterOS version on devices from RouterOS list. Upgrade process is automatic, after a click on upgrade (or force upgrade), the package will be uploaded and the router will be rebooted by the Dude automatically.
The Dude hierarchical upgrade
For complicated networks, when routers are connected sequentially, the simplest example is 1router-2router-3router connection. You might get an issue, 2router will go to reboot before packages are uploaded to the 3router. The solution is Dude groups, the feature allows to group routers and upgrade all of them by one click!
- Select group and click Upgrade (or Force Upgrade),
License issues
When upgrading from older versions, there could be issues with your license key. Possible scenarios:
- When upgrading from RouterOS v2.8 or older, the system might complain about expired upgrade time. To override this, use Netinstall to upgrade. Netinstall will ignore old license restriction and will upgrade
- When upgrading to RouterOS v4 or newer, the system will ask you to update license to a new format. To do this, ensure your Winbox PC (not the router) has a working internet connection without any restrictions to reach www.mikrotik.com and click «update license» in the license menu.
Suggestions
When using a RouterBOARD device, it is always suggested to upgrade it’s RouterBOOT bootloader after RouterOS is upgraded. To do this, issue the command «/system routerboard upgrade«
Netinstall
NetInstall is the most commonly used installation tool. It runs on Windows machines or Linux with Wine ( superuser permissions are required).
You can download NetInstall on the www.mikrotik.com download section.
NetInstall is also used to re-install RouterOS in cases where the previous install failed, became damaged or access passwords were lost.
Your device must support booting from ethernet, and there must be a direct ethernet link from the NetInstall computer to the target device. All RouterBOARDs support PXE network booting, it must be either enabled inside RouterOS «routerboard» menu if RouterOS is operable or in the bootloader settings. For this you will need a serial cable.
Note: For RouterBOARD devices with no serial port, and no RouterOS access, the reset button can also start PXE booting mode. See your RouterBOARD manual PDF for details.
NetInstall can also directly install RouterOS on a disk (USB/CF/IDE/SATA) that is connected to the Netinstall Windows machine. After installation just move the disk to the Router machine and boot from it.
User Interface
The following options are available in the NetInstall window:
- Routers/Drives — list of PC drives and PXE booted routers. Select from the list on which drive or router you want to install RouterOS.
- Make floppy — used to create a bootable 1.44″ floppy disk for PCs that don’t have Etherboot support.
- Net booting — used to enable PXE booting over the network.
- Install/Cancel — after selecting the router and selecting the RouterOS packages below, use this to start install.
- SoftID — the SoftID that was generated on the router. Use this to purchase your key.
- Key / Browse — apply the purchased key here, or leave blank to install a 24h trial.
- Get key — get the key from your mikrotik.com account directly.
- Flashfig — launch Flashfig — the mass config utility which works on brand new devices.
- Keep old configuration — keeps the configuration that was on the router, just reinstalls software (no reset).
- IP address / Netmask — enter an IP address and netmask in CIDR notation to preconfigure in the router.
- Gateway — default gateway to preconfigure in the router.
- Baud rate — default serial port baud-rate to preconfigure in the router.
- Configure script File — a file that contains RouterOS CLI commands that directly configure the router (e.g. commands produced by export command). Used to apply default configuration.
Attention! Do not try to install RouterOS on your system drive. Action will format your hard drive and wipe out your existing OS.
CD Install
RouterOS Package Types
RouterOS supports a lot of different features and since every installation requires a specific set of features supported it is possible to add or remove certain groups of features using the package system. As a result user is able to control what features are available and the size of the installation. Packages are provided only by MikroTik and no 3rd parties are allowed to make them.
List of packages
| Package | Description |
|---|---|
| advanced tools | Package contains advanced tools like netwatch, ip scan, wake on lan and others. |
| calea | Data gathering tool for specific use due to «Communications Assistance for Law Enforcement Act» in USA. |
| dhcp | Dynamic Host Control Protocol client and server. |
| gps | Global Positioning System devices support. |
| hotspot | |
| ipv6 | |
| mpls | Multi-protocol label switching support |
| multicast | Multicast PIM and IGMP proxy support |
| ntp | Network time protocol service |
| ppp | Enables all ppp type tunnel support (pppoe, sstp, pptp etc.) |
| routerboard | Allows to access and manage RouterBOARD specific settings. |
| routing | Dynamic routing protocols (OSPF, RIP, BGP) |
| security | Ipsec, SSH, secure winbox |
| system | RouterOS core package, enables basic routing, firewall, interface drivers etc. RouterOS cannot run without this package |
| ups | |
| user-manager | MikroTik’s RADIUS server |
| wireless | Enables wireless drivers |
| wireless-fp | Enables wireless 802.11ac support |
| isdn | |
| lcd | 3rd party LCD pannel support. |
| kvm | Enables KVM virtualization |
| routeros | Combined RouterOS package. Includes system, hotspot, wireless, ppp, security, mpls, advanced-tools, dhcp, routerboard, ipv6, routing. |
Working with packages
Actions for executed commands will be applied only on restart. Until then, user can freely schedule or revert set actions.
| Command | Description |
|---|---|
| disable | Schedule package to be disabled after next reboot. All features provided by package will not be accessible. |
| downgrade | During reboot process router will try to force installation of uploaded packages on the router. Will prompt for reboot. |
| Outputs information about installed packages (version, package state, planned state changes, build date etc.) | |
| enable | Schedule package to be enabled after next reboot. |
| uninstall | Schedule package to be removed from the router. |
| unschedule | Remove scheduled task. |
For example list of available packages
Notice that we have wireless-fp package disabled and mpls package scheduled for disable
Источник
Mikrotik и Linux. Рутина и автоматизация
Представлюсь, меня зовут Андрей.
Первоначальная задача стояла такая — создать сотни конфигов для Mikrotik, чтобы поднять на каждом ovpn с сертификатом, затем залить на сотни Mikrotik конфиги, а так же сертификаты и ключ.
Пароль от сертификата у каждого уникален. Создавать сотни конфигов руками бред, да и в друг завтра скажут сделать новые или захочется залить еще какие-то изменения на Mikrotik.
Чего я хотел добиться:
- создавать автоматически уйму скриптов;
- автоматически отправить их на нужное мне оборудования;
- быть уверенным в том, что они отработали без ошибок или узнать о том, что конфиг выполнился не корректно.
В RouterOS можно автоматически выполнять скрипты (ваш файл скрипта должен иметь вид- имя.auto.rsc). После того, как файл будет загружен с помощью FTP на маршрутизатор, он будет автоматически выполнен, как и с командой ‘/import’ (этот метод работает только с FTP).
Как только файл загружен, он автоматически выполняется. Информация об успешности выполнения команд записывается в имя.auto.log
AWK — C-подобный скриптовый язык построчного разбора и обработки входного потока (например, текстового файла) по заданным шаблонам (регулярным выражениям). Может использоваться в сценариях командной строки.
Expect — инструмент для автоматизации и тестирования в ОС Unix, написанный Don Libes как расширение к скрипт-языку Tcl, для интерактивных приложений таких, как telnet, ftp, passwd, fsck, rlogin, tip, ssh, и других.
Начнем с того, что я сделал 3 файла:
- Файл List.txt в него записал имя OVPN соединений (в моем случает название магазина) и пароль от ключа (разделял табуляцией);
- sh1.sh – Баш файл с командой построчного разбора по list.txt + конвейер;
- sh2.sh – Баш файл который с помощью Echo и переменных создает файл конфига и записывает в него наши настройки.
И так:
$1.crt и $1.key их создали заранее по тому же list.txt, из — за этого имя файла так же название магазина.
Создали сотню конфигов. Теперь надо их разослать, используя все тот же AWK и Expect+FTP.
Создаем 4 файла:
- Файл list2.txt – в нем мы храним данные Mikrotik IP| Логин | Пароль | Название магазина. Разделял табуляцией.
- newsh1.sh – Баш файл с командой построчного разбора по list2.txt + конвейер
- newsh2.sh – Отправляет наши пожелания по FTP используя Expect пакет, который отвечает на запросы консоли.
- $1.auto.rsc – файл конфиг в моем случае они были созданы от переменной $1, которая являлась названием магазина в предыдущем скрипте. Пример gamazin1.auto.rsc.
Примечание
Сначала мы отправили сертификаты с ключом, а потом только конфиг (если делать в обратной последовательности он начнет ругаться что нет таких сертификатов).
Конфиги и сертификаты разлетелись как горячие пирожки. Из — за названия .auto.rsc по FTP Mikrotik их автоматически прогнал в себе и применились наши настройки.
Мы хотим знать, что везде все супер используя конфигурацию выше меняем 1 строку.
Загрузили все файлики домой и прошлись по файлам сортировкой, где 0 байт размер файла у вас проблемы c Mikrotik. По имени файла можно узнать его IP по нашему файлику list2.txt. А в хорошем варианте открыв файл можно увидеть там “Script file loaded and executed successfully”.
Можно написать еще по этим файлам скрипты, но мне хватило сортировать файлы по весу.
Так же я еще один написал скрипт и после всех этих действий который закрывает FTP и наоборот открывает по SSH. Просто изменил FTP на SSH для того, чтобы…
Я пытался все сразу в 1 конфиг запихать, но file remove в конце команда не давала результата он не мог затереть файл, из которого получал эту команду. Были еще нюансы.
И в итоге… счастье! Можно управлять отдельными списками Mikrotik или всеми сразу, как душе угодно. Теперь, открывая FTP и закрывая можно отправлять команды и быть уверенным что они выполнились. Но мое мнение удобнее FTP, SSH не отвалился на пол пути так как вы будете уверены, что все прошло успешно, посмотрев в папке логи.
В данной статье я показал инструменты, а как использовать их можете придумать сами…
Все делал на Ubuntu 16.04.
Источник


