- Ubuntu Wiki
- Installation
- Setting up your Nexus 7
- What you will need
- Optional
- Ubuntu Nexus 7 Desktop Installer
- Unlocking the Nexus 7
- Installing Ubuntu 13.04 on Nexus 7
- Manually Installing Ubuntu 13.04 on Nexus 7
- First boot
- Having both Android and Ubuntu installed for dual boot
- Returning your Nexus 7 to Stock Android
- Troubleshooting the Install
- How To Install Latest Sonatype Nexus 3 on Linux
- Sonatype Nexus System Requirements
- Sonatype Nexus 3 on Linux ec2
- Running Nexus as a System Service
- Manage Nexus Service
- Sonatype Nexus not Starting [Troubleshooting]
- Установить Ubuntu на Nexus One
- Как установить и запустить графический интерфейс X11 на вашем телефоне Nexus One / Android!
- ИСПРАВЛЕНИЕ ОБНОВЛЕНИЯ BOOTUBUNTU
Ubuntu Wiki
Installation
Installing Ubuntu on the Nexus7
Get started here!
This project is no longer maintained. You might be interested in Ubuntu Touch though.
Setting up your Nexus 7
Please note as of 12/7/2012 we strongly urge users to re-flash to Raring 13.04
What you will need
- Nexus 7 Tablet (8GB, 16GB, or 32GB)
- Standard MicroUSB Cable (should come with the device)
- Ubuntu Nexus 7 Desktop Installer installed on your development system
- (Version 1.7 now supports 13.04)
- Ubuntu 12.04 LTS or Later
-
This is a developer preview image, not intended for general users.
Optional
Micro USB Host Cable (OTG Cable) — used for attaching keyboard, mouse, etc. Directions on how to get and use one of these are towards the bottom of the page at https://wiki.ubuntu.com/Nexus7/UsingTheDevice
Ubuntu Nexus 7 Desktop Installer
A simple graphical installer has been provided, and is available in a PPA. The installer has been updated to 1.7 to now support 13.04
Usage instructions for the installer are provided below.
Unlocking the Nexus 7
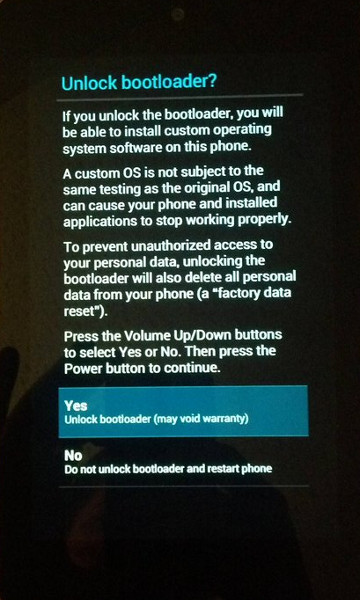
The Nexus 7 ships with a locked bootloader. You must unlock it in order to flash different images to the device. Fortunately, this is a trivial process, and you only need to do it once.
Warning: Unlocking the bootloader erases all data and resets the device to factory defaults.
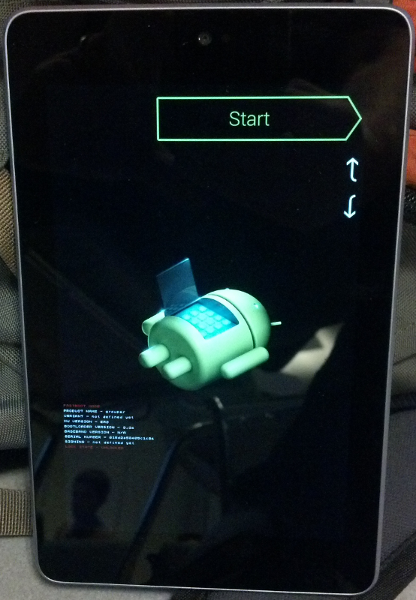
- Reboot the Android device into the Android boot loader. To do this, first power down the device in the normal fashion (hold down the power button, then select power off and wait a few seconds). From the off state, hold the volume down button and press the power button. Continue holding the volume down and power buttons until you see the boot loader UI.
- Plug in the device to your laptop with your micro-usb cable The device now displays the boot loader GUI, which looks like this:
Verify fastboot lists the device. In a terminal on your laptop, run:
Complete the process by rebooting:
Or simply press the power button.
When the device reboots back into the bootloader (fastboot mode), you should see «LOCK STATE — UNLOCKED» in small red print. At this point your device is now unlocked.
Installing Ubuntu 13.04 on Nexus 7
Once all setup has been completed, the installation can start. To install, ensure the Nexus 7 is in fastboot mode, plug it into your computer (and make sure NO OTHER DEVICES are plugged in).
Find the installer in the dash (search for ‘nexus’): 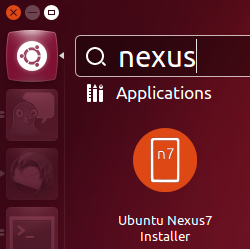
This will provide a Graphical Interface for installing Ubuntu. This tool will download the latest image automatically, and flash it accordingly. The flashing step should take about 2 minutes. Once the flashing is complete, the device will reboot and finish the installation. This step can take 10-15 minutes.
Manually Installing Ubuntu 13.04 on Nexus 7
The following instructions are for manually installing Ubuntu 13.04 on the Nexus 7. Please refer to the Known Issues Page prior to flashing.
Be sure to have the ubuntu-nexus7-installer package installed so that all of the necessary prerequistes are pulled on your system.
Download the two Raring daily build files (.bootimg & img.gz) from: http://cdimage.ubuntu.com/daily-preinstalled/current/
$sudo fastboot erase userdata
$sudo fastboot flash boot /path/to/*.bootimg*
$sudo fastboot flash userdata /path/to/unzipped/*.img
$sudo fastboot reboot
* The tablet will now reboot and boot into the Ubuntu installer.
First boot
During first boot, the initial configuration will begin. You will be prompted to connect your device to a local Wifi Network followed by the time zone, keyboard layout, user name & password, system name and some additional options. After all of these steps have been completed the user will be presented with the desktop.
Do not worry about a messed up desktop background during the configuration/installation, as soon as your final desktop gets started, you get a correct background.
In some cases the onscreen keyboard does not work. It displays but the characters typed do not appear in the input fields. To go on, connect a PC keyboard (USB wired or non-Bluetooth 2.4 GHz wireless with USB dongle) with an OTG adapter cable. After the installation the onscreen keyboard will work and you can also configure Bluetooth keyboards.
Having both Android and Ubuntu installed for dual boot
If you want to try Ubuntu but not lose your Android, you can use a dual-boot setup. There is a working solution for Ubuntu 13.04 on the XDA mobile developer forum. You need at least version 7 of MultiROM and the corresponding Recovery version. Also make sure that after installing the Ubuntu image that you go into the ROM list, click your new Ubuntu entry, and in the menu appearing then disable flash-kernel, otherwise Ubuntu updates would overwrite the boot sector. See also bug 1078391.
Returning your Nexus 7 to Stock Android
Warning: Disconnect ALL other mobile devices connected from your computer or they might get erased too. This will erase ALL DATA on your Nexus 7.
In case anything happens while developing, the system image for Nexus 7 can be found here: https://dl.google.com/dl/android/aosp/nakasi-jdq39-factory-c317339e.tgz
After downloading the above tarball, uncompress it with the following:
Then, place your machine into fastboot mode and run the resulting script:
You may get the following warnings, which you can ignore, the restoration will continue anyway.
Then you may lock the device again after another reboot into the fastboot mode:
Troubleshooting the Install
If you have problems installing the image, please use the following troubleshooting steps:
- Detach the USB cable, restart the tablet back into fastboot mode, and re-attach the USB cable.
- If problems persist, reboot your host PC.
- If you still have issues, try a different USB cable.
- If you have a 16G tablet, try using the 8G image.
- If you still have issues after doing all this, return the image to stock using the directions above and re-try.
If none of that works, ask a question on Ask Ubuntu using the mobile tag, or ask for help in the #ubuntu-arm channel on freenode. If you believe it’s a bug, file a bug against ubuntu-nexus7 in Launchpad.
Nexus7/Installation (последним исправлял пользователь e8hffff 2013-06-30 07:18:10)
Источник
How To Install Latest Sonatype Nexus 3 on Linux

Sonatype Nexus is one of the best open-source artifact management tools. It is some tool that you cannot avoid in your CI/CD pipeline. It effectively manages deployable artifacts.
Sonatype Nexus System Requirements
- Minimum 1 VCPU & 2 GB Memory
- Server firewall opened for port 22 & 8081
- OpenJDK 8
- All Nexus processes should run as a non-root nexus user.
Note: For production setup, please consider minimum production hardware requirements based on the nexus usage and data storage. Check out the official system requirements document for detailed information
Sonatype Nexus 3 on Linux ec2
This article guides you to install and configure Sonatype Nexus 3 in a secure way on an ec2 Linux System.
Note: This was tested on a Redhat machine and it will work on Centos or related Linux flavors as well.
Step 1: Login to your Linux server and update the yum packages. Also install required utilities.
Step 2: Install OpenJDK 1.8
Step 3: Create a directory named app and cd into the directory.
Step 4: Download the latest nexus. You can get the latest download links fo for nexus from here.
Untar the downloaded file.
Rename the untared file to nexus.
Step 5: As a good security practice, it is not advised to run nexus service with root privileges. So create a new user named nexus to run the nexus service.
Change the ownership of nexus files and nexus data directory to nexus user.
Step 6: Open /app/nexus/bin/nexus.rc file
Uncomment run_as_user parameter and set it as following.
Step 7: If you want to change the default nexus data directory, open the nexus properties file and change the data directory -Dkaraf.data parameter to a preferred location as shown below. If you don’t specify anything, by default nexus data directory will be set to /app/sonatype-work/nexus3
Tip: For production setup, it is is always better to mount the nexus data directory to a separate data disk attached to the server. So that backup and restore can be done easily.
An example configuration is shown below.
Running Nexus as a System Service
It is better to have systemd entry to manage nexus using systemctl . Follow the steps given below for adding nexus as a systemd service.
Create a nexus systemd unit file.
Add the following contents to the unit file.
Manage Nexus Service
Now we have all the configurations in place to run nexus.
Execute the following command to add nexus service to boot.
To start the Nexus service, use the following command. If you are having trouble starting nexus, please check the troubleshooting section below.
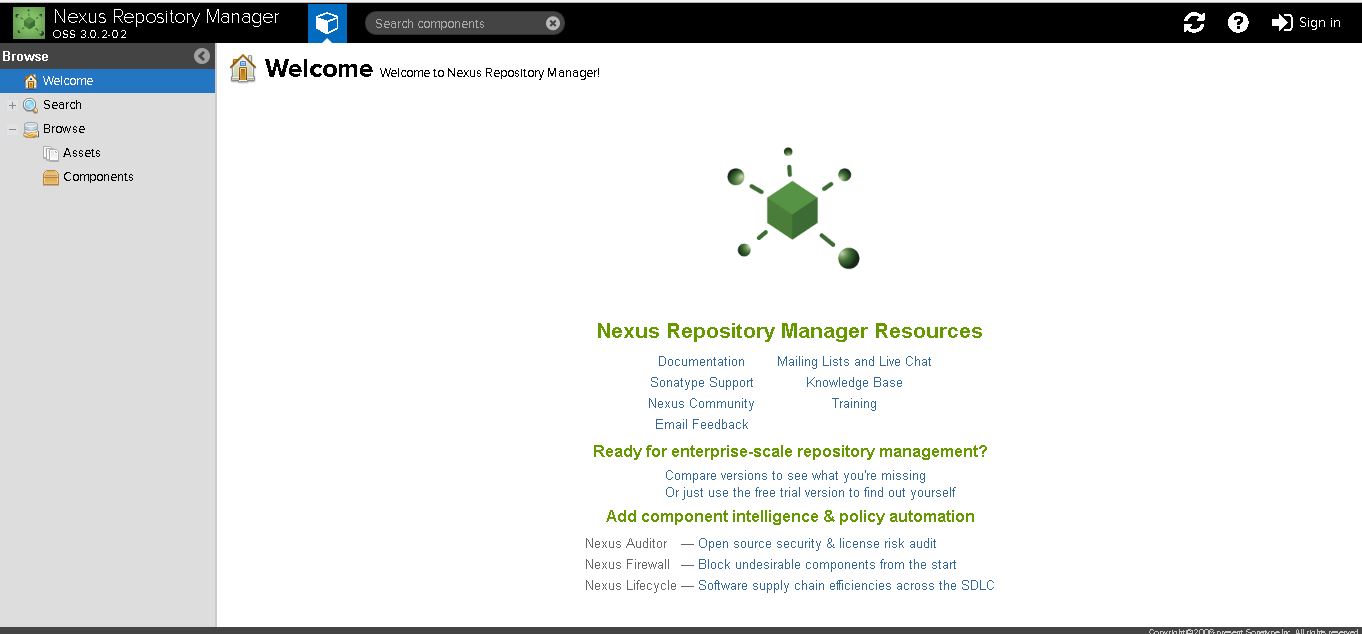
The above command will start the nexus service on port 8081 . To access the nexus dashboard, visit http://:8081. You will be able to see the nexus homepage as shown below.
To log in, use the default username and password.
Default username is admin
You can find the default admin password in / app/sonatype-work/nexus3/admin.password file. The path will be shown in the login screen as show below.
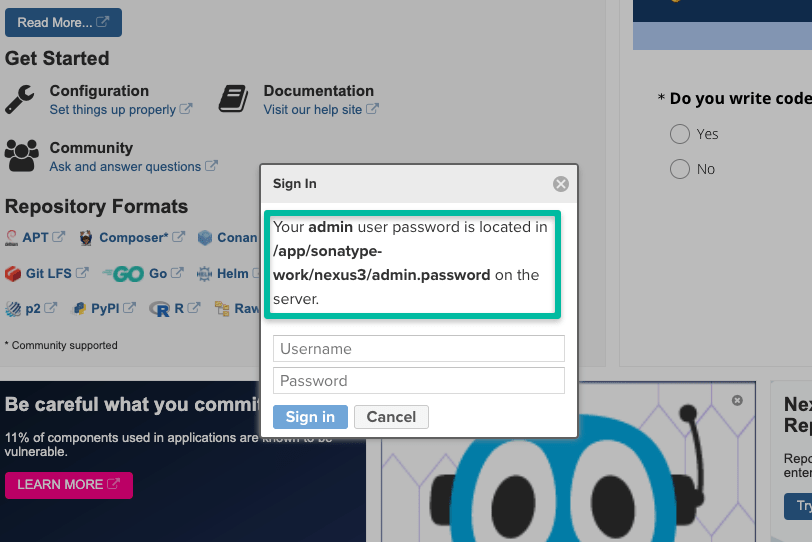
Once you login, you will be prompted to reset the password.
For stopping nexus, execute
For restarting nexus,
Sonatype Nexus not Starting [Troubleshooting]
Sometimes, if the server is enabled with SELINUX, you might get the following error. (Commonly on Centos Servers)
Execute the following command and see the actual error.
Check the output for the following SELINUX issue.
To rectify this issue, add a SELinux policy to allow Systemd to access the nexus binary in path /app/nexus/bin/nexus using the following command.
Источник
Установить Ubuntu на Nexus One
Если вы увлечены гаджетами и хотели сделать что-то впечатляющее со своим Nexus One, то теперь у вас есть возможность перенести Ubuntu на свой Nexus One. Да, вы правильно читаете! разработчики NexusOneHacks.net успешно перенесли Ubuntu на Nexus One, а также выпустили подробную процедуру переноса.
Вот полное пошаговое руководство по установке Ubuntu на Nexus One в соответствии с Взлом Nexus One.
Чтобы приступить к этой процедуре портирования, вам понадобится Nexus One с root-правами. Не пытайтесь выполнить эту процедуру, если у вас нет обширного опыта рутирования и взлома устройств Android.
Прежде всего, скачайте ubuntu.zip и разархивируйте его:
(Пожалуйста, не стесняйтесь отзеркаливать другие места, если хотите!)
1. Во-первых, вам понадобится телефон Nexus One / Android с рутированным доступом. Если у вас Nexus One, следуйте этим инструкциям и сначала рутируйте свой телефон!
ОБНОВЛЕНИЕ: Также вам необходимо установить последнюю версию Busybox, попробуйте это руководство здесь, чтобы установить Busybox.
2. Как только у вас будет «рутированный» телефон Android, вы сможете запускать Ubuntu под Chroot.
Что такое Chroot?
Я только что обнаружил об этом на днях, когда делал это, но Chroot с точки зрения непрофессионала — это в основном возможность запускать другие операционные системы под вашей текущей системой (в данном случае Android). Первоначально Chroot был разработан для тестирования новых операционных систем в виртуальной среде, но в этом случае будет отлично работать для нашего проекта, поскольку он позволит нам использовать Ubuntu в качестве «виртуальной» машины под системой Android. Да, просто подумайте об этом как о Sun Virtualbox или VMWare для Android и других Linux-систем.
Еще одно замечание: вы можете «вырезать» только другую операционную систему, созданную для архитектуры вашей системы. Например, большинство новых Android-смартфонов, включая Nexus One, HTC Evo 4G и Droid X, используют ЦП с архитектурой ARM, что означает, что вы можете использовать только системы / порты Linux на базе ARM.
В данном случае нам повезло, потому что в Ubuntu есть ARM-порт. Скорее всего, вы также можете «искоренить» другие устройства Linux, поддерживающие ARM. Я также работаю над удалением других популярных дистрибутивов, таких как Fedora, Gentoo и других.
3. Теперь вы понимаете, что такое Chrooting, давайте скопируем файлы, которые нам нужны для chroot. Эти файлы включают файл образа Ubuntu ARM (в основном корневая файловая система, которую можно установить на телефон Android с помощью команды устанавливать), установочный файл скрипта (ubuntu.sh), файл загрузки / запуска chroot (bootubuntu), Unionfs, fsrw, а также Mountonly.
Скопируйте эти шесть файлов в корневую папку SD-карты под именем папки «убунту«. Или вы можете просто разархивировать предоставленный мной файл и скопировать папку ubuntu в корневую папку SD-карты.

(Да, я уже работаю над другими дистрибутивами Linux! Но мне больше всего нравится Ubuntu.)
Файлы сценария были изменены (мной) из других инструкций в Интернете по установке Debian на телефоны G1 (спасибо Saurik). Кстати, Debian и Ubuntu — это в значительной степени один и тот же Linux, поскольку Ubuntu — это просто расширение Debian, поэтому вы также сможете легко запускать Debian, используя тот же метод, просто измените имена файлов.
4. Прежде чем мы продолжим, убедитесь, что на вашем телефоне выключено USB-накопитель, чтобы мы могли получить доступ к SD-карте из ADB Shell. Также убедитесь, что ваш режим отладки USB отмечен в разделе Настройки-> Приложения-> Разработка. (И да, не забудьте подключить свой телефон Nexus One / Android к компьютеру через USB!)
5. Я предполагаю, что вы уже установили Android SDK (во время рутирования своего телефона), поэтому давайте перейдем в каталог Android SDK и загрузим ADB Shell.
В Windows перейдите в каталог Android SDK Tools, например c: SDK инструменты и введите «оболочка adb«.

(К вашему сведению, cd — это команда, которую вы можете использовать для перехода в каталог sdk tools. Для Windows выполните компакт-диск SDK инструменты а для Mac / Linux сделайте компакт-диск / SDK / инструменты.
Для Linux и Mac перейдите в каталог Android SDK Tools, например / SDK / инструменты и введите «./adb оболочка«Или также может быть»sudo ./adb оболочка”Для Ubuntu.
6. Как только вы войдете в оболочку ADB, вы должны увидеть символ «#». Отлично, давайте сразу же приступим к загрузке Ubuntu.
7. Введите «вс», Чтобы войти в режим суперпользователя. Кстати, если вы получите ошибку в этой части, это означает, что вы не рутировали свой телефон! (или вам, возможно, придется установить рутированное ПЗУ.)
8. Затем введите «компакт-диск / SD-карта / убунту«, Который перенесет вас в каталог, в который вы скопировали файлы Ubuntu.
9. Введите «sh ./ubuntu.sh», Чтобы запустить сценарий установки. Вам нужно запускать это только один раз или всякий раз, когда вы меняете файл сценария bootubuntu.

10. Когда это будет завершено, введите «bootubuntu» в «chroot» или загрузитесь в новый Ubuntu на Android!

Если вы получили значок «localhost», поздравляем! Вы только что установили Ubuntu на свой телефон Nexus One / Android!
Если вы этого не поняли и получили ошибку при падении на землю на скорости 200 миль в час обратно на символе «#», не волнуйтесь, я делал это около тысячи раз в течение 2 дней подряд, вы не одиноки.
Попробуйте перезагрузить телефон и ВНИМАТЕЛЬНО повторите шаги с 5 по 10, и я уверен, что у вас все заработает. Часто наши глаза могут лгать нам, следуя пошаговым инструкциям, В самом деле!
Кроме того, если вы здесь не используете Nexus One, у вас могут возникнуть другие проблемы, так как я еще не смог выполнить chroot в Ubuntu на моем HTC Evo 4G.
Как установить и запустить графический интерфейс X11 на вашем телефоне Nexus One / Android!
11. На самом деле я предпочитаю командную строку графическому интерфейсу, потому что она экономит много памяти, и я довольно хорошо умею делать что-то в терминале, но графический интерфейс дает вам полноценный рабочий стол по сравнению с Ubuntu, поэтому сначала вам нужно скачать последнюю версию Android VNC Viewer в виде файла .apk. Загрузив его на свой телефон (или скопировав на SD-карту после загрузки на свой компьютер), откройте его и установите приложение.
12. Далее вам нужно будет установить некоторые файлы через Ubuntu. apt-get установщик. Вернитесь в chrooted терминал Ubuntu и введите:
apt-get update
чтобы обновить пакеты Ubuntu, выполните следующие действия:
apt-get install tightvncserver

для установки TightVNCServer и:
apt-get install lxde

для установки LXDE.
13. Следующий тип:
экспорт USER = root
vncserver — геометрия 1024 × 800

Здесь вы можете установить свой пароль на VNCserver, как я сделал: «123123123«.
* Примечание. Вы также можете изменить 1024 × 800 на точное разрешение ЖК-дисплея вашего телефона Android, но я обнаружил, что немного более высокое разрешение дает вам лучший дисплей, поэтому Nexus One имеет 800 × 480, но я установил его на 1024 × 800 для лучший просмотр.
Далее мы собираемся добавить следующее в /root/.vnc/xstartup файл с помощью команды cat:
кошка> /root/.vnc/xstartup
#! / bin / sh
xrdb $ HOME / .Xresources
xsetroot — сплошной серый
icewm &
lxsession
Затем дважды нажмите Ctrl + D и клавишу Enter.

14. Затем откройте приложение Android VNC на своем телефоне Nexus One / Android, введите пароль, который вы установили ранее на шаге 13, и установите для порта значение 5901.
15. Затем нажмите «Подключиться» и вуаля, вы должны получить что-то вроде этого, крутой экран GNome Ubuntu .
16. Теперь давайте настроим вашу chrooted Ubuntu, чтобы вы могли запускать VNCserver каждый раз, когда вы запускаете chrooted Ubuntu.
17. Теперь давайте добавим код в /root/.bashrc файл, который запускается при каждой загрузке вашего Ubuntu, поэтому VNCServer запускается автоматически при запуске Ubuntu.
кошка> спереди
экспорт USER = root
CD /
rm -r -f tmp
mkdir tmp
CD /
vncserver — геометрия 1024 × 800
Затем дважды нажмите Ctrl + D и клавишу Enter.

Затем мы объединим только что созданный файл передний а также /root/.bashrc в новый файл с именем temp:
cat front /root/.bashrc> temp
Затем мы скопируем новый файл temp поверх существующего /root/.bashrc.
cp temp /root/.bashrc

(Я использовал терминал Windows command.com, который повторяет вещи дважды. Это происходит только в Windows из-за эха!)
* Примечание. Причина, по которой я использовал команду cat, чтобы сделать все здесь, предназначена для пользователей Windows, потому что текстовый редактор vi некорректно работает в оболочке Windows. Но вы всегда можете просто использовать свой любимый текстовый редактор Ubuntu, если используете Linux или Mac. (Просто добавьте содержимое файла передний в начале /root/.bashrc Таким образом, мне нужно написать только одно руководство, которое будет работать для каждой платформы. Для пользователей Windows вы также можете установить SSH (выполните «apt-get установить openssh-server“) И используйте SSH-клиент, например PuTTy.)
Чтобы убедиться, что он работает, вы можете выйти из Ubuntu обратно в оболочку Android:
выход
затем загрузите резервную копию Ubuntu:
bootubuntu
Теперь каждый раз, когда вы выполняете chroot / загрузку Ubuntu, VNCServer запускается автоматически при запуске.
Вы можете использовать Приложение эмулятора терминала (в свободном доступе на Android Market), чтобы запустить chroot Ubuntu, введя:
вс
bootubuntu
поэтому вам не нужно подключаться к оболочке ADB для запуска Ubuntu, что дает вам свободу использовать Ubuntu вместе с Android, где бы вы ни находились.
ИСПРАВЛЕНИЕ ОБНОВЛЕНИЯ BOOTUBUNTU
ОБНОВЛЕНИЕ: для людей, у которых возникают проблемы с его работой (благодаря людям, тестирующим его на XDA Developers), попробуйте загрузить новый файл bootubuntu здесь тогда:
Запустите ubuntu.sh, выполнив в оболочке ADB:
вс
компакт-диск / SD-карта / убунту
Источник


