Опыт создания домашнего Wi-Fi маршрутизатора. Часть 2. Установка и настройка ПО

И снова здравствуйте!
В первой части статьи я рассказывал о «железной» составляющей будущего роутера. Поскольку без софта даже самое расчудесное железо, естественно, работать не будет, следовательно требовалось снабдить аппарат соответствующей программной «начинкой».
Когда я затевал всё это движение, я предполагал, что будет непросто. Но не предполагал, что настолько. В одном из комментариев к предыдущей части статьи я клятвенно пообещал рассказать о нижеследующем «к выходным». Благоразумно умолчал к каким именно. 🙂 Тут ещё умудрился прихворнуть не вовремя, но всё-таки сдерживаю своё обещание.
- материнская плата Intel D2500CC с комплектным двухядерным 64-bit процессором Intel Atom D2500, двумя гигабитными сетевыми интерфейсами
- оперативная память SO-DIMM DDR-3 1066 4Gb Corsair
- SSD-накопитель Crucial M500 120 GB
- сетевая карта 1000 Mbit D-Link DGE-528T
- mini-PCI-E Wi-Fi карта Intel 7260.HMWWB 802.11 a/b/g/n/ac + Bluetooth 4.0
- всё это хозяйство упаковано в корпус Morex T-3460 60W
Первым делом я определил для себя круг задач, которые будет выполнять маршрутизатор, чтобы в дальнейшем мне было проще его админить.
Ещё раз уточню, что эти ваши интернеты приходят ко мне по 100 Мбитному каналу (тариф, естественно, даёт несколько меньшую скорость, но не суть). Получилось, собственно, вот что:
- Доступ в интернет со всех устройств, имеющихся дома в распоряжении +n устройств, появляющихся эпизодически или вообще однократно
- Домашняя локалка
- Соответственно, маршрутизация трафика из/в интернет/локальная сеть
- Файлохранилище (доступ по FTP или Samba)
- Торрентокачалка
- ed2k-сеть (ибо очень круто развита у провайдера)
- web-сервер
В перспективе:
- домен
- видеонаблюдение
- элементы «умного дома»
чёрт в ступемного чего интересного
Естественным в этой ситуации было выбирать из *nix-based систем. Некоторое время пришлось потратить на изучение матчасти, рыская по сети. В итоге я проделал следующий путь…
1. FreeBSD 10.1-RELEASE
Всё было замечательно, система встала, но меня ждал неприятный сюрприз, о котором я, откровенно говоря, знал, но решил-таки проверить на практике: FreeBSD напроч отказывалась видеть Wi-Fi карточку. Вернее видеть-то она её видела, но только адрес и название вендора, а что это и с чем её едят, фряха понимать не желала (драйвер устройства значился как none1). Кроме того, дальнейшее чтение мануала выявило, что в режиме точки доступа во FreeBSD работают только Wi-Fi карты на основе набора микросхем Prism. Печальбеда. Да, нашёл я также и информацию, что моя карточка в настоящий момент вообще не имеет драйвера под фряху. Даже портированного.
10. Debian 7.7.0

Расстраивался я недолго: не состоялась фряха — возьму старый добрый Debian. Установил с netinstall-образа базовую систему без графического окружения. Долго пытался понять, что не так. Стабильный релиз Debian в данный момент 7.7.0, имеет ядро версии 3.2. В этом ядре опять же нет поддержки моей многострадальной Wi-Fi сетевушки. Полез на ЛОР искать ответ, в итоге получил неутешительные выводы: надо ставить ядро посвежее (в случае Debian — тот ещё геморрой), пляски с бубном ядрами, по мнению гуру, не труъ Debian-way (так прямо и сказали: хочешь перекомпилять ядра — выбери другой дистрибутив).
11. Ubuntu Server 14.04 LTS
Плюнув на попытки круто провести время покрасноглазить, я взял знакомый и уважаемый мной дистрибутив. Уже более года он (правда версии 12.04 LTS ) вертится у меня на сервере, раздающем плюшки в сети провайдера.
Из плюсов: стабильность, простота установки, настройки и администрирования, куча документации.
Из минусов: необходимость дорабатывать напильником, поскольку «искаропки» получается толстоват и несколько неповоротлив.
Установка
По сути не представляет ничего сложного и аналогична таковой в Debian. Производится в диалоговом режиме text-mode. Описывать детально не вижу смысла, т.к. всё это уже десятки раз пережёвано и валяется на множестве ресурсов (начиная с официальных сайтов на разных языках и заканчивая местечковыми форумами).
Перед началом любых манипуляций с накопителем рекомендуется обновить прошивку, но на моём оказалась самая свежая, поэтому данный шаг я пропустил.
Первой необходимой манипуляцией при разметке накопителя является выравнивание разделов диска. Если кратко, то каждый раздел должен начинаться с сектора кратного 8. Первый раздел рекомендовано начинать с 2048 сектора (это связано с расположением в начале накопителя MBR или GPT , а «отступ» в 1 Мб берётся с запасом.
При разметке я создал 3 раздела:
Как видно, все разделы начинаются с секторов, кратных 8. Таким образом доступ будет осуществляться с обращением по правильному сектору, что поможет сберечь нежный ресурс накопителя.
Далее в опциях монтирования разделов в /etc/fstab следует добавить discard — для включения TRIM и noatime — для отключения записи в метаданные времени последнего доступа к файлу.
Все остальные советы, нагугленные на просторах сети, как то увеличение времени между сбросами буферов на диск (опция commit=[time, sec.]), отключение «шлагбаума» (опция barrier=0) и прочее не внушили мне доверия в плане приобретаемой полезности в ущерб сохранности данных и безопасности.
Кроме того, я не стал выделять отдельный раздел для swap, решив, что оперативной памяти мне должно хватить для поставленных задач. Если же всё-таки возникнет необходимость в подкачке, ничто не мешает сделать swap в виде файла и смонтировать его как раздел.
Также было принято волевое решение вынести временные файлы (/tmp) в tmpfs.
В процессе установки задаются общие параметры, как то: локаль, параметры времени/геопозиции, имя системы, а также создаётся новый юзер и пароль к нему. Далее следует выбор устанавливаемого программного обеспечения, в котором я пометил для установки следующее:
- OpenSSH server
- DNS server
- LAMP server
- Print server
- Samba file server
После загрузки в свежеустановленную систему проявилась одна крайне неприятная особенность (кстати, в Debian было то же самое): после инициализации драйверов вырубалось видео, монитор переходил в режим ожидания, и становилось непонятно система зависла или просто что-то не так с выводом. Обнаружилось, что доступ по ssh есть, и можно было бы на этом остановиться, но всегда может возникнуть ситуация, когда необходимо получить физический доступ к маршрутизатору (например, шаловливые ручонки админа поковырялись в настройках сети, и доступ через консоль категорически пропал %) ). Посёрфиф по форумам я наткнулся на решение (оказывается баг известен и проявляется именно на этой материнской плате):
add to /etc/modprobe.d/blacklist.conf:
blacklist gma500_gfx
run
sudo update-initramfs -u
sudo reboot
Пруф.
В случае с Debian — /etc/modprobe.d/fbdev-blacklist.conf.
После перезагрузки всё заработало.
Настройка сети
no talloc stackframe at ../source3/param/loadparm.c:4864, leaking memory
Проблема связана с библиотекой авторизации libpam-smbpass, можно просто её снести, а можно поступить более изящно:
снять пометку с SMB password synchronization, что отключает синхронизацию паролей системных пользователей и пользователей Samba.
Устанавливаем все доступные обновления:
И приступаем к настройке сетевых интерфейсов. В маршрутизаторе 4 физических интерфейса и loopback:
- eth0 — «смотрит» в интернет, получает настройки по DHCP
- eth1 и em0 — интегрированные в материнку сетевые адаптеры
- wlan0 — как нетрудно догадаться, беспроводной интерфейс Wi-Fi
Устанавливаем hostapd и переводим беспроводной интерфейс в режим Master:
К моему величайшему сожалению такой способ не сработал, и команда вывалилась с ошибкой, поэтому я прибегнул к альтернативному способу:
Теперь необходимо сконфигурировать все сетевые интерфейсы, чтобы было удобнее с ними работать. Я решил объединить встроенные сетевушки и Wi-Fi в мост, чтобы управлять этим хозяйством как единым целым при раздаче IP-адресов по DHCP, маршрутизации и пр. Приводим к следующему виду /etc/network/interfaces:
Включаем автоматический запуск hostapd при загрузке системы, для этого в /etc/default/hostapd раскомментируем и редактируем строки:
Далее, не мудрствуя лукаво, я настроил общий доступ. Скрипт для настройки iptables и ip-форвардинга я взял отсюда, привёл его в соответствие своим реалиям и настроил автозапуск. В результате iptables наполняются необходимым содержимым при загрузке системы.
Логично, что нужно текже настроить DHCP-сервер. Решив упростить задачу до минимума, я установил dnsmasq и снёс имеющийся в наличии и конфликтующий с ним bind9. Конфиг прост:
На самом деле в конфиге ещё куча закомментированных опций, которые позволяют производить очень fine tuning, но такого набора вполне хватает для корректной работы. В принципе, с этого момента аппарат уже работает как домашний маршрутизатор.
После окончания основной настройки я установил и настроил transmission-daemon, aMuled и vsftpd. Собственно говоря, настройка данных сервисов достаточно тривиальна, останавливаться детально на ней не буду. Естественно, доступ к данным ресурсам имеется только из локальной сети, если хочется получить доступ извне, необходимо будет открыть соответствующие порты в iptables.
Вёб-сервер представляет из себя связку Apache 2.4.7 + MySQL Ver 14.14 Distrib 5.5.40. Пока не придумал, чем буду его заполнять: накатить готовый движок и баловаться с дизайном или же просто попрактиковаться в html и php. В любом случае сие имеет для меня прикладное значение. Возможно, в перспективе получится настроить вёб-интерфейс для мониторинга и управления маршрутизатором.
После всех манипуляций остаётся настроить ведение логов: по возможности привести настройки всех процессов, ведущих логи, выводить в них только критически важные уведомления и предупреждения. Идея заключается в снижении количества операций записи, а, соответственно, и негативного влияния на SSD.
Кроме того, следует настоятельно рекомендуется включить запуск по cron раз в сутки fstrim (для каждого раздела отдельно). Говорят, хуже не будет точно.
Ффух… Получилось несколько сумбурное описание моих мытарств с собственноручно собранным устройством, но удовлетворение от того, что всё работает просто неописуемо.
В комментарии к предыдущей части статьи многоуважаемый dmitrmax интересовался уровнем энергопотребления сборки. Ну что же, привожу примерные данные, которые мне удалось почерпнуть из открытых источников:
- процессор Intel Atom D2500 — до 10 Вт
- SSD-накопитель Crucial M500 — 3,6 Вт
По остальным крмплектующим данных сходу не нашлось, но практически везде в характеристиках сетевой карты и Wi-Fi модуля пишут «низкое энергопотребление». Если грубо накинуть на всё про всё 10 Вт (прочее железо, интегрированные сетевушки, etc), то итого получается около 25 Вт — не так уж и много, полагаю…
Вроде бы ничего не забыл, упомянул все ключевые моменты. За подробностями прошу в комментарии. Спасибо за внимание! (-;
UPD: Господин Revertis справедливо заметил, и я с ним соглашусь, что изначально при установке системы не следовало отмечать DNS-сервер, чтобы потом его сносить (речь о bind9), но в статье я описывал именно путь, который проделал — со всеми его ошибками и закоулками. И да, соглашусь, что nginx лучше, чем Apache, более того — я его даже заменю. Спасибо за совет.
Источник
Install Linux on a Modern WiFi Router: Linksys WRT1900AC and OpenWrt
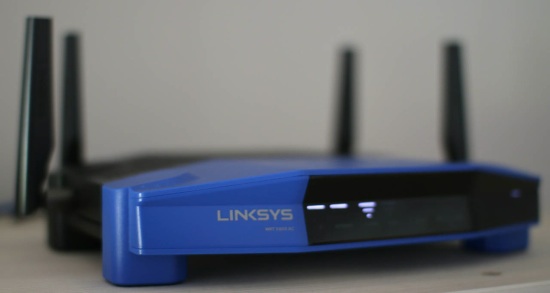
The Linksys WRT1900AC is a top-end modern router that gets even sweeter when you unleash Linux on it and install OpenWrt. OpenWrt includes the opkg package management system giving you easy access to a great deal of additional open source software to use on your router. If you want the pleasure of SSH access on your router, the ability to use iptables on connections passing through it, and the ability to run various small servers on it, the Linksys WRT1900AC and OpenWrt are a powerful combination.
From a hardware perspective, the Linksys WRT1900AC includes simultaneous dual band with support for 802.11n (2.4 GigaHertz) up to 600 Megabytes per second and 802.11ac (5 GHz) up to 1.3 Gigabytes per second. This lets you connect your older devices to 802.11n and newer hardware can take advantage the greater speed and less congested 802.11ac signal.
The router has a dual-core Marvell Armada 370/XP CPU with 256 MB of RAM and 128 MB of flash storage. You can also attach more storage to the WRT1900AC using its USB 3.0 and eSATA ports. When using OpenWrt you might also like to attach a webcam and printer to the router. The Linksys WRT1900AC has a 4 port gigabit switch and a gigabit upstream WAN port.
Initial setup
The stock firmware that comes with the Linksys WRT1900AC uses a very simple four-step procedure for initial setup. I only partially followed the recommended setup steps.
Step 1: Connect the antennae and power.
Step 2: Connect your upstream “Internet” link to the appropriate port on the router.
Step 3: Connect to the wifi signal from the router. You are given a custom wireless network name and password which appears to be set differently for each individual router. This step 3 nicely removes the security vulnerability inherent in initial router setup, because your router will have a custom password right from the first time you power it on.
Step 4: Log in to linksyssmartwifi.com and setup the router.
Instead of directly connecting to the Internet port, I used one of the 4 gigabit switch ports to attach the router to the local LAN. This made using the linksyssmartwifi.com website at step 4 not work for me. I could create an account on the smartwifi site, but it wanted me to be connected through the wifi router in order to adjust the settings.
You can however set up the router without needing to use any remote websites. The Linksys will appear at 192.168.1.1 and connecting a laptop to the wifi router and manually forcing the laptop’s IP address to 192.168.1.2 allowed me to access the router configuration page. At that stage the Connectivity/Local Network page lets you set the IP address of the router to be something that will fit into your LAN in a non conflicting manner (and on the subnet you are using) and also disable the DHCP server if you already have one configured.
The initial screen I got when I was connecting directly using 192.168.1.1 again wanted to take me off to a remote website, though you can click through to avoid having to do that if you want.
I tried to attach a 120 GB SanDisk Extreme SSD to test eSATA storage. Unfortunately ext4 is not a supported filesystem for External Storage in the stock firmware. It could see /dev/sda1 but 0 kilobytes used of 0 kb total space. Using a 16 GB flash pen drive formatted to FAT filesystem was fine; the ftp service was started and the drive showed up as a Samba share, too.
Switching over to OpenWrt
At the time of writing the options for installing OpenWrt on the device were changing. There were four images which offered Linux kernel version 3.18 or 4.0 and some level of extra fixes and updates depending on the image you choose. I used Kaloz’s evolving snapshots of trunk linked at openwrt_wrt1900ac_snapshot.img.
Flashing the image onto the router is very simple as you use the same web interface that is used to manually install standard firmware updates. The fun, and moments of anxiety that occur after the router reboots are familiar to anyone who has ever flashed a device.
When the router reboots you will not have any wifi signals at all from it. The router will come up at a default IP address of 192.168.1.1. The easiest method to talk to the router is to use a laptop and force the ethernet interface to an address of 192.168.1.2. Using a trunk distribution of OpenWrt you are likely not to have a useful web interface on the router. Visiting 192.168.1.1 will likely show an empty web server with no files.
When falling back to trying to do an SSH or network login to the router, another little surprise awaits. Trying to SSH into the router showed that a connection was possible but I was unable to connect without any password. Unfortunately, OpenWrt sets the default password to nothing, creating a catch-22 with SSH not allowing a login with no password, so connection seemed impossible. The saving grace is that telnet is also running on the router and after installing the telnet client on the laptop I could login without any password without any issue. Gaining access to the router again was a tremendous relief.
In the telnet session you can use the passwd command to set a password and then you should be able to login using SSH. I opted to test the SSH login while the telnet session was still active so that I had a fallback in case login failed for some reason.
To make the web interface operational you will have to install the LuCI package. The below commands will do that for you. If you need to use a proxy to get to the Internet the http_proxy, https_proxy, and ftp_proxy environment variables will be of use. Again you might run into a little obstacle here, with the router on the 192.168.1.0/24 subnet it might not be able to talk with your existing network if it is on the often used 192.168.0.0/24 subnet. I found that manually forcing the IP address to a 192.168.0.X address using ifconfig on br-lan changed the address for bridged ports and everything moved to that subnet. This is not a permanent change, so if it doesn’t work rebooting the router gets you back to 192.168.1.0/24 again. It is easy to change this for good using LuCI once you have that installed.
Once you have LuCI installed the rest of the router setup becomes point and click by visiting the web server on your router. To enable WiFi signals, go to the Network/Wifi page which gives you access to the two radios, one for 2.4 Ghz and the newer 5 Ghz 802.11nac standard. Each radio will be disabled by default. Oddly, I found that clicking edit for a radio and scrolling down to the Interface Configuration and the Wireless Security page, the default security was using “No Encryption.” I would have thought WPA2-PSK was perhaps a better default choice. So getting a radio up and running involved setting an ESSID, checking the Mode (I used Access Point), and setting the Wireless Security to something other than nothing and setting a password.
Many of the additional features you might install with opkg also have a LuCI support package available. For example, if you want to run a DLNA server on the Linksys WRT1900AC the minidlna package is available, and a luci-app-minidlna package will let you manage the server right from the LuCI web interface.
Although the Linksys WRT1900AC has 128 MB of flash storage, it is broken up into many smaller partitions. The core /overlay partition had a size of only 24.6 MB with /tmp/syscfg being another 30 MB partition of which only around 300 KB was being used. While this provides plenty of space to install precompiled software, there isn’t enough space to install gcc onto the Linksys WRT1900AC/OpenWrt installation. I have a post up asking if there is a simple method to use more of the flash on the Linksys WRT1900AC from the OpenWrt file system. Another method to gain more space on an OpenWrt installation is to use an extroot, where the main system is stored on external storage. Perhaps with the Linksys WRT1900AC this could be a partition on an eSATA SSD.
If you don’t want to use extroot right away, another approach is to use another ARM machine that is running a soft floating point distribution to compile static binaries. Those can be transferred over using rsync to the OpenWrt installation on the Linksys WRT1900AC. An ARM machine is either using soft or hard floating point, and generally everything is compiled to work with one or the other. To see which version of floating point your hardware is expecting you can use the readelf tool to sniff at a few existing binaries as shown below. Note the soft-float ABI line in the output.
I tried to get push button WPS setup to work from OpenWrt without success. I had used that feature under the standard firmware so it is able to work and makes connecting new devices to the router much simpler.
I also notice that there are serial TTL headers on the Linksys WRT1900AC and a post shows a method to reflash the firmware directly from uboot. I haven’t tried this out, but it is nice to see as a possible final ditch method to resurrect a device with non functioning firmware.
Another useful thing is to set up users other than root to use on the OpenWrt installation so that you have less risk of interrupting normal router activity. You might like to install that shadow utils and sudo in order to do this as shown below:
I found that the fan came on when the Linksys WRT1900AC was booting into OpenWrt. The fan was turned off again soon after. The temperature readings are available using the sensors command as shown below.
Performance
Using an LG G3 phone with Android 5, the Wifi Network Analyzer app indicated a speed of 433 Mbps with the phone about a foot from the router. That speed dropped back to around 200Mbps when I moved several rooms away. The same results were given using the stock firmware and the OpenWrt image.
Running iperf (2.0.5) on the OpenWrt installation and a Mid 2012 Macbook Air gave a Bandwidth of 120 Mbps. The same client and server going through a DLink DIR-855 at a similar distance on 5 Ghz gave only 82 Mbps. Unfortunately the Mac only has wifi-n on it as wifi-ac was added to the next year’s model.
The LG G3 running Android 5 connected to the wifi-ac network using the iperf app could get 102 Mbps. These tests where run by starting the server with ‘-s’ and the client with ‘-c server-ip-address’. The server which was running on the Linksys WRT1900AC/OpenWrt machine chose a default of 85 kb TCP window size for these runs. Playing with window sizes I could get about 10 percent additional speed on the G3 without too much effort.
I connected a 120 GB SanDisk Extreme SSD to test the eSATA performance. For sequential IO Bonnie++ could write about 89 Mbps and read 148 Mbps and rewrite blocks at about 55 Mbps. Overall 5,200 seeks/s were able to be done. This compares well for read and rewrite with the eSATA on the Cubox which got 150 Mbps and 50 Mbps respectively. The Cubox could write at 120 Mbps which is about 35 percent faster than the Linksys WRT1900AC. This is using the same ext4 filesystem on both machines, the drive was just moved to each new machine.
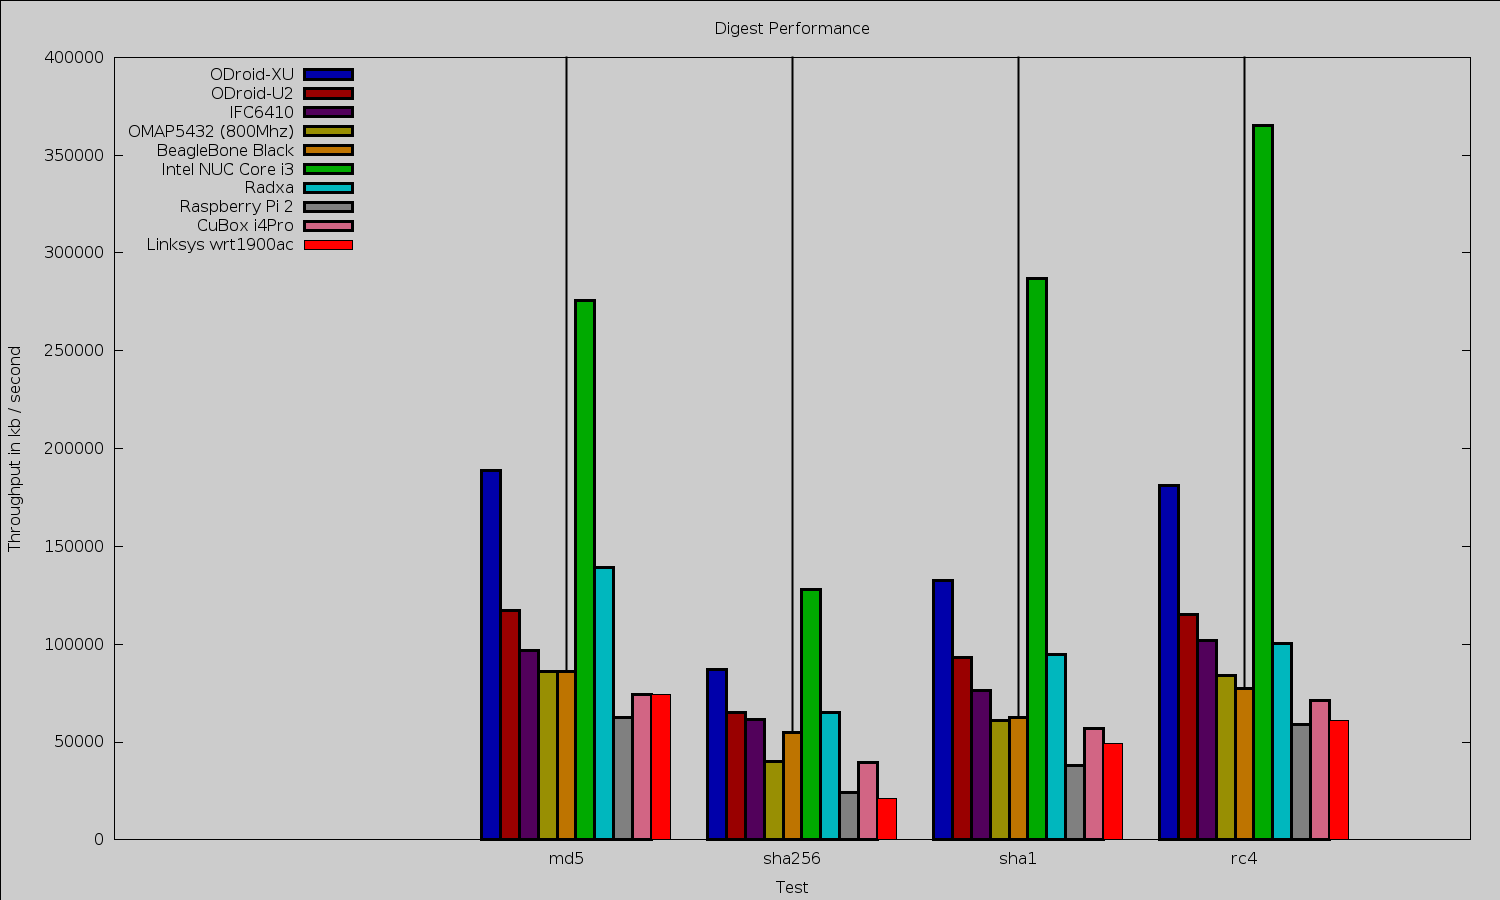
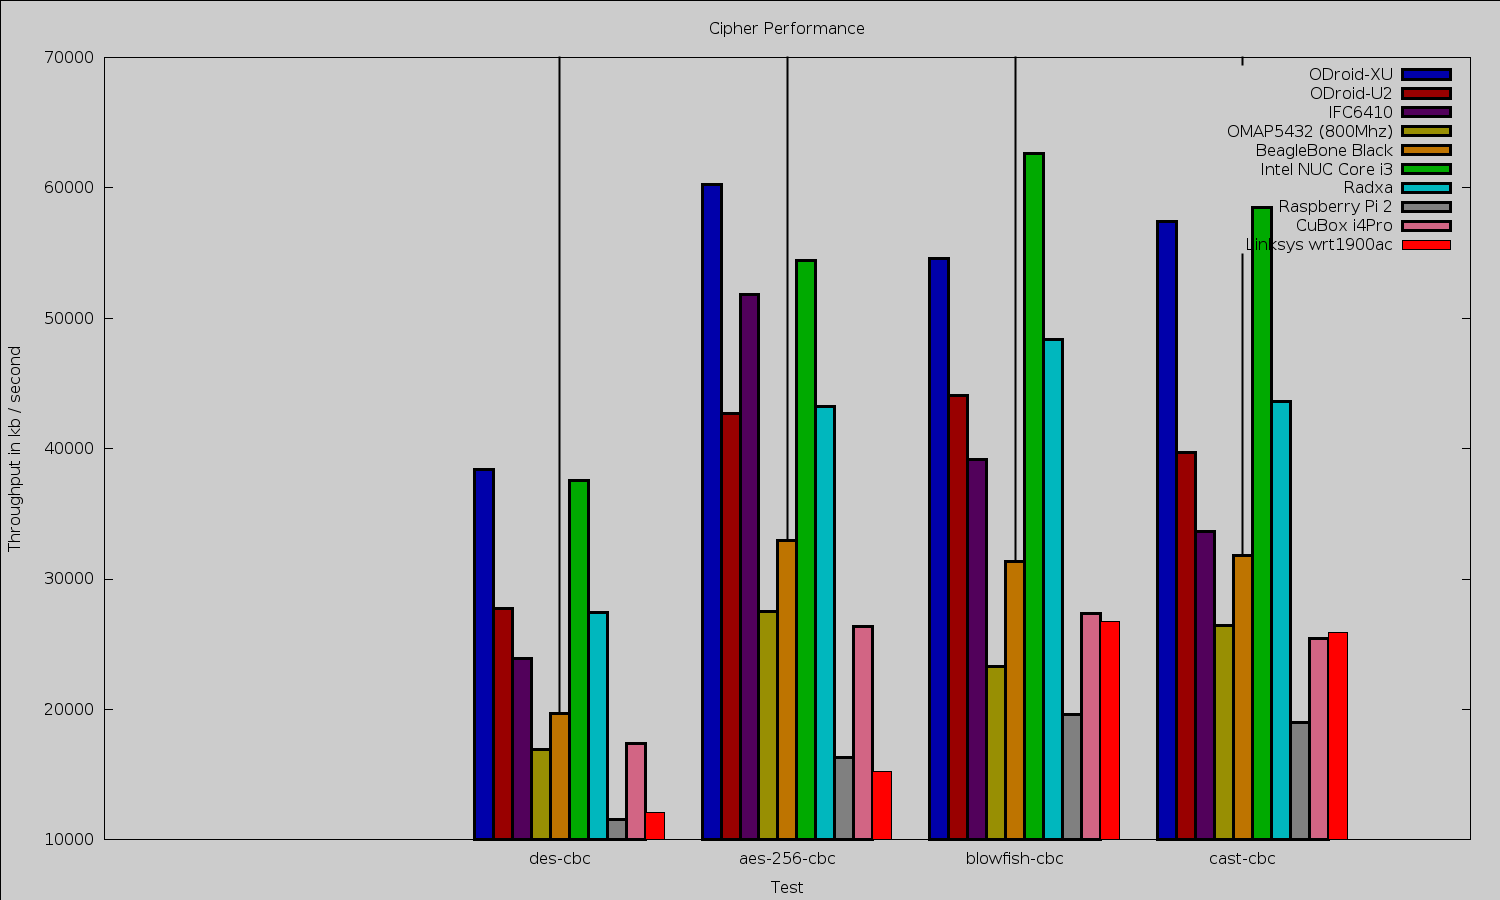
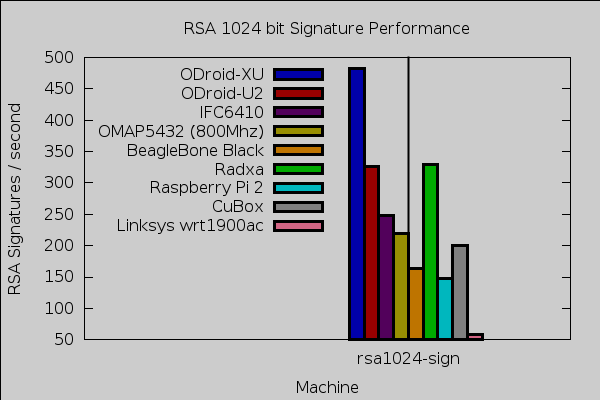
OpenSSL performance for digests was in a similar ballpark to the BeagleBone Black and CuBox i4Pro. For ciphers the story was very different depending on which algorithm was used, DES and AES-256 were considerably slower than other ARM machines, whereas Blowfish and Cast ran at similar speeds to many other ARM CPUs. For 1,024 bit RSA signatures the Linksys WRT1900AC was around 25-30 percent the performance of the more budget ARM CPUs.
Final Thoughts
It is great to see that LuCI gives easy access to the router features and even has “app” packages to let you configure some of the additional software that you might like to install on your OpenWrt device. OpenWrt images for the Linksys WRT1900AC are a relatively recent development. Once a recommended stable image with LuCI included is released it should mitigate some of the tense moments that reflashing can present at the moment. The 177+ pages on the OpenWrt forum for the Linksys WRT1900AC are testament to the community interest in running OpenWrt on the device.
It is wonderful to see the powerful hardware that the Linksys WRT1900AC provides being able to run OpenWrt. The pairing of Linux/FLOSS and contemporary hardware lets you customize the device to fit your usage needs. Knowing that you can not only SSH in but that rsync is ready for you and that your programming language of choice can be installed on the device for those little programs that you want to have available all the time but don’t really want to leave a machine on in order to do. There are also some applications which work well on the router itself, for example, packet filtering. A single policy on the router can block tablets and phones from connecting to your work machines.
We would like to thank Linksys for providing the WRT1900AC hardware used in this article.
Источник


