- Install mac os from ubuntu
- Apple hardware considerations
- 2. Requirements
- 3. Prepare the USB stick
- 4. Install and run Etcher
- 5. Etcher configuration
- 6. Write to device
- 7. Boot your Mac
- Finding help
- Как установить macOS на виртуальной машине в Linux с помощью Sosumi
- Как установить macOS на виртуальную машину (QEMU) в Linux с помощью пакета Sosumi snap
- 1. Установка snap пакета Sosumi:
- 2. Запустите Sosumi, набрав sosumi в терминале
- 3. После установки виртуальной машины и её запуска нажмите Enter для начала процесса установки macOS
- 4. Форматирование жесткого диска виртуальной машины с macOS
- 5. Установка macOS на виртуальную машину
- 6. Запуск операционной системы macOS
- Ubuntu Documentation
- Introduction
- Preparing your system
- Installing Mac-on-Linux
- Configuring Mac-on-Linux
- Running Mac-on-Linux as a normal user
- Running MOL
- Configuring Network
- Alternative — Networking without DHCP
- Trouble Shooting
- OS 9 Double Click and Slow Response Trouble
- To run Tiger and Eliminate Annoying Sluggish Behavior on MOL Install this Patched Version
- Remove boot loader out of memory problem
- External Links
Install mac os from ubuntu
With a bootable Ubuntu USB stick, you can:
- Install or upgrade Ubuntu, even on a Mac
- Test out the Ubuntu desktop experience without touching your PC configuration
- Boot into Ubuntu on a borrowed machine or from an internet cafe
- Use tools installed by default on the USB stick to repair or fix a broken configuration
Creating a bootable USB stick is very simple, especially if you’re going to use the USB stick with a generic Windows or Linux PC. We’re going to cover the process in the next few steps.
Apple hardware considerations
There are a few additional considerations when booting the USB stick on Apple hardware. This is because Apple’s ‘Startup Manager’, summoned by holding the Option/alt (⌥) key when booting, won’t detect the USB stick without a specific partition table and layout. We’ll cover this in a later step.
2. Requirements
- A 2GB or larger USB stick/flash drive
- An Apple computer or laptop running macOS
- An Ubuntu ISO file. See Get Ubuntu for download links
3. Prepare the USB stick
To ensure maximum compatibility with Apple hardware, we’re going to first blank and reformat the USB stick using Apple’s ‘Disk Utility’. But this step can be skipped if you intend to use the USB stick with only generic PC hardware.
- Launch Disk Utility from Applications>Utilities or Spotlight search
- Insert your USB stick and observe the new device added to Disk Utility
- Select the USB stick device (you may need to enable the option View>Show All Devices) and select Erase from the tool bar (or right-click menu)
- Set the format to MS-DOS (FAT) and the scheme to GUID Partition Map
- Check you’ve chosen the correct device and click Erase

Warning: Disk Utility needs to be used with caution as selecting the wrong device or partition can result in data loss.
4. Install and run Etcher
To write the ISO file to the USB stick, we’re going to use a free and open source application called Etcher. After downloading this and clicking to mount the package, Etcher can either be run in-place or dragged into your Applications folder.
By default, recent versions of macOS block the running of applications from unidentified developers. To side-step this issue, enable ‘App Store and identified developers’ in the ‘Security & Privacy’ pane of System Preferences. If you are still warned against running the application, click ‘Open Anyway’ in the same pane.

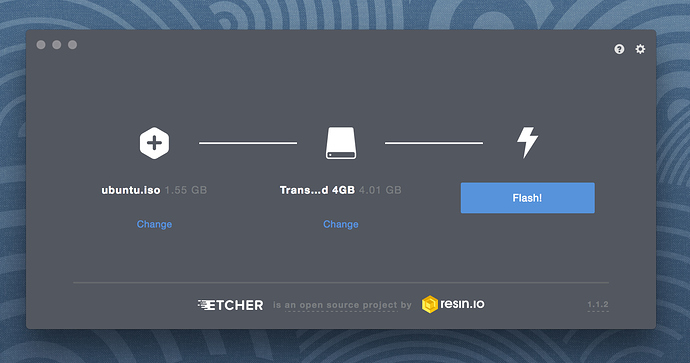
5. Etcher configuration
Etcher will configure and write to your USB device in three stages, each of which needs to be selected in turn:
Select image will open a file requester from which should navigate to and select the ISO file downloaded previously. By default, the ISO file will be in your Downloads folder.
Select drive, replaced by the name of your USB device if one is already attached, lets you select your target device. You will be warned if the storage space is too small for your selected ISO.
Flash! will activate when both the image and the drive have been selected. As with Disk Utility, Etcher needs low-level access to your storage hardware and will ask for your password after selection.
6. Write to device
After entering your password, Etcher will start writing the ISO file to your USB device.
The Flash stage of the process will show progress, writing speed and an estimated duration until completion. This will be followed by a validation stage that will ensure the contents of the USB device are identical to the source image.
When everything has finished, Etcher will declare the process a success.
Congratulations! You now have Ubuntu on a USB stick, bootable and ready to go.
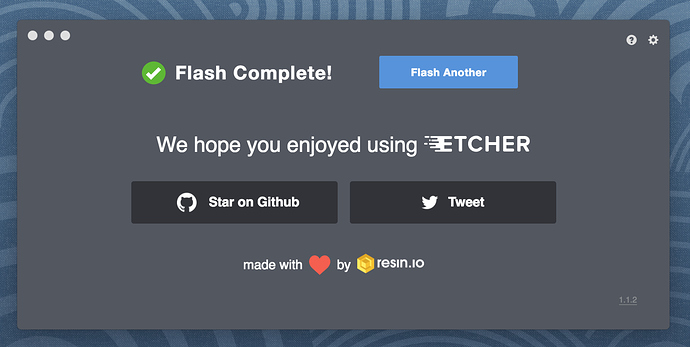
Warning: After the write process has completed, macOS may inform you that ‘The disk you inserted was not readable by this computer’. Don’t select Initialise. Instead, select Eject and remove the USB device.
7. Boot your Mac
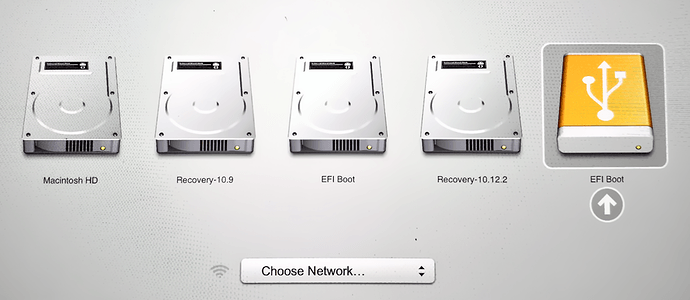
If you want to use your USB stick with an Apple Mac, you will need to restart or power-on the Mac with the USB stick inserted while the Option/alt (⌥) key is pressed.
This will launch Apple’s ‘Startup Manager’ which shows bootable devices connected to the machine. Your USB stick should appear as gold/yellow and labelled ‘EFI Boot’. Selecting this will lead you to the standard Ubuntu boot menu.
Finding help
If your Mac still refuses to boot off your USB stick you may find it easier to boot and install off an Ubuntu DVD instead. See our How to burn a DVD on macOS for further details.
Alternatively, if you feel confident using the macOS command line, see the community documentation on How to install Ubuntu on MacBook using USB Stick for a more manual approach.
If you want to install Ubuntu, follow our install Ubuntu desktop tutorial.
Finally, if you get stuck, help is always at hand:
Источник
Как установить macOS на виртуальной машине в Linux с помощью Sosumi
Sosumi – snap пакет, основанный на проекте macOS-Simple-KVM, который позволяет легко загрузить и установить операционную систему macOS на виртуальной машине (поставляется в комплекте с qemu-virgil, virtio-vga, паравиртуальным драйвером 3D-графики). Образ операционной системы macOS не входит в комплект, но будет загружен во время установки. Будет загружена и установлена версия – macOS Catalina.
После использования Sosumi в течение нескольких часов на ноутбуке с операционной системой Ubuntu 20.04 я могу сказать, что установка занимает много времени (почти два часа в моем случае), и работа системы macOS была немного медленной, но достаточной для использования. Таким образом проект может не подойти для тяжелых задач, но идеально подойдет для тестирования.
Snap пакет Sosumi, созданный Аланом Поупом из Canonical / Ubuntu, упрощает установку и запуск macOS на виртуальной машине в Debian / Ubuntu, Fedora и других дистрибутивах Linux (при установленном snapd – api для работы snap пакетов), поставляя практически все инструменты, которые необходимы. Исходный код пакета Sosumi доступен на GitHub . Если вы не хотите использовать snap пакет, то у вас есть альтернатива – macOS-Simple-KVM, набор инструментов для настройки виртуальной машины MacOS в QEMU (KVM).
Перед началом установки стоит отметить несколько важных вещей:
- После установки macOS на виртуальную машину общий размер папки Sosumi (
/snap/sosumi) в моей системе составляет около 31,5 ГБ, но она может увеличиться при установке дополнительных приложений на виртуальной машине macOS.
Как установить macOS на виртуальную машину (QEMU) в Linux с помощью пакета Sosumi snap
Чтобы установить Sosumi, операционная система должна иметь возможность устанавливать пакеты Snap. Snapd по умолчанию доступен в Ubuntu, а для других дистрибутивов Linux следуйте инструкциии из документации Snapcraft.
1. Установка snap пакета Sosumi:
2. Запустите Sosumi, набрав sosumi в терминале
Запуск из терминала требуется только один раз; затем будет создан ярлык приложения.
Если вы столкнулись с ошибкой, в которой сообщается, что не удалось запустить Sosumi / qemu, поскольку невозможно запустить X11, то для решения проблемы нужно добавить пользователя в группу kvm:
3. После установки виртуальной машины и её запуска нажмите Enter для начала процесса установки macOS
Освободить фокус мыши можно с помощью комбинации клавиш CTRL+Alt+G.
4. Форматирование жесткого диска виртуальной машины с macOS
Дальше в ходе запуска виртуальной машины, откроется окно macOS Utilities, в котором доступны различные инструменты.
Открываем инструмент Disk Utility.
В диалоговом окне «Disk Utility» на панели с левой стороны, выберите жесткий диск Apple Inc. Virtio (тот, что имеет емкость 68,72 ГБ), затем нажмите Erase, введите имя для жесткого диска (например, macOS) и оставьте остальные параметры без изменений.
Теперь нажмите кнопку Erase, чтобы отформатировать раздел.
5. Установка macOS на виртуальную машину
После того как вы закроете инструмент Disk Utility, вы снова попадете в диалоговое окно macOS Utility. В окне из списка инструментов выберите Reinstall macOS. Нажмите Continue несколько раз, и далее отобразится окно, на котором вы должны выбрать жесткий диск, отформатированный в предыдущем шаге.
Выберите жесткий диск и нажмите на Install.
Во время установки виртуальная машина автоматически несколько перезагрузится.
6. Запуск операционной системы macOS
После завершения установки виртуальная машина macOS перезагрузится, в меню загрузки Clover вы увидите несколько дополнительных параметров. Используйте клавиши со стрелками влево / вправо для выбора опции Boot macOS from. например, так ( Boot macOS from macOS , где второе название macOS это имя жесткого диска, настроенного на 4 шаге).
Для каждого запуска операционной системы macOS нужно выбирать данную опцию для загрузки.При первой загрузке в macOS вам необходимо выполнить первоначальную настройку, выбрать свое местоположение, предпочитаемый язык, при желании войти в систему с помощью Apple ID, принять условия и т. д., а также создать учетную запись компьютера (имя пользователя и пароль).
Так как у меня отсутствует Apple ID, то я выбрал – Set Up Later.
По окончанию настройки загрузится рабочий стол macOS Catalina.
Видимо во время настройки допустил ошибку и не выбрал русский язык в качестве основного. Поэтому система установилась на английском языке.
Для установки русского языка в macOS Catalina нужно открыть настройки System Preferences – Language & Region и перетянуть (либо сначала добавить нажав на плюсик и выбрав язык из выпадающего меню) выше английского языка. При выходе из настроек появится диалоговое окно с предложением перезагрузить систему для применения настроек.
Источник
Ubuntu Documentation

Unsupported Version
This article applies to an unsupported version of Ubuntu. More info.
Introduction
Mac-on-Linux (MOL) allows you to run MacOS 9 and MacOS X from within Linux. It requires a Mac OS (9/X) and PowerPC computer. As it does not need to emulate a processor it runs at near native speeds. see http://mac-on-linux.sourceforge.net/ for full details.
This howto assumes that you have a working install on MacOS on your computer. It is also possible to use MOL to install MacOS into a disk image, see man mol for more details.
The MOL kernel modules are included in DapperDrake so it is no longer necessary to compile and install them manually.
Preparing your system
To install all of Mac-on-Linux, you’ll need to enable the universe and multiverse, see AddingRepositoriesHowto for details.
Installing Mac-on-Linux
You will need to install the following packages mol and mol-drivers-macosx and/or mol-drivers-macos for MacOS X and/or MacOS 9 support.
You may need to add this repository to get some of the drivers: http://people.debian.org/
jensen woody/. See AddingRepositoriesHowto for more information.
This can be done using Synaptic Package Manager or by running the following commands
Configuring Mac-on-Linux
If you are not comfortable with editing text look at NanoHowto.
This assumes that you have a working install of Mac OS X or 9, on a partition on you harddrive somewhere.
There are a few settings you may want to play with be for you use mol. One of them is memory. The default is 96mb, which is barely enough to boot Mac OS X (although ok for Mac OS 9 if you arn’t planning to do much).
In /etc/mol/molrc.osx (molrc.macos for Mac OS 9) find ram_size: 96 (or ram_size: 48 in molrc.macos) and change to at least 128
Its possible to give mol more RAM than you physically have, and linux will deal with putting stuff into swap, but you are likely to end up with a slow system. (It may also crash if you give too much RAM; I had to keep a ram_size of 48 in my molrc.macos.)
Then it is worth setting up the video modes, run sudo molvconfig
You basically type ‘y’ to try out a configuration, and then ‘y’ if you can see a nice gradient on the screen. The red screen comes out as a stripes, but it seems to work anyway. If you get a random mess, blank screen or some other problem then press ‘n’
Running Mac-on-Linux as a normal user
By default, Mac-on-Linux requires root privileges to run. The following command makes sure you can run Mac-on-Linux as a normal user.
Running MOL
Now you should be able to run startmol --osx (just startmol for Mac OS 9), and Mac OS X will boot up in a window or on a new virtual terminal. You need to install the MOL package that you find on the desktop. This provides sound and network drivers.
To exit mol, choose shutdown from the apple menu.
If the video modes are correctly configured then pressing CTRL + ALT + F8 (sometimes higher F keys) will take you to a full screen MOL. CTRL + ALT + F7 should take you back to your Linux desktop.
If you want mol to always start full screen, edit /etc/mol/molrc.video and change enable_xvideo: yes to
See its manpage for more usage information.
Configuring Network
If you are using mol to use the iTunes music store, or watch flash on the web, then you will need to get networking running.
You will need to install ipmasq, dnsmasq and dhcpd using synaptic or
Then enable dhcp for the tun0 interface that mol uses, in /etc/default/dhcp, put the line
Then in /etc/mol/molrc.net add the line
and in /etc/mol/tunconfig at the bottom just before
Now run startmol --osx, and we can set up the network on the Mac OS X side. MOL creates a network tunnel called tun0 at the Linux end, and en3 on the Mac OS X end.
Once you have logged into to Mac OS X open up the system preferences. Make sure that en3 is set to configure with DHCP.
Now open up Safari or Firefox, and if you are lucky you should have a web connection.
Alternative — Networking without DHCP
Do as above, but without installing dhcpd. Once you have completed the setup, run ip addr to check the ip address for the tun0 interface. Mine was given as follows:
In OS X, then set up the en3 network port manually, by allocating an appropriate IP (in my case 192.168.40.2 was a good choice), set Router and DNS server to the ip associated with your tun0 interface in linux (192.168.40.1) and the subnet mask to 255.255.255.0. Now you should be ready to go.
Trouble Shooting
If you get mol module not found errors, try insmodding it manually
If OSX doesn’t start, edit the blkdev settings in /etc/mol/molrc.osx. Your OSX boot partition should not be mounted under linux and should have the setting of
Obviously the hda3 part could be different for you.
OS 9 Double Click and Slow Response Trouble
If you are having very slow response with OS 9, you probably need to open the MOL Install CD that appears on the desktop and drag the MOLAudio to the System Folder. Then you need to go to the sound control panel and enable the MOL Audio for output. (Before I did this I was unable to even double click. Afterwards, the response was more snappy.) The real fix is to use a more recent version of Mac-on-Linux though. To do that, I am providing my notes below.
To run Tiger and Eliminate Annoying Sluggish Behavior on MOL Install this Patched Version
Thanks to folks on the MOL mailing list for these tips. http://www.maconlinux.org/lists/index.html
1) Download the latest kernel source. You can user uname -r to determine your version. Mine was 2.6.12-9-powerpc. You can also use the synaptic package manager or Adept to do this.
sudo apt-get install linux-source-2.6.12
2) Follow the instructions on this Wiki for building the kernel found at https://wiki.ubuntu.com/KernelBuildPPCHowTo.
3) Download the patched MOL that Joe Jezak has kindly provided. http://dev.gentoo.org/
josejx/ Look for the latest mol version he has provided.
4) Extract it using tar -jxvf
5) Build it using make.
6) Set up and start MOL using the instructions in the section above. Actually, I had better luck on the networking setup with the sheep driver. I just made the /etc/mol/molrc.net have the line:
netdev: eth1 -sheep
You may need eth0 instead if that is your primary network interface (do an ip addr call to find out). With this setting Tiger boots and gets an IP address via dhcp from my local wireless router.
A side note: I have not been able to boot an OS 9 partition with this setup and there have been some similar notes on a Yellow Dog Linux forum. If I figure that out, I’ll append this note.
Remove boot loader out of memory problem
If you start MoL to boot OS X and get an error that looks like this:
Then you need to install the new boot loader.
2) Extract the bootx file.
3) Copy the file into /usr/share/mol/drivers/. You will need to do this as root.
External Links
Mac How To Everything about Macintosh OS
MacOnLinuxHowto (последним исправлял пользователь ckimes 2017-09-13 01:41:18)
The material on this wiki is available under a free license, see Copyright / License for details
You can contribute to this wiki, see Wiki Guide for details
Источник


