- Как получить старые версии macOS
- Проверка совместимости
- Загрузка macOS на компьютер Mac с помощью Safari
- Инструкция по установке Mac OS Lion для «не разработчиков»
- ГДЕ ВЗЯТЬ MAC OS LION
- КУДА СТАВИТЬ MAC OS LION
- КАК СТАВИТЬ MAC OS LION
- Perform a Clean Install of OS X Lion on Your Mac
- Create a clean install on an internal or external drive
- What You Need to Install Lion
- Clean Install Preparation
- Perform a Backup
- Format the Destination Drive
- Use the OS X Lion Installer
- OS X Lion Setup Assistant
- Migration Assistant
- Optional Registration
- Set up an Administrator Account
- Learning to Scroll
- Just One More Thing
Как получить старые версии macOS
Если ваш компьютер Mac несовместим с последней версией macOS, можно перейти на более раннюю версию macOS, например: macOS Catalina, Mojave, High Sierra, Sierra или El Capitan.
Для получения новейшего функционала и поддержания безопасности, стабильности, совместимости и производительности компьютера Mac крайне важно поддерживать программное обеспечение в актуальном состоянии. Apple рекомендует использовать последнюю версию macOS, совместимую с вашим компьютером Mac.
Проверка совместимости
Версия macOS, входящая в комплект поставки компьютера Mac, является самой ранней версией, которую он поддерживает. Например, если на вашем компьютере Mac была установлена macOS Big Sur, вам не удастся установить macOS Catalina или более ранние версии.
Если версия macOS не может использоваться на компьютере Mac, приложение App Store или установщик сообщит вам об этом. Например, он может сообщить о несовместимости с данным устройством или что установщик устарел для открытия в этой версии macOS. Чтобы проверить совместимость до начала загрузки, проверьте минимальные требования к аппаратному обеспечению.
- Требования к аппаратному обеспечению macOS Catalina 10.15
- Требования к аппаратному обеспечению macOS Mojave 10.14
- Требования к аппаратному обеспечению macOS High Sierra 10.13
- Требования к аппаратному обеспечению macOS Sierra 10.12
- Требования к аппаратному обеспечению OS X El Capitan 10.11
- Требования к аппаратному обеспечению OS X Yosemite 10.10
Загрузка macOS на компьютер Mac с помощью Safari
Safari использует эти ссылки для поиска устаревших установщиков в App Store. После выполнения загрузки из App Store установщик открывается автоматически.
- macOS Catalina 10.15 обновляет Mojave, High Sierra, Sierra, El Capitan, Yosemite, Mavericks
- macOS Mojave 10.14 обновляет High Sierra, Sierra, El Capitan, Yosemite, Mavericks, Mountain Lion
- macOS High Sierra 10.13 обновляет Sierra, El Capitan, Yosemite, Mavericks, Mountain Lion
Safari загружает следующие более старые установщики в виде образа диска с именем InstallOS.dmg или InstallMacOSX.dmg. Откройте образ диска, затем откройте установщик .pkg из образа диска. Он устанавливает приложение с именем «Установить [ название версии ]». Чтобы начать установку операционной системы, откройте это приложение из папки «Программы».
- macOS Sierra 10.12 обновляет El Capitan, Yosemite, Mavericks, Mountain Lion или Lion
- OS X El Capitan 10.11 обновляет Yosemite, Mavericks, Mountain Lion, Lion или Snow Leopard
- OS X Yosemite 10.10обновляет Mavericks, Mountain Lion, Lion или Snow Leopard
Источник
Инструкция по установке Mac OS Lion для «не разработчиков»
Вчера, одновременно с выходом новых MacBook Pro появилась первая версия Mac OS Lion, доступная для установки. Правда доступна она стала лишь разработчикам, имеющим соответствующую лицензию и в виде Developer Preview. Это значит, что простому пользователю никак не получить эту версию, да и толку от нее будет мало — она предназначена не для роботы, а для проверки работоспособности приложений.
Но мак-пользователь простым в большинстве своем не является. Как только появилась возможность «пощупать» Льва, многие твердо на это решились. Мы, как «пощупавшие» хотим предоставить всем желающим инструкцию по установке Mac OS Lion для «не разработчиков».
ГДЕ ВЗЯТЬ MAC OS LION
Как мы выше упоминали, официально взять первую версию Mac OS Lion можно только будучи зарегистрированным разработчиком Apple. Стоит лицензия $99 на один год и она даст вам право получать все тестовые продукты компании, вплоть до версий Golden Master, которые идут в продажу.
Второй способ — воспользоваться услугами разработчиков-посредников. Они добавят ваше устройство в свой список тестеров всего за $10. Вы получите возможность установки новых версий программного обеспечения абсолютно на законных основаниях. Такое практикуют журналисты и «гики», готовые платить за удовольствие первыми получать «на руки» бета-версии и обновления. Мы только можем рекомендовать сервис imodzone, который всего за $7 даст вам возможность получать все бета-версии. Там же можно просто скачать требуемый образ.
Третий путь самый распространенный — путь пиратства. Очень многие считают, что информация должна распространятся бесплатно и открыто, без всяких ограничений. А некоторые просто не хотят платить лишних денег. В любом случае, если у вас нет желания воспользоваться первыми двумя путями получения Mac OS Lion — поищите в Пиратской Бухте, там всегда все есть.
Какой бы путь вы не выбрали, результат один — у вас есть нужный образ, который мы сейчас и будем устанавливать. Хотя у подписки разработчика есть свои плюсы — все новые версии разработчик получает через Mac App Store, вводя необходимый Redeem-код. Это нововведение появилось совсем недавно и позволяет сэкономит много времени.
КУДА СТАВИТЬ MAC OS LION
У вас уже есть заветный образ Mac OS Lion и вам не терпится начать установку. Для начала нужно определиться со способом установки. В можете либо поставить льва поверх работоспособной системы, либо установить второй системой на внешний носитель. Так как версия для работы не предназначена, мы рекомендуем второй вариант. Подойдет любой носитель, обладающий емкостью от 16 ГБ. Мы выбрали для установки внешний HDD, о чем ни разу не пожалели.
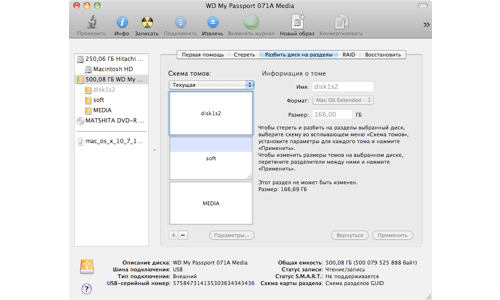
Для установки необходимо разметить диск в GUID и отформатировать нужный раздел в HFS+ журнальный. Все это делается в Дисковой Утилите, которая расположена в Служебных Программах. Выбор места установки — довольно важный момент. Версия пока еще очень сырая, и жертвовать работоспособностью системы ради того, чтобы посмотреть на новые жесты не очень логично. И еще — 8 ГБ флешки вам будет мало, проверено.
КАК СТАВИТЬ MAC OS LION
Mac OS Lion устанавливать очень просто. Монтируем образ и запускаем установщик. Без разворачивания на раздел или флешку, без записи болванки. Прямо из работающей системы, выполнив минимум операций.
Мастер установки предложит вам прочесть лицензионное соглашение и выбрать место установки. Мы выбрали заранее подготовленный раздел и запустили установку.
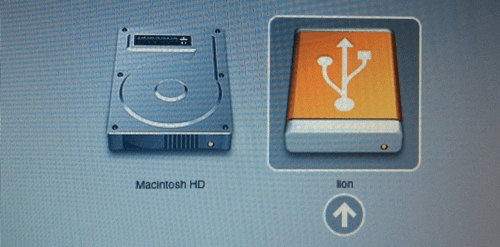
Через десять минут подготовки ваш Мак перезагрузится. Без предупреждения и уведомления. Рекомендуем закончить все свои дела перед установкой и сохранить все свои рабочие документы. После перезагрузки начнется сама установка. Не задавая никаких вопросов Mac OS Lion установится на раздел и перезагрузится. Для выбора загрузочного раздела вам необходимо будет в самом начале загрузки, до появления яблока на экране, зажать клавишу option, после чего появится возможность выбирать нужный раздел.
Дальше будет произведена обычная процедура ввода личных данных, паролей, выбор языка и часового пояса. Здесь ничего пока не изменили, кроме внешнего вида. Еще одна перезагрузка и вуаля — Mac OS Lion готов к работе.
О том, что нового появилось в Mac OS Lion вы можете узнать посмотрев видео, которое мы вчера публиковали. Наши личные впечатления и найденные интересности мы расскажем позже, в отдельной статье. А пока, желаем удачи в установке и надеемся, что у вас все получится.
Источник
Perform a Clean Install of OS X Lion on Your Mac
Create a clean install on an internal or external drive
Apple made the installation process for OS X Lion (10.7) slightly different than it was for previous versions of the operating system. Even with the differences, you can still create a clean installation of Lion on an internal drive, a partition, or an external drive.
This article looks at installing OS X Lion (10.7) on a drive or partition, either internally on your Mac or on an external drive.
Mac users can also create a bootable USB flash drive with Lion installed on it, which can be handy to have in an emergency.
What You Need to Install Lion
Purchase Lion from the Apple Store online. You receive a content code for the Mac App Store, usually within one day. After you download the installer, copy it to any Mac that meets the minimum hardware requirements and install Lion. The Lion installer downloads to your Applications folder, and it is just under 4 GB in size. The system requirements are:
- Intel Core 2 Duo, i3, i5, Core i7 or Xeon processor
- Mac OS X Snow Leopard v10.6.6 or later (v10.6.8 is recommended)
- 7 GB of free hard drive space
- 2 GB of RAM
You can install Lion on any internal drive, including SSDs. Also, you can install Lion on any external drive that is connected to your Mac by USB 2.x, USB 3, FireWire 400/800, or Thunderbolt. An eSATA-based external drive probably won’t work as a bootable installation destination because most add-on eSATA controllers don’t support booting OS X.
The Lion Recovery partition takes 650 MB of free space. The Lion installer creates two partitions, one for Lion and one for recovery tools. You can use the Recovery Partition to repair drives, fix permissions, and format drives, as well as reinstall Lion if needed. The Recovery Partition includes a bootable system with Disk Utility.
Clean Install Preparation
To perform a clean install of Lion, you must have a disk or partition available that uses the GUID Partition Table and is formatted with the Mac OS X Extended (Journaled) file system. The target volume should be erased at best; at a minimum, it should not contain any OS X system.
:max_bytes(150000):strip_icc()/LionDiskUtil-593096503df78c08ab0bc2fa.jpg)
With previous versions of OS X installers, you could erase the target drive as part of the installation process. With the Lion installer, there are two methods of performing a clean install. One method requires you to create a bootable Lion install DVD, and the second lets you perform a clean install using the Lion installer you downloaded from the Mac App Store.
The difference between the two methods is that to use the Lion installer directly, you must have a drive or partition that you can erase before running the installer. Using a bootable Lion install DVD allows you to erase a drive or partition as part of the installation process.
If you want to use your current startup drive as the target for a clean install, you need to use the bootable Lion install DVD method.
If you’re going to perform a clean install of Lion on a drive other than your current startup drive, then you’re ready to proceed.
Perform a Backup
Before you begin the Lion installation process, back up your existing OS X system and user data. Performing a clean install on a separate drive or partition shouldn’t cause any data loss with your current system, but stranger things have happened, and it is best to be prepared.
At a minimum, make sure you have a current backup. For more protection, make a bootable clone of your current startup drive.
If you use Carbon Copy Cloner, you can download a version of the app that works with OS X Snow Leopard and Lion.
Format the Destination Drive
You must erase the target drive before you can start the Lion installation process. Remember that to use the Lion installer as downloaded from the Mac App Store, you must have a working copy of OS X to start the installer from. You may need to create a new partition to install to or resize existing partitions to create the necessary space.
Use the OS X Lion Installer
Before you start the Lion installer, close all other applications that are currently running on your Mac.
The Lion installer is located in the Applications folder, and the file is named Install Mac OS X Lion. The download process from the Mac App Store also created an Install Mac OS X Lion icon in your Dock.
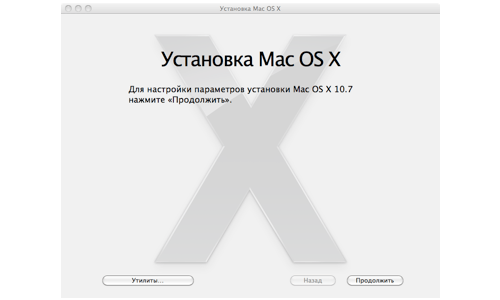
Click the Lion installer Dock icon (or double-click the Install Mac OS X Lion application in the Applications folder) to start the Lion installation process.
:max_bytes(150000):strip_icc()/001-perform-clean-install-os-x-lion-2260354-a4d31370917c4f61b6309e69c8c27d57.jpg)
Click Continue in the window that opens.
Scroll through the terms of use and click Agree.
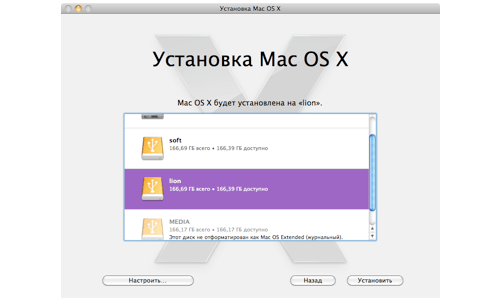
The Lion installer assumes you want to install Lion on the current startup drive. To select a different target drive, click Show All Disks and select the target disk from the list—the disk you erased earlier.
With the target disk highlighted, click Install.
:max_bytes(150000):strip_icc()/001B-perform-clean-install-os-x-lion-2260354-dd68c4ee071949bcb67a3db6e35c01ea.jpg)
Enter your admin username and password to begin the installation process and click OK.
Wait while the Lion installer copies the necessary files to the target disk. When the copying is finished, you are prompted to restart your Mac. Click Restart.
After the Mac restarts, the installation process continues. A progress bar displays along with an estimate of the time it takes to complete the installation. Installation speed ranges from 10 to 30 minutes.
If you have multiple displays connected to your Mac, turn all of them on before you begin the Lion installation process. The installer may display the progress bar on a display other than your usual main screen; if that display isn’t on, you’ll wonder what’s happening.
OS X Lion Setup Assistant
When the installation of OS X Lion is complete, your Mac displays a Welcome window, which marks the start of the registration and setup process for Lion.
The OS X Lion Setup Assistant walks you through the various steps you need to set up an admin account and register. It includes tutorials as well.
In the Welcome window, select the country or region where you use your Mac and click Continue.
Select the keyboard style that matches yours.
Click Continue.
Migration Assistant
Because this is a clean install of OS X Lion, you can use the Migration Assistant to transfer data from another Mac, PC, Time Machine, or another disk or partition on your Mac.
However, it is better not to use the Migration Assistant at this point, opting instead for a clean installation of Lion. After you know Lion is installed and working correctly, run the Migration Assistant from the Lion installation to move any user data you need to the Lion disk. You can find the Migration Assistant in the Utilities folder inside the Applications folder.
Select Don’t transfer now and click Continue.
Optional Registration
Registration is optional. You can click through the next two screens if you want. If you fill in the registration information, some of the applications you use in Lion are prepopulated with appropriate data. Specifically, Mail and Address Book have your primary email account information partially set up, and Address Book has your personal entry already created.
Enter your Apple account information, and click Continue to open a window that requests information. You aren’t required to enter it. When you’re finished, or if you prefer not to register, click Continue.
Set up an Administrator Account
Lion requires at least one administrator account to be set up. You can use the administrator account to perform most Lion housekeeping tasks, to create additional users, and to install any applications that require administrator privileges.
When prompted for the administrator account name, enter your name.
Enter your shortname, which is a shortcut name used for the administrator account and the name of the account’s home directory. Shortnames cannot be changed, so be sure you’re happy with the name you enter. You’ll be living with it for a long time.
Enter the password you want to use, along with any additional information requested, and then click Continue.
You can associate an image or picture with the account you’re creating. If you have a webcam connected to your Mac, you can snap a picture of yourself to use. You can also choose one of many pictures already installed in Lion. Make your selection, and click Continue.
Learning to Scroll
The Lion Setup Assistant is just about done. The final step shows you how to use the new touch-based gesture system in Lion. Depending on the type of touch-based input device you have (Magic Mouse, Magic Trackpad, or integrated trackpad), you see a description of how to scroll. Follow the instructions to scroll down through the text area, and click the Start Using Mac OS X Lion button.
Just One More Thing
You can start exploring Lion, but before you head off, use the Software Update service to ensure that you have all the latest patches, device drivers, and other undercover goodies your Mac may need to perform at its best. From the Apple menu, select Software Update, and then follow the on-screen instructions.
Источник


