- Создание загружаемого установщика для macOS
- Что нужно для создания загружаемого установщика:
- Загрузка macOS
- Использование команды createinstallmedia в приложении «Терминал»
- How to reinstall macOS
- Start up from macOS Recovery
- Apple silicon
- Intel processor
- Reinstall macOS
- Other macOS installation options
- How to clean install Mac OS from USB
- Before we start
- Step 1: Clean system junk on your current Mac OS X
- The manual way to remove old user caches:
- Automatic solution for system junk cleanup
- Step 2: Back up your Mac
- Step 3: Installing Mac OS from USB
- How to create a bootable USB flash drive
- How to install the OS from USB
- Чистая установка OS X El Capitan на Mac при помощи USB-флешки или через Интернет
- Как сделать чистую установку OS X El Capitan на Mac с предварительным форматированием диска?
Создание загружаемого установщика для macOS
В качестве загрузочного диска для установки операционной системы на компьютер Mac можно использовать внешний диск или дополнительный том.
Эти расширенные инструкции предназначены в первую очередь для системных администраторов и других пользователей, имеющих опыт работы с командной строкой. Загружаемый установщик не требуется для обновления macOS или переустановки macOS, но он может оказаться удобен, если требуется выполнить установку на несколько компьютеров, не загружая установщик заново каждый раз.
Что нужно для создания загружаемого установщика:
- USB-накопитель или другой дополнительный том, отформатированный в Mac OS Extended, на котором есть не менее 14 ГБ свободного пространства;
- загруженный установщик для macOS Big Sur, Catalina, Mojave, High Sierra или El Capitan.
Загрузка macOS
- Загрузка macOS Big Sur, macOS Catalina, macOS Mojave или macOS High Sierra
Эти элементы загружаются в папку «Программы» в виде приложения с именем «Установка macOS [ название версии ]». Если после загрузки запустится установщик, завершите его работу без продолжения установки. Чтобы получить подходящий установщик, выполняйте загрузку с компьютера Mac, на котором используется macOS Sierra 10.12.5 или более поздней версии либо El Capitan 10.11.6. Корпоративным администраторам следует производить загрузку с сайта Apple, а не с сервера обновления ПО, размещенного в локальной сети. - Загрузка OS X El Capitan
В результате этого действия загрузится образ диска с именем InstallMacOSX.dmg. На компьютере Mac, совместимом с El Capitan, откройте образ диска и запустите с него установщик с именем InstallMacOSX.pkg. Приложение с именем «Установка OS X El Capitan» будет установлено в папку «Программы». Загружаемый установщик создается именно из этого приложения, а не из образа диска или установщика .pkg.
Использование команды createinstallmedia в приложении «Терминал»
- Подключите USB-накопитель или другой том, используемый для загружаемого установщика.
- Откройте приложение «Терминал» в подпапке «Утилиты» папки «Программы».
- Введите или вставьте в приложение «Терминал» одну из следующих команд. Предполагается, что установщик находится в папке «Программы», а имя MyVolume обозначает USB-накопитель или другой используемый вами том. Укажите вместо MyVolume имя своего тома в следующих командах.
Big Sur*:
Catalina*:
Mojave*:
High Sierra*:
El Capitan:
* Если на компьютере Mac установлена операционная система macOS Sierra или более ранней версии, включите аргумент —applicationpath и путь установки аналогично тому, как это делается в случае команды для El Capitan.
После набора команды
- Нажмите «Ввод», чтобы ввести команду.
- При появлении запроса введите пароль администратора и нажмите клавишу «Ввод» еще раз. При вводе пароля приложение «Терминал» не отображает вводимые символы.
- При появлении запроса нажмите клавишу Y , чтобы подтвердить удаление всех данных на томе, затем клавишу «Ввод». Приложение «Терминал» показывает прогресс по мере стирания тома.
- После стирания тома может быть отображено предупреждение о том, что приложению «Терминал» требуется доступ к файлам на съемном томе. Нажмите «OK», чтобы продолжить копирование.
- Когда приложение «Терминал» сообщит о завершении процесса, имя тома будет совпадать с именем загруженного установщика, например «Установка macOS Big Sur». После этого можно закрыть приложение «Терминал» и извлечь том.


Источник
How to reinstall macOS
Use macOS Recovery to reinstall the Mac operating system.
Start up from macOS Recovery
Apple silicon
Turn on your Mac and continue to press and hold the power button until you see the startup options window. Click the gear icon labeled Options, then click Continue.
Intel processor
Make sure that your Mac has a connection to the internet. Then turn on your Mac and immediately press and hold Command (⌘)-R until you see an Apple logo or other image.
If you’re asked to select a user you know the password for, select the user, click Next, then enter their administrator password.
Reinstall macOS
Select Reinstall macOS from the utilities window in macOS Recovery, then click Continue and follow the onscreen instructions.
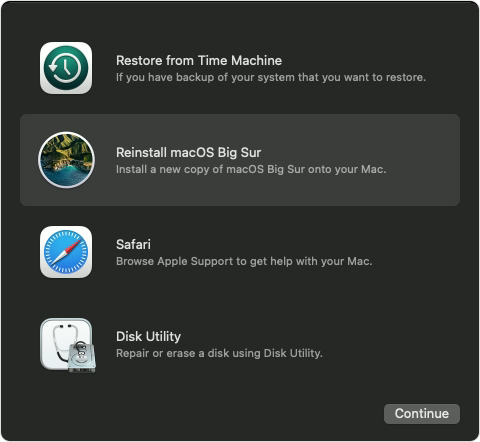
Follow these guidelines during installation:
- If the installer asks to unlock your disk, enter the password you use to log in to your Mac.
- If the installer doesn’t see your disk, or it says that it can’t install on your computer or volume, you might need to erase your disk first.
- If the installer offers you the choice between installing on Macintosh HD or Macintosh HD — Data, choose Macintosh HD.
- Allow installation to complete without putting your Mac to sleep or closing its lid. Your Mac might restart and show a progress bar several times, and the screen might be empty for minutes at a time.
After installation is complete, your Mac might restart to a setup assistant. If you’re selling, trading in, or giving away your Mac, press Command-Q to quit the assistant without completing setup. Then click Shut Down. When the new owner starts up the Mac, they can use their own information to complete setup.
Other macOS installation options
When you install macOS from Recovery, you get the current version of the most recently installed macOS, with some exceptions:
- On an Intel-based Mac: If you use Shift-Option-Command-R during startup, you’re offered the macOS that came with your Mac, or the closest version still available. If you use Option-Command-R during startup, in most cases you’re offered the latest macOS that is compatible with your Mac. Otherwise you’re offered the macOS that came with your Mac, or the closest version still available.
- If the Mac logic board was just replaced, you may be offered only the latest macOS that is compatible with your Mac. If you just erased your entire startup disk, you may be offered only the macOS that came with your Mac, or the closest version still available.
You can also use these methods to install macOS, if the macOS is compatible with your Mac:
- Use the App Store to download and install the latest macOS.
- Use the App Store or a web browser to download and install an earlier macOS.
- Use a USB flash drive or other secondary volume to create a bootable installer.
Источник
How to clean install Mac OS from USB

Before we start
Having spent some years coding applications for macOS we’ve created a tool that everybody can use. The all-round problem fixer for Mac.

So here’s a tip for you: Download CleanMyMac to quickly solve some of the issues mentioned in this article. But to help you do it all by yourself, we’ve gathered our best ideas and solutions below.
Features described in this article refer to the MacPaw site version of CleanMyMac X.
Those who still rely on older Mac OS X operating systems, know these still are going strong. There are so many things you can do with past OS X — like Lion, Mavericks or Yosemite — each one of these operates flawlessly. So if you’re looking to give your Mac a fresh start with just a classic Mac OS X and nothing else, to clean install Mac OS from USB is the best option for you.
To clean install Mac OS from USB, there are three things you should do. First, you should clean up your Mac from the old baggage — system files that have piled up over time. Once it’s all cleaned up, the next you should do is backup your newly cleaned Mac. And finally, after doing a backup, you can clean install OS X of your choice from USB.
We’ve got the steps outlined below, so let’s get to it.

Step 1: Clean system junk on your current Mac OS X
Whatever OS X you are currently on, system junk and outdated cache files are a potential source for software conflicts. Having cleaned them up, you may discover around 35 GB of newly created space previously taken by junk. What’s more, old caches may interfere with your new Mac OS X installation, so this step is pretty essential.
Cleaning can be done either manually or using a dedicated app. If you don’t want to spend the next 20 minutes on repetitive clicking and typing, jump right to the automatic solution further down.
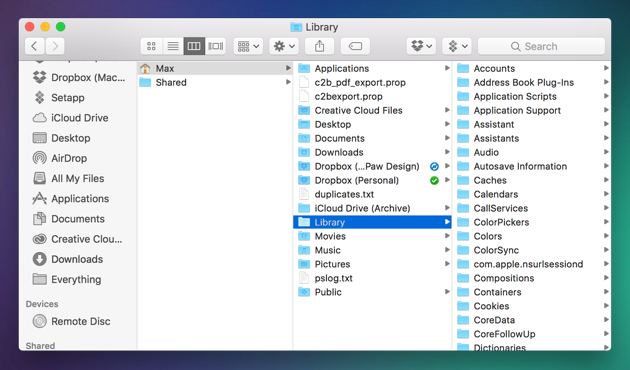
The manual way to remove old user caches:
- Click on a Finder window and choose “Go to Folder” in the Go menu.
- Type in
/Library/Caches and click Enter to go open the folder.
Note: Do not remove the folders themselves, just their insides.
Next off, do the same steps, but now replace.
/Library/Caches with… /Library/Caches
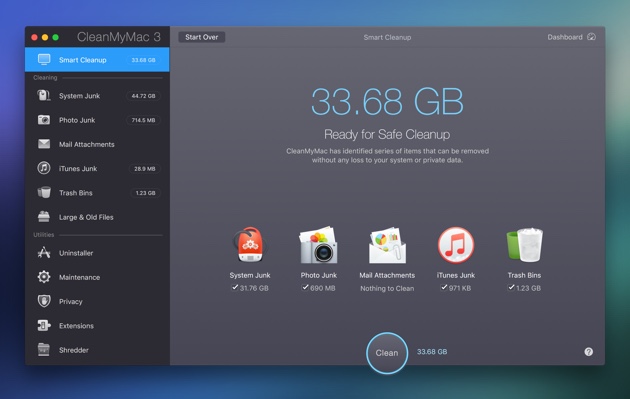
Automatic solution for system junk cleanup
There are many nice apps that offer a quick Mac clean up. Among those, CleanMyMac 3 is our favorite as it looks most user-friendly of all. It scans your hard drive for old caches, broken apps, and app leftovers so you can remove all unwanted files in a minute or two. After all, a newly installed OS X feels better on a clean computer.
Download CleanMyMac and then follow the steps:
- Launch CleanMyMac 3.
- Click Scan.
- Click Remove.
And you’re done. If you want to clean up more junk on your Mac, go through each of the modules located on the left panel of the app. It’ll help you clear out gigabytes of junk that you probably didn’t even realize were there. Once you’ve finished the cleanup, head to the next step.

Step 2: Back up your Mac
Before you begin to reinstall Mac OS from USB, you should back up your Mac. Note: If you don’t do this step, you will not be able to recover files, nor restore anything if something goes wrong. To back up your Mac:
- Open an app called Time Machine.
- Click “Select Disk.”
- Select where you wish to save your files (an external drive works best, Apple Time Capsule is a safe bet).
- Click “On” on the left-hand side of the screen to turn Time Machine on.
- On the right, under the name of the storage device, there are three lines that say, “Oldest backup,” “Latest backup,” and “Next backup.” Your backup should be scheduled within the next 5 minutes.
- Don’t want to wait? In the menu bar at the top of your screen, a few icons left of the Date & Time, click on the “arrow clock” icon and select “Back Up Now.”

Step 3: Installing Mac OS from USB
You will need 3 essential things:
- The OS X Installer (downloaded from the App Store)
- The backup of your old system
- Startup drive to install OS X on
Once it’s all prepared, it’s time to clean install OS X. But first, you need to create a bootable drive using a USB containing Mac OS X of your choice. Don’t know how? Then read on.
How to create a bootable USB flash drive
1. Connect your Mac to the USB flash drive. It should have at least 12 GB of available storage.
2. Open Terminal from the Utilities folder of your Applications folder.
3. Type or paste the following commands in Terminal:
Mavericks:
Yosemite:
El Capitan:
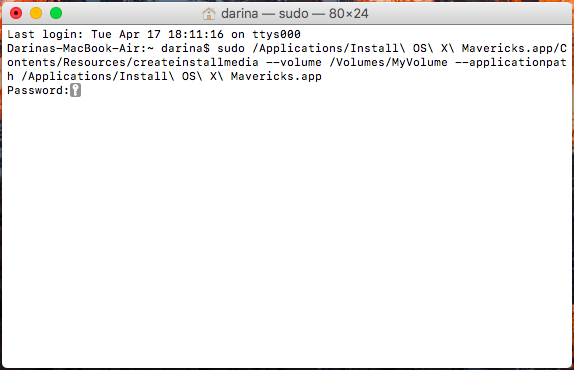
5. Type your administrator password and press Return.
6. When prompted, type Y to confirm that you want to erase the volume and press Return. You’ll see the progress as the bootable installer is created.
7. Quit Terminal when the process is finished.
How to install the OS from USB
1. Plug in your bootable USB drive and Restart your Mac while holding the Option key. Make sure to keep it pressed down!
2. When it restarts, you’ll have a few options. Choose your USB Installer.
3. Next, select the Disk Utility option.
4. In the window, at the top of the left bar, select your Mac’s Main Drive.
5. Next, to the First Aid button at the top, click the Erase button.
6. Now, near the center of the window, select the Format drop-down list and select “Mac OS X Extended (Journaled)” as the type.
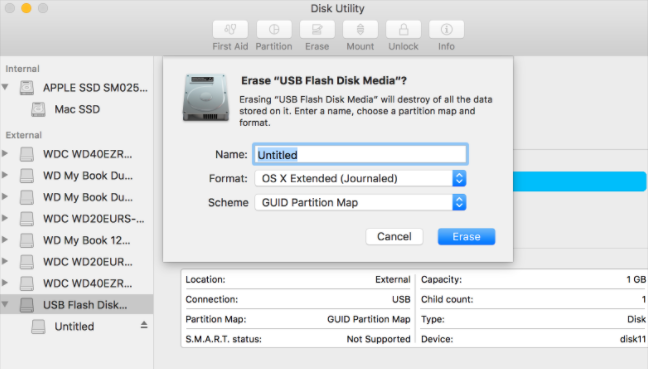
7. Click Erase (this will erase your main drive) and allow time for the drive to format.
8. When it’s finished, close out Disk Utility and select “Install OS X” from the menu.
9. Select your main drive and install a new OS X on it.
Follow the installation prompts and enjoy your new operating system. And if you want your new OS works smoothly for a long time to come, use a great cleaning and maintenance tool we’ve mentioned above — CleanMyMac 3. The app will take care of your Mac, so you’ll get the most out of your computer again. Try it now!
Источник
Чистая установка OS X El Capitan на Mac при помощи USB-флешки или через Интернет
Большинство пользователей Mac обновляются на новое поколение операционной системы простым нажатием кнопки «Обновить» в Mac App Store, хотя, считается, что чистая установка OS X является наиболее надёжным способом. В этом материале мы расскажем как это сделать.
Как сделать чистую установку OS X El Capitan на Mac с предварительным форматированием диска?
1. Перезагрузите Mac и во время включения компьютера зажмите клавиши ⌘ Cmd и R.
2. В загрузившемся приложении Утилиты OS X выберите пункт меню «Дисковая утилита» и нажмите кнопку «Продолжить».
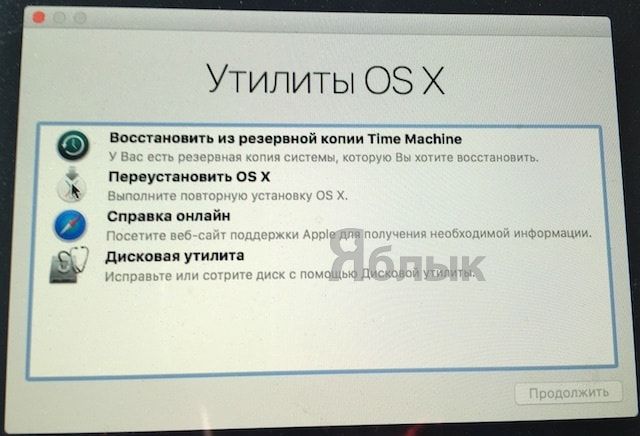
3. В левом боковом меню выберите системный диск (по умолчанию он называется «Macintosh HD») и в основном окне перейдите во вкладку «Стереть» и отформатируйте его, указав формат «Mac OS Extended (журнальный)».
Внимание! Все данные будут удалены с Mac.
![]() 4. После окончания процесса форматирования закройте «Дисковую утилиту».
4. После окончания процесса форматирования закройте «Дисковую утилиту».
5. Выберите пункт Установить OS X в окне «OS X Утилиты», в случае если необходима загрузка копии OS X El Capitan из интернета и нажмите кнопку «Продолжить».
![]()
6. Если же Вы планируете использовать загрузочную USB-флешку (наша инструкция по созданию), то закройте окно «OS X Утилиты».
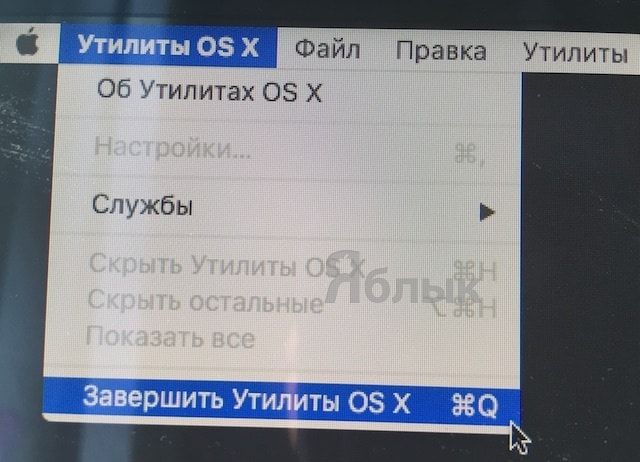
7. В появившемся окне нажмите пункт Загрузочный диск…
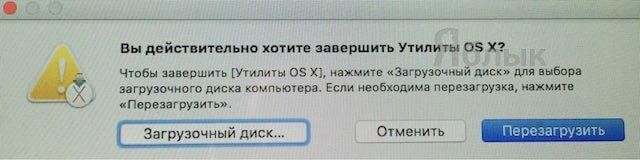
8. В появившемся окне выберите заранее подключенный к компьютеру загрузочный USB-флеш накопитель с OS X El Capitan и нажмите Перезагрузить.
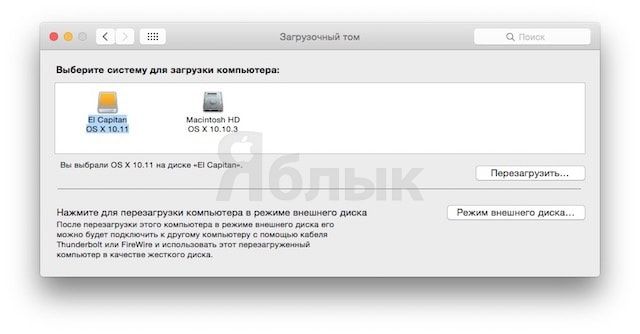
Компьютер перезагрузится и предложит установку системы с USB-флешки.
Стоит отметить, что запустить Mac с загрузкой с USB можно и путем нажатия кнопки ⌥Option (Alt) на клавиатуре в момент включения компьютера. При этом появится список доступных дисков из которых необходимо выбрать загрузочную USB-флешку.
Источник


