- 4 Steps to Install Magento 2 on XAMPP Windows
- Step 1: Install XAMPP
- Step 2: Install Composer (optional)
- Step 3: Download Magento 2 Pack
- Step 4: Install Magento 2
- Step 4.3: Start Installing
- Step 4.2 Add a Database
- Step 4.3 Web Configuration
- Step 4.4. Customize Your Store
- Step 4.5. Create Admin Account
- Step 4.6. Install
- Step 4.7: Check the result
- Quick start install
- Prerequisites
- Log in as file system owner
- Get the metapackage
- Example — Minor release
- Example — Quality patch
- Example — Security patch
- Set file permissions
- Install Magento
- Command summary
- Common arguments
- Advanced install
- Magento command-line interface (CLI)
- Before you start your installation
- Completely secure installation
- Installer help commands
- Install the Magento software from the command line
- What is sensitive data?
- Sample localhost installations
- Example 1—Basic installation with admin user account
- Example 2— Basic install without admin user account
- Example 3—Install with additional options
4 Steps to Install Magento 2 on XAMPP Windows
You are looking for Install Magento 2 latest version on Windows from Magento repo or Github with Apache/NginX, MySQL/MariaDB and PHP 7.x, this guide is best place for you. In this post, I will show you how to install Magento 2.3 on an Ubuntu latest with Apache2, MariaDB. In previous posts, I talked about Install Magento 2 on Ubuntu, Centos or Windows.
Magento 2 Requirements
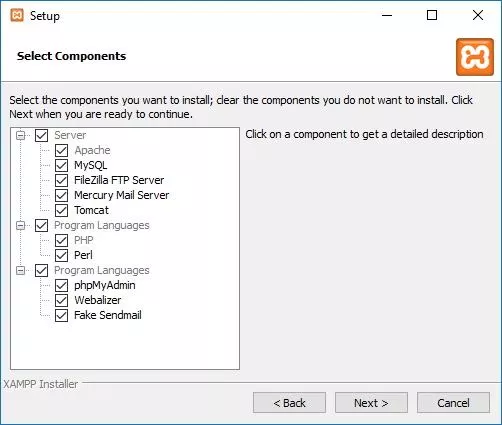
Step 1: Install XAMPP
XAMPP is the most popular local web development solution for Windows. It is free and includes Apache or NginX, PHP or Python, Perl or Ruby.
- To download latest version here.
- Open and install XAMPP for your Windows:
 Install it in C drive. We suppose that the path is: c:\xampp\
 - Open XAMPP Controller in XAMPP folder
 Install it in C drive. We suppose that the path is: c:\xampp\
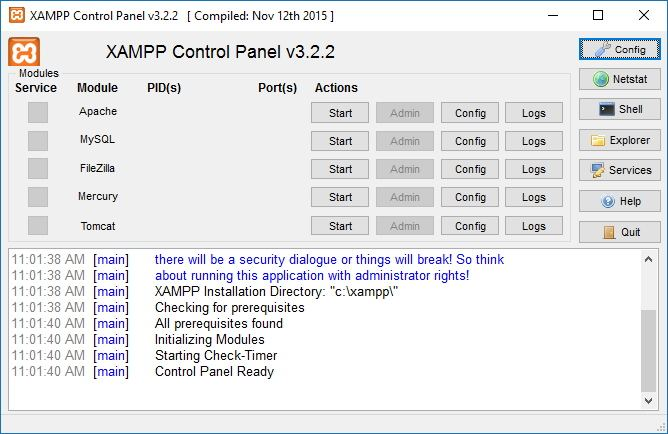
Now you have already setup XAMPP succesfully on your Windows.
Step 2: Install Composer (optional)
- Download Composer and install for windows
- Direct download composer: Composer stable version
- or you can use command line to install Composer:
Step 3: Download Magento 2 Pack
You can download from one of the folling resources:
After donwload, you should extract the pack to c:\xampp\htdocs\magento2 . E.g you have a folder call: magento2 in c:\xampp\htdocs\
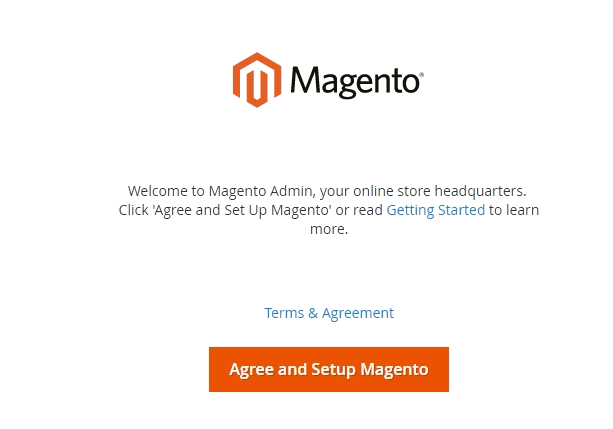
Step 4: Install Magento 2
Access to this address http://localhost/magento2 , you will get this Magento Setup Wizard as the following:
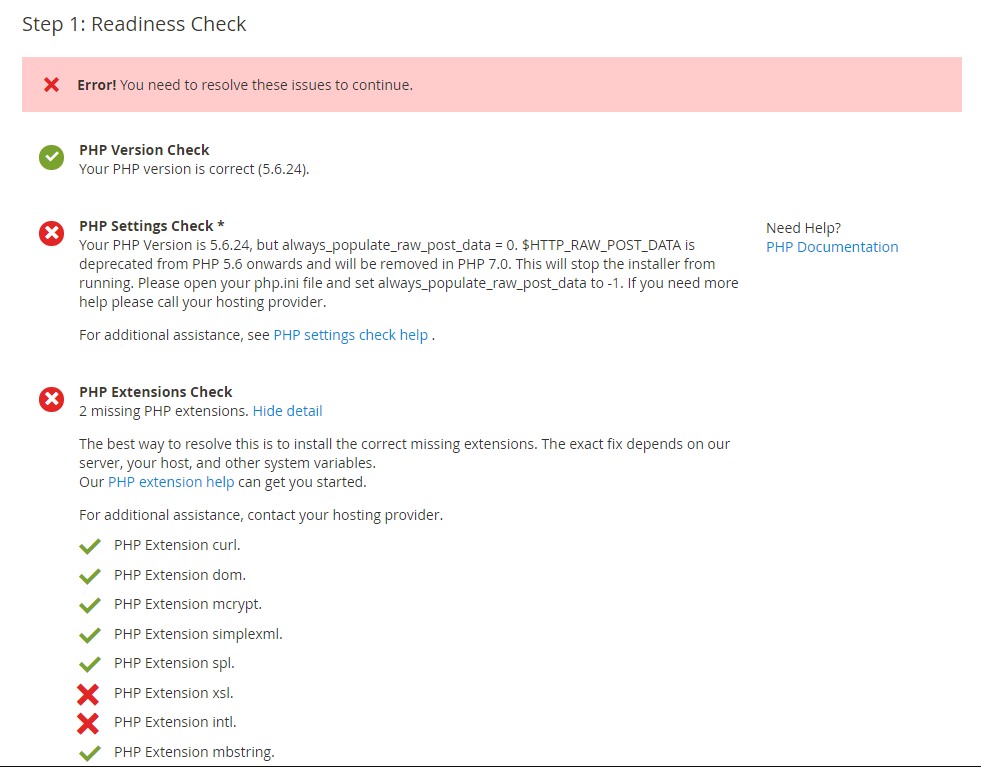
Step 4.3: Start Installing
- Click Start Readiness Check . If any errors are displayed, you must resolve them before you continue. Click More detail if available to see more information about each check.
- Click Next
Step 4.2 Add a Database
Fill database information then click Next
Step 4.3 Web Configuration
- Enter the following information:
- Your Store Address: http://localhost
- Magento Admin Address: Enter the relative URL by which to access the Magento Admin. e.g: secret, backend
- Then click Next
Step 4.4. Customize Your Store
- From the Store Default Time Zone list, click the name of your store’s time zone.
- From the Store Default Currency list, click the default currency to use in your store.
- From the Store Default Language list, click the default language to use in your store.
- Expand Advanced Modules Configuration to optionally enable or disable modules before you install the Magento software.

You can choose install Sample Data or not in this step.
Important!: Use Skip dependency check for individual modules with caution. We recommend against it because a typical reason for this error is you manually edited the deployment configuration. Editing the deployment configuration is not recommended because future Magento software updates can undo your changes.
Step 4.5. Create Admin Account
Now enter admin information such as
- New Username
- New E-Mail
- New Password
- Confirm Password
- Then click Next
Step 4.6. Install

After completing all previous steps in the Setup Wizard, click Install Now .
Installation Success The message Success will be displayed to indicate a successful installation.
Step 4.7: Check the result
Now go to the frontend and backend to see the result
Quick start install
We use Composer to manage Magento components and their dependencies. Using Composer to get the Magento software metapackage provides the following advantages:
- Reuse third-party libraries without bundling them with source code
- Reduce extension conflicts and compatibility issues by using a component-based architecture with robust dependency management
- Adhere to PHP-Framework Interoperability Group (FIG) standards
- Repackage Magento Open Source with other components
- Use the Magento software in a production environment
You can also download an archive file for a specific version of Magento in either ZIP or TAR format. Installing Magento from an archive lacks the advantages of using Composer. Contributing developers should use the git-based installation method.
Prerequisites
Before you continue, you must do the following:
Log in as file system owner
Learn about ownership, permissions, and the Magento file system owner in our Overview of ownership and permissions topic.
To switch to the Magento file system owner:
Log in to the Magento server as, or switch to, a user with permissions to write to the Magento file system. See switch to the Magento file system owner.
If you use the bash shell, you can use the following syntax to switch to the Magento file system owner and enter the command at the same time:
If the Magento file system owner does not allow logins, you can do the following:
To run Magento commands from any directory, add /bin to your system PATH .
Because shells have differing syntax, consult a reference like unix.stackexchange.com.
Sample bash shell for CentOS:
Optionally, you can run the commands in the following ways:
- cd /bin and run them as ./magento
- /bin/magento
- is a subdirectory of your web server docroot.
In addition to the command arguments discussed here, see Common arguments.
Get the metapackage
To get the Magento metapackage:
- Log in to your Magento server as, or switch to, the Magento file system owner.
- Change to the web server docroot directory or a directory that you have configured as a virtual host docroot.
Create a new Composer project using the Magento Open Source or Magento Commerce metapackage.
Magento Open Source
Magento Commerce
When prompted, enter your Magento authentication keys. Public and private keys are created and configured in your Magento Marketplace.
If you encounter errors, such as Could not find package. or . no matching package found , make sure there are no typos in your command. If you still encounter errors, you may not be authorized to download Magento Commerce. Contact Magento support for help.
See Troubleshooting for help with more errors.
Magento Commerce customers can access 2.4.x and 2.3.x patches two weeks before the General Availability (GA) date. Pre-release packages are available through Composer only. You cannot access pre-releases on the Magento Portal or GitHub until GA. If you cannot find these packages in Composer, contact Magento Support.
Example — Minor release
Minor releases contain new features, quality fixes, and security fixes. Use Composer to specify a minor release. For example, to specify the Magento Commerce 2.4.0 metapackage:
Example — Quality patch
Quality patches primarily contain functional and security fixes. However, they can also sometimes contain new, backward-compatible features. Use Composer to download a quality patch. For example, to specify the Magento Commerce 2.3.4 metapackage:
Example — Security patch
Security patches contain security fixes only. They are designed to make the upgrade process faster and easier.
Security patches use the Composer naming convention 2.3.2-px . Use Composer to specify a patch. For example, to download the Magento Commerce 2.3.2-p1 metapackage:
Set file permissions
You must set read-write permissions for the web server group before you install the Magento software. This is necessary so that the command line can write files to the Magento file system.
Install Magento
You must use the command line to install Magento.
This example assumes that the Magento install directory is named magento2ee , the db-host is on the same machine ( localhost ), and that the db-name , db-user , and db-password are all magento :
You can customize the Admin URI with the —backend-frontname option. However, we recommend omitting this option and allowing the installation command to automatically generate a random URI. A random URI is harder for hackers or malicious software to exploit. The URI displays in your console when installation is complete.
For a full description of the CLI install options, refer to Install the Magento software from the command line.
Command summary
To display a complete list of commands, enter:
To get help for a particular command, enter:
The following table summarizes the available commands. Commands are shown in summary form only. For more information about a command, click the link in the Command column.
| Command | Description | Prerequisites |
|---|---|---|
| magento setup:install | Installs the Magento software | None |
| magento setup:uninstall | Removes the Magento software. | Magento software installed |
| magento setup:upgrade | Updates the Magento software. | Deployment configuration |
| magento maintenance: | Enables or disables maintenance mode (in maintenance mode, only exempt IP addresses can access the Magento Admin or storefront). | Magento software installed |
| magento setup:config:set | Creates or updates the deployment configuration. | None |
| magento module: | Enable or disable modules. | None |
| magento setup:store-config:set | Sets storefront-related options, such as base URL, language, timezone, and so on. | Deployment configuration |
| Database (simplest way is to use magento setup:upgrade) | В | В |
| magento setup:db-schema:upgrade | Updates the Magento database schema. | Deployment configuration |
| magento setup:db-data:upgrade | Updates the Magento database data. | Deployment configuration |
| magento setup:db:status | Checks if the database is up-to-date with the code. | Deployment configuration |
| magento admin:user:create | Creates a Magento administrator. | All of the following: Enable at minimum the Magento_User and Magento_Authorization modules Database (simplest way is to use magento setup:upgrade) |
| magento list | Lists all available commands. | None |
| magento help | Provides help for the specified command. | None |
Common arguments
The following arguments are common to all commands. These commands can be run either before or after the Magento software is installed:
| Long version | Short version | Meaning |
|---|---|---|
| —help | -h | Get help for any command. For example, ./magento help setup:install or ./magento help setup:config:set . |
| —quiet | -q | Quiet mode; no output. |
| —no-interaction | -n | No interactive questions. |
| —verbose=1,2,3 | -v, -vv, -vvv | Verbosity level. For example, —verbose=3 or -vvv displays debug verbosity, which is the most verbose output. Default is —verbose=1 or -v . |
| —version | -V | Display this application version |
| —ansi | n/a | Force ANSI output |
| —no-ansi | n/a | Disable ANSI output |
Hooray! You’ve completed the quick install. Need more advanced help? Check out our Advanced install guide.
Advanced install
Totally lost? Need a helping hand? Try our Quick start install or Contributor install guides.
If you chose to enable SELinux, see SELinux and iptables.
Magento command-line interface (CLI)
Magento has one command-line interface that performs both installation and configuration tasks: /bin/magento . The new interface performs multiple tasks, including:
- Installing Magento (and related tasks such as creating or updating the database schema, creating the deployment configuration, and so on).
- Clearing the cache.
- Managing indexes, including reindexing.
- Creating translation dictionaries and translation packages.
- Generating non-existent classes such as factories and interceptors for plug-ins, generating the dependency injection configuration for the object manager.
- Deploying static view files.
- Creating CSS from Less.
- A single command ( /bin/magento list ) lists all available installation and configuration commands.
- Consistent user interface based on Symfony.
- The CLI is extensible so third party developers can “plug in” to it. This has the additional benefit of eliminating users’ learning curve.
- Commands for disabled modules do not display.
This topic discusses installing the Magento software using the CLI. For information about configuring Magento, see the Configuration Guide.
Before you start your installation
Before you begin, complete the following steps:
Verify that your system meets the requirements discussed in Magento system requirements.
Complete all prerequisite tasks.
Complete the first installation steps. See Your install or upgrade path.
After you log in to the Magento server, switch to the Magento file system owner.
You must install Magento from its bin subdirectory.
You can run the installer multiple times with different options to complete installation tasks like the following:
Install in phases—For example, after you configure your web server for Secure Sockets Layer (SSL), you can run the installer again to set SSL options.
Correct mistakes in previous installations.
Install Magento in a different database instance.
By default, the installer does not overwrite the Magento database if you install the Magento software in the same database instance. You can use the optional cleanup-database parameter to change this behavior.
Completely secure installation
To use Secure Sockets Layer (SSL), also referred to as HTTPS, for both the Magento Admin and the storefront, you must set all of the following parameters:
- —use-secure : Set to 1
- —base-url-secure : Set to a secure URL (that is, starting with https:// )
- —use-secure-admin Set to 1
More details about these parameters can be found later in this topic.
Installer help commands
You can run the following commands to find values for some required arguments:
| Installer argument | Command |
|---|---|
| Language | magento info:language:list |
| Currency | magento info:currency:list |
| Time zone | php magento info:timezone:list |
If an error displays when you run these commands, verify that you updated installation dependencies as discussed in Update installation dependencies.
Install the Magento software from the command line
The install command uses the following format:
The following tables describe the installation option names and values. For example installation commands. see Sample localhost installations.
Any options that contain spaces or special characters must be enclosed in either single or double quotes.
Admin credentials:
The following options specify the user information and credentials for the Magento admin user.
In Magento Commerce version 2.2.8 and later, you can create the Magento admin user during or after installation. If you create the user during installation, all admin credential variables are required. See Sample localhost installations.
| Name | Value | Required? |
|---|---|---|
| —admin-firstname | Magento administrator user’s first name. | Yes |
| —admin-lastname | Magento administrator user’s last name. | Yes |
| —admin-email | Magento administrator user’s e-mail address. | Yes |
| —admin-user | Magento administrator username. | Yes |
| —admin-password | Magento administrator user password. The password must be at least 7 characters in length and must include at least one alphabetic and at least one numeric character. We recommend a longer, more complex password. Enclose the entire password string in single quotes. For example, —admin-password=’A0b9%t3g’ | Yes |
Site and database configuration options:
| Name | Value | Required? |
|---|---|---|
| —base-url | Base URL to use to access your Magento Admin and storefront in any of the following formats: Note: The scheme (http:// or https://) and a trailing slash are both required. is the docroot-relative path in which to install the Magento software. Depending on how you set up your web server and virtual hosts, the path might be magento2 or it might be blank. To access Magento on localhost, you can use either http://127.0.0.1/ / or http://127.0.0.1/ / . — « which represents a base URL defined by a virtual host setting or by a virtualization environment like Docker. For example, if you set up a virtual host for Magento with the hostname magento.example.com, you can install the Magento software with —base-url= and access the Magento Admin with a URL like http://magento.example.com/admin. | Yes |
| —backend-frontname | Uniform Resource Identifier (URI) to access the Magento Admin. You can omit this parameter to let Magento generate a random URI for you with the following pattern admin_jkhgdfq . We recommend a random URI for security purposes. A random URI is harder for hackers or malicious software to exploit. The URI displays at the end of the installation. You can display it later at any time using the magento info:adminuri command. If you choose to enter a value, we recommend you not use a common word like admin, backend, and so on. The Admin URI can contain alphanumeric values and the underscore character ( _ ) only. | No |
| —db-host | Use any of the following: — The database server’s fully qualified hostname or IP address. — localhost (default) or 127.0.0.1 if your database server is on the same host as your web server.localhost means the MySQL client library uses UNIX sockets to connect to the database. 127.0.0.1 causes the client library to use the TCP protocol. For more information about sockets, see the PHP PDO_MYSQL documentation. Note: You can optionally specify the database server port in its hostname like www.example.com:9000 | Yes |
| —db-name | Name of the Magento database instance in which you want to install the Magento database tables. Default is magento2 . | Yes |
| —db-user | Username of the Magento database instance owner. Default is root . | Yes |
| —db-password | Magento database instance owner’s password. | Yes |
| —db-prefix | Use only if you’re installing the Magento database tables in a database instance that has Magento tables in it already. In that case, use a prefix to identify the Magento tables for this installation. Some customers have more than one Magento instance running on a server with all tables in the same database. The prefix can be a maximum of five characters in length. It must begin with a letter and can include only letters, numbers, and underscore characters. This option enables those customers to share the database server with more than one Magento installation. | No |
| —db-ssl-key | Path to the client key. | No |
| —db-ssl-cert | Path to the client certificate. | No |
| —db-ssl-ca | Path to the server certificate. | No |
| —language | Language code to use in the Admin and storefront. (If you have not done so already, you can view the list of language codes by entering magento info:language:list from the bin directory.) | No |
| —currency | Default currency to use in the storefront. (If you have not done so already, you can view the list of currencies by entering magento info:currency:list from the bin directory.) | No |
| —timezone | Default time zone to use in the Admin and storefront. (If you have not done so already, you can view the list of time zones by entering magento info:timezone:list from the bin directory.) | No |
| —use-rewrites | 1 means you use web server rewrites for generated links in the storefront and Admin. 0 disables the use of web server rewrites. This is the default. | No |
| —use-secure | 1 enables the use of Secure Sockets Layer (SSL) in storefront URLs. Make sure your web server supports SSL before you select this option. 0 disables the use of SSL with Magento. In this case, all other secure URL options are assumed to also be 0. This is the default. | No |
| —base-url-secure | Secure base URL to use to access your Magento Admin and storefront in the following format: http[s]:// / / | No |
| —use-secure-admin | 1 means you use SSL to access the Magento Admin. Make sure your web server supports SSL before you select this option. 0 means you do not use SSL with the Admin. This is the default. | No |
| —admin-use-security-key | 1 causes the Magento software to use a randomly generated key value to access pages in the Magento Admin and in forms. These key values help prevent cross-site script forgery attacks. This is the default. 0 disables the use of the key. | No |
| —session-save | Use any of the following: — db to store session data in the database. Choose database storage if you have a clustered database; otherwise, there might not be much benefit over file-based storage. — files to store session data in the file system. File-based session storage is appropriate unless the Magento file system access is slow, you have a clustered database, or you want to store session data in Redis. — redis to store session data in Redis. If you will be using Redis for default or page caching, Redis must be already installed. See Use Redis for session storage for additional information about configuring support for Redis. | No |
| —key | If you have one, specify a key to encrypt sensitive data in the Magento database. If you don’t have one, Magento generates one for you. | Yes |
| —cleanup-database | To drop database tables before installing the Magento software, specify this parameter without a value. Otherwise, the Magento database is left intact. | No |
| —db-init-statements | Advanced MySQL configuration parameter. Uses database initialization statements to run when connecting to the MySQL database. Consult a reference similar to this one before you set any values. Default is SET NAMES utf8; . | No |
| —sales-order-increment-prefix | Specify a string value to use as a prefix for sales orders. Typically, this is used to guarantee unique order numbers for payment processors. | No |
Elasticsearch configuration options:
| Name | Value | Required? |
|---|---|---|
| —search-engine | The version of Elasticsearch to use as the search engine. Possible values are elasticsearch7 , elasticsearch6 , and elasticsearch5 . The default is elasticsearch7 . Elasticsearch 5 has been deprecated and is not recommended. | No |
| —elasticsearch-host | The host name or IP address where Elasticsearch is running. The default is localhost . | No |
| —elasticsearch-port | The port for incoming HTTP requests. The default is 9200 . | No |
| —elasticsearch-index-prefix | A prefix that identifies the Elasticsearch index. The default is magento2 . | No |
| —elasticsearch-timeout | The number of seconds before the system times out. The default is 15 . | No |
| —elasticsearch-enable-auth | Enables authentication on the Elasticsearch server. The default is false . | No |
| —elasticsearch-username | The user ID to authenticate Elasticsearch | No, unless authentication is enabled |
| —elasticsearch-password | The password to authenticate Elasticsearch | No, unless authentication is enabled |
RabbitMQ configuration options:
| Name | Value | Required? |
|---|---|---|
| —amqp-host | Do not use the —amqp options unless you have already set up an installation of RabbitMQ. See RabbitMQ installation for more information about installing and configuring RabbitMQ. The hostname where RabbitMQ is installed. | No |
| —amqp-port | The port to use to connect to RabbitMQ. The default is 5672. | No |
| —amqp-user | The username for connecting to RabbitMQ. Do not use the default user guest . | No |
| —amqp-password | The password for connecting to RabbitMQ. Do not use the default password guest . | No |
| —amqp-virtualhost | The virtual host for connecting to RabbitMQ. The default is / . | No |
| —amqp-ssl | Indicates whether to connect to RabbitMQ. The default is false . See RabbitMQ for information about setting up SSL for RabbitMQ. | No |
| —consumers-wait-for-messages | Should consumers wait for a message from the queue? 1 — Yes, 0 — No | No |
Lock configuration options:
| Name | Value | Required? |
|---|---|---|
| —lock-provider | Lock provider name. Available lock providers: db , zookeeper , file . The default lock provider: db | No |
| —lock-db-prefix | The specific db prefix to avoid lock conflicts when using db lock provider. The default value: NULL | No |
| —lock-zookeeper-host | Host and port to connect to Zookeeper cluster when you use zookeeper lock provider. For example: 127.0.0.1:2181 | Yes, if you set —lock-provider=zookeeper |
| —lock-zookeeper-path | The path where Zookeeper will save locks. The default path is: /magento/locks | No |
| —lock-file-path | The path where file locks will be saved. | Yes, if you set —lock-provider=file |
Consumers configuration options:
| Name | Description | Value | Required |
| —consumers-wait-for-messages | Determines if consumers will wait for a message from the queue. | 1 — Yes, 0 — No | No |
0 : Consumers process available messages in the queue, close the TCP connection, and terminate. Consumers do not wait for additional messages to enter the queue, even if the number of processed messages is less than the —max_messages value specified during starting consumers.
1 : Consumers continue to process messages from the message queue until reaching the maximum number of messages (the value specified for —max_messages on the queue:consumers:start command) before closing the TCP connection and terminating the consumer process. If the queue empties before reaching —max_messages the consumer waits for more messages to arrive. If you use workers to run consumers instead of using a cron job, set this variable to 1 .
The —consumers-wait-for-messages option is a global option and cannot be configured separately for each consumer.
To enable or disable modules after installing Magento, see Enable and disable modules.
What is sensitive data?
Magento uses your encryption key to encrypt the following:
- Credit card information
- Usernames and passwords specified in the Magento Admin configuration (for example, logins to payment gateways)
- CAPTCHA values sent over the network
Magento does not encrypt:
- Administrative and customer usernames and passwords (these passwords are hashed)
- Address
- Phone number
- Other types of personally identifiable information except for credit card numbers
Sample localhost installations
The following examples show the commands to complete install Magento Commerce locally with various options.
Example 1—Basic installation with admin user account
The following example installs Magento with the following options:
The Magento software is installed in the magento2 directory relative to the web server docroot on localhost and the path to the Magento Admin is admin ; therefore:
Your storefront URL is http://127.0.0.1
The database server is on the same host as the web server.
The database name is magento , and the username and password are both magento
Uses server rewrites
The Magento administrator has the following properties:
- First and last name are Magento User
- Username is admin and the password is admin123
- E-mail address is user@example.com
Messages similar to the following display to indicate a successful installation:
Example 2— Basic install without admin user account
You have the option to install Magento without creating the Magento administrator user as shown in the following example.
Messages like the following display if the installation is successful:
After installation you can create an admin user using the admin:user:create command: Create or edit an administrator
Example 3—Install with additional options
The following example installs Magento with the following options:
The Magento software is installed in the magento2 directory relative to the web server docroot on localhost and the path to the Magento Admin is admin ; therefore:
Your storefront URL is http://127.0.0.1
The database server is on the same host as the web server.
The database name is magento , and the username and password are both magento
The Magento administrator has the following properties:
- First and last name are Magento User
- Username is admin and the password is admin123
- E-mail address is user@example.com
You must enter the command either on a single line or, as in the preceding example, with a \ character at the end of each line.
Messages like the following display if the installation is successful:
If you have one user account to access the Magento server, see Optionally set a umask.
This type of setup is typical for shared hosting.


