- Missing Windows Installer cache requires a computer rebuild
- Summary
- More information
- Third-party recovery tools
- Other error messages
- Report availability
- missing file message on Windows 10 install
- Replies (4)
- Troubleshoot and Restore Missing Windows Installer Cache files
- Missing Windows Installer Cache files
- Use Restore-InstallerFiles PowerShell script
- Windows Installer Cache Verifier Package
- FIX: Windows Cannot Install Required Files 0x8007025D
- What is Error 0x8007025D?
- Bad HDD or SSD space
- Corrupt or bad RAM
- Solutions to Fix Error 0x8007025D
- Method 1: Unplug all other external devices
- Method 2: Reduce the size of HDD or SSD disk space and format it
- Method 3: Download a new Windows 10 ISO image file
- Method 4: Try writing the image onto another USB drive
- Method 5: Run a memory diagnostic on your RAM and replace a bad RAM stick
- Note:
Missing Windows Installer cache requires a computer rebuild
This article discusses how to restore missing Windows Installer cache files.
Original product version: В Windows 10 — all editions, Windows 7 Service Pack 1, Windows Server 2012 R2
Original KB number: В 2667628
Summary
The Windows Installer Cache is used to store important files for applications that are installed by using Windows Installer. By default, this cache is located in the c:\windows\installer folder, and it should not be deleted. If the installer cache is compromised, you may not immediately see problems until you take an action such as uninstalling, repairing, or updating a product.
When a product is installed by using the Windows Installer, important files are stored in the Windows Installer cache that are required for uninstalling and updating applications. Missing files cannot be copied between computers because the files are unique.
More information
If application files are missing from the Windows Installer Cache, ask the vendor or support team for the application about the missing files. You must follow the procedures or steps recommended by the application vendor to restore the files. In some cases, you may have to rebuild the operating system and reinstall the application to fix the problem.
Windows support engineers cannot help you recover missing application files from the Windows Installer cache.
If the missing installer cache files are Microsoft Office or SharePoint files, follow the instructions in the following topics on the Microsoft website:
Third-party recovery tools
Some third-party entities claim to be able to rebuild or repair the Windows Installer cache. For legal and supportability reasons, we cannot recommend or endorse any of these entities. If you use such third-party products and recommendations, you do this at your own risk. If you have backups for your system that were made before the file deletions, consider the following options:
- System Restore points (available only on client operating systems)
- Restoreable system state backup
- Failure recovery methods that can restore the full system state backup
- Reinstallation of the operating system and all applications
To restore the missing files, a full system state restoration is required. It is not possible to replace only the missing files from a previous backup.
Other error messages
Other error messages might be triggered by missing Windows Installer Cache files. Many of the following messages are SQL-specific and are not limited to this issue. These entries are logged in either the Setup or MSI Verbose log.
1612: The installation source for this product is not available. Verify that the source exists and that you can access it.
1620: This installation package could not be opened. Contact the application vendor to verify that this is a valid Windows Installer package.
1635: Unable to install Windows Installer MSP file
This update package could not be opened. Verify that the update package exists and that you can access it, or contact the application vendor to verify that this is a valid Windows Installer update package.
1636: Unable to install Windows Installer MSP file
1642: The upgrade cannot be installed by the Windows Installer service because the program to be upgraded may be missing, or the upgrade may update a different version of the program. Verify that the program to be upgraded exists on your computer and that you have the correct upgrade.
1706: The endpoint format is invalid.
1714: The older version of Microsoft SQL Server Native Client cannot be removed.
Report availability
We strongly encourage you to download this package from the portal instead of reusing a portable copy. If you submit the results, the latest diagnostic rules will be used. This package is frequently updated.
The report is available immediately after you run this tool without submitting the results to Microsoft. The report is an XML file. It will be located in the user profile Temp folder in a path that resembles the following:
missing file message on Windows 10 install
Replies (4)
Hi Samson. I»m Greg, an installation specialist, 9 year Windows MVP and Independent Advisor, here to help you.
I will give you all possible steps to troubleshoot installation failure which work in about 90% of cases. If not we’ll go from there:
Follow the illustrated Clean Install steps in this tutorial which compiles the best possible install that will stay that way as long as you stick with the tools and methods given: http://answers.microsoft.com/en-us/windows/wiki.
Make sure all other drives and peripherals are unplugged. Update the BIOS or UEFI firmware to latest, or reset to Defaults, making sure SATA controller is set to AHCI, UEFI is enabled, CSM disabled, Windows Boot Manager set first to boot, if necessary disable Secure and Fast Boot until after install: https://www.mydigitallife.net/comprehensive-lis.
https://www.groovypost.com/howto/reset-pc-bios-.
Create the latest new Windows 10 Installation Media by installing Media Creation Tool and following the directions here: http://windows.microsoft.com/en-us/windows-10/m. . If you’re using another PC to do this then uncheck the box for Recommended Settings to choose the exact version and bit rate for the target PC only.
Insert media, boot it by powering up PC while pressing the BIOS Boot Menu Key: https://www.sysnative.com/forums/hardware-tutor.
If the media won’t boot you may need to enter BIOS/UEFI Setup (pressing key given in chart in link above) to turn off Fast Boot or Fast Startup first. If you can start Windows enter UEFI firmware here: http://www.isunshare.com/windows-password/four-.
Choose the boot device as a UEFI device if offered, on first screen press Shift + F10 to open a Command Prompt, type the following commands, each followed by Enter key:
DISKPART
LIST DISK
SEL DIS # (replace # with the disk # of the Windows disk from list in previous command)
CLEAN
EXIT
Close Command Box, on second screen choose Install Now, then Custom Install, then at the drive selection screen choose Unallocated Space, click Next to let it create needed partitions and start install — this makes it foolproof.
Make sure to follow the setup steps in the first link tutorial to complete your install. Drivers are important enough that those steps are printed in red.
You will get and keep the best possible install to the exact extent you stick with the steps, tools and methods in the first linked tutorial. It’s a better install than any amount of money could buy and a great learning experience that will make you the master of your PC.
I hope this helps. Feel free to ask back any questions and let us know how it goes. I will keep working with you until it’s resolved.
________________________________________________________
Standard Disclaimer: There are links to non-Microsoft websites. The pages appear to be providing accurate, safe information. Watch out for ads on the sites that may advertise products frequently classified as a PUP (Potentially Unwanted Products). Thoroughly research any product advertised on the sites before you decide to download and install it.
Windows MVP 2010-20
Over 100,000 helped in forums in 10 years
I do not quit for those who are polite and cooperative.
I will walk you through any steps and will not let you fail.
Troubleshoot and Restore Missing Windows Installer Cache files
The Windows Installer cache folder is a hidden system folder located at C:\Windows\Installer. Whenever you install a software using the Windows Installer, a copy of changed system information is placed in this folder. The Windows Installer cache contains the saved copies of the installed updates that are applied by the Installer.
This information is required, should you later decide to uninstall the software. This information is stored, not in the form of complete files, but simply as a triggering MSI. If you delete the particular files or folder, you probably would not be able to uninstall or repair or even update the program using the Windows Installer. That is why one should never delete the contents of the Windows Installer folder.
But if you do face a situation where you find that you are unable to uninstall, repair, or update some software, even when you have not deleted any files from the cache, it may be possible that Windows Installer cache folder may have been compromised or corrupted. For instance. Windows Installer will clean-out the installer cache if ever the owner on the %WINDIR%\Installer directory changes from SYSTEM or Administrators.
If you think of copying the missing installer files from some other computer to this one, it will not help, as the files from the cache are unique for every system.
Missing Windows Installer Cache files
Microsoft Support or third-party software will not really be able to help you recover the missing files from the Windows Installer cache. You may have to reinstall the software or maybe even have to rebuild the operating system, using system restore points, system backups – or even reinstall the operating system.
There are other system error messages that can arise as a consequence of missing Windows Installer Cache files.The errors that could be logged are:
- 1612 The installation source for this product is not available. Verify that the source exists and that you can access it.
- 1620 This installation package could not be opened. Contact the application vendor to verify that this is a valid Windows Installer package.
- 1635 Unable to install Windows Installer MSP file
- This update package could not be opened. Verify that the update package exists and that you can access it, or contact the application vendor to verify that this is a valid Windows Installer update package.
- 1636 Unable to install Windows Installer MSP file
- 1642 The upgrade cannot be installed by the Windows Installer service because the program to be upgraded may be missing, or the upgrade may update a different version of the program. Verify that the program to be upgraded exists on your computer and that you have the correct upgrade.
- 1706 The endpoint format is invalid.
- 1714 The older version of Microsoft SQL Server Native Client cannot be removed.
To restore the missing files, a full system state restoration is required. It is not possible to replace only the missing files from a previous backup. You can read more about them at KB2667628.
Use Restore-InstallerFiles PowerShell script
You can use this PowerShell script “Restore-InstallerFiles.ps1” to scan for the missing Installer files and to restore them from different sources such as the Local folder, Shared folder or another machine which can be accessed from the target machine. It is available on TechNet.
Windows Installer Cache Verifier Package
The Windows Installer Cache Verifier Package troubleshooter is integrated with the Microsoft Support Diagnostics service. This service can run an automated diagnostic analysis to determine solutions.
The Windows Installer Cache Verifier Package troubleshooter can perform automated diagnostic analysis to identify solutions and find if you are missing Windows Installer Cache files.
To run the troubleshooter, visit Microsoft Fix it Center Pro and sign in using your Microsoft Account. You will see a list of Analysis packages. Search for and click on Windows Installer Cache Verifier Package. Give your Analysis Session a name and click Save. You will need this name to be able to see the analysis later on.
Follow the on-screen instructions to download and run the Windows Installer Cache Verifier Package.
Once done, go here after an hour or so, to view the analysis results.
Look for the name you gave for your Analysis Session and check if any of the possible recommended solutions help you.
FIX: Windows Cannot Install Required Files 0x8007025D
Windows 10 has come with many perks but has been one of the hardest systems to update to owing to the numerous errors consumers encounter during installation. One of them is error 0x8007025D that appears and halts installation after a certain percentage. Retrying will only give you the same error. Several people who have sought answers from online indicated that they were running a clean install from their USB drive.
This page is going to explain to you why error 0x8007025D appears. The error might be brought by several issues, but they are all related to the USB buffering system. After a brief explanation of what the error means we will the give you the steps to resolve this error.
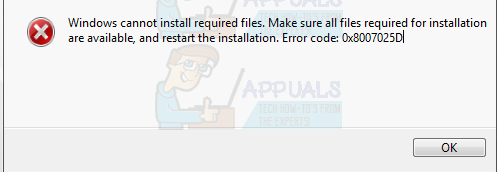
What is Error 0x8007025D?
According to windows support, 0x8007025D = ERROR_BAD_COMPRESSION_BUFFER = the specified buffer contains ill-formed data. USB 3.0 uses the Message Signaled Interrupt (MSI) mode for communications with the system. USB 2.0 uses the much older Interrupt Request (IRQ) system. One feature of the new MSI system that USB 3.0 devices use is asynchronous handling of data transfer between the device and system. This requires a buffer through which data is streamed to at high data rates (“SuperSpeed”), which is then decoded by the system. If you receive error 0x8007025D then probably your PNY devices are sending bad or corrupted data to the buffers, your device’s buffers are choked or your device can’t decode the data properly. Here are the reasons why you might be receiving this error.
Corrupt data on the USB drive means that this data cannot be decoded properly thus throwing this error. Corrupt data may be from the corrupt .ISO image file used to create the bootable USB drive. If the file that should be copied is missing or corrupt, you will get this error. The issue might also arise from a bad flash drive that is corrupt of unreadable at a certain section. In the case where you might have plugged in another USB device that is read as another disk drive, the data sent to the buffer by this devices might cause the error.
Bad HDD or SSD space
If the HDD or SSD has a bad sector or record and the Windows installation tries to copy files to this space, an error is returned to the buffer, which in turn displays error 0x8007025D. This can be caused by prolonged use of a disk space (e.g. to play computer games) or storage space that needs to be checked or formatted. A failing HDD can also be the issue causing you error 0x8007025D.
Corrupt or bad RAM
A bad RAM is also likely to be a cause to this error. Since a clean install does not fight for space with other programs, it means that the whole RAM can be dedicated to installing windows 10 so even a tiny corrupt or bad section of the RAM can cause this issue. Windows 10 needs at least 1GB of RAM to install. If data is copied to a bad section of the RAM, then the buffer technology will receive an error therefore displaying error 0x8007025D on your screen.
Solutions to Fix Error 0x8007025D
Here are the things you need to do in order to resolve the issues. If the first method does not work for you, proceed to the next one since this error might be as a result of several different issues. We have listed them beginning from the simplest and least expensive to do, to the hardest and most expensive method.
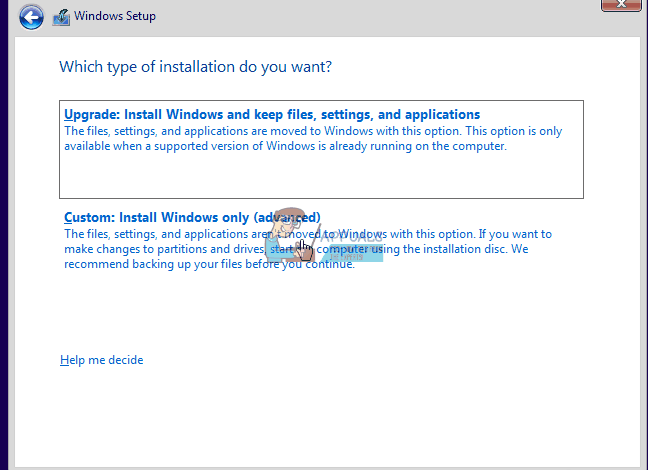
We are not going to talk about how to install Windows 10 in this page, only on how to resolve the error 0x8007025D. If you need help with the clean installation of Windows 10, please go to our Windows 10 installation guide page here or here.
Method 1: Unplug all other external devices
Unplug all your USB devices and other peripheral devices including the internet cable. Most of the times the Windows installation will throw an error because of bad hardware drivers or outdated drivers.
It also turns out that after copying the files to your computer, windows installation might not need your USB drive anymore. Just unplug your drive and see if the installation will continue from where it left off.
Retry to see if this works, if not, go to the next method.
Method 2: Reduce the size of HDD or SSD disk space and format it
You only need around 20GB of space to install windows 10. We will recommend reducing your installation partition to around 125GB. This will reduces the chances that the space you are copying to is corrupted. You can reduce the disk space by clicking on the “extend” option after choosing to custom install windows 10. Make sure, however, that your hard drive is healthy and not damaged in any way.

If you are doing a clean install, make sure that you format the partition you are installing into. This will iron out the bad sectors and records. To format your partition, choose to install a customized Windows 10, click on the “format” button and accept to format.
Retry the installation.
Method 3: Download a new Windows 10 ISO image file
There is a possibility that the image file you downloaded has a corrupt file that would not be decoded or be copied. It is entirely possible that the file is missing from the USB drive or the disk especially if you downloaded the file via image creation.
You will need to download the files again, create your USB installation drive and then retry the installation. To download Windows 10 .ISO file, go to the Microsoft page here. You will also get instructions on how to download and use the media creation tool to create a bootable USB drive. While installing, make sure to uncheck the Recommended Windows settings and check if that works.
Method 4: Try writing the image onto another USB drive
In the event that your USB drive is corrupt or has an unreadable section, then the buffer technology will detect this error and throw the 0x8007025D error on your screen.
You will therefore need another USB drive for this method. Create the installation files into the new drive and retry the installation. Creating the installation drive from another computer might help resolve the issue.
If you were using USB 3.0 earlier, you could try using a USB 2.0 port since it uses a different technology from USB 3.0 to read the data.
Here is our guide on how to use Rufus to create a bootable Windows 10 USB media device. If you wish to use the Microsoft Media Creation Tool to create your drive, follow the instructions here.
Method 5: Run a memory diagnostic on your RAM and replace a bad RAM stick
If all the above methods have failed, then we are down to the most expensive method here and this is probably the problem with your PC. However, this has solved the error for most of the installations. It seems that the Windows 10 setup would rather not install Windows on your device if it finds a bad RAM, than crashing all the time after installation.
If you have two RAM sticks, each of at least 1GB, you can try removing either and trying the installation (swap if the first one returns an error). You can also check for RAM errors using the memory diagnostics tool in BIOS. To run a memory diagnosis simply:
- Immediately on booting your PC. press f2, or f8, or f10 key (depending on your computer) repeatedly, to enter the BIOS setup window.
- Use the Left Arrow and Right Arrow keys to select Diagnostics.
- Use the Down Arrow and Up Arrow keys to select the Memory Test, and then press the enter key to begin the test. Make note of the errors
If it persists or you find error in your RAM, replace your RAM and retry your installation.
Note:
We also received reports from several users that reverting the BIOS to default configurations along with changing the RAM stick solved the problem for them instantly. If all the above methods don’t work, you can try this and see if this fixes the problem.


