- Installing a Mod Pack on Your Server
- How to Install Minecraft Mods
- Using the JAR Installer
- Vanilla: latest download
- Bukkit: latest download
- FTB: latest download
- Tekkit: latest download
- How To Install Forge Mods (Client Side)
- Overview
- Adding mods to Minecraft Forge
- Common Issues
- Как создать сервер майнкрафт с модами и Forge
- Создадим сервер:
- Настройка сервера:
- Работа с сервером:
- Как установить моды:
- Правила сервера с модами:
- How to Add Mods to a Minecraft Server
- Overview
- How to Install Mods on a Minecraft Server
- Common Issues
- Related Content
Installing a Mod Pack on Your Server
Last modified on Feb 25, 2021 in control panel

Since the game of Minecraft is very sandbox-like you can turn your hosting account into any type of server that you would like. There are endless options only limited by the imagination but each has an associated level of difficulty for bringing to life and the number of server resources necessary. As you add more players and plugins your server will require more RAM and a more expensive Minecraft hosting package. Don’t worry though, it is fine to start small and expand your services as required instead of needing to invest a lot of money into something that you really haven’t started to build yet.
How to Install Minecraft Mods
You can quickly install a variety of modpacks onto your server using our JAR Installers. The process generally takes a few clicks and is ready to go within 2 minutes. This hassle-free option is available to any plan higher 2gb. While you have this option with the majority of our plans it recommended you go with an 4gb plan to ensure your server has enough resources to run all those mods. Now when you opt to use the JAR Installer it’s best to you do it on a clean slate, ensuring all server files are deleted to a guarantee a successful installation.
Using the JAR Installer
- Navigate to the respective servers details page and locate the JAR setting.
- Next to it will be an input field along with a dropdown: containing a list of our pack installers as well as some other choices. At this point you should review the list for the modpack you plan on having installed.
- When you find the one you want, select it and then click save.
- Once saved you will then need to restart the server for the installer to take effect.
- As you start the server the installer will being to download and extract the respective files for the pack and load them onto the server. During this time you can review its progress by access your console for its pre-initialization log.
- The pre-initialization can take about 1-2 minutes depending on the pack and should keep a steady progression throughout the process.
- Once finished you get a green check indicating your all good and the servers up.
- From this point you simply need to open the respective launcher and connect to the server.
When we are talking about customizing a server the first item to decide is what type of modification pack you would like your server to run on. I will outline all of the available packages discussing some features of each.
Vanilla: latest download
This isn’t a mod pack, just the standard set of tools available in Minecraft. This is the lightest of packages requiring minimal sources to run. If you just want to get your feet wet in Minecraft and build things and kill Creepers this will be a good starting place with the cheapest minecraft hosting costs associated with your exploration.
Bukkit: latest download
This is one of the most popular addons for your minecraft server available due to the vast amount of plugins available. It is also easy to discover plugins by visiting sites which stored thousands of the latest and most popular addons available for the server. Our hosting account come with Bukkit built in and can be activated instantly. This isn’t exactly the easiest to work with though as most of the plugins will need to be configured properly to work together, but it does give the user the easiest way to make a completely custom server. There are even some packages of extras available which will turn a basic Bukkit server into a full-featured gametype at the click of a button. Find the latest Version here
FTB: latest download
FTB is a group of plugins and a mod pack built into one. You will activate this on your server to run whatever specific gametype you have downloaded and added to your server. There are many packages available with Unleashed being one of the most popular items. In addition, the interface is greatly simplified by client which allows you to download and launch the games. Find the latest Version here
Tekkit: latest download
Tekkit is one of the more advanced frameworks available for the server owner and programmer. It is a very interesting set of mods which sets the platform for exploring spaces never seen before in Minecraft. If you have become bored with the standard game types and packages then getting familiar with Tekkit will take your minecraft hosting to a whole new dimension. Find the latest Version here
How To Install Forge Mods (Client Side)
Last modified on Feb 25, 2021 in General
Overview
Having a modded Minecraft server is a great way to customize your gameplay experience. However, playing with mods is not as simple as just uploading them to your server. For every mod that goes into your server, it has to be run client-side. Minecraft by default does not run mods so you need to use a mod loader, Forge. There are multiple different ways you can add mods whether you are just installing Forge and the mods manually to Minecraft or if you are using a launcher such as the Twitch Desktop App. Adding mods to your Minecraft client can be tricky, however, we will be walking you through each step of the process.
Keep in mind that in order for mods to work, you must be running Forge. You can find our guide on installing Minecraft Forge here.
Adding mods to Minecraft Forge
This section only covers how-to on the default Minecraft launcher with Forge installed.
- You need to get the mods from CurseForge or the mod author’s official site. Doing this ensures that you won’t get corrupted files or viruses.
- Once you decide on a mod you want, click the name to open the mod page.
- Open the Files tab to view the versions. To the right of the version you want, press download. It’s best to download the latest recommended update for your version of Minecraft.
- Head back to the mods page and open the Relations tab. This is very important as these are the mods you need for it to work correctly. If you don’t download the dependencies, the mod will not function properly or can cause the game to crash.
- Make sure your Minecraft client is closed.
- Press the Windows Key (Start)
- Type in %appdata% and press enter.
- Open the .minecraft folder and then enter the mods folder.
- From here, just drag in the mods that you wish to add.
- Open Minecraft again and click Play, and the mods should now be loaded. You can check this by clicking the Mods tab on the Minecraft homepage.
- Make sure your Minecraft client is closed.
- At the top of your Mac, click the Go tab and then “Go to Folder…”.
- Type in
/Library/Application Support/minecraft and click Go.
Common Issues
Minecraft Crashes on startup
Minecraft crashing on startup can be a result of a variety of different issues. If this is happening to you, you need to check that all of your mods are for the correct version of Forge, there are no duplicate mods, and that you are not missing any dependencies. You can also test to see if it is the mods crashing the game by launching it without any mods loaded. If you still can’t find out which mod is the issue, you can add the mods back one at a time. This may take a bit of time but it is effective.
Getting Mod Rejections when trying to join a server
Having a mod rejection either means that the mod is not the same version as the one from the server, or that you are missing a mod on your Minecraft client that is on your server or vice versa. Double-check that your mods folder from client-side matches with the server-side mods folder with the exception of client-side only mods.
This server has mods that require FML/Forge to be installed on the client
This means that Forge is not on your Minecraft client at all. This could be that you are just launching the wrong version. Close the client and double-check that it is running the Forge version, if you don’t see Forge under the versions you will need to reinstall it.
Как создать сервер майнкрафт с модами и Forge
В этой инструкции я расскажу как создать и запустить простой сервер майнкрафт вместе с модами для игры со своими друзьями используя хамачи или общую сеть и даже интернет.
В данной статье я буду использовать официальный сервер майнкрафт на который будет произведена установка Forge, установлены моды и вы сможете играть с друзьями в сборки.
Создадим сервер:
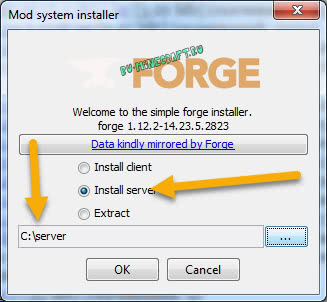
Скачайте установочник Minecraft forge необходимой версии, exe или jar, не важно.
Запустите скачанный файл, в данном окне выберите Install server, а ниже укажите произвольную папку в которой будет ваш сервер, нажмите Ok.
Установочник сам все скачает, необходим интернет.
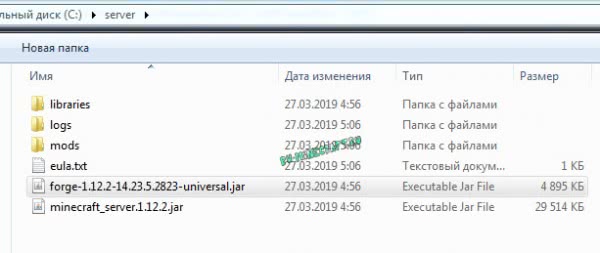
Перейдите в папку которую указали, там вы увидите примерно это:
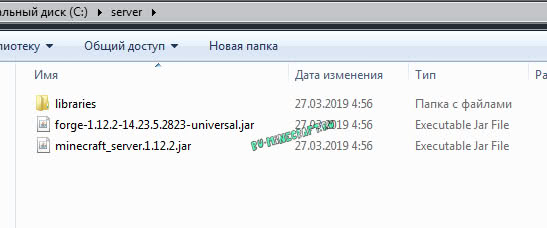
Вам необходимо запустить файл fоrge-1.12.2-14.23.5.2823-universal.jar (будет ваша версия форджа, более новая)
Если этот файл открывается при помощи Winrar или любой другой программы, то смотрите информацию под спойлером.
Я настоятельно рекомендую создать start.bat для запуска, это займет всего пол минуты.
Создайте в папке сервера текстовый документ, поместите внутрь такую строчку:
Внимание название файла сервера указывается в строке, в данном случае forge-1.12.2-14.23.5.2823-universal.jar, если вы переименовали, либо у вас другая версия, измените название на ваше.
Так же значение 1024 указывает максимальное количество оперативной памяти доступной для сервера, если модов много, то необходимо выделять больше памяти.
Важным моментом является параметр nogui, он отключает окно сервера которое показывает игроков и график нагрузки на сервер, да, это окно может быть удобным, но лично у меня оно очень сильно нагружает процессор при работе сервера, НАСТОЯТЕЛЬНО рекомендую отключать GUI сервера.
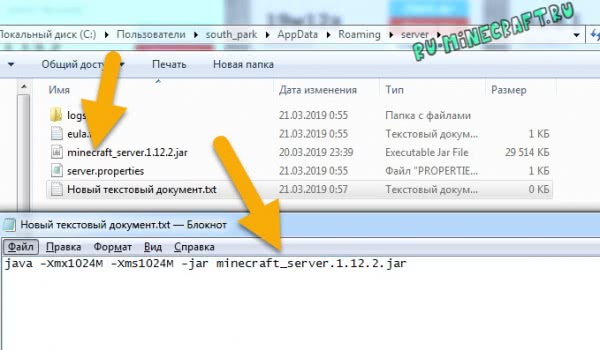
Сохраните файл, переименуйте его например в start и замените расширение .txt на .bat

После того как вы запустите файл, в папке появятся несколько папок и файлов:
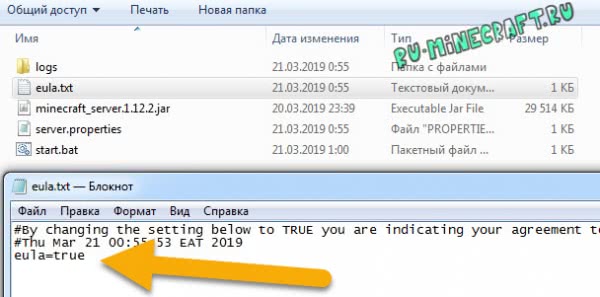
Откройте файл eula.txt, внутри измените eula=false на eula=true
Запустите сервер при помощи двойного клика по fоrge-1.12.2-14.23.5.2823-universal.jar или по start.bat
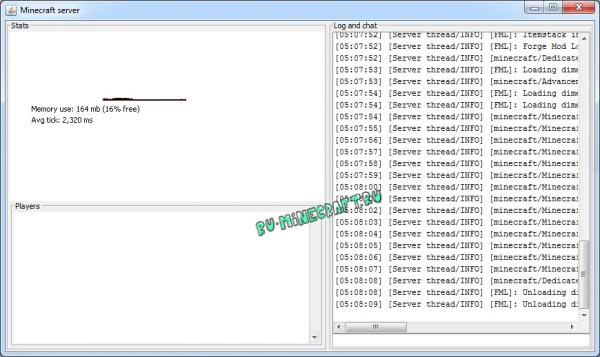
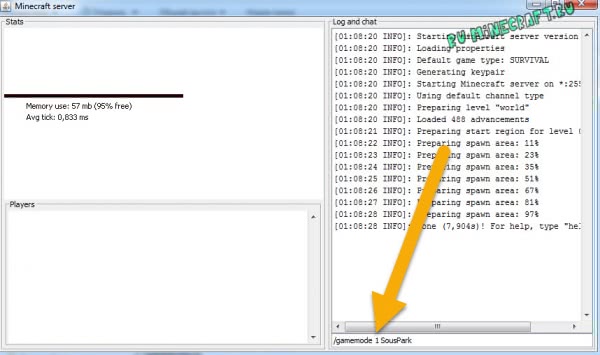
У вас должно открыться окно c консолью сервера:
Если у вас пиратка, обязательно читайте раздел настройки.
Настройка сервера:
Перейдем к базовой настройке, закройте окно сервера если оно открыто.
1) Откройте файл server.properties в нем есть основные настройки сервера, я затрону только базовые необходимые.
2) Если у вас пиратка, то что бы вас пускало на сервер найдите параметр online-mode=true и измените его на online-mode=false
3) Укажите IP своего сервера в параметре server-ip=
Вы можете указать IP своего пк в интернете (не забывайте открыть порты), IP в хамачи, локальный адрес пк если ваши игроки находятся в одной сети ( подключены к одному вайфай или проводом)
Инструкция как настроить хамачи.
Инструкция как играть по сети
4) Значение — max-players=20 указывает максимальное количество игроков, все прочие настройки вы легко найдете поискав в гугле.
Работа с сервером:
Как установить моды:
Моды устанавливаются подобно обычному майнкрафту, вы помещаете мод и зависимости в папку mods вашего выключенного сервера, хотя есть несколько правил.
Правила сервера с модами:
Если ваш сервер не запускается, то читайте файл лога в папке logs, там может быть написан проблемный мод и причину сбоя.
How to Add Mods to a Minecraft Server
Last modified on Feb 25, 2021 in Control Panel
Overview
If you have been playing Vanilla Minecraft, or using a premade modpack, it is likely that you have already explored all there is to do. Why not start exploring into customizing your server further? A great way to customize your server is by adding mods. Whether you are adding them to an existing modpack or to your current Forge setup, adding mods is a great way to open up new possibilities. Mods can be added with just a few steps and we will walk you through each of them so you can build your dream server.
When running a modded server, do not forget that you need to have the mods downloaded on your Minecraft client. This also applies if you are adding additional mods to an already created modpack. In order to run mods on your client, you will need to install Forge client side.
How to Install Mods on a Minecraft Server
- You need to get the mods from CurseForge or the mod authors official site. Doing this ensures that you won’t get corrupted files or viruses.
- Once you decide on a mod you want, click the name to open the mod page.
- Open the Files tab to view the versions. To the right of the version you want, press download. It’s best to download the latest recommended update for your version of Minecraft.
- Head back to the mods page and open the Relations tab. This is very important as these are the mods you need for it to work correctly. If you don’t download the dependencies, the server will not function properly, or at all.
- Make sure that your server is set to Forge under the jar dropdown. You can find a tutorial on changing server versions here. Note that you need to run forge before you put the mods in, to create the mods folder, and if you do not your mods will be deleted.
- Stop the server.
- To the left of the game panel, click on FTP File Access and go into the mods folder.
- Click on “Upload” then simply drag in the mods you have previously downloaded. Wait for the mods to fully upload before leaving this page.
- When you upload mods, it is highly recommended that you generate a new world to ensure that there is no corruption. You can find our guide on making a new world here.
- Once they are uploaded, head back to the Game Panel and start the server. Once the server is fully started, you are safe to connect.
Common Issues
Incorrect Forge version
The mods you have uploaded to the server may not always be compatible with the Forge version we have available from our jar selector. If this is the case, you will need to install the correct version of Forge for your mod manually. We have a tutorial on uploading a custom version of Forge here.
Server is crashing on startup
The server crashing during the startup process can be common on Forge servers if they are not setup correctly. This can be due to multiple issues. Most commonly this is caused by a duplicate mod, missing dependency mods, or incorrect mod versions.
Server is stuck loading
Many times when modifying the server, the server will need to be confirmed before it will fully start. This happens a lot especially when you remove or add mods. Most of the time in console, you will see Missing Mod Id’s errors. All you need to do to resolve this is type /fml confirm in console.
Duplicate Mods
You can detect a duplicate mod from console pretty easily. You will see an error that says “Duplicate Mods” with the mod name listed underneath it. Simply go into the FTP File Access, the mods folder, and delete the extra mod.
Missing Dependency
To detect if you have a missing dependency mod, head into the console where you will see an error code that reads something similar to The mod nei (Not Enough Items) requires mod [JEI] to be available From this error, we can see that the missing mod is JEI. You will need to add the mod into the server in order for the server to work again.
Incorrect Mod Version
Detecting if the mod is the incorrect version is pretty easy. It will almost always display an error stating that it is for a different version of Forge. It will look similar to File jei_1.12.2-4.15.0.268.jar is for an older version of Forge and cannot be loaded. If you have this issue, make sure that the mod you are using has an update for the version of Forge you are running. If it doesn’t, then you won’t be able to use the mod on your server.
Related Content
Order your Minecraft server hosting from Apex and get started today.


