- How to Install the Latest Mainline Linux Kernel Version in Ubuntu [GUI and Terminal Methods]
- Using the latest Linux kernel version in Ubuntu: Things you should know
- Why install a new Linux kernel version manually?
- HWE kernel option is also available
- Older kernels remain available
- Two ways of installing new kernel in Ubuntu: Command line and GUI
- Method 1: Manually install new Linux kernel in Ubuntu using command line
- Step 1: Check current installed version
- Step 2: Download the mainline Linux kernel of your choice
- Step 4: Install the downloaded kernel
- Step 5: Reboot Ubuntu and enjoy the new Linux kernel.
- Rollback the changes and downgrade Linux kernel
- Method 2: Upgrade Linux Kernel in Ubuntu Ukuu GUI tool
- Step 1: Install Ukuu in Ubuntu
- Step 2: Install kernel with Ukuu
- Rollback the changes/Downgrade Linux Kernel with Ukuu
- Обновление ядра Linux до новой версии
- Обновление ядра Ubuntu вручную
- Обновление ядра Linux до в CentOS
- Выводы
- Оцените статью:
- Об авторе
- 21 комментарий
How to Install the Latest Mainline Linux Kernel Version in Ubuntu [GUI and Terminal Methods]
Last updated October 29, 2020 By Abhishek Prakash 54 Comments
This article shows you how to upgrade to the latest Linux kernel in Ubuntu. There are two methods discussed. One is manually installing new kernel and the other uses a GUI tool providing even easier way.
I am assuming that you already know what is Linux kernel. This is the core software that drives any Linux distribution. This is what Linus Torvalds created around 30 years ago and this is what he still works on.
A newer version of Linux kernel is released every few months with new features (such as support for more hardware), bug fixes etc.
But most Linux distribution does not provide the latest Linux kernel unless you are using an Arch-based distribution or some other rolling release distribution.
Linux distributions are responsible for your system’s stability and this is why they don’t release a newer version of Linux Kernel to its users unless they test it for regression on their end. They often use a specific kernel release as base and provide you updates on this base kernel, instead of giving you the latest mainline kernel.
This does not mean that you cannot use the latest Linux kernel in Ubuntu or other distribution you are using.
In this tutorial, I’ll discuss various ways to get a new Linux kernel on Ubuntu.
Using the latest Linux kernel version in Ubuntu: Things you should know
In my opinion, there is no ‘real’ need of upgrading to a newer Linux kernel unless it provides you a good enough reason.
Why install a new Linux kernel version manually?
What could be such a reason? Well, suppose the new Linux kernel introduces support for your sound card or Wi-Fi card or some other hardware component. You read some official forum that the problem you are having with the hardware component could be fixed with a newer Linux kernel version.
HWE kernel option is also available
You should also keep in mind that Ubuntu has this hardware stack enablement (HWE) feature that lets you use somewhat newer Linux kernel on an Ubuntu LTS release.
Older kernels remain available
Another thing to note here is that installing a new kernel doesn’t mean that the older kernel has been removed from the system. It remains at your disposal. By default, Ubuntu boots into the newest Linux Kernel installed on the system.
Two ways of installing new kernel in Ubuntu: Command line and GUI
There are two ways to install newer Linux kernel:
The GUI tool Ukuu is not open source anymore and it locks a few feature which I have discussed in its section.
Let’s see the methods.
Method 1: Manually install new Linux kernel in Ubuntu using command line
The latest Linux kernel is called mainline Linux kernel. You’ll see this term used often.
I must warn you that you should be aware of the risk. If something goes wrong, you may revert to a previous Kernel version but you must not panic. Make a backup of Ubuntu system to be sure. If you are easily baffled with troubleshooting, avoid playing with manual upgrades and stick to your distribution’s system updates.
Step 1: Check current installed version
You may want to first check current installed version of kernel. You can do this by using the uname command in the terminal:
As you can see in output below, I have kernel version 5.4 installed.
Step 2: Download the mainline Linux kernel of your choice
Now you have to download the desired kernel build provided Ubuntu from here.
You can see kernel list like this. I am going to download kernel 5.7. You also should keep in mind to install the stable kernel instead of rc (release candidate).
Now download appropriate kernel files for your architecture. For 64 bit architecture, you should download these kind of files
- linux-headers-VERSION-NUMBER_all.deb
- linux-headers-VERSION-NUMBER_amd64.deb
- linux-image-VERSION-NUMBER_amd64.deb
- linux-modules-VERSION-NUMBER_amd64.deb
Hence I will download these files:
Step 4: Install the downloaded kernel
Now it’s time to install downloaded kernel. First do into the directory where you’ve downloaded kernel and enter following command. Make sure there isn’t any other “.deb” file in that directory other than downloaded kernel files.
sudo dpkg -i *.deb
It will take some time. After installation finished, you will see screen like this.
Step 5: Reboot Ubuntu and enjoy the new Linux kernel.
Now you’ve installed new kernel in Ubuntu successfully, it’s time to reboot the machine. Ubuntu by default boots into the newer kernel version.
After rebooting, check kernel version with same uname -sr command you used earlier. As you can see, it’s updated to 5.7.0.
Rollback the changes and downgrade Linux kernel
If you didn’t like new Linux Kernel or if you discovered issues with it. You can easily downgrade the Kernel. You just have to:
- Boot into an older kernel
- Remove the newer Linux kernel you don’t want
Let’s see how to do that.
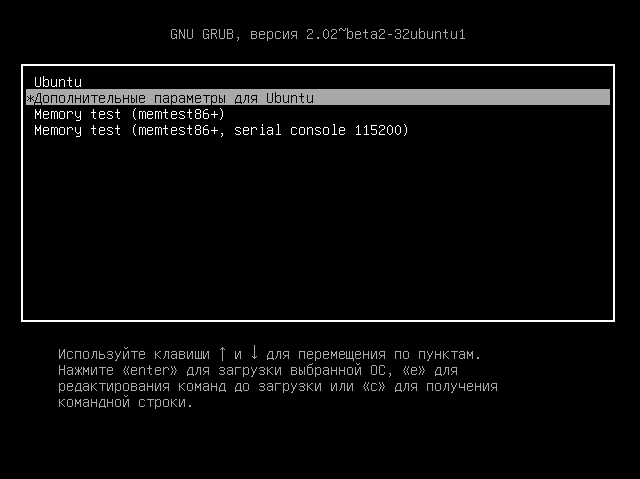
When you are booting into your system, on the grub menu, select the Advanced options for Ubuntu.
If you do not see the grub menu, try holding the shift key or use Esc key to bring the grub menu.

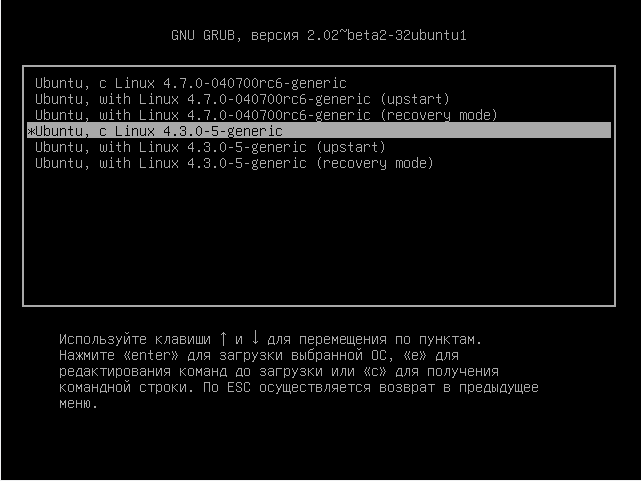
In here, you’ll see all the Linux kernels installed on your system. Select an older one. Don’t choose the recovery mode, just go with the normal ones.
Now that you have booted into your good old kernel, we have to remove new kernel.
You can use the apt or dpkg command to remove the installed kernel version. Do you remember the version of new kernel you installed manually? For me it was kernel 5.7. So here’s what I use to delete it.
Change the commands with the version you want to install:
You can see, I have two packages associating with kernel 5.7.0. If I remove the first package it will automatically remove all it’s related dependencies.
Install New Linux Kernel 10
Method 2: Upgrade Linux Kernel in Ubuntu Ukuu GUI tool
You can upgrade Linux kernel on your own in Linux command line. But the kernel upgrade procedure is much easier and more convenient with a GUI tool called Ukuu (Ubuntu Kernel Update Utility).
This GUI tool is developed by Tony George who has provided us with several other useful tools for Ubuntu such as battery monitor for Ubuntu, app backup tool Aptik etc.
You should know that Ukuu of version above 18.9 is now paid and closed source. Version 18.9 is still free and open source.
Paid version contains additional features like:
- Downloading and installing newer kernel versions automatically
- Deleting downloaded packages after install
- Option to stay on same series of a kernel release
- Automatically removing older kernels.
- UI improvements.
If you want the additional features, you can purchase it from developer’s official website. Ukuu free version can still be used for installing and removing kernels, though.
Step 1: Install Ukuu in Ubuntu
You can download the deb files for the old Ukuu version 18.9 which is free to use but not updated lately.
Step 2: Install kernel with Ukuu
Once you have installed Ukuu, start it. It will refresh the list of available Linux kernels available for Ubuntu.
By default, it will show you all the available kernels, including the unstable release kernel (tagged with RC and with red Tux icon).
Kernel versions from the distributions are labeled with the logo and the other versions have just the good old Tux logo.
As you can see I have kernel 5.7.0 installed already, now I will install kernel 5.7.1 using Ukuu.
Again, you should avoid the release candidates. Select the desired Kernel version and click on install to install the newer Linux kernel version.
Of course, it will require admin password for this action. Once you have entered your password, you can see the installation progress in the application itself. Focus on the end result to know if it new Linux kernel was installed successfully or not.
Note: If the installation fails, no need to panic. Nothing will be wrong the system. Just try a different Kernel version and it might work.
You should see something like this when installation finished successfully.
Once installation finishes, you’ll see a very helpful screen that tells you if anything goes wrong with the new Linux kernel, you can always choose to boot into the older kernel from the grub menu.
When you boot into the system next, you’ll be running the Linux kernel you had just installed.
Rollback the changes/Downgrade Linux Kernel with Ukuu
Rollbacking done in two steps:
- Boot into an older kernel
- Remove the newer Linux kernel you don’t want
Let’s see how to do that.
When you are booting into your system, on the grub menu, select the Advanced options for Ubuntu.
Select your old kernel to boot into it.
Once you boot into the system with the older Linux kernel, start Ukuu again. Make sure that you are not deleting the kernel that you are running at present.
Select the newer kernel version which you don’t want anymore and click on Remove.
That’s all you need to do here to downgrade the Linux kernel in Ubuntu.
While we are discussing it, I would like to point out a few more features of Ukuu. Ukuu has settings option that allows you to not display release candidates of kernels in the list. You can also hide Linux kernel versions older than version 4.0.
You can also choose the option to display desktop notifications in case new Linux Kernel are available.
You can also remove Ukuu using apt remove ukuu command.
How do you upgrade Linux kernel?
I hope this tutorial was helpful to show you how to install mainline Linux kernel in Ubuntu.
So, do you often upgrade Linux kernel on your own or do you wait for your distribution to provide the upgrade? How do you do it?
Like what you read? Please share it with others.
Источник
Обновление ядра Linux до новой версии
В последнее время новые версии ядер выходят достаточно часто. Раз в несколько месяцев выходит стабильный релиз. Ну а нестабильные кандидаты в релизы выходят и того чаще. Линус Торвальдс и множество разработчиков по всему миру постоянно работают над улучшением новых ядер и добавлением в них все больше и больше функциональности.
С каждой новой версией в ядре Linux появляется поддержка нескольких новых устройств, например, новых процессоров, видеокарт или даже сенсорных экранов. За последнее время, поддержка нового оборудования очень сильно улучшилась. Также в ядро включаются новые файловые системы, улучшается работа сетевого стека, исправляются ошибки и баги.
Если вам нужна более подробная информация об изменениях в какой-то определенной версии ядра смотрите ее Changelog на kernel.org, а в этой статье мы рассмотрим обновление ядра Linux до самой новой версии. Я попытаюсь не привязывать инструкцию к определенной версии ядра, новые ядра выходят достаточно часто и она будет актуальна для каждого из них. Рассмотрим обновление ядра Ubuntu и CentOS. Сначала давайте рассмотрим как обновить ядро в Ubuntu.
Обновление ядра Ubuntu вручную
Давайте сначала посмотрим какое ядро у вас установлено. Для этого откройте терминал и выполните:

Например, у меня сейчас используется версия 5.4, и я могу обновиться к самой новой версии. Разработчики Ubuntu уже позаботились о том чтобы их пользователи не собирали ядро вручную и сделали deb пакеты новой версии ядра. Их можно скачать с официального сайта Canonical.
Я мог бы привести здесь команды wget для загрузки, если была бы известна версия ядра, но в нашем случае лучше будет использовать браузер. Откройте сайт http://kernel.ubuntu.com/
kernel-ppa/mainline/. Здесь находятся все, собираемые командой Ubuntu ядра.
Пролистайте вниз, именно там находятся более новые версии ядер:

Кроме того, в самом верху есть папка daily/current, в которой находятся самые свежие, ночные сборки ядер. Выберите нужную версию ядра, затем выберите архитектуру. Для 64-битных систем вам понадобится архитектура amd64:

Далее надо скачать четыре файла: два linux-headers, linux-image и linux-modules. Как видите, там есть несколько типов ядер: lowlatency и generic. Ядро lowlatency судя из названия имеет более низкие задержки при работе с прерываниями. Зато ядро generic имеет большую пропускную способность. В большинстве случаев достаточно ядра generic. Скачайте linux-headers для all и generic, а также linux-image-generic и linux-modules-generic:

После завершения загрузки можно переходить к установке. Перейдите в папку с установочными пакетами, например,
dpkg -i linux-headers* linux-image* linux-modules*

Если эта команда не сработала, можно пойти другим путем. Установите утилиту gdebi:
sudo apt install gdebi
Затем с помощью нее установите ядро:
sudo gdebi linux-headers*.deb linux-image-*.deb linux-modules-*.deb
Ядро установлено, осталось обновить загрузчик:
Теперь можно перезагружать компьютер и смотреть что получилось. После перезагрузки убедимся, что обновление ядра Linux до самой новой версии прошло успешно:

Как видите ядро успешно установлено и работает. Но не спешите удалять старую версию ядра, рекомендуется иметь несколько версий ядра в системе, чтобы в случае неполадок иметь возможность загрузиться со старой рабочей версии. Если вы хотите настроить автоматическое обновление ядра в Ubuntu — используйте утилиту UKKU.
Если во время установки произошли какие-либо ошибки или ядро обновилось неправильно, и теперь система не загружается с новым ядром, вы можете использовать старое ядро. Также система может не запускаться, если вы используете проприетарный драйвер для видеокарты NVIDIA в таком случае не спешите качать самую новую версию ядра, используйте только стабильные ядра, в них, как правило, уже добавлена поддержка этого модуля.
А чтобы восстановить работу системы выберите пункт Advanced options for Ubuntu в меню Grub:
И запустите предыдущее работающее ядро:
После загрузки останется удалить неверно установленное ядро и еще раз обновить Grub. Найдите точное имя пакета ядра с помощью apt search. Например:
sudo apt search linux-headers-5.8
Затем удалите этот пакет:
sudo apt remove linux-headers-5.8-000055-generic
Аналогично надо поступить с ядром. После этого обновите конфигурацию Grub:
Теперь ваша система вернулась к прежнему состоянию. Вы можете попробовать устанавливать более старую версию ядра или попробовать еще раз.
Обновление ядра Linux до в CentOS
А теперь давайте рассмотрим как обновить ядро Linux самой новой версии в CentOS. Инструкция проверена на CentOS 8, но скорее всего, будет работать и на RHEL 8, Fedora и других подобных дистрибутивах.
Как правило, новые ядра не включены в официальные репозитории CentOS, поэтому чтобы получить последнюю стабильную версию нам необходимо будет добавить репозиторий ELRepo. Это репозиторий коммерческих пакетов (Enterprise Linux Packages) он также поддерживается в RHEL и Fedora.
Для добавления репозитория сначала необходимо импортировать ключ:
sudo rpm —import https://www.elrepo.org/RPM-GPG-KEY-elrepo.org
Для того чтобы добавить репозиторий и необходимые компоненты в RHEL 7 и CentOS 7 выполните:
sudo yum install https://www.elrepo.org/elrepo-release-7.el7.elrepo.noarch.rpm
В CentOS 8 выполните:
sudo dnf install https://www.elrepo.org/elrepo-release-8.el8.elrepo.noarch.rpm

sudo yum install https://www.elrepo.org/elrepo-release-6.el6.elrepo.noarch.rpm
Готово, теперь посмотрим текущую версию ядра:

Можем устанавливать самую новую версию ядра Linux командой:
sudo yum —enablerepo=elrepo-kernel install kernel-ml

Пакет kernel-ml, это текущий стабильный mainline релиз, на данный момент, это 5.8. После того как установка нового ядра Linux завершена, обновите конфигурационный файл загрузчика:
sudo grub2-mkconfig -o /boot/grub2/grub.cfg
Затем можете перезагружать систему. Обновление ядра в CentOS завершено.
Если после перезагрузки у вас возникли какие-либо проблемы с новым ядром, просто удалите его с помощью команды:
yum remove kernel-ml -y
dnf remove kernel-ml -y
И перезагрузите компьютер, чтобы вернуть систему к прежнему состоянию.
Выводы
В этой инструкции мы рассмотрели как обновить ядро Linux до 4.4 в Ubuntu и CentOS, но мы говорили только об обновлении ядра из бинарников. Также можно собрать ядро из исходных кодов, которые доступны для загрузки на официальном сайте ядра. О сборке ядра Linux я писал в отдельной статье. Вроде все разобрали, если остались вопросы — пишите в комментариях.


Оцените статью:
Об авторе
Основатель и администратор сайта losst.ru, увлекаюсь открытым программным обеспечением и операционной системой Linux. В качестве основной ОС сейчас использую Ubuntu. Кроме Linux, интересуюсь всем, что связано с информационными технологиями и современной наукой.
21 комментарий
Спасибо за статью.
Подписан на вашу рассылку, так что в качестве обратной связи с читателями передаю вам привет!
Система Минт 17.3 Роза, ядро 3.16. Делаю все как описано в статье — после рестарта ядро 3.16. Иду в диспетчер обновлений, вижу предлагаемые ядра для обновления, 4-ки нет ни одной, рекомендуемое ядро 3.19, устанавливаю — работает, 3.16 убиваю. Ошибок нигде не выдавало. Остался пока без 4.4.
Выполните в место: sudo dpkg -i linux*.deb — sudo dpkg -i *.deb И выполнять команду обязательно в папке, в которую были загружены установочные пакеты.
Установил ядро 4.4, но слетел Вайфай, запустить не смог, пока откатился на старое ядро.
Да у меня такая же беда, обновился на 4.2 правда, было 3.19. Теперь вай фай с блютузом, не запускаются, пока остался на 3.19.
Подожду уже выхода Ubuntu 16.04 посмотрим, что будет в релизе, должны пофиксить по идее.
Ребзя а чего у меня не хочет обновлять? Сейчас стоит на VPS Ubuntu Xenial (16.04 LTS) (GNU/Linux 4.5.7-std-3 x86_64). Пробую обновить до 4.7.3 и ошибку пишет:
Selecting previously unselected package linux-headers-4.7.3-040703-generic.
(Reading database . 20139 files and directories currently installed.)
Preparing to unpack linux-headers-4.7.3-040703-generic_4.7.3-040703.201609070334_amd64.deb .
Unpacking linux-headers-4.7.3-040703-generic (4.7.3-040703.201609070334) .
Selecting previously unselected package linux-image-4.7.3-040703-generic.
Preparing to unpack linux-image-4.7.3-040703-generic_4.7.3-040703.201609070334_amd64.deb .
Done.
Unpacking linux-image-4.7.3-040703-generic (4.7.3-040703.201609070334) .
dpkg: dependency problems prevent configuration of linux-headers-4.7.3-040703-generic:
linux-headers-4.7.3-040703-generic depends on linux-headers-4.7.3-040703; however:
Package linux-headers-4.7.3-040703 is not installed.
dpkg: error processing package linux-headers-4.7.3-040703-generic (—install):
dependency problems — leaving unconfigured
dpkg: dependency problems prevent configuration of linux-image-4.7.3-040703-generic:
linux-image-4.7.3-040703-generic depends on initramfs-tools | linux-initramfs-tool; however:
Package initramfs-tools is not installed.
Package linux-initramfs-tool is not installed.
dpkg: error processing package linux-image-4.7.3-040703-generic (—install):
dependency problems — leaving unconfigured
Errors were encountered while processing:
linux-headers-4.7.3-040703-generic
linux-image-4.7.3-040703-generic
Источник


