- Nmap for Mac OS X Explores Networks, Scans Ports, and More
- How to Install Nmap for Mac OS X
- Sample Usages of Nmap
- Find Open Ports on Localhost
- Scan & List a Range of Local Network IP’s
- Scan & Detect Operating Systems
- Using Nmap with Alternate DNS Servers & Trace Route
- More Resources
- Install nmap mac os
- Executable Installer
- Compile from Source Code
- Compile Nmap from source code
- Compile Zenmap from source code
- Third-party Packages
- Executing Nmap on Mac OS X
- Install nmap mac os
- Microsoft Windows binaries
- Linux RPM Source and Binaries
- Mac OS X Binaries
- Source Code Distribution
- Other Operating Systems
Nmap for Mac OS X Explores Networks, Scans Ports, and More

Nmap is a powerful command line network discovery utility that lets you review network inventory, host response and uptime, and perform security auditing through port scans, OS and firewall detection, and more. Though it’s free (and open source) and ships along with many versions of linux, it doesn’t come standard with Mac OS X installations, and thus must be installed separately. Nmap is generally fairly advanced, but it has plenty of useful applications even for those of us who are not network administrators and security professionals, and it can also be helpful for simple network setup tasks and troubleshooting.
While installing nmap you will also have the option to install the full suite of network discovery utilities, including ncat, zenmap (requires X11), ndiff, and nping. These are all useful tools as well, so it’s a good idea to install them all along the way.
How to Install Nmap for Mac OS X
Using the DMG installer is the easiest way, but you can also build nmap yourself from source or get it through something like Homebrew or MacPorts.
To download the the dmg installer for nmap via nmap.org:
- Get nmap for Mac OS X (free)
- Install through the dmg, be sure to right-click and choose “Open” to get around the Gatekeeper warning if it’s still enabled
- Install the full nmap suite, or selectively choose whether to install ncat, ndiff, nping, etc
For installing Nmap on Mac with Homebrew, just run the following command:
brew install nmap
There’s no need to reboot, but you will want to refresh or open a new Terminal to have nmap found in your path.
Sample Usages of Nmap
Nmap works with both LAN and WAN IP’s and has near infinite applications, but we’ll cover a few commonly used simple tricks. Do note that its not unusual for very little information to be reported back from Mac OS X machines, particularly if the software firewall has been enabled and no sharing services are enabled. On the other hand, scanning a Windows PC or a network of Windows machines will often give you a huge amount of information and reveal many services, even if the Windows firewall is enabled.
Find Open Ports on Localhost
Nmap makes it very easy to find out which ports are open on localhost (that is, your computer):
You might see something like the following reported back:
PORT STATE SERVICE
22/tcp open ssh
80/tcp open http
445/tcp open microsoft-ds
548/tcp open afp
6817/tcp open unknown
This let’s you know that SSH/SFTP, HTTP, Samba, and the Apple File Sharing protocol are all open on the localhost Mac, and shows which ports they’re running under.
For a Mac, toggling various options directly in the System Preference “Sharing” panel will directly impact what you see as running, whether it’s to activate the SSH and SFTP server and enabling remote login, turning on and off file sharing for Macs or Windows or both, screen sharing, or whatever else. Separately, if you started a local web server at some point (even the super quick python http server), you’ll also find those running.
Scan & List a Range of Local Network IP’s
You can also find information about other machines on your local network. We’ll assume your LAN has an IP range of 192.168.0.1 to 192.168.0.25, change those numbers as appropriate:
nmap -sP 192.168.0.1-25
If you don’t know the range, you can also use wildcards:
Scan & Detect Operating Systems
Using the same IP range concept as above, you can attempt to discover which operating systems and their accompanying versions are running on the networked machines. This does not always work, but there’s no harm in trying:
nmap -O 192.168.0.1-5
If nothing is reported back (not uncommon), you can try to use the –osscan-guess flag instead to try and guess which OS is running based on the services detected:
nmap —osscan-guess 192.168.0.2
Using Nmap with Alternate DNS Servers & Trace Route
Nmap is also really useful for troubleshooting internet connections, WAN issues, and publicly available assets, and it can be helpful when trying to figure out if a network issue is your network, an ISP, or somewhere else along the way. By using the –traceroute and –dns-servers flags you’ll be able to help determine what’s going on and where, and the latter is particularly helpful if you are having trouble accessing certain remote IP’s but are unsure if the host is actually unavailable or if your DNS servers are the issue.
The –dns-servers flag overrides system DNS settings for that scan. Here we’ll use nmap to scan through alternate DNS (Google’s DNS servers used in example) of yahoo.com:
nmap —dns-servers 8.8.8.8 yahoo.com
In this example, if yahoo.com is live through the alternate DNS but not available to you without specifying –dns-servers, you may have an issue with whichever DNS servers you are using rather than the host itself.
The –traceroute flag incorporates the familiar trace route ability in the scan, note this has to be run as root through sudo:
sudo nmap —traceroute yahoo.com
More Resources
Nmap has much more to offer than what we mention above, you can see the full list of possible commands and flags by typing:
Источник
Install nmap mac os
Nmap has supported Mac OS X since 2001, and our support has only improved over time. While Mac users can compile Nmap themselves, we also offer an executable installer. Nmap makes use of Jhbuild and gtk-mac-bundler which are used to build other projects for Mac OS X, such as OpenSSL, libapr, libsvn. Nmap is also available through systems such as MacPorts and Fink which package Unix software for Mac OS X.
Executable Installer
The easiest way to install Nmap and Zenmap on Mac OS X is to use our installer. The Mac OS X section of the Nmap download page provides a file named nmap- .dmg , where is the version number of the most recent release. The .dmg file is known as a “ disk image ” . Installation instructions follow:
Download the file nmap- .dmg . Double-click the icon to open it. (Depending on how you downloaded the file, it may be opened automatically.)
The contents of the disk image will be displayed. One of the files will be a Mac meta-package file named nmap- .mpkg . Open it to start the installer.
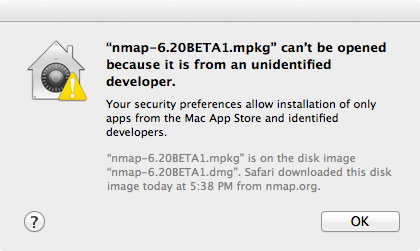
On OS X 10.8 and later, you may see a dialog like Figure 2.2.
Figure 2.2. Apple Gatekeeper block screen
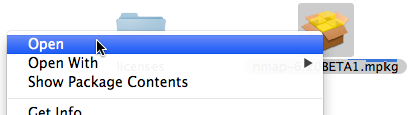
If this happens, it is necessary to right-click or control-click on the .mpkg and select “ Open ” , as shown in Figure 2.3.
Figure 2.3. Apple Gatekeeper Open menu
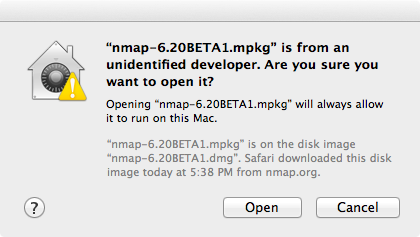
A dialog similar to the first will appear, this time having an “ Open ” button (shown in Figure 2.4). Click the button to continue.
Figure 2.4. Apple Gatekeeper Open screen
Follow the instructions in the installer. You will be asked for your password since Nmap installs in a system directory.
Once the installer is finished, eject the disk image by control-clicking on its icon and selecting “ Eject ” . The disk image may now be placed in the trash.
See the instructions in the section called “Executing Nmap on Mac OS X” for help on running Nmap and Zenmap after they are installed.
The programs installed by the installer will run on Intel Mac OS X 10.5 (Leopard) or later. Users of earlier versions will have to compile from source or use a third-party package. Instructions for PowerPC (PPC) Mac systems (which Apple ceased selling in 2006) are available on our wiki.
Compile from Source Code
Compiling Nmap from source on Mac OS X is no more difficult than on other platforms once a proper build environment is in place.
Compile Nmap from source code
Compiling Nmap on Mac OS X requires Xcode, Apple’s developer tools that include GCC and the rest of the usual build system. Xcode is not installed by default, but can be downloaded free of charge from the Mac App Store. After installing Xcode, open “ Preferences ” , select the “ Downloads ” tab, and click the “ Install ” next to “ Command Line Tools ” .
Xcode installations don’t always include the command line tools. You can install them by opening Xcode from the Applications folder, opening Preferencechoosing the Download header icon and clicking the Install button next to “ Command Line Tools ” .
Once you have installed Xcode and the command-line tools, follow the compilation instructions found in the section called “Linux/Unix Compilation and Installation from Source Code”. Note that on some older versions of Mac OS X, you may have to replace the command ./configure with ./configure CPP=/usr/bin/cpp . Also, on some newer Mac OS X versions, the libpcap version of the library provided by Apple may be too old. You may have to configure Nmap with the command ./configure —with-libpcap=included in order to use the compatible version included in Nmap, or you should update the libpcap installed on your machine.
Compile Zenmap from source code
Zenmap depends on some external libraries that do not come with Mac OS X, including GTK+ and PyGTK. These libraries have many dependencies of their own. A convenient way to install all of them is to use a third-party packaging system as described in Section . Once the dependencies are installed, follow the instructions in the section called “Linux/Unix Compilation and Installation from Source Code” to install Zenmap as usual.
Third-party Packages
Another option for installing Nmap is to use a system which packages Unix software for Mac OS X. The two discussed here are Fink and MacPorts. See the respective projects’ web sites for how to install the package managers.
To install using Fink, run the command fink install nmap . Nmap will be installed as /sw/bin/nmap . To uninstall use the command fink remove nmap .
To install using MacPorts, run sudo port install nmap . Nmap will be installed as /opt/local/bin/nmap . To uninstall, run sudo port uninstall nmap .
These systems install the nmap executable outside the global PATH . To enable Zenmap to find it, set the nmap_command_path variable in zenmap.conf to /sw/bin/nmap or /opt/local/bin/nmap as described in the section called “The nmap Executable”.
Executing Nmap on Mac OS X
The terminal emulator in Mac OS X is called Terminal , and is located in the directory /Applications/Utilities . Open it and a terminal window appears. This is where you will type your commands.
By default the root user is disabled on Mac OS X. To run a scan with root privileges prefix the command name with sudo , as in sudo nmap -sS . You will be asked for a password, which is just your normal login password. Only users with administrator privileges can do this.
Zenmap requires the X11 application to be installed. If it was not installed by default it may be available as an optional install on the Mac OS X installation discs.
When Zenmap is started, a dialog is displayed requesting that you type your password. Users with administrator privileges may enter their password to allow Zenmap to run as the root user and run more advanced scans. To run Zenmap in unprivileged mode, select the “ Cancel ” button on this authentication dialog.
Источник
Install nmap mac os
Nmap and Zenmap (the graphical front end) are available in several versions and formats. Recent source releases and binary packages are described below. Older version (and sometimes newer test releases) are available from the dist directory (and really old ones are in dist-old). For the more security-paranoid (smart) users, GPG detached signatures and SHA-1 hashes for each release are available in the sigs directory (verification instructions). Before downloading, be sure to read the relevant sections for your platform from the Nmap Install Guide. The most important changes (features, bugfixes, etc) in each Nmap version are described in the Changelog. Using Nmap is covered in the Reference Guide, and don’t forget to read the other available documentation, particularly the new book Nmap Network Scanning!
Nmap users are encouraged to subscribe to the Nmap-hackers mailing list. It is a low volume (7 posts in 2015), moderated list for the most important announcements about Nmap, Insecure.org, and related projects. You can join the 128,953 current subscribers (as of September 2017) by submitting your email address here:
You can also get updates from our Facebook and Twitter pages.
Nmap is distributed with source code under custom license terms similar to (and derived from) the GNU General Public License, as noted in the copyright page.
Microsoft Windows binaries
Please read the Windows section of the Install Guide for limitations and installation instructions for the Windows version of Nmap. You can choose from a self-installer (includes dependencies and also the Zenmap GUI) or the much smaller command-line zip file version. We support Nmap on Windows 7 and newer, as well as Windows Server 2008 and newer. We also maintain a guide for users who must run Nmap on earlier Windows releases..
Note: The version of Npcap included in our installers may not always be the latest version. If you experience problems or just want the latest and greatest version, download and install the latest Npcap release.
The Nmap executable Windows installer can handle Npcap installation, registry performance tweaks, and decompressing the executables and data files into your preferred location. It also includes the Zenmap graphical frontend. Skip all the complexity of the Windows zip files with a self-installer:
Latest stable release self-installer: nmap-7.92-setup.exe
Latest Npcap release self-installer: npcap-1.55.exe
We have written post-install usage instructions. Please notify us if you encounter any problems or have suggestions for the installer.
For those who prefer the command-line zip files (Installation Instructions; Usage Instructions), they are still available. The Zenmap graphical interface is not included with these, so you need to run nmap.exe from a DOS/command window. Or you can download and install a superior command shell such as those included with the free Cygwin system. Also, you need to run the Npcap and Microsoft Visual C++ 2013 Redistributable Package installers which are included in the zip file. The main advantage is that these zip files are a fraction of the size of the executable installer:
Linux RPM Source and Binaries
Many popular Linux distributions (Redhat, Mandrake, Suse, etc) use the RPM package management system for quick and easy binary package installation. We have written a detailed guide to installing our RPM packages, though these simple commands usually do the trick: You can also download and install the RPMs yourself:
Mac OS X Binaries
Nmap binaries for Mac OS X (Intel x86) are distributed as a disk image file containing an installer. The installer allows installing Nmap, Zenmap, Ncat, and Ndiff. The programs have been tested on Intel computers running Mac OS X 10.8 and later. See the Mac OS X Nmap install page for more details. Users of PowerPC (PPC) Mac machines, which Apple ceased selling in 2006, should see this page instead for support information.
Source Code Distribution
This is the traditional compile-it-yourself format. The Nmap tarball compiles under Linux, Mac OS X, Windows, and many UNIX platforms (Solaris, Free/Net/OpenBSD, etc.) It includes Zenmap, the GUI frontend.
Detailed Linux/BSD/Solaris compilation instructions and options are provided here, though this usually does the trick:
Most Mac OS X users install with our Mac installer, but we also provide Mac OS X source code compilation instructions.
If you are compiling Nmap anyway, you might prefer to get the very latest code from our SVN source code repository rather than downloading a tarball here.
Other Operating Systems
Many other operating systems support Nmap so well that I have no need to create and distribute binary packages myself. You can choose to use the packages below, or compile the source distribution, which is often newer. We have created installation pages for the following platforms:
Источник


