- How to Install NMAP on Windows with Real-time Usage Examples?
- Installing NMAP
- Detecting the version
- Checking certificate information
- Checking cipher information
- Chapter 2. Obtaining, Compiling, Installing, and Removing Nmap
- Introduction
- Testing Whether Nmap is Already Installed
- Command-line and Graphical Interfaces
- Downloading Nmap
- Verifying the Integrity of Nmap Downloads
- Obtaining Nmap from the Subversion (SVN) Repository
- Information Security Squad
- Как установить NMAP в Windows с примерами использования в реальном времени
- Установка NMAP
- Обнаружение версии
- Проверка информации сертификатов
- Проверка информации шифрования
How to Install NMAP on Windows with Real-time Usage Examples?

NMAP (Network Mapper), one of the famous open-source tools to perform network scans, security auditing, and find vulnerabilities in network infrastructure.
One of the popular know usages of NMAP is to find the open ports in the network. NMAP can be installed on Windows, Linux, macOS, and much more.
In this quick guide, I will explain how to get NMAP installed on Windows OS & some usage examples.
Installing NMAP
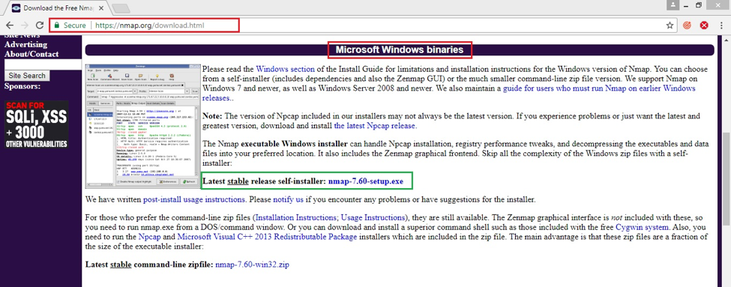
- Go to Nmap download link and download the latest stable version
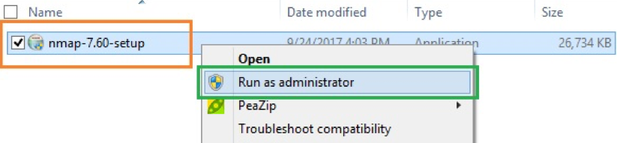
- Go to the location where the file is downloaded
- Right-click on the EXE file and click “Run as administrator.”
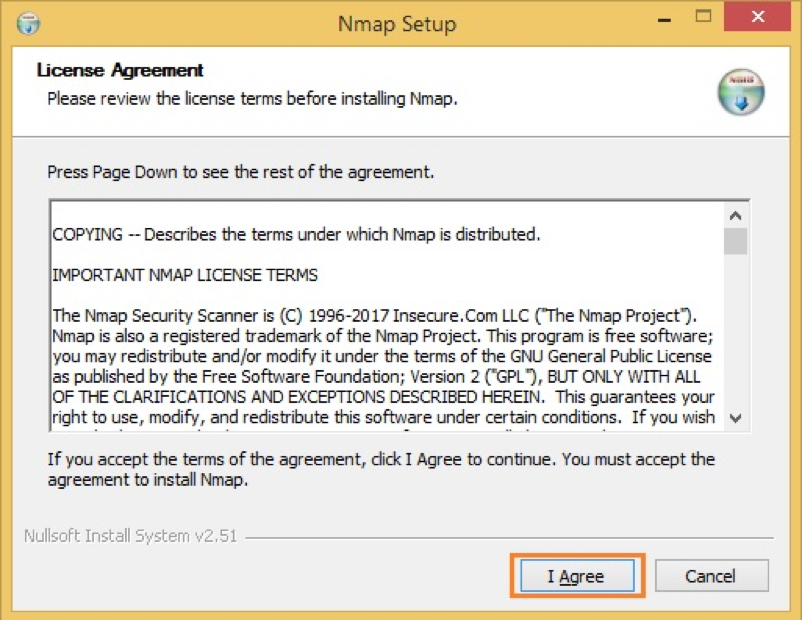
- It will start the installation process, accept the license agreement
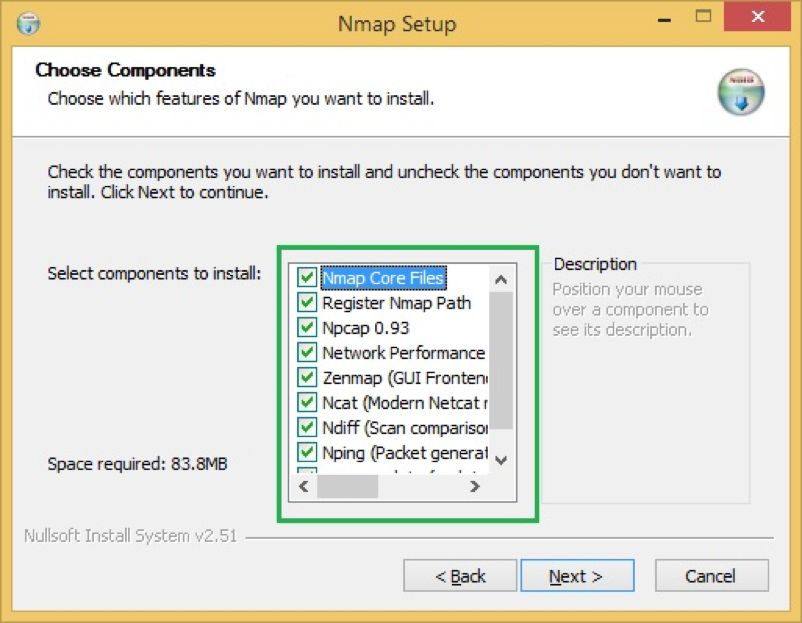
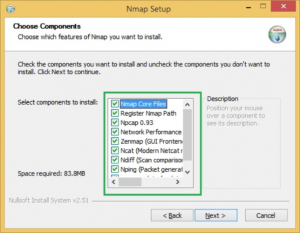
- You can choose what components to install, but it would be good to install all of them
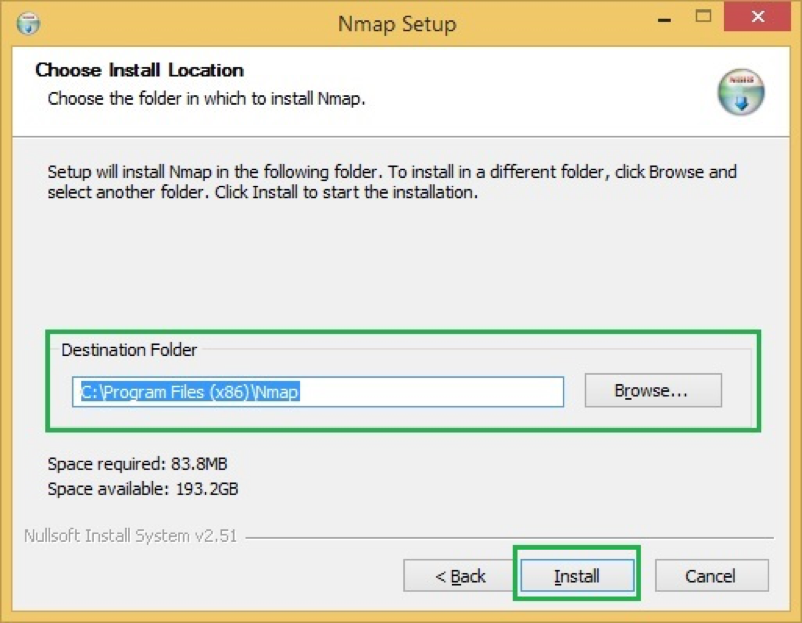
- By default, it will install under C:\Program Files (x86)\Nmap but feel free to change if needed
- It will start installing NMAP and once done; you will get confirmation
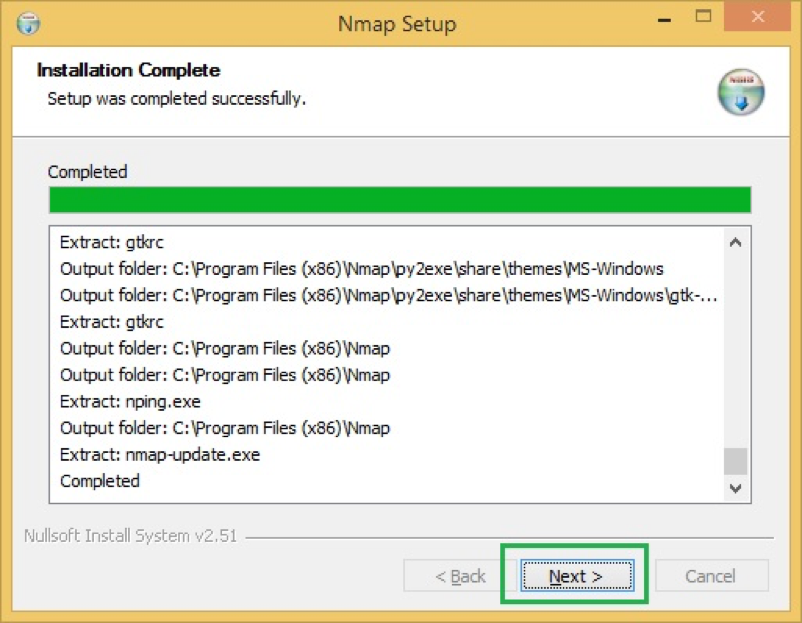
- This concludes NMAP is successfully installed.
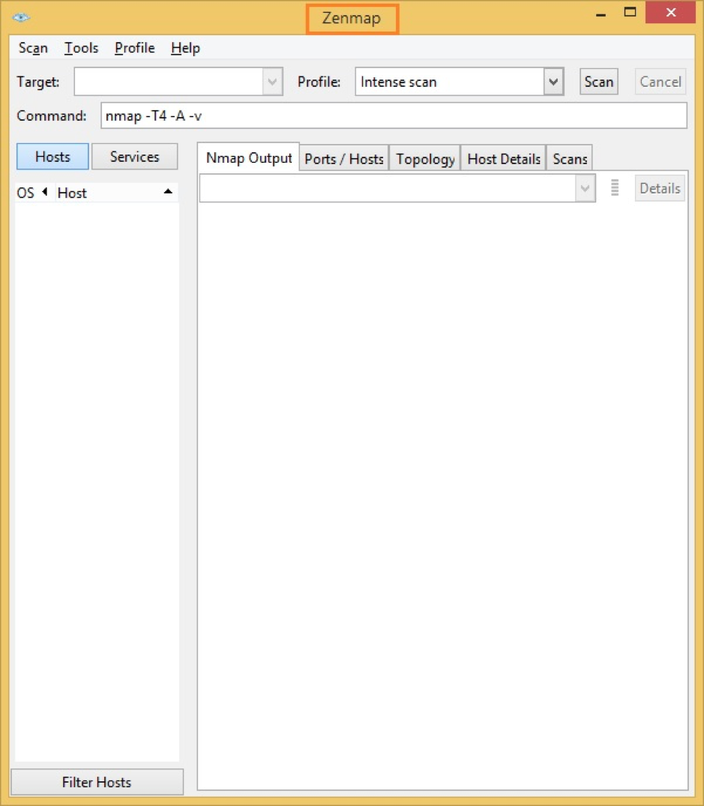
Go ahead and play around with the tool to get an idea of how it works. Here are some of the examples.
Detecting the version
One of the wide usage for NMAP is to fingerprint the OS and running technologies.
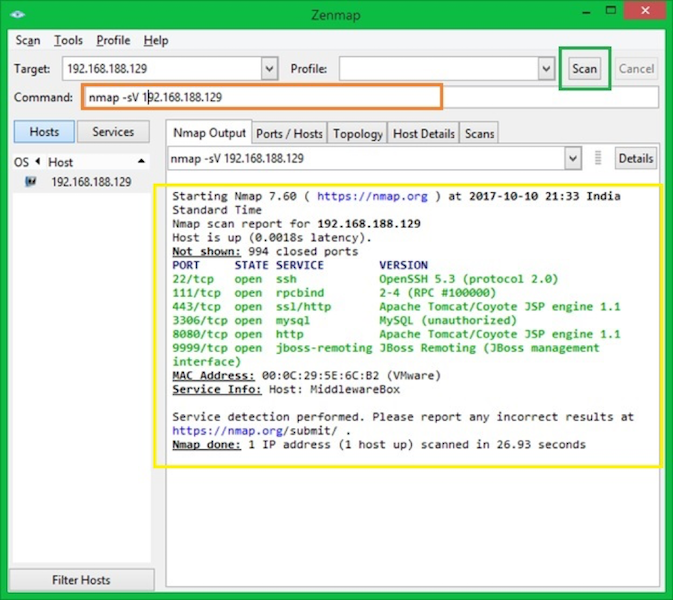
-sV command argument will detect the versions & state of running services
Checking certificate information
OpenSSL is mostly used to perform the certificate operation like generation, verification, modification, etc. However, you can do certain things with NMAP as well.
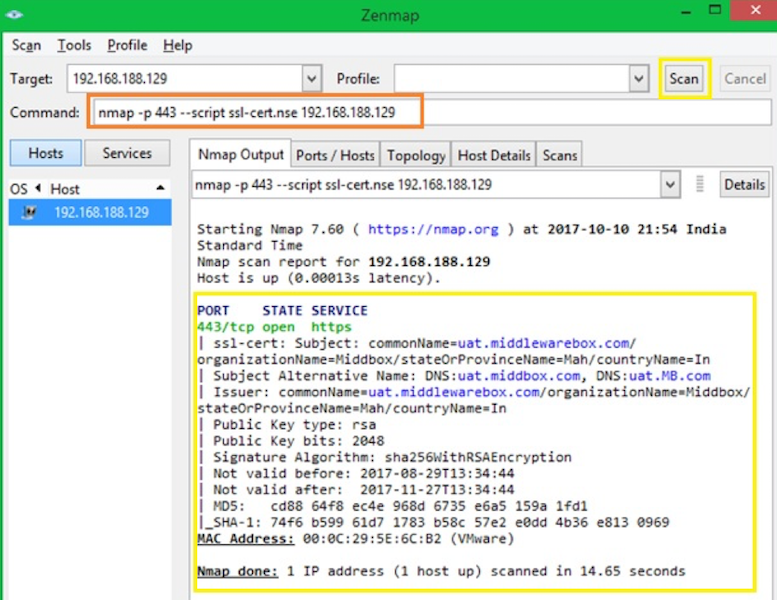
In case you are wondering, ssl-cert.nse is the script gets installed along with NMAP. It’s available under the default location C:\Program Files x86)\Nmap\scripts
Checking cipher information
ssl-enum-cihpers.nse script can be used to validate the SSL cipher information.
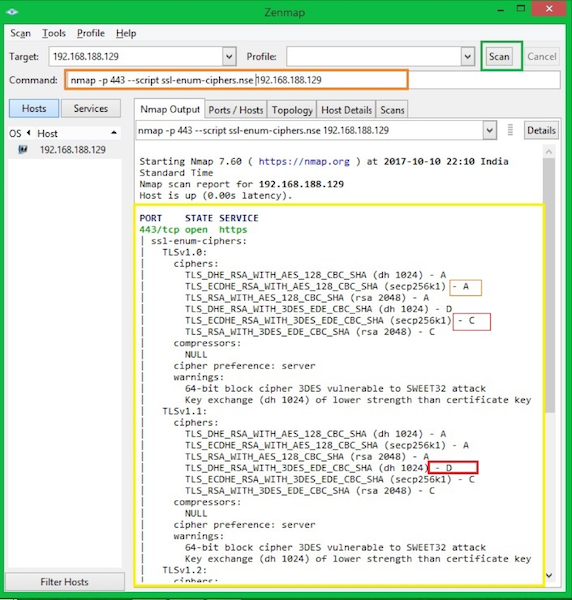
Each cipher suite is shown with a letter grade (A through F) indicating the strength of the connection. The grade is based on the cryptographic strength of the key exchange and of the stream cipher.
The message integrity (hash) algorithm choice is not a factor. The output line beginning with the least strength shows the strength of the weakest cipher offered.
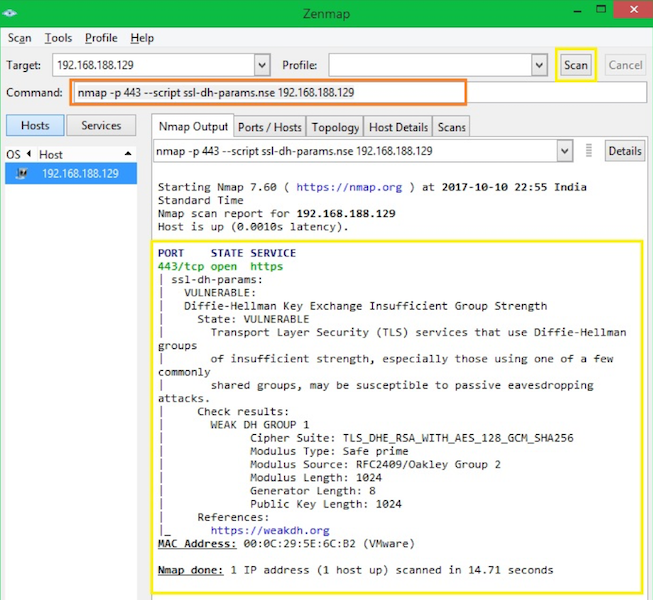
To detect DH (Diffie-Hellman) vulnerability, you can use below syntax.
I hope this quick instruction helps you to install and get familiar with NMAP on Windows operating system.
If you are looking to master how to use NMAP then check out this online course by Jimmy Larsson.
Chapter 2. Obtaining, Compiling, Installing, and Removing Nmap
Table of Contents
Introduction
Nmap can often be installed or upgraded with a single command, so don’t let the length of this chapter scare you. Most readers will use the table of contents to skip directly to sections that concern them. This chapter describes how to install Nmap on many platforms, including both source code compilation and binary installation methods. Graphical and command-line versions of Nmap are described and contrasted. Nmap removal instructions are also provided in case you change your mind.
Testing Whether Nmap is Already Installed
The first step toward obtaining Nmap is to check whether you already have it. Many free operating system distributions (including most Linux and BSD systems) come with Nmap packages, although they may not be installed by default. On Unix systems, open a terminal window and try executing the command nmap —version . If Nmap exists and is in your PATH , you should see output similar to that in Example 2.1.
Example 2.1. Checking for Nmap and determining its version number
If Nmap does not exist on the system (or if your PATH is incorrectly set), an error message such as nmap: Command not found is reported. As the example above shows, Nmap responds to the command by printing its version number (here 4.76 ).
Even if your system already has a copy of Nmap, you should consider upgrading to the latest version available from https://nmap.org/download.html. Newer versions often run faster, fix important bugs, and feature updated operating system and service version detection databases. A list of changes since the version already on your system can be found at https://nmap.org/changelog.html. Nmap output examples in this document may not match the output produced by older versions.
Command-line and Graphical Interfaces
Nmap has traditionally been a command-line tool run from a Unix shell or (more recently) Windows command prompt. This allows experts to quickly execute a command that does exactly what they want without having to maneuver through a bunch of configuration panels and scattered option fields. This also makes Nmap easier to script and enables easy sharing of useful commands among the user community.
One downside of the command-line approach is that it can be intimidating for new and infrequent users. Nmap offers more than a hundred command-line options, although many are obscure features or debugging controls that most users can ignore. Many graphical frontends have been created for those users who prefer a GUI interface. Nmap has traditionally included a simple GUI for Unix named NmapFE , but that was replaced in 2007 by Zenmap, which we have been developing since 2005. Zenmap is far more powerful and effective than NmapFE, particularly in results viewing. Zenmap’s tab-based interface lets you search and sort results, and also browse them in several ways (host details, raw Nmap output, and ports/hosts). It works on Linux, Windows, Mac OS X, and other platforms. Zenmap is covered in depth in Chapter 12, Zenmap GUI Users’ Guide. The rest of this book focuses on command-line Nmap invocations. Once you understand how the command-line options work and can interpret the output, using Zenmap or the other available Nmap GUIs is easy. Nmap’s options work the same way whether you choose them from radio buttons and menus or type them at a command-line.
Downloading Nmap
Nmap.Org is the official source for downloading Nmap source code and binaries for Nmap and Zenmap. Source code is distributed in bzip2 and gzip compressed tar files, and binaries are available for Linux (RPM format), Windows (NSIS executable installer) and Mac OS X ( .dmg disk image). Find all of this at https://nmap.org/download.html.
Verifying the Integrity of Nmap Downloads
It often pays to be paranoid about the integrity of files downloaded from the Internet. Popular packages such as Sendmail (example), OpenSSH (example), tcpdump, Libpcap, BitchX, Fragrouter, and many others have been infected with malicious trojans. Software distributions sites at the Free Software Foundation, Debian, and SourceForge have also been successfully compromised. This has never happened to Nmap, but one should always be careful. To verify the authenticity of an Nmap release, consult the PGP detached signatures or cryptographic hashes (including SHA1 and MD5) posted for the release in the Nmap signatures directory at https://nmap.org/dist/sigs/?C=M&O=D.
The most secure verification mechanism is detached PGP signatures. As the signing key is never stored on production servers, even someone who successfully compromises the web server couldn’t forge and properly sign a trojan release. While numerous applications are able to verify PGP signatures, I recommend GNU Privacy Guard (GPG).
Nmap releases are signed with a special Nmap Project Signing Key, which can be obtained from the major keyservers or https://svn.nmap.org/nmap/docs/nmap_gpgkeys.txt. My key is included in that file too. The keys can be imported with the command gpg —import nmap_gpgkeys.txt . You only need to do this once, then you can verify all future Nmap releases from that machine. Before trusting the keys, verify that the fingerprints match the values shown in Example 2.2.
Example 2.2. Verifying the Nmap and Fyodor PGP Key Fingerprints
For every Nmap package download file (e.g. nmap-4.76.tar.bz2 and nmap-4.76-win32.zip ), there is a corresponding file in the sigs directory with .asc appended to the name (e.g. nmap-4.76.tar.bz2.asc ). This is the detached signature file.
With the proper PGP key in your keyring and the detached signature file downloaded, verifying an Nmap release takes a single GPG command, as shown in Example 2.3. That example assumes that the verified file can be found in the same directory by simply removing “ .asc ” from the signature filename. When that isn’t the case, simply pass the target filename as the final argument to GPG. If the file has been tampered with, the results will look like Example 2.4.
Example 2.3. Verifying PGP key fingerprints (Successful)
Example 2.4. Detecting a bogus file
While PGP signatures are the recommended validation technique, SHA2, SHA1, and MD5 (among other) hashes are made available for more casual validation. An attacker who can manipulate your Internet traffic in real time (and is extremely skilled) or who compromises Nmap.Org and replaces both the distribution file and digest file, could defeat this test. However, it can be useful to check the authoritative Nmap.Org hashes if you obtain Nmap from a third party or feel it might have been accidentally corrupted. For every Nmap package download file, there is a corresponding file in the sigs directory with .digest.txt appended to the name (e.g. nmap-4.76.tar.bz2.digest.txt ). An example is shown in Example 2.5. This is the detached signature file. The hashes from the digest file can be verified using common tools such as gpg , sha1sum , or md5sum , as shown in Example 2.6, “Verifying Nmap hashes”.
Example 2.5. A typical Nmap release digest file
Example 2.6. Verifying Nmap hashes
While releases from Nmap.Org are signed as described in this section, certain Nmap add-ons, interfaces, and platform-specific binaries are developed and distributed by other parties. They have different mechanisms for establishing the authenticity of their downloads.
Obtaining Nmap from the Subversion (SVN) Repository
In addition to regular stable and development releases, the latest Nmap source code is always available using the Subversion (SVN) revision control system. This delivers new features and version/OS detection database updates immediately as they are developed. The downside is that SVN head revisions aren’t always as stable as official releases. So SVN is most useful for Nmap developers and users who need a fix which hasn’t yet been formally released.
SVN write access is strictly limited to top Nmap developers, but everyone has read access to the repository. Check out the latest code using the command svn co https://svn.nmap.org/nmap . Then you can later update your source code by typing svn up in your working directory.
While most users only follow the /nmap directory in SVN, there is one other interesting directory: /nmap-exp . This directory contains experimental Nmap branches which Nmap developers create when they wish to try new things without destabilizing Nmap proper. When developers feel that an experimental branch is ready for wider-scale testing, they will generally email the location to the nmap-dev mailing list.
Once Nmap is checked out, you can build it from source code just as you would with the Nmap tarball (described later in this chapter).
Information Security Squad
stay tune stay secure
- Home
- 2017
- Декабрь
- 5
- Как установить NMAP в Windows с примерами использования в реальном времени
Как установить NMAP в Windows с примерами использования в реальном времени
NMAP (Network Mapper), один из известных инструментов с открытым исходным кодом для выполнения сетевого сканирования, проверки безопасности и поиска уязвимостей в сетевой инфраструктуре.
Одним из популярных способов использования NMAP является поиск открытых портов в сети. NMAP можно установить на Windows, Linux, OSX
Установка NMAP
Перейдите по ссылке загрузки nmap и загрузите последнюю стабильную версию
или, используйте прямую ссылку здесь, чтобы скачать nmap
Перейдите в папку, куда загружен файл
Щелкните правой кнопкой мыши на EXE-файле и нажмите «Run as administrator», чтобы запустить от имени администратора.

Он начнет процесс установки, примите лицензионное соглашение

Вы можете выбрать компоненты для установки, но было бы неплохо установить их все
По умолчанию он будет установлен в папке C:\Program Files (x86)\Nmap, но при необходимости измените его путь

Это начнет установку NMAP и после того, как она будет выполнена; вы получите подтверждение

Идем вперед и поиграем с инструментами, чтобы понять, как это работает.
Вот некоторые из примеров.
Обнаружение версии
Одним из применений NMAP является отразить отпечаток ОС и запущенных служб

-sV аргумент команды будет определять версии и состояние запущенных служб
Проверка информации сертификатов
OpenSSL в основном используется для выполнения операций с сертификатами, например, генерации, проверки, модификации и т. д.
Однако вы также можете выполнять некоторые действия с NMAP.

Если вам интересно, ssl-cert.nse – это скрипт, который устанавливается вместе с NMAP.
Он доступен по умолчанию: C:\Program Files x86)\ Nmap\scripts
Проверка информации шифрования
Скрипт ssl-enum-cihpers.nse может использоваться для проверки информации шифрования SSL.

Каждый набор шифров отображается с буквой (от A до F), указывающей силу соединения.
Оценка основана на криптографической силе обмена ключами и потокового шифрования.
Выбор алгоритма целостности сообщения (хеш) не является фактором.
Выходная линия, начинающаяся с наименьшей силы, показывает силу самого слабого шифрования.
Чтобы обнаружить уязвимость DH (Diffie-Hellman), вы можете использовать синтаксис ниже:

Я надеюсь, что эта краткая инструкция поможет вам установить и ознакомиться с NMAP в операционной системе Windows.


