- Install OpenCV 3 and Dlib on Windows ( Python only )
- Step 1: Install Anaconda (a python distribution)
- Step 2 : Create Virtual Environment
- Step 3 : Install OpenCV
- 3.1. Activate the environment
- 3.2. Install OpenCV and other important packages
- 3.3. Test your installation
- Subscribe & Download Code
- Настройте Opencv в среде анаконды
- Install OpenCV 3 on Windows
- Step 1: Install Visual Studio
- Step 2: Install CMake
- Step 3: Install Anaconda (a python distribution)
- Step 4: Download and extract opencv-3.3.1 and opencv_contrib-3.3.1
- Step 5: Generate Visual Studio project using CMake
- Step 5.1: Additional changes to CMake config
- Step 5.2 : Add Python paths for both Python2 and Python3 (optional)
- Step 5.3 : Generate build files
- Step 6: Compile OpenCV
- Step 6.1:Compile opencv in Release mode
- Step 6.2 : Compile opencv in Debug mode
- Step 7: Update System Environment Variables
- Step 7.1 : Update environment variable – PATH
- Step 7.2 : Update user environment variable – OPENCV_DIR
- Step 8: Testing C++ code
- Step 9: Testing Python code
- Step 9.1 : Quick check
- Step 9.2 : Testing redEyeRemover application
Install OpenCV 3 and Dlib on Windows ( Python only )
November 30, 2017 By 59 Comments
This is an old blog and some information might be obsolete. We have published new instructions. You can find them here:
We already have a post for installing OpenCV 3 on Windows which covers how to install OpenCV3 from source for working with both C++ and Python codes. However, many readers have faced problems while installing OpenCV 3 on Windows from source. This post is for those readers who want to install OpenCV on Windows for writing Python code only.
If you are still not able to install OpenCV on your system, but want to get started with it, we suggest using our docker images with pre-installed OpenCV, Dlib, miniconda and jupyter notebooks along with other dependencies as described in this blog.
Step 1: Install Anaconda (a python distribution)
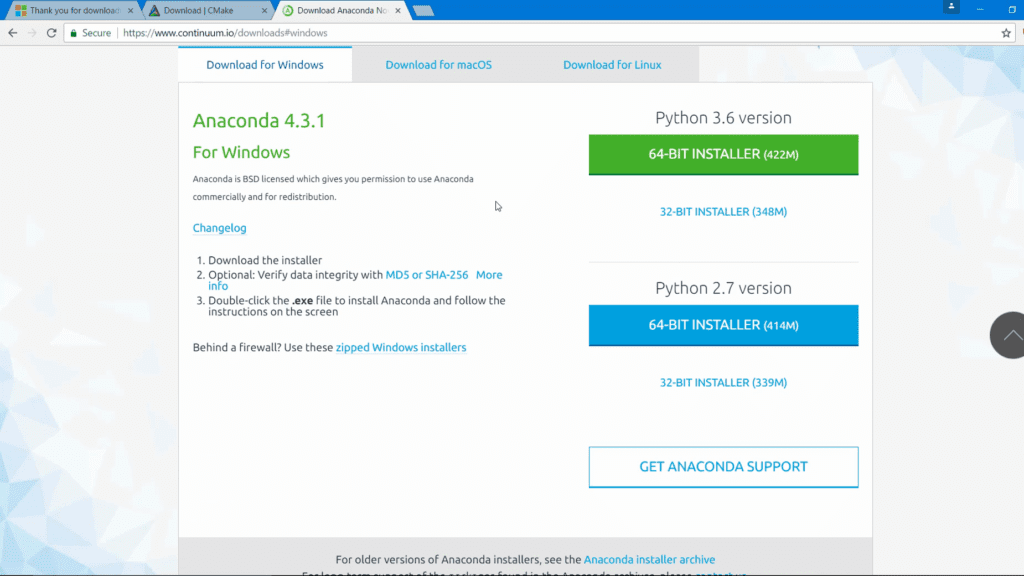
Download and install Anaconda 64-bit version from https://www.continuum.io/downloads.
It is advised to install Anaconda for Python 3.
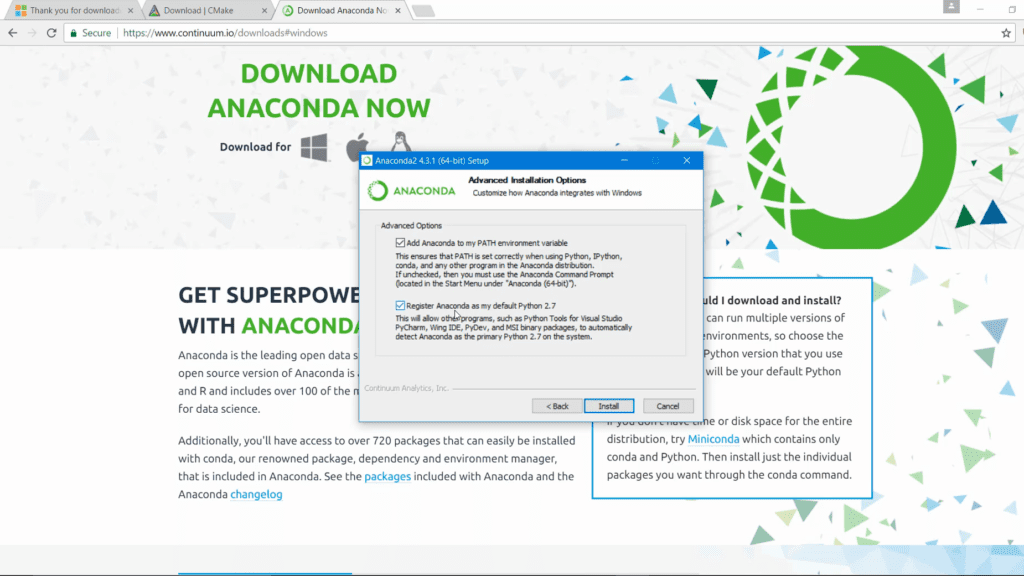
While installing Anaconda make sure that you check both options:
- Add Anaconda to my PATH environment variable
- Register Anaconda as my default Python
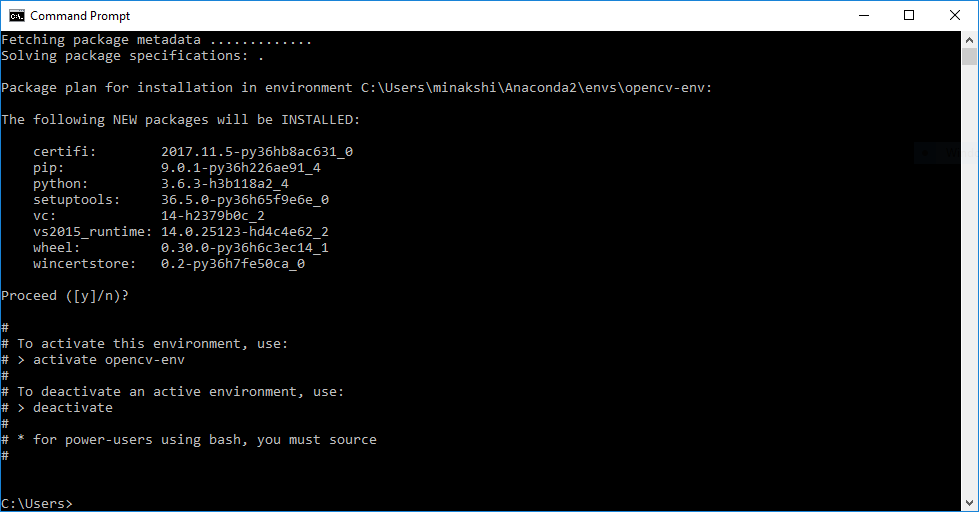
Step 2 : Create Virtual Environment
Open the command prompt and execute the following command.
You should get an output as shown below:
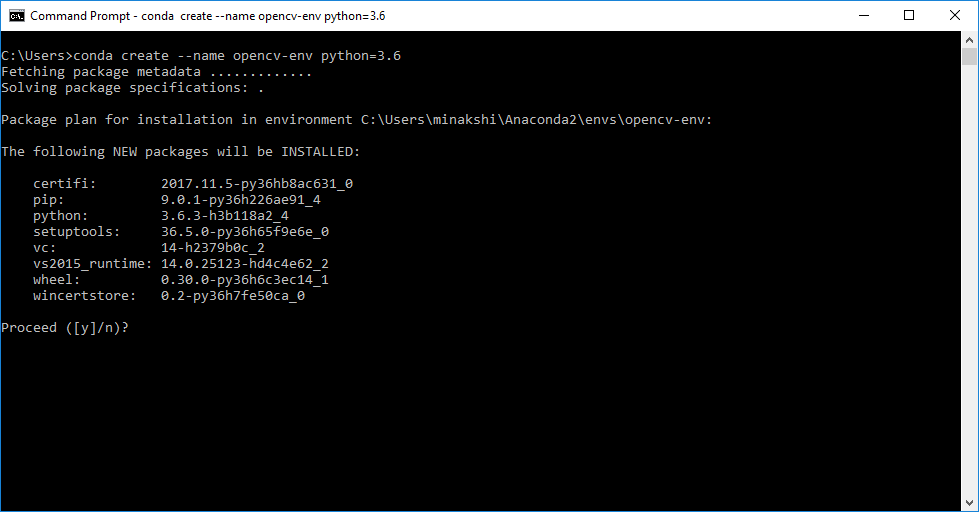
Press Enter and the environment will be installed and you should get an output as shown below :
Step 3 : Install OpenCV
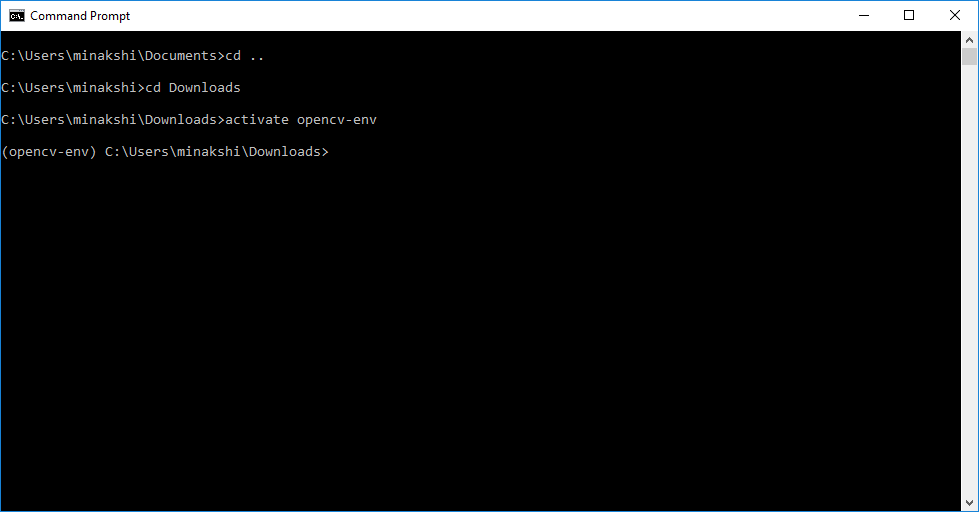
3.1. Activate the environment
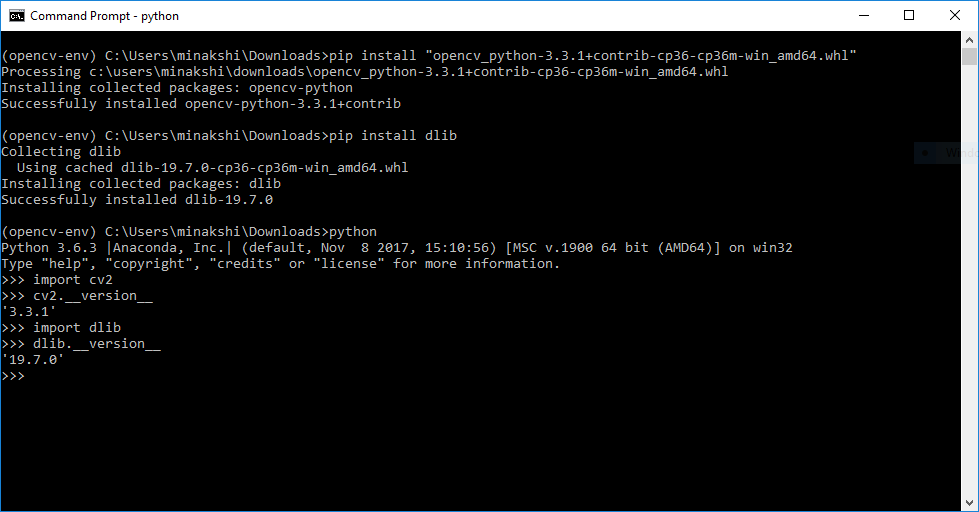
3.2. Install OpenCV and other important packages
Continuing from the above prompt, execute the following commands
3.3. Test your installation
Open the python prompt on the command line by typing python on the command prompt
You should get the following output
Subscribe & Download Code
If you liked this article, please subscribe to our newsletter. You will also receive a free Computer Vision Resource Guide. In our newsletter, we share OpenCV tutorials and examples written in C++/Python, and Computer Vision and Machine Learning algorithms and news.
Настройте Opencv в среде анаконды
Если вам нравится работать с изображениями и анализировать видео с помощью Python, то вы попали по адресу. Python — один из основных языков, который можно использовать для обработки изображений или видео.
Требования к OpenCV и Anaconda
— 32- или 64-битный компьютер.
— для Miniconda — 400 МБ дискового пространства.
— Для Anaconda — минимум 3 ГБ дискового пространства для загрузки и установки.
— Windows, MacOS или Linux.
— Python 2.7, 3.4, 3.5 или 3.6.
Anaconda — это программное обеспечение с открытым исходным кодом, содержащее юпитер, шпионы и т. Д., Которые используются для обработки больших данных, анализа данных, тяжелых научных вычислений. Анаконда работает на языке программирования R и Python. Spyder (подприложение Anaconda) используется для Python. OpenCV для Python будет работать в Skyder. Версии пакетов управляются системой управления пакетами conda. 
Установка Anaconda: Перейдите на Continumum.io/downloads/ и установите последнюю версию Anaconda. Обязательно установите «Python 3.6 Version» для соответствующей архитектуры. Установите его с настройками по умолчанию.

OpenCV (Open Source Computer Vision) — это библиотека компьютерного зрения, которая содержит различные функции для выполнения операций с изображениями или видео. Первоначально он был разработан Intel, но позже был поддержан компанией Willow Garage и теперь поддерживается компанией Itseez. Эта библиотека кроссплатформенная, то есть она доступна на нескольких языках программирования, таких как Python, C ++ и т. Д. 
Шаги для импорта OpenCV на Anaconda в среде Windows ‘
- Создание среды Anaconda:
Шаг 1: — Найдите Anaconda в панели задач и выберите ANACONDA NAVIGATOR.

Шаг 2: — Теперь вы увидите меню с различными вариантами, такими как блокнот Юпитер, Spyder и т. Д. Это Anaconda Environment.
Шаг 3: — Выберите Spyder, поскольку он является IDE Anaconda для Python, и библиотека OpenCV будет работать только в нем.
Установить OpenCV
Шаг 1: — После установки анаконды откройте подсказку Анаконды.

Шаг 2: — Введите данную команду, нажмите ввод и дайте ей скачать весь пакет.
команда
Шаг 3: — Теперь просто импортируйте opencv в вашу программу на python, в которой вы хотите использовать функции обработки изображений.
Примеры: некоторые основные функции библиотеки opencv (эти функции выполняются для версии Anaconda для Windows, но она также работает для версии linux)
Вышеупомянутая функция imread сохраняет изображение в заданном месте в переменной img.
Преобразование изображения в оттенки серого
Вышеуказанная функция преобразует изображение в градации серого, а затем сохраняет его в переменной img.
Отображение сохраненного изображения
Вышеупомянутая функция показывает изображение, сохраненное в переменной img.
Сохранить изображение в файл
Вышеуказанная функция сохраняет изображение в файл. Изображение хранится в переменной типа Mat в форме матрицы.
Чтение видео прямо с веб-камеры
Хранит живое видео с вашей веб-камеры в переменной крышке.
Чтение видео из локального хранилища
Сохраняет видео, расположенное в заданном месте, в переменной.
Чтобы проверить, успешно ли видео сохранено в переменной
cap — это переменная, которая содержит видео. Вышеуказанная функция возвращает true, если видео успешно открыто, иначе возвращает false.
Отпустите сохраненное видео после завершения обработки
Вышеуказанная функция освобождает видео, хранящееся в шапке.
Install OpenCV 3 on Windows
In this post, we will provide step by step instructions on how to install OpenCV 3 (C++ and Python) on Windows.
If you want to install OpenCV 4 from source, please check out this tutorial: Install OpenCV from source on Windows
We have used Windows Power Shell to run commands. Alternatively, you can use the command prompt too.
Step 1: Install Visual Studio
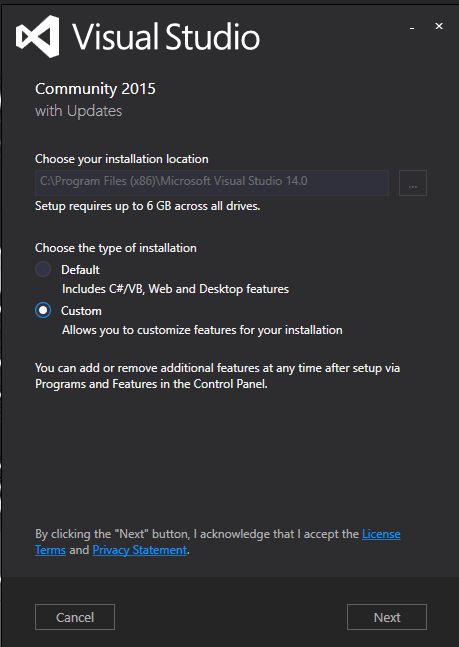
Download and install Visual Studio 2015 community edition from https://www.visualstudio.com/vs/older-downloads/. If you are finding it difficult to search for Visual Studio 2015, use this link. If you don’t have a Visual Studio Dev Essentials account, create account and login. Run installer, select “Custom” in “type of installation”.
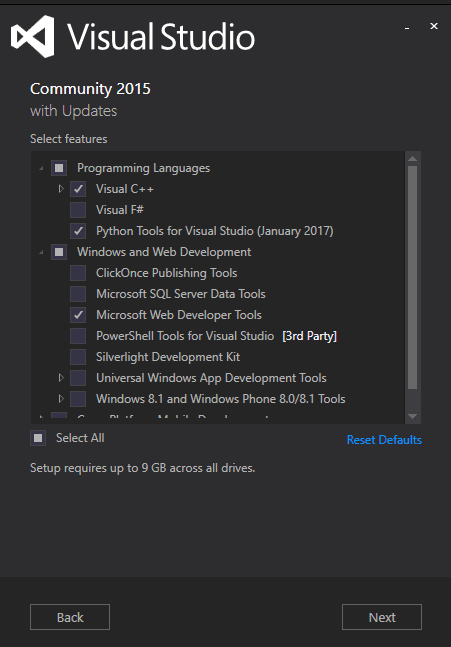
In next screen within Programming Languages, select Visual C++ and Python tools for Visual Studio. Click next.
Now click next. It will take some time to complete the installation.
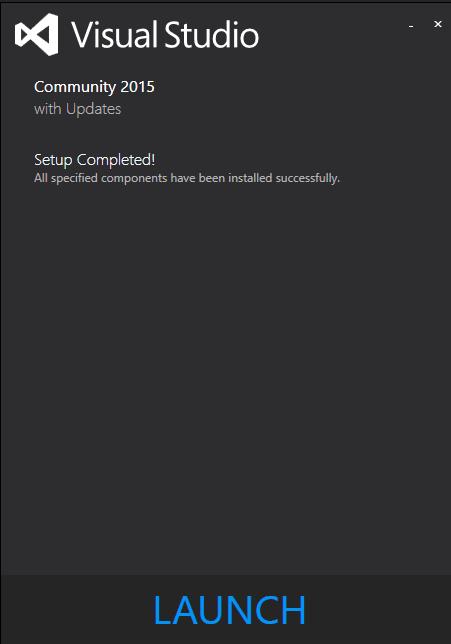
We have finished installation of Visual Studio 2015.
Note: Since Visual Studio 2017 fails to compile Dlib, we switched back to Visual Studio 2015.
Step 2: Install CMake
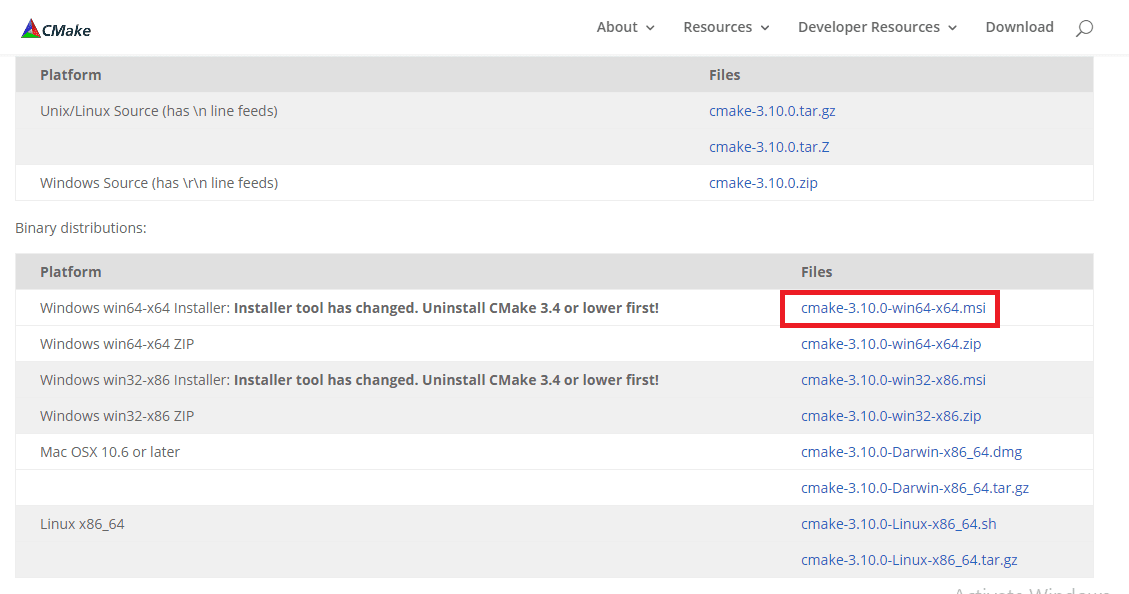
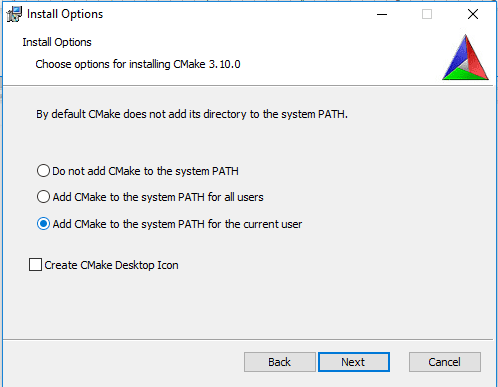
Download and install CMake v3.10.0 from https://cmake.org/download/.
During installation select “Add CMake to system PATH”
Step 3: Install Anaconda (a python distribution)
Download and install Anaconda 64-bit version from https://www.continuum.io/downloads.
Note: Dlib ships a prebuilt binary for Python 3 and not Python 2. Building Dlib’s Python bindings from source is a hassle as you have to build Boost.Python first.
So it is advised to install Anaconda 3. In case you want to build OpenCV’s Python bindings for Python 2, you can install Anaconda 2 as well but you won’t be able to use Dlib in Python 2.
While installing Anaconda make sure that you check both options:
- Add Anaconda to my PATH environment variable
- Register Anaconda as my default Python
Step 4: Download and extract opencv-3.3.1 and opencv_contrib-3.3.1
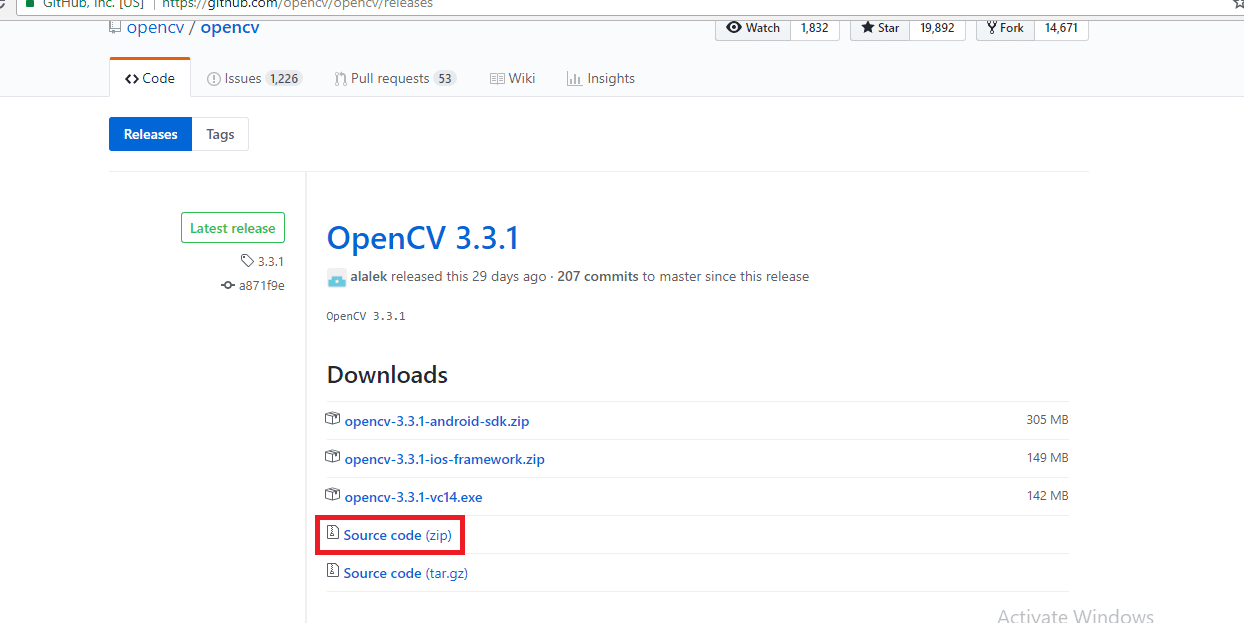
Go to https://github.com/opencv/opencv/releases and download opencv-3.3.1 source code zip
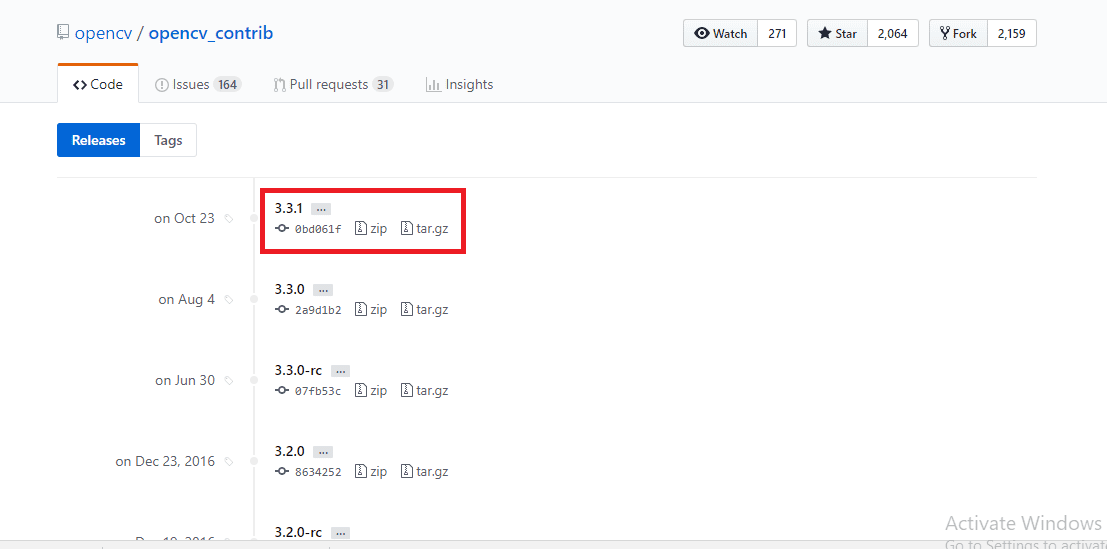
Go to https://github.com/opencv/opencv_contrib/releases and download opencv_contrib-3.3.1 source code zip
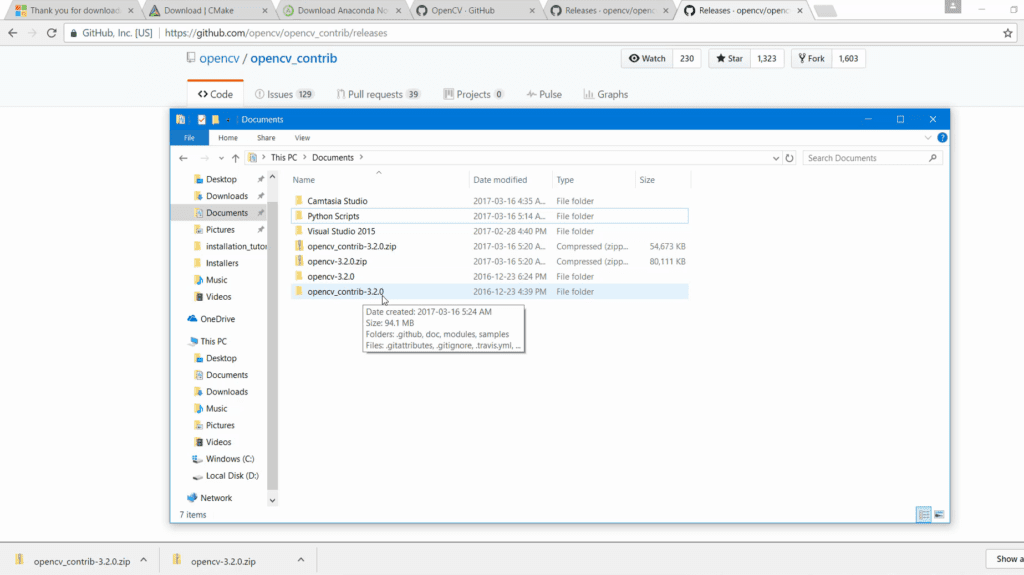
Extract both zip files. Although you can keep opencv and opencv_contrib folders anywhere, I suggest that you should keep both in the same directory. I have placed these two folders in “My Documents” directory.
NOTE : From hereon we will refer the path to opencv-3.3.1 folder as OPENCV_PATH. For example, in my case OPENCV_PATH is C:/Users/Vaibhaw Chandel/Documents/opencv-3.3.1
Depending upon where you have kept opencv-3.3.1 folder, this path would be different.
Step 5: Generate Visual Studio project using CMake
Run Cmake, in box “Where is the source code” write value of OPENCV_PATH (which is path to opencv-3.3.1 folder) and path to build directory. We will choose build directory as OPENCV_PATH/build
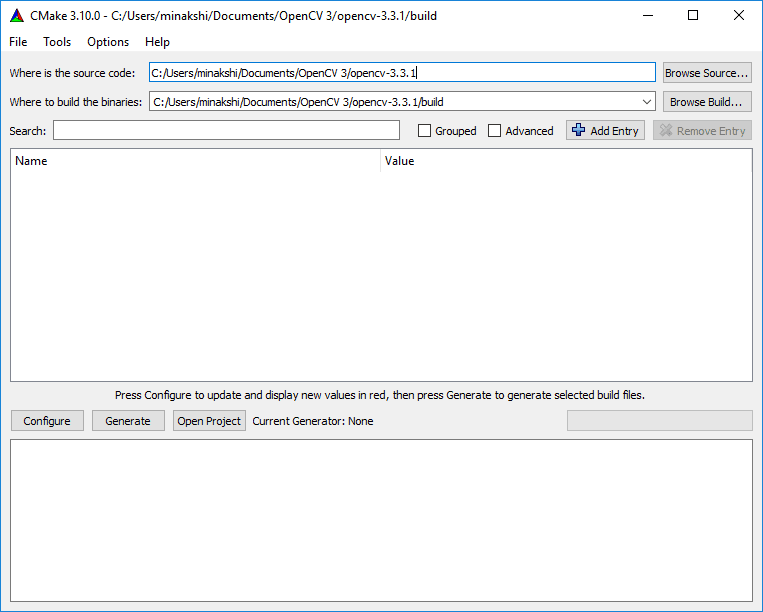
Now click configure.
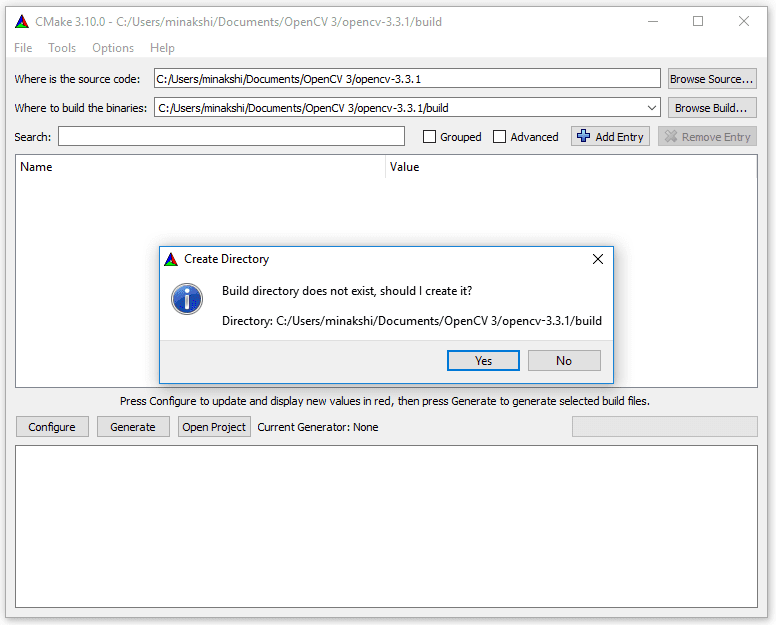
You will be asked for permission to create the build folder. Click Yes.
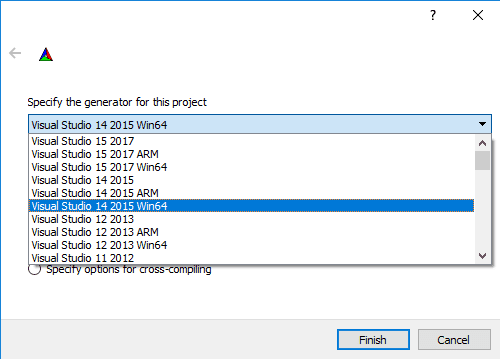
When prompted to select a compiler, select Visual Studio 14 2015 Win64.
Click finish and in the next window keep the default parameters checked.
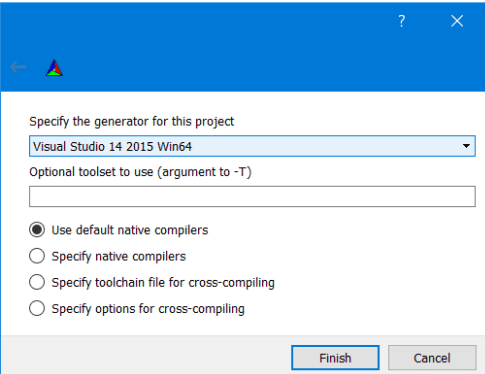
Click finish. Now CMake will look in the system directories and generate the makefiles.
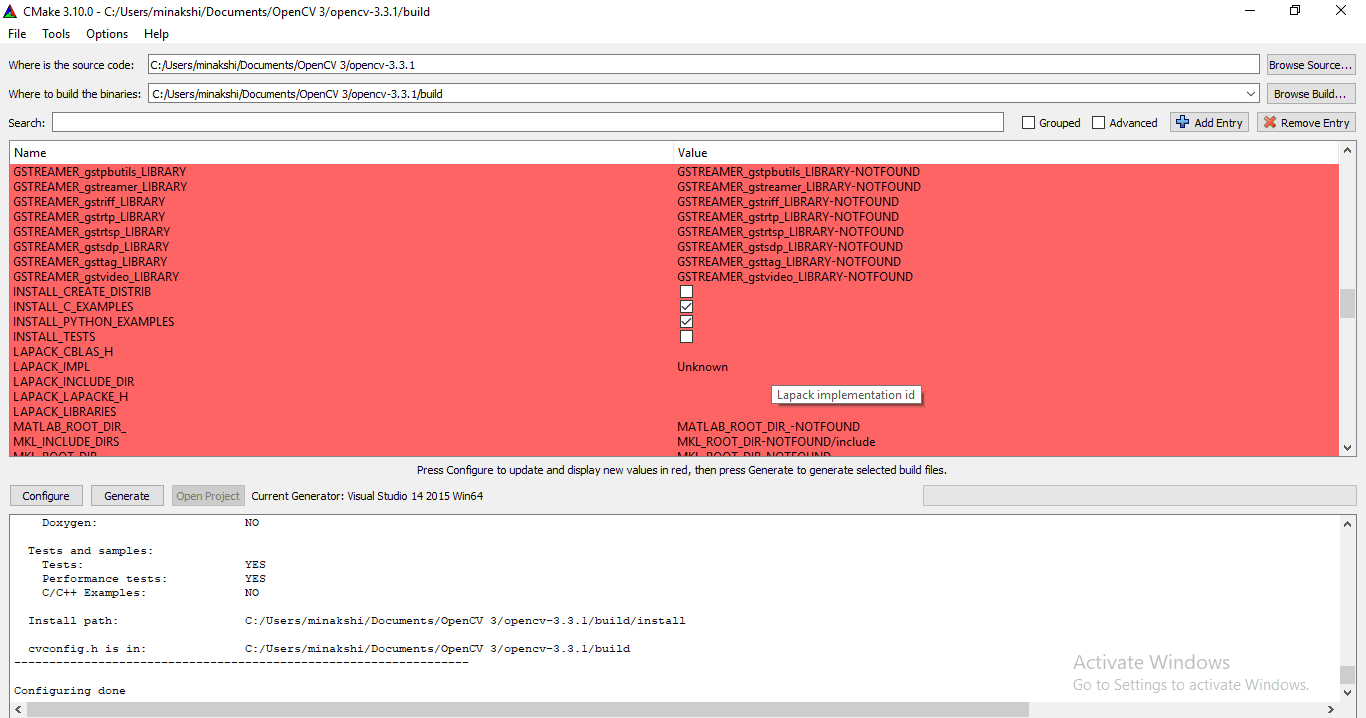
Step 5.1: Additional changes to CMake config
We will make few changes in the default configuration generated by CMake. Click on the images to see a larger version.
- Check “INSTALL_C_EXAMPLES” and “INSTALL_PYTHON_EXAMPLES”
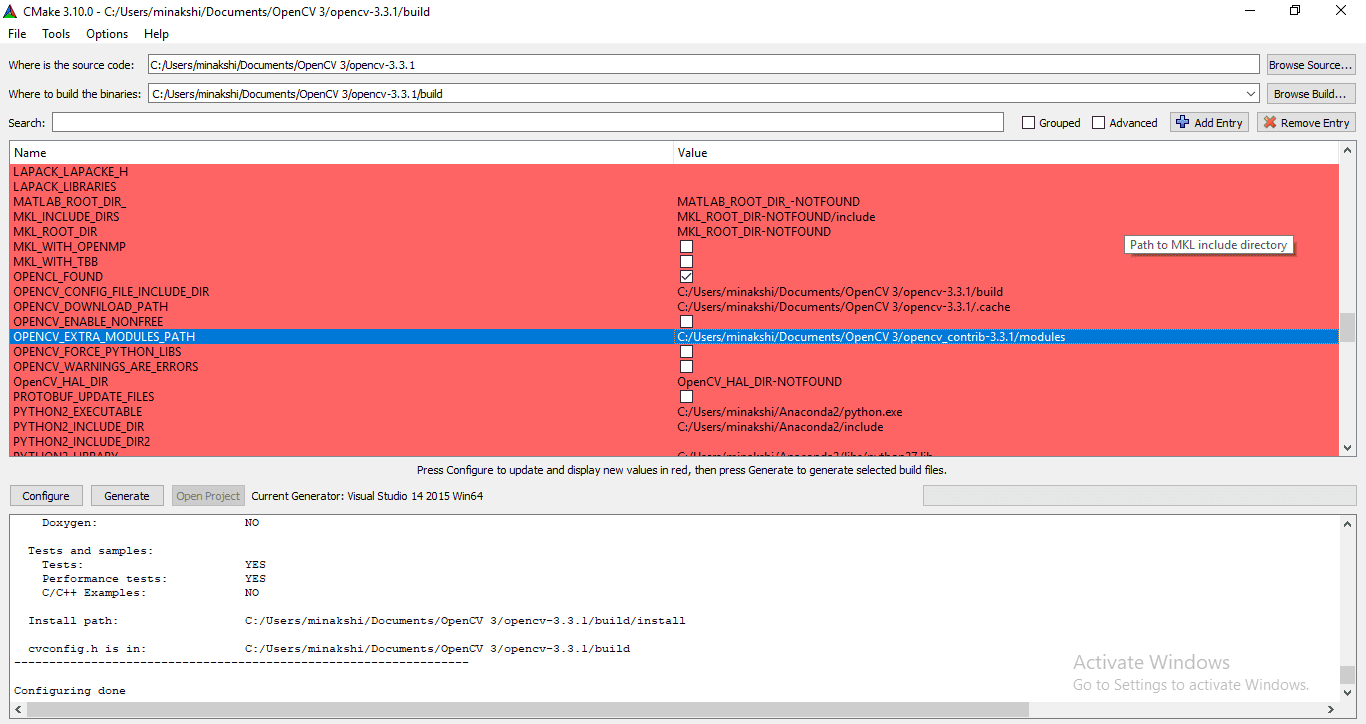
- In flag “OPENCV_EXTRA_MODULES_PATH”, give path of modules directory within opencv_contrib-3.3.1. In our case we have kept opencv_contrib-3.3.1 in Documents folder so path is “C:/Users/Vaibhaw Chandel/Documents/opencv_contrib-3.3.1/modules”
Now click configure to apply these changes.
- On Windows 10, opencv_saliency module fails to build. So we will disable it. Uncheck BUILD_opencv_saliency
Now click on configure again to include this change.
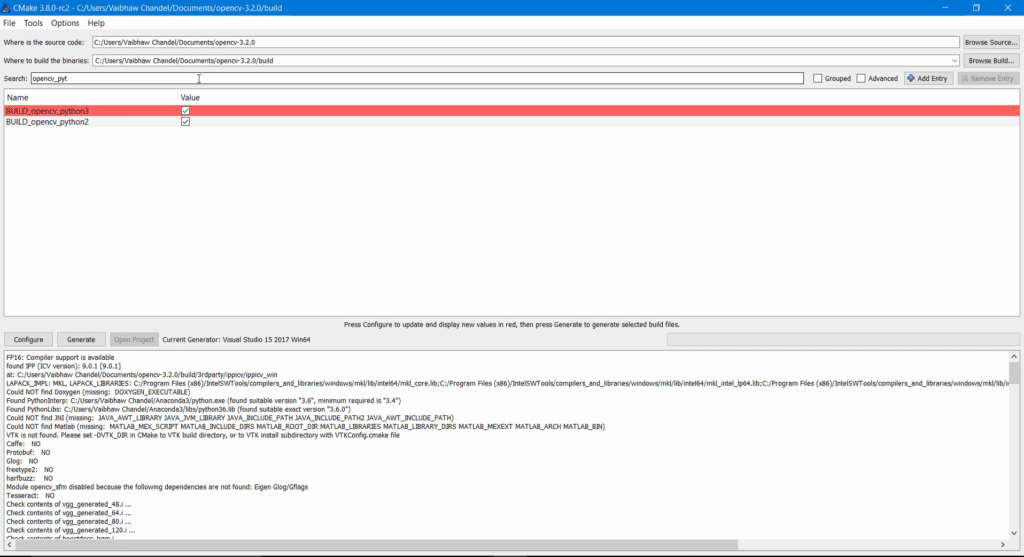
Step 5.2 : Add Python paths for both Python2 and Python3 (optional)
This section is only for people who want to generate OpenCV binary for both Python2 and Python 3. If you are going to use just one Python either 2 or 3, you should skip this section.
CMake was unable to find paths for my Python3 files.
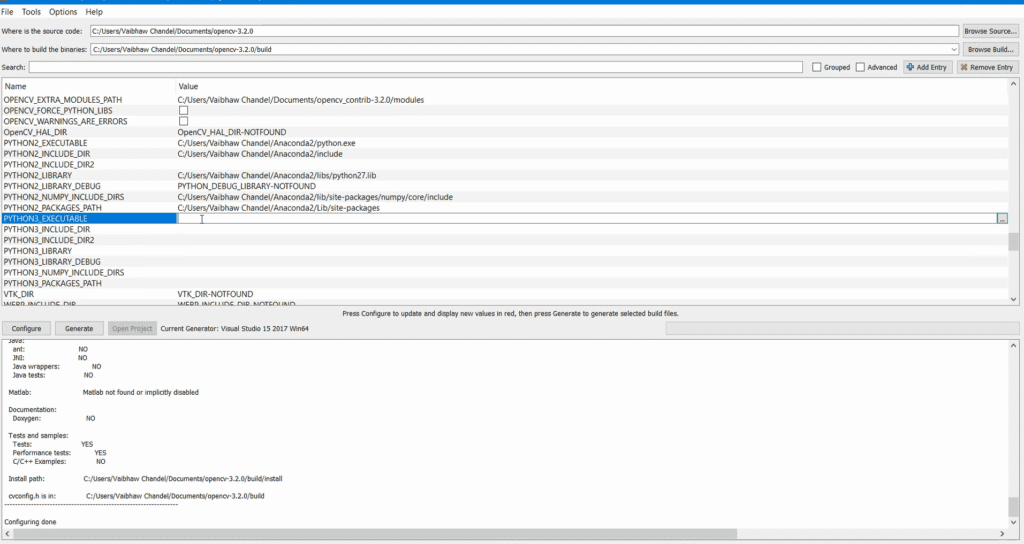
So I manually added paths for Python3.
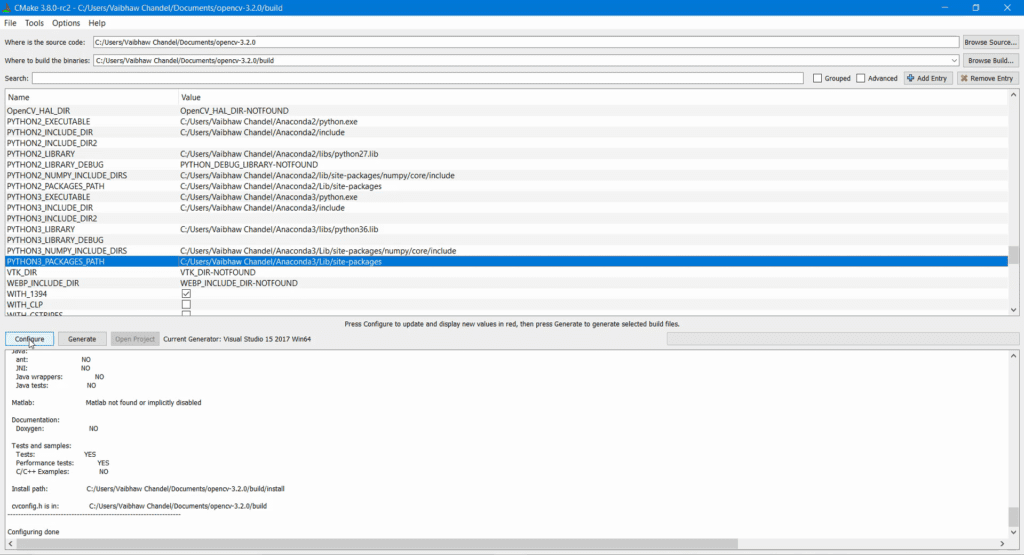
Now click configure again. After configuring is done, search opencv_python in search bar, both BUILD_opencv_python2 and BUILD_opencv_python3 will be automatically checked. Now we are sure that OpenCV binaries for both Python2 and Python 3 will be generated after compilation.
Step 5.3 : Generate build files
If CMake is able to configure without any errors it should say “Configuring done”.
Click generate.
Note: Whenever you make any changes(check/uncheck boxes or change path) to configuration generated by CMake, always click configure and generate.
Step 6: Compile OpenCV
Step 6.1:Compile opencv in Release mode
Open Windows Command Prompt (cmd).
Go to OPENCV_PATH/build directory and run this command
Step 6.2 : Compile opencv in Debug mode
Open CMake GUI again as mentioned in Step 5.
- Search “python” in search box
- Uncheck INSTALL_PYTHON_EXAMPLES, BUILD_opencv_python3 and BUILD_opencv_python2
- Click configure
- Click generate
Now in windows command prompt
Go to OPENCV_PATH/build directory and run this command
Now that we have compiled OpenCV we will find out how to test a OpenCV project using CMake.
Step 7: Update System Environment Variables
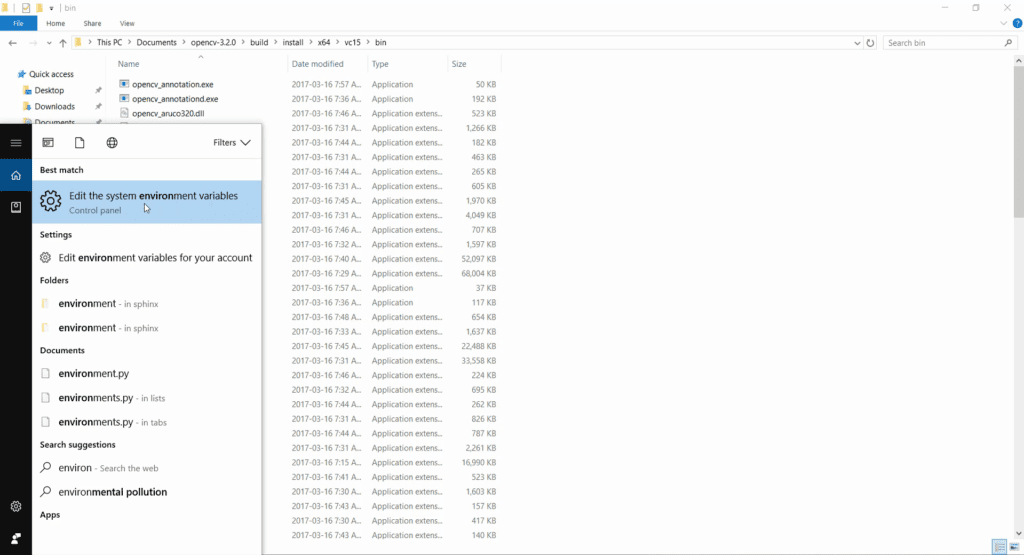
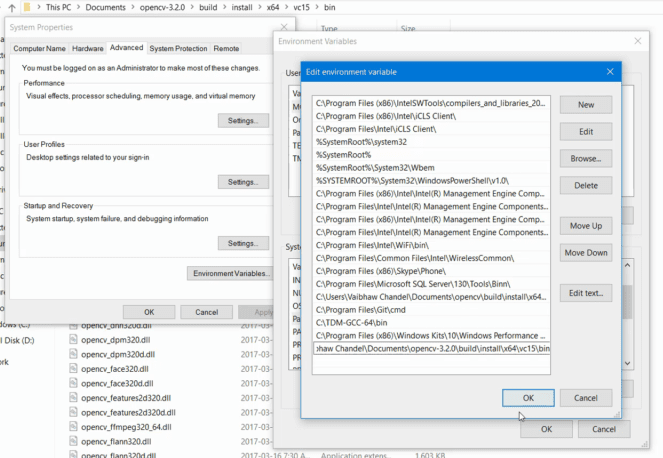
Step 7.1 : Update environment variable – PATH
First of all we will add OpenCV dll files’ path to our system PATH. Press Windows Super key, search for “environment variables”
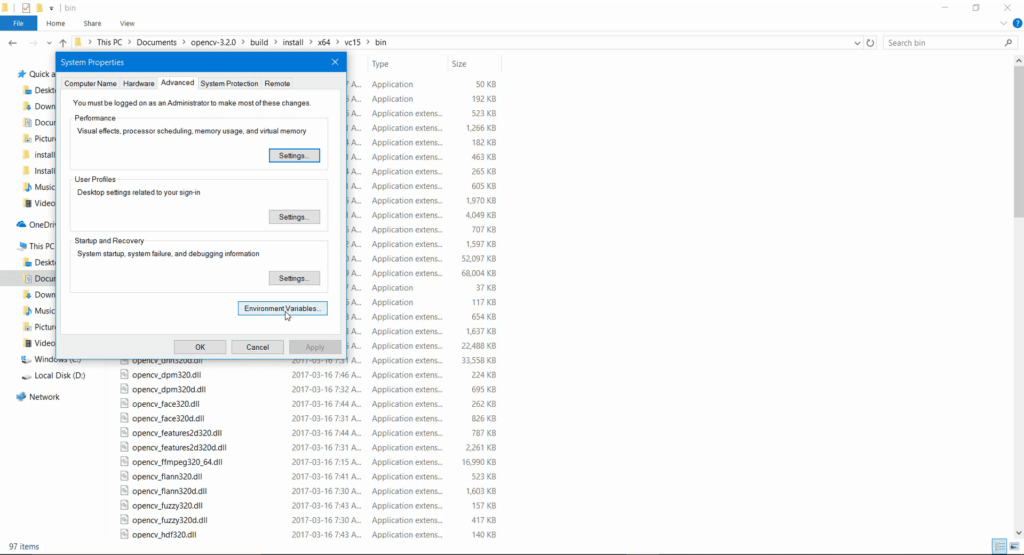
Click Environment Variables in System Properties window
Under System Variables, Select Path and click edit
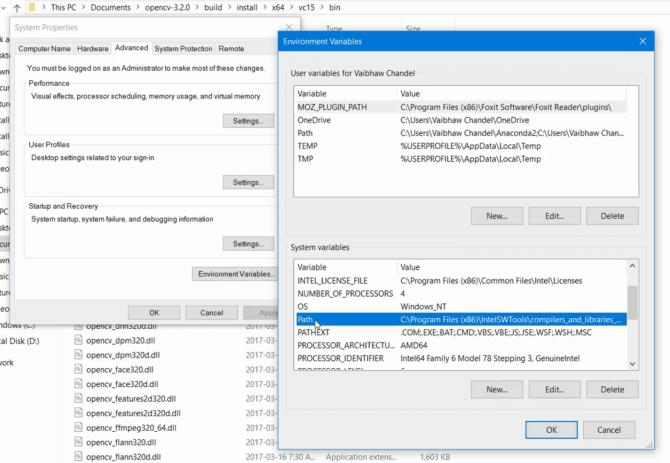
Click New, and give path to OPENCV_PATH\build\install\x64\vc14\bin and click Ok. Depending upon where you have kept opencv-3.3.1 folder and what version of Visual Studio you used to compile OpenCV, this path would be different. In my case full path is:
C:\Users\Vaibhaw Chandel\Documents\opencv-3.3.1\build\install\x64\vc14\bin
Now click Ok to save. Don’t close the Environment Variables window yet. We will update OPENCV_DIR variable in next step.
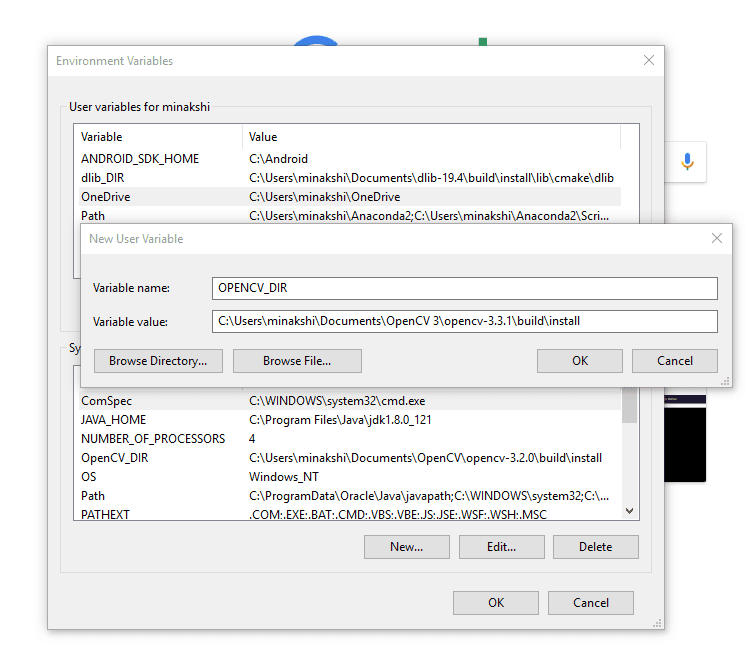
Step 7.2 : Update user environment variable – OPENCV_DIR
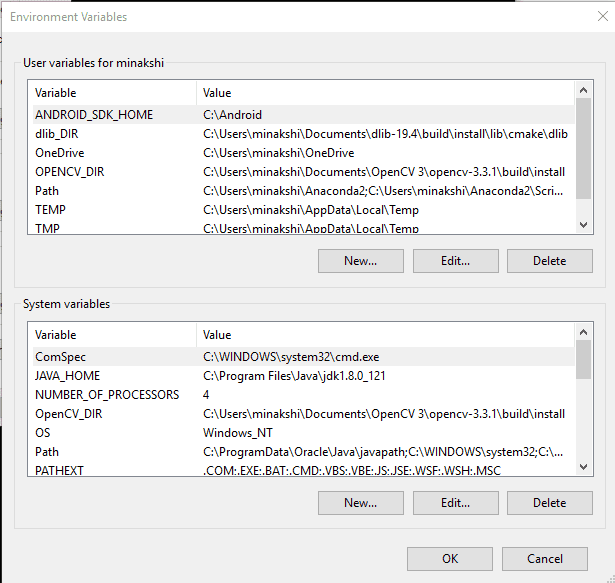
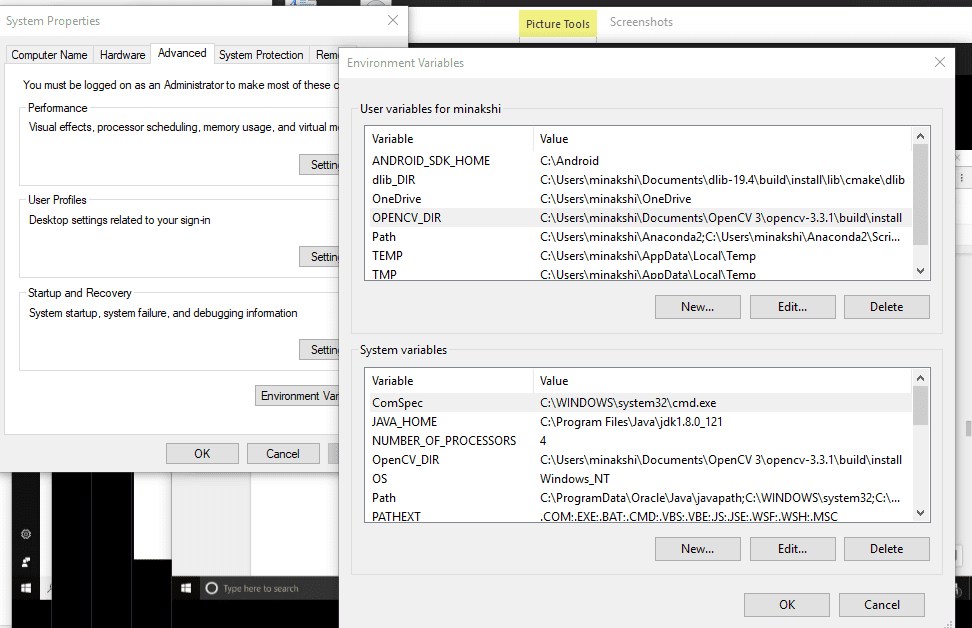
Click New in “User Variables” (upper half of right hand side window). Under variable name write OPENCV_DIR and under variable value write OPENCV_PATH\build\install.
As you can see in my case variable value is:
C:\Users\Vaibhaw Chandel\Documents\opencv-3.3.1\build\install
This directory contains file “OpenCVConfig.cmake”. This is used by CMake to configure OpenCV_LIBS and OpenCV_INCLUDE_DIRS variables to generate project files.
Now click ok to save and close environment variables window.
Note: If you have an open Command Prompt/Power Shell window before these values were updated, you have to close and open a new Command Prompt/Power Shell window again.
Step 8: Testing C++ code
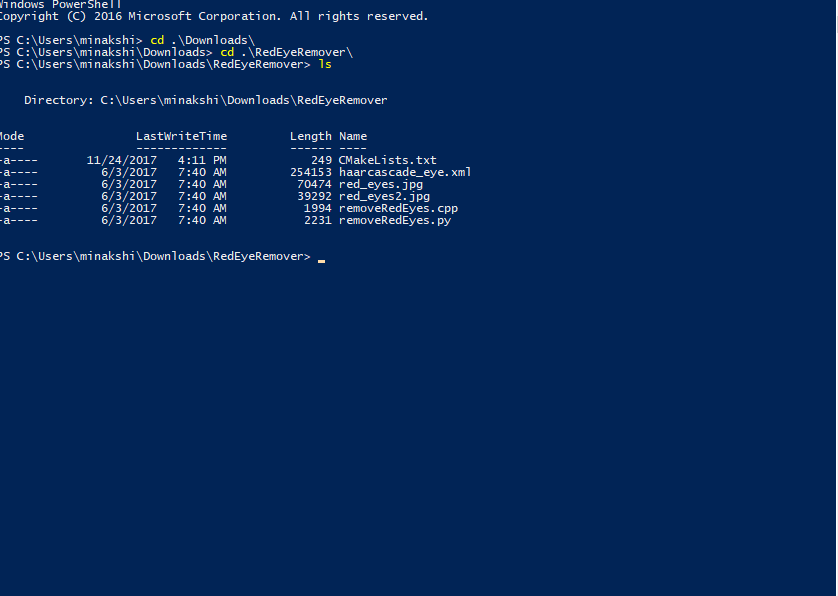
Download this redEyeRemover code and extract it into a folder.
Now open Windows Power Shell and navigate to this directory.
Create a file named CMakeLists.txt and put this code in this file.
This file has information about opencv’s include and library paths.
Now we will compile removeRedEyes.cpp and run it.
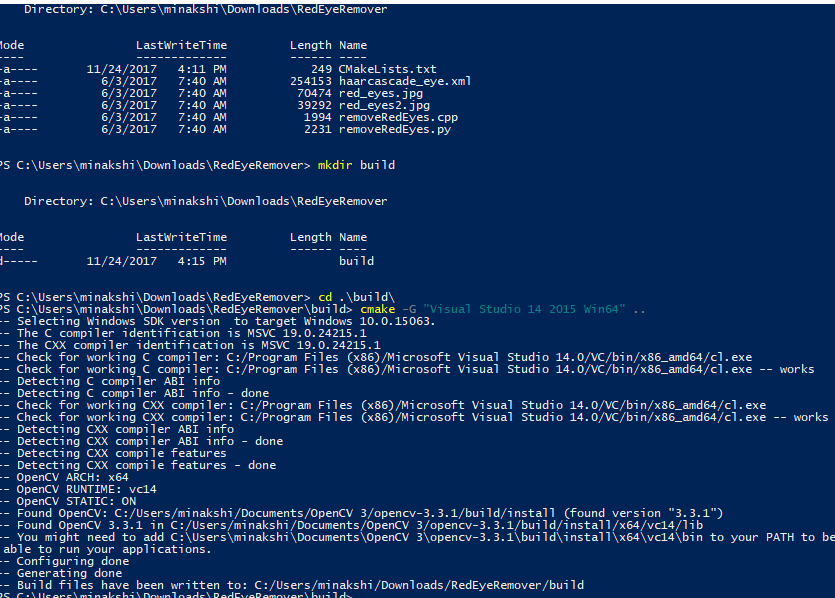
You can see in the screenshot below that CMake found the OpenCV on my machine.
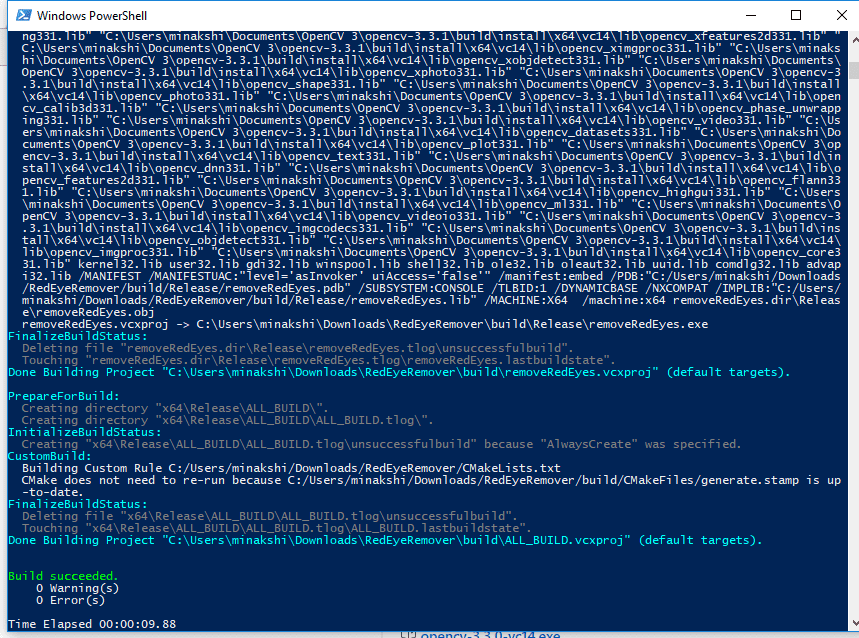
Now we will build our application.
Since our C++ code assumes that jpg files are in the current directory, we will move to directory RedEyeRemover and run removeRedEyes.exe file from there.
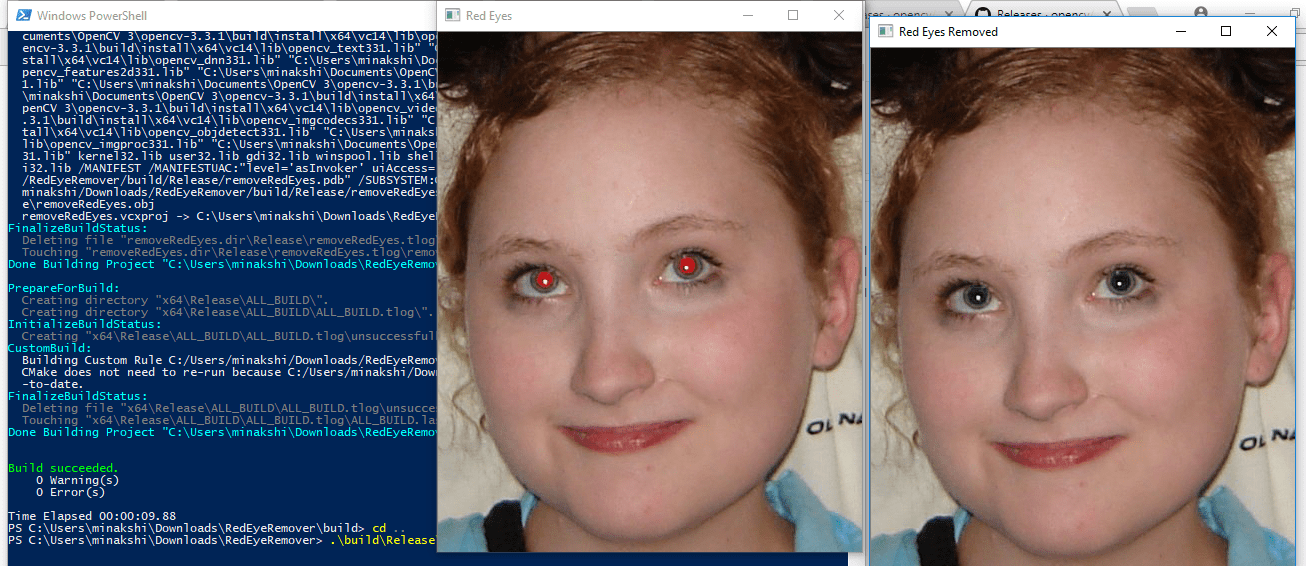
After running the application you will see two image windows, one with red eyes and another with black eyes.
Step 9: Testing Python code
Step 9.1 : Quick check
Quick way to check whether OpenCV for Python is installed correctly or not is to import cv2 in python interpreter.
Open command prompt in Windows, run python command. This will open Python interpreter. Run these two commands
Anaconda comes with a feature-rich Python interpreter called IPython. I tested these commands in IPython.
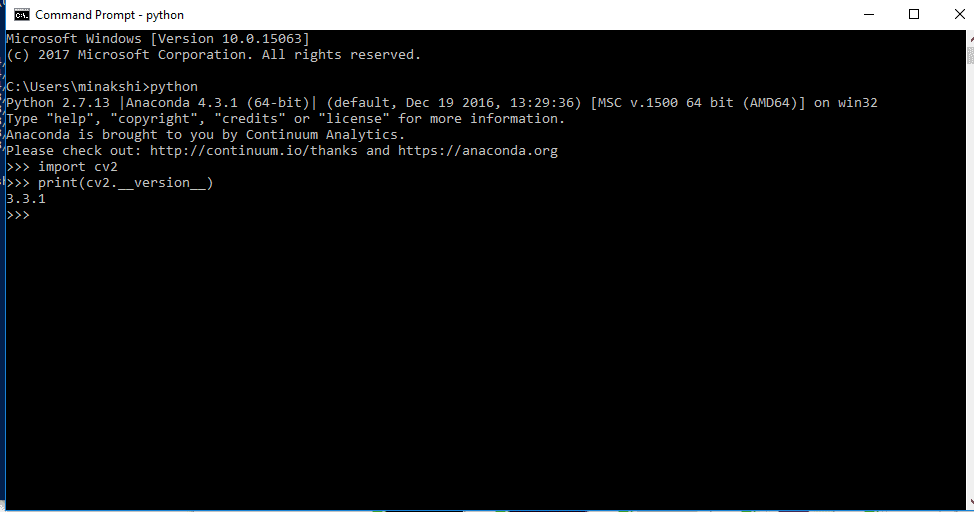
If OpenCV for Python is installed correctly, running command “import cv2” will give no errors. If any error comes up it means installation failed.
Step 9.2 : Testing redEyeRemover application
Open Windows Power Shell and navigate to directory where you have extracted RedEyeRemover.zip
Now run python code like this:
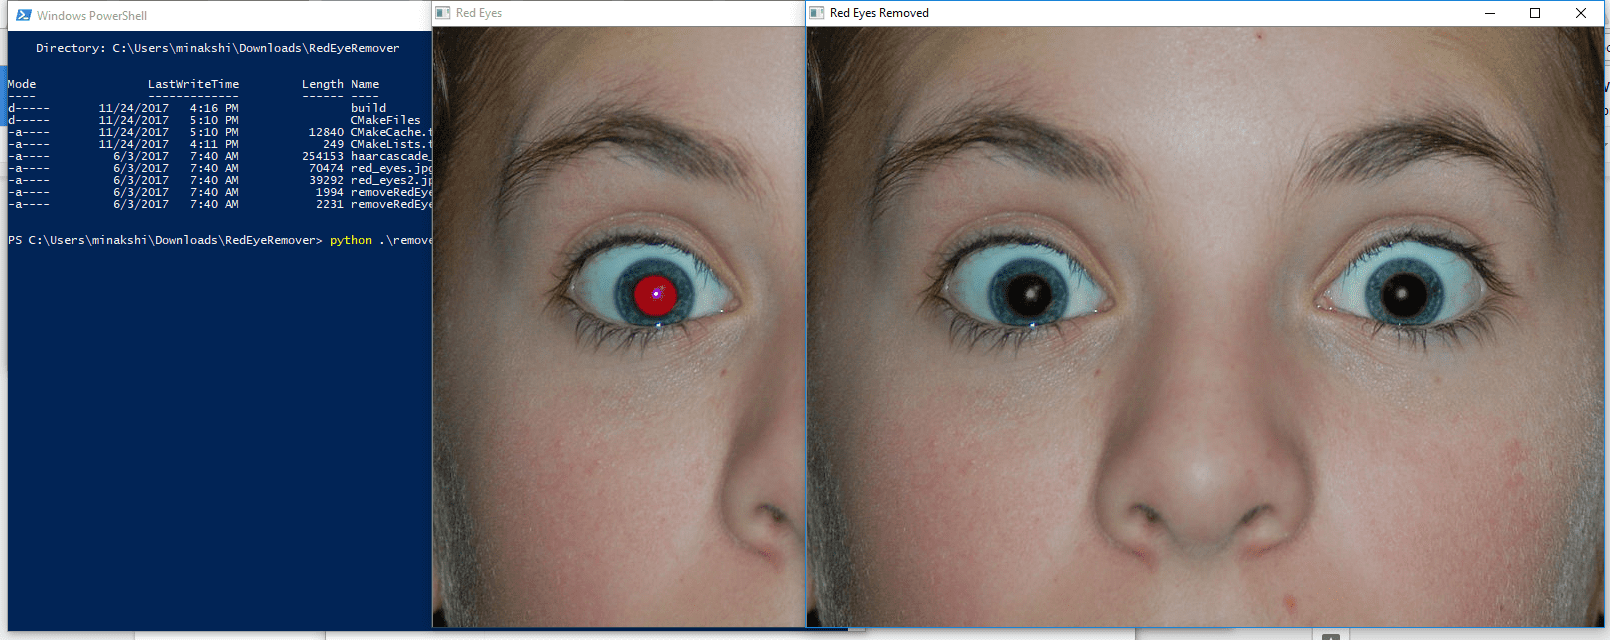
If the program runs successfully, you will see two image windows one with red-eyes other with black eyes.


