- Восстановление удаленных файлов в Linux
- Возможности PhotoRec
- Установка PhotoRec в Linux
- Восстановление удаленных фотографий и видео
- PhotoRec – Recover Deleted or Lost Files in Linux
- Install Testdisk (PhotoRec) in Linux Systems
- If You Appreciate What We Do Here On TecMint, You Should Consider:
- Related Posts
- 34 thoughts on “PhotoRec – Recover Deleted or Lost Files in Linux”
- Got something to say? Join the discussion. Cancel reply
Восстановление удаленных файлов в Linux
Удаление файла, как правило, не означает, что он потерян навсегда. При удалении файла его метаданные (т.е. имя файла, размер, время создания, расположение и т.д.) теряются, но фактические данные, содержащиеся в файле, остаются нетронутыми до тех пор, пока этот блок файловой системы не будет перезаписан данными другого файла. Это значит, что если вы случайно удалили файл, есть шансы его восстановить.
В этом руководстве я опишу восстановление удаленных файлов в Linux. Для этого предназначены несколько утилит. Среди них необходимо отметить PhotoRec , так как это программа с открытым исходным кодом, распространяющаяся под лицензией GPLV v2+. PhotoRec работает в Linux, BSD, MacOS X и Windows.
Возможности PhotoRec
Как можно понять из названия программы, изначально PhotoRec предназначался для восстановления случайно удаленных цифровых фотографий. Тем не менее, на сегодняшний день он достаточно универсален и поддерживает различные форматы файлов. PhotoRec восстанавливает файлы, просматривая блоки данных один за другим и сравнивая их с хранящимися в его базе данных сигнатурами для различных типов файлов.
Поддерживаемые типы файлов: видео (avi, mov, mp3, mp4, mpg), изображения (jpg, gif, png), документы (doc(x), ppt(x), xls(x), html), аудио (mp3, ogg), архивы (gz, zip) и т.д.
Поддерживаемые файловые системы: EXT2, EXT3, EXT4, HFS+, FAT, NTFS, exFAT.
Помимо жестких дисков, PhotoRec может восстанавливать файлы, хранимые на CD/DVD, USB-флешках, картах памяти (CompactFlash, Memory Stick, Secure Digital/SD, SmartMedia) и так далее. Если вы случайно удалили цифровые фотографии, хранившиеся на карте памяти или в фотоаппарате, то можете использовать PhotoRec для их восстановления.
Установка PhotoRec в Linux
На официальном сайте PhotoRec предлагают скачать бинарные файлы для различных платформ. Поэтому вы можете скачать статически скомпонованный бинарник для вашей системы Linux.
Для 32-битного Linux:
Для 64-битного Linux:
В директории с распакованным архивом вы найдете исполняемый файл PhotoRec (photorec_static).
Восстановление удаленных фотографий и видео
В этом руководстве я покажу вам, как восстанавливать фото и видео, удаленные с SD-карты, которые были созданы камерой Canon EOS Rebel T3i. Если вы случайно удалили файлы, очень важно не сохранять больше никаких файлов на этот диск или карту памяти, чтобы не перезаписать удаленные файлы. Как только вы обнаружили, что удалили файлы, сразу же запустите PhotoRec.
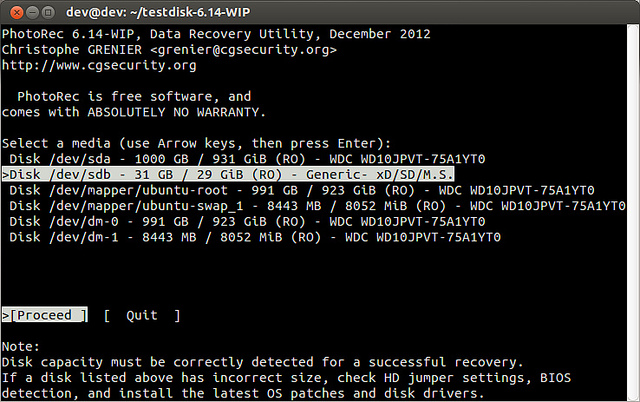
Вы увидите список доступных носителей. Выберите нужный.
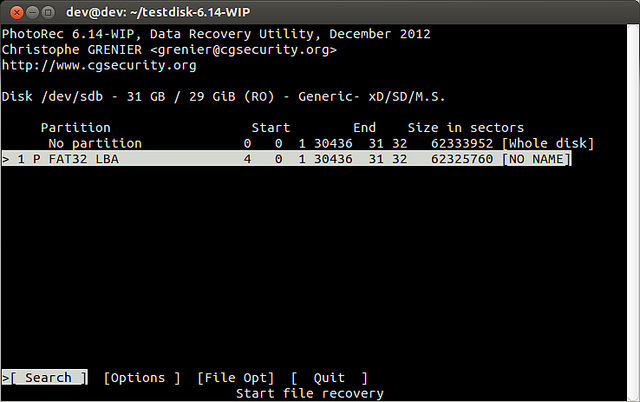
Далее, выберите раздел, который содержит удаленные файлы.
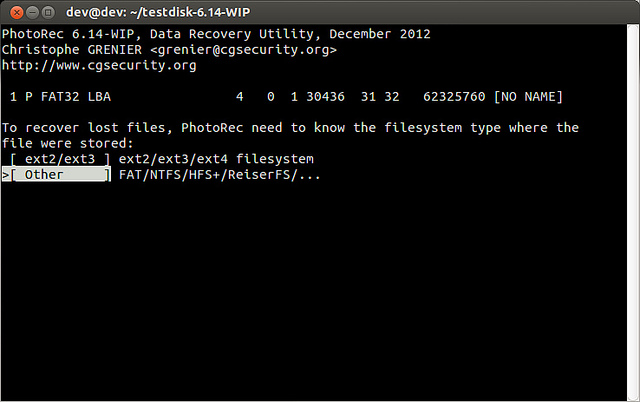
Выберите тип используемой файловой системы. В целом, вы можете идентифицировать файловую систему из вывода команды mount. В случае SD-карты из Canon, она отформатирована в файловую систему VFAT. Поэтому выберите «Other».
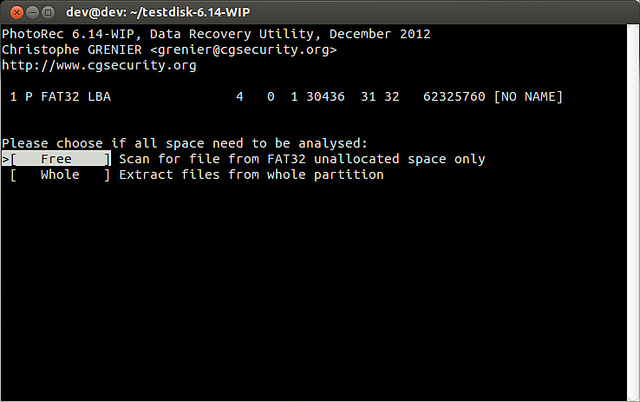
Выберите, нужно ли анализировать весь диск. В нашем случае выберите «Free», чтобы просканировать только свободное пространство.
Выберите папку, в которой хранились удаленные файлы. Теперь вам нужно выбрать другой раздел или диск, после чего нажать «C».
Теперь PhotoRec начинает считывать отдельные сектора в поиске потерянных файлов. Вы будете видеть ход процесса. В зависимости от размера носителя, он может занять пару минут или даже больше.

После окончания сканирования восстановленные файлы будут сохранены в выбранной вами папке назначения. Обратите внимание, что размер восстановленного файла может быть таким же или большим, чем размер оригинального файла.
Источник
PhotoRec – Recover Deleted or Lost Files in Linux
When you delete a file accidentally or intentionally on your system using ‘shift + delete‘ or delete option or empty Trash, the file content is not destroyed from the hard disk (or any storage media).
It is simply removed from the the directory structure and you cannot see the file in the directory where you deleted it, but it still remains somewhere in your hard drive.
If you have the appropriate tools and knowledge, you can recover lost files from your computer. However, as you store more files on your hard disk, the deleted files are overwritten, you may only recover recently deleted files.
In this tutorial, we will explain how to recover lost or deleted files on a hard disk in Linux using Testdisk, is a remarkable recovery tool ships in with a free tool called PhotoRec.
PhotoRec is used to recover lost files from storage media such as hard drives, digital camera and cdrom.
Install Testdisk (PhotoRec) in Linux Systems
To install Testdisk by running the relevant command below for your distribution:
In case it is not available on your Linux distribution’s repositories, download it from here and run it on a Live CD.
It can also be found in rescue CD such as Gparted LiveCD, Parted Magic, Ubuntu Boot CD, Ubuntu-Rescue-Remix and many more.
Once the installation is complete, start PhotoRec in a text window as follows with root privileges and specify the partition from which the files where deleted:
You’ll see the interface below:
![]() PhotoRec Data Recovery Tool for Linux
PhotoRec Data Recovery Tool for Linux
Use the right and left arrow keys to select a menu item, and press Enter. To continue with the recovery operation, select [Proceed] and hit Enter.
You will be at the following interface:
![]() Select Partition to Proceed File Recovery
Select Partition to Proceed File Recovery
Select [Options] to view available recovery operation options as in the interface below:
![]() Linux File Recovery Options
Linux File Recovery Options
Press Q to move back, at the interface below, you can specify the file extensions you want to search and recover. Therefore, select [File Opt] and press Enter.
Press s to disable/enable all file extensions, and in case you have disabled all file extensions, only choose types of files you want to recover by selecting them using right arrow keys (or left arrow key to deselect).
For instance, I want to recover all .mov files that I lost on my system.
![]() Specify Recovery File Type
Specify Recovery File Type
Then press b to save the setting, you should see the message below after pressing it. Move back by hitting Enter (or simply press Q button), then press Q again to go back to the main menu.
![]() Save File Recovery Settings
Save File Recovery Settings
Now select [Search] to start the recovery process. In the interface below, choose the filesystem type where the file(s) were stored and hit Enter.
![]() Select Filesystem to Recover Deleted Files
Select Filesystem to Recover Deleted Files
Next, choose if only free space or the whole partition needs to be analyzed as below. Note that choosing whole partition will make the operation slower and longer. Once you have selected the appropriate option, press Enter to proceed.
![]() Choose Filesystem to Analyze
Choose Filesystem to Analyze
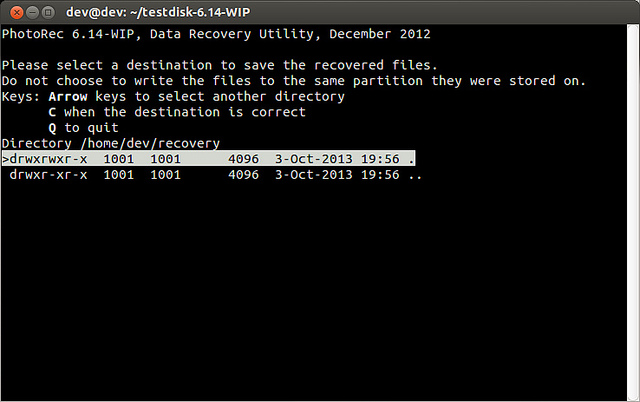
Closely select a directory where recovered files will be stored, if the destination is correct, press C button to continue. Choose a directory on a different partition to avoid deleted files being overwritten when more data is stored on the partition.
To move back until the root partition, use the left arrow key.
![]() Select Directory to Save Recovered Files
Select Directory to Save Recovered Files
The screenshot below shows deleted files of the specified type being recovered. You can stop the operation by pressing Enter.
Note: Your system may become slow, and possibly freeze at certain moments, so you need to be patient until when the process is complete.
![]() Recovering Deleted Files in Linux
Recovering Deleted Files in Linux
At the end of the operation, Photorec will show you the number and the location of files recovered.
![]() Linux File Recovery Summary
Linux File Recovery Summary
The recovered files will be stored with root privileges by default, therefore open your file manager with elevated privileges to access the files.
Use the command below (specify your file manager):
For more information, visit PhotoRec homepage: http://www.cgsecurity.org/wiki/PhotoRec.
That’s all! In this tutorial, we explained the necessary steps to recover deleted or lost files from hard disk using PhotoRec. This is so far the most reliable and effective recovery tool I have ever used, if you know any other similar tool, do share with us in the comments.
If You Appreciate What We Do Here On TecMint, You Should Consider:
TecMint is the fastest growing and most trusted community site for any kind of Linux Articles, Guides and Books on the web. Millions of people visit TecMint! to search or browse the thousands of published articles available FREELY to all.
If you like what you are reading, please consider buying us a coffee ( or 2 ) as a token of appreciation.

We are thankful for your never ending support.
Related Posts
![]()
![]()
![]()
![]()
![]()
![]()
34 thoughts on “PhotoRec – Recover Deleted or Lost Files in Linux”
This program worked for me. I’m a storm chaser here in southern Louisiana. I went out Saturday evening to get some lightning shots and watch a storm that passed by my house. When I got home, I transferred the images from my SD card to my external hard drive. When I got up yesterday morning, the pictures weren’t there. I scanned my whole external drive yesterday to no avail. When I got up this morning, I scanned my SD card and the pictures were still on there. It even had pictures from earlier this year. Thanks for this.
![]()
I have mounted a pen drive where the files were deleted from, but when i enter the file path it says “unable to open file or device”.
![]()
Hi, I dont have an sda3 folder in my dev folder. What should I do?
specify the partition from which the files where deleted:
“sda3” us an example, put the drive you are trying to recover in that spot, whether sda1 or sda 2, an extended logical drive or a USB drive (i,e,sda1).
![]()
Apparently, doesn’t work on Linux Mint 19. Can it recover .xls files ?
![]()
Will this tool recover .tgz files?
Yes, it will recover any files with any extension, just give a try and see..
I am limiting by filetype. I don’t see an option to select tgz guessing it will get the file if I select tar and or gz? I am searching an ext3 filesystem.
I think so, select file type as tar and gz, and see if it works..
![]()
I was just one step away from finishing a research project and all of sudden one of my students removed everything by «rm -rf *» command. I recovered all my python files and manuscript with this helpful guide you provide here. I don’t know how to say thank you for sharing this knowledge.
Oh, that’s great, we are glad to know this. Many thanks for the feedback.
![]()
Any Assistance would be greatly appreciated. Trying to recover a series of deleted MS Office files on a windows 10 system. I have booted the machine to a SystemRescueCD Live USB drive which includes TestDisk (PhotoRec) and Gparted.
From the command line, I have mounted a second USB drive (to store the recovered files to) as well as the Windows partition on the ssd hard disk I am trying to recover files from. (Note: there are 4 partitions on this SSD hard drive – Recovery etc. I am only mounting the Windows partition). Once mounted I can view the files and folders of the windows partition through the Live USB file system (nautilaus I think).
When I launch photorec from the command line I get the choice of log file type (I choose none) and am then presented with a list of drives to recover data from. I can see both USB drives (the Live USB boot drive and the blank USB drive, but cannot see the windows drive/partition I want to recover data from.
NOTE: The windows drive is the internal drive of the laptop that I have mounted after boot to live USB drive. I tried unmounting the windows mount and running photorec again but it’s the same result. It doesn’t see the windows partition or the drive itself.
I thought I would give Gparted a shot, and Gparted can see all 4 partitions (nvme0n1p1, nvme0n1p2, nvme0n1p3, and nvme0n1p4) however, it displays the device name as nvme0n1p1 which is the first partition and I can’t seem to choose the other partitions to attempt data rescue on.
I can see them in the Gparted Window showing the device partitions, but can’t act on any of them, so i thought I would come back to Photorec to see if I can’t figure out why it isn’t seeing the windows partition whether I have it mounted or not.
Additional, before booting to USB key, I turned off bitlocker in windows, and disabled hibernation and fast startup.
Any advice you can provide to get Photorec to see the windows partition to recover this data would be greatly appreciated.
Got something to say? Join the discussion. Cancel reply
This site uses Akismet to reduce spam. Learn how your comment data is processed.
Источник


