- Installing the Latest CMake on Ubuntu Linux
- Remove old version
- Install the latest CMake
- Get started with CMake Tools on Linux
- Prerequisites
- Ensure that CMake is installed
- Ensure that development tools are installed
- Check if GCC is installed
- Create a CMake project
- Create a CMake hello world project
- Select a kit
- Configure Hello World
- Select a variant
- CMake: Configure
- Build hello world
- Debug hello world
- Installing CMake
- Windows
- macOS
- Linux, UNIX
- Download Verification
- How to Install CMake on Ubuntu 20.04 LTS
- Install CMake through the Ubuntu UI
- Installation
- Remove CMake
- Install CMake through the Ubuntu Command Line
- Karim Buzdar
Installing the Latest CMake on Ubuntu Linux
12 Mar 2020 (Updated 8 May 2021 )
When you install CMake with APT, you’ll notice it installs an older version. This tutorial shows you how to install the latest version so that you can build software that requires newer CMake features.
Remove old version
Before we begin, you’ll want to remove any previous versions of CMake that were installed with APT. Run the following commands to remove it:
Install the latest CMake
As of writing the latest version of CMake is 3.20.2 which can be installed using one of the following two options:
Option 1: Use Snappy
Using the Snappy package manager is the quickest and easiest way to install the latest version of CMake on Ubuntu Linux.
Install it with Snappy by running the following command:
You can check to see if it’s installed by running:
Option 2: Install from source
The second option is to download the source code from the CMake website and compile it on your Linux machine. This can take much longer, depending on how powerful your machines processor is.
Run the following commands to download, compile and install CMake:
(Note: replace v3.20.2 with the version you want to install, see the CMake download page for a list of versions)
That’s it, now you have the latest version of CMake installed on your Ubuntu Linux machine, as you can see from the output of the cmake —version command below.
Источник
Get started with CMake Tools on Linux
CMake is an open-source, cross-platform tool that uses compiler and platform independent configuration files to generate native build tool files specific to your compiler and platform.
The CMake Tools extension integrates Visual Studio Code and CMake to make it easy to configure, build, and debug your C++ project.
In this tutorial, you’ll use the CMake Tools extension for Visual Studio Code to configure, build, and debug a simple C++ CMake project on Linux. Aside from installing CMake, your compiler, debugger, and build tools, the steps in this tutorial apply generally to how you’d use CMake on other platforms, like Windows.
If you have any trouble, please file an issue for this tutorial in the VS Code documentation repository.
Prerequisites
To complete this tutorial on Ubuntu, install the following:
C++ extension for VS Code. Install the C/C++ extension by searching for ‘c++’ in the Extensions view ( ⇧⌘X (Windows, Linux Ctrl+Shift+X ) ).

CMake Tools extension for VS Code. Install the CMake Tools extension by searching for ‘CMake tools’ in the Extensions view ( ⇧⌘X (Windows, Linux Ctrl+Shift+X ) ).

You’ll also need to install CMake, a compiler, a debugger, and build tools.
Ensure that CMake is installed
The VS Code CMake Tools extension does its work by using CMake installed on your system. For best results, use CMake version 3.15 or greater.
See if CMake is already installed on your system. Open a Terminal window and enter the following command:
To install CMake, or to get a later version if you don’t at least have version 3.15, see the instructions for your platform at Kitware APT Repository. Install version 3.15 or greater.
Ensure that development tools are installed
Although you’ll use VS Code to edit your source code, you’ll compile and debug the source code using the compiler, debugger, and build tools (such as make ) installed on your system.
For this tutorial on Ubuntu, we’ll use the GCC compiler, GDB to debug, and make to build the project. These tools are not installed by default on Ubuntu, so you need to install them. Fortunately, that’s easy.
Check if GCC is installed
To see if GCC is already installed on your system, open a Terminal window and enter the following command:
If GCC isn’t installed, run the following command from the Terminal window to update the Ubuntu package lists. An out-of-date Linux distribution can interfere with getting the latest packages.
Next, install the GNU compiler, make , and the GDB debugger with this command:
Create a CMake project
If you have an existing CMake project that already has a CMakeLists.txt file in the root directory, you can skip to Select a kit to configure your existing project.
Otherwise, create a folder for a new project. From the Terminal window, create an empty folder called cmakeQuickStart , navigate into it, and open VS Code in that folder by entering the following commands:
The code . command opens VS Code in the current working folder, which becomes your «workspace».
Create a CMake hello world project
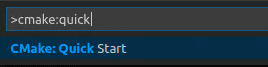
The CMake Tools extension can create the files for a basic CMake project for you. Open the Command Palette ( ⇧⌘P (Windows, Linux Ctrl+Shift+P ) ) and run the CMake: Quick Start command:
Enter a project name. This will be written to CMakeLists.txt and a few initial source files.
Next, select Executable as the project type to create a basic source file ( main.cpp ) that includes a basic main() function.

Note: If you had wanted to create a basic source and header file, you would have selected Library instead. But for this tutorial, Executable will do. If you are prompted to configure IntelliSense for the folder, select Allow.
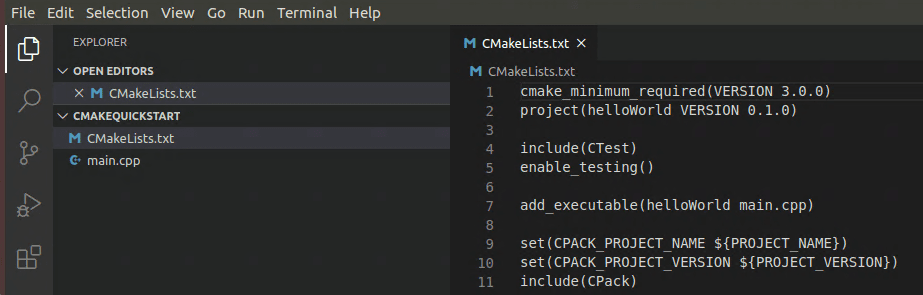
This creates a hello world CMake project containing main.cpp , CMakeLists.txt (which tells the CMake tools how to build your project), and a folder named build for your build files:
Select a kit
Before you can use the CMake Tools extension to build a project, you need to configure it to know about the compilers on your system. Do that by scanning for ‘kits’. A kit represents a toolchain, which is the compiler, linker, and other tools used to build your project. To scan for kits:
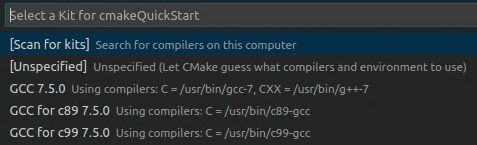
Open the Command Palette ( ⇧⌘P (Windows, Linux Ctrl+Shift+P ) ) and run CMake: Select a Kit. The extension will automatically scan for kits on your computer and create a list of compilers found on your system.
Select the compiler you want to use. For example, depending on the compilers you have installed, you might see something like:
Configure Hello World
There are two things you must do to configure your CMake project: select a kit (which you just did) and select a variant.
The kit you selected previously is shown in the Status bar. For example:

To change the kit, you can click on the kit in the Status bar, or run the CMake: Select a kit command again from the Command Palette. If you don’t see the compiler you’re looking for, you can edit the cmake-tools-kits.json file in your project. To edit the file, open the Command Palette ( ⇧⌘P (Windows, Linux Ctrl+Shift+P ) ) and run the CMake: Edit User-Local CMake Kits command.
Select a variant
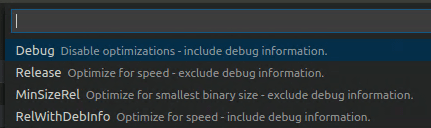
A variant contains instructions for how to build your project. By default, the CMake Tools extension provides four variants, each corresponding to a default build type: Debug , Release , MinRelSize , and RelWithDebInfo . These options do the following:
Debug : disables optimizations and includes debug info. Release : Includes optimizations but no debug info. MinRelSize : Optimizes for size. No debug info. RelWithDebInfo : Optimizes for speed and includes debug info.
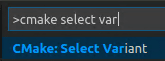
To select a variant, open the Command Palette ( ⇧⌘P (Windows, Linux Ctrl+Shift+P ) ) run the CMake: Select Variant command.
Select Debug to include debug information with your build.
The selected variant will appear in the Status bar next to the active kit.
CMake: Configure
Now that you’ve selected a kit and a variant, open the Command Palette ( ⇧⌘P (Windows, Linux Ctrl+Shift+P ) ) and run the CMake: Configure command to configure your project. This generates build files in the project’s build folder using the kit and variant you selected.
Build hello world
After configuring your project, you’re ready to build. Open the Command Palette ( ⇧⌘P (Windows, Linux Ctrl+Shift+P ) ) and run the CMake: Build command, or select the Build button from the Status bar.

You can select which targets you’d like to build by selecting CMake: Set Build Target from the Command Palette. By default, CMake Tools builds all targets. The selected target will appear in the Status bar next to the Build button.
Debug hello world
To run and debug your project, open main.cpp and put a breakpoint on the std::cout line. Then open the Command Palette ( ⇧⌘P (Windows, Linux Ctrl+Shift+P ) ) and run CMake: Debug. The debugger will stop on the std::cout line:
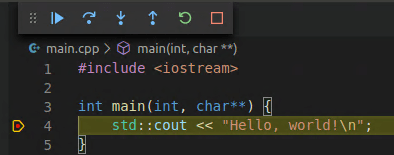
Go ahead and press F5 to continue.
You’ve now used the VS Code CMake Tools extension to use CMake to build and debug a C++ app on Ubuntu. The steps are the same for other platforms; the difference being how you install CMake and the compiler/debugger for the platform of your choice. For instructions on setting up compilers/debuggers for other platforms, see the following:
Источник
Installing CMake
There are several ways to install CMake, depending on your platform.
Windows
There are pre-compiled binaries available on the Download page for Windows as MSI packages and ZIP files. The Windows installer has an option to modify the system PATH environment variable. If that is not selected during installation, one may manually add the install directory (e.g. C:\Program Files\CMake\bin) to the PATH in a command prompt.
One may alternatively download and build CMake from source. The Download page also provides source releases. In order to build CMake from a source tree on Windows, you must first install the latest binary version of CMake because it is used for building the source tree. Once the binary is installed, run it on CMake as you would any other project. Typically this means selecting CMake as the Source directory and then selecting a binary directory for the resulting executables.
macOS
There are pre-compiled binaries available on the Download page for macOS as disk images and tarballs. After copying CMake.app into /Applications (or a custom location), run it and follow the “How to Install For Command Line Use” menu item for instructions to make the command-line tools (e.g. cmake) available in the PATH. Or, one may manually add the install directory (e.g. /Applications/CMake.app/Contents/bin) to the PATH.
One may alternatively download and build CMake from source as in the following section.
Linux, UNIX
There are pre-compiled binaries available on the Download page for some UNIX platforms. One may alternatively download and build CMake from source. The Download page provides source releases. There are two possible approaches for building CMake from a source tree. If there is no existing CMake installation, a bootstrap script is provided:
(Note: the make install step is optional, cmake will run from the build directory.)
By default bootstrap will build CMake without any debug or optimization flags. To enable optimizations you will need to specify the CMAKE_BUILD_TYPE option to bootstrap like this: ./bootstrap — -DCMAKE_BUILD_TYPE:STRING=Release
For more options with bootstrap, run ./bootstrap —help .
Or, an existing CMake installation can be used to build a new version:
(Note: the make install step is optional, cmake will run from the build directory.) If you are not using the GNU C++ compiler, you need to tell the bootstrap script (or cmake) which compiler you want to use. This is done by setting the environment variables CC and CXX before running it. For example:
Download Verification
Each release on the Download page comes with a file named cmake-$version-SHA-256.txt, where $version is the release version number.
One may use this file to verify other downloads, such as the source tarball. For example:
The SHA-256 file itself can be verified by GPG signature:
The GPG key C6C265324BBEBDC350B513D02D2CEF1034921684 is a signing subkey whose expiry is updated yearly.
Источник
How to Install CMake on Ubuntu 20.04 LTS
CMake is an open-source, cross-platform family of tools designed to build, test, and package software. CMake is used to control the software compilation process using simple platform and compiler-independent configuration files, and generate native makefiles and workspaces that can be used in the compiler environment of your choice. The suite of CMake tools was created by Kitware in response to the need for a powerful, cross-platform build environment for open-source projects such as ITK and VTK.
In this article, we will describe how you can install CMake to your Ubuntu both through the UI and the command line.
We have run the commands and procedures mentioned in this article on a Ubuntu 20.04 LTS system.
Install CMake through the Ubuntu UI
The latest version of CMake at the time of writing this article was 3.20.0 and luckily available through the Snap Store. Here, we will explain how you can install it through the Ubuntu Software Manager.
Installation
For a person who does not want to open the Command Line much, installing software present in the Ubuntu repository through the UI is very simple. On your Ubuntu desktop Activities toolbar, click the Ubuntu Software icon.

In the following view, click on the search icon and enter “CMake” in the search bar. The search results will display Cmake as follows:

The first package listed in the search result is the one maintained by the Snap Store. From the Software Manager, click on the CMake entry to open the following view:

Click the Install button to begin the installation process. The following authentication dialog will display for you to provide your authentication details as only an authorized user can install software on Ubuntu.

Enter your password and click the Authenticate button. After that, the installation process will begin, displaying a progress bar as follows. Advertisement
 CMake will then be installed to your system and you will get the following message after a successful installation:

Through the above dialog, you can choose to directly launch CMake and even Remove it immediately for whatever reason.
Note: The same version of the software can be installed through the command line using the following command:
Remove CMake
If you want to remove CMake that was installed using the above method, you can remove it from your system as follows:
Open the Ubuntu Software Manager and search for CMake. You will see the “Installed” status in the search entry. Click this entry and then click Remove from the following view:

Then, the system will prompt you with an Authentication dialog. The software will be removed when you provide the password for the sudo user and click Authenticate on the dialog.
Install CMake through the Ubuntu Command Line
If you prefer the command line over the UI, here is the method you will need to follow in order to install the latest version of CMake. I also tried installing CMake through default Ubuntu repositories and also through PPA but none of them gave me the latest version. The only workable method involves downloading the source code from the Official CMake website “https://cmake.org/download/”, compiling it and then installing CMake through it.
Open the Ubuntu command line, the Terminal either through the Ctrl+Alt+T shortcut or through the Application launcher search.
Install build tools and libraries that CMake depends on:
Go to the temp directory:
Then, enter the following command to download the source code:
Once the tar.gz file is downloaded, enter the following command to extract it:
Then move to the extracted folder as follows:
Finally, run the following commands to compile and install CMake:

The bootstrap process may take some time, do not interrupt it. When CMake has bootstrapped, you will get the following output:

You can now make it using the following command:

And then install it as follows:

After the software is successfully installed, you can verify its installation and also if the correct version is installed, through the following command:

CMake 3.20.0 has been installed successfully on Ubuntu. You can now use the CLI tool to work with your software’s code.
Karim Buzdar
About the Author: Karim Buzdar holds a degree in telecommunication engineering and holds several sysadmin certifications. As an IT engineer and technical author, he writes for various web sites. You can reach Karim on LinkedIn
Источник


