- Как установить звуковые драйвера Realtek ?
- Install Realtek d723 WiFi driver for GNU/Linux
- Getting Internet
- Finding Device
- Prerequisite
- Method 1
- Method 2
- Method 3
- Download
- Install realtek drivers linux
- About
- Easy Linux Tips Project
- Realtek wireless chipset: install the right driver
- If unsure: determine the WiFi chipset
- Driver for the Realtek RTL8192EU chipset (2357:0109)
- HP laptop with RTL8723BE chipset: try antenna selection
- Driver for the Realtek RTL8723BU chipset (0bda:b720)
- HP laptop with RTL8723DE chipset: try antenna selection or a new driver
- Driver for the Realtek RTL8821CE chipset
- The rtw88 driver from lwfinger for the RTL8723DE, RTL8821CE, RTL8822BE and RTL8822CE chipsets
- Driver for the Realtek RTL8814AU WiFi chipset
- Check the Draft tips for more Realtek WiFi solutions (RTL8188CUS, RTL8192CU, RTL8188EU, RTL8188FU, RTL8192DU, RTL8821CU)
Как установить звуковые драйвера Realtek ?
Как установить звуковые драйвера Realtek ? качал от сюда (Linux driver (3.0) 5.18rc8 2014/5/21 4597k)
стоит Ubuntu 14.04 Карта встроеная. Инфо о карте: guitar@guitar:
$ lspci |grep Audio 00:14.2 Audio device: Advanced Micro Devices, Inc. [AMD/ATI] SBx00 Azalia (Intel HDA) 01:00.1 Audio device: NVIDIA Corporation High Definition Audio Controller (rev a1) guitar@guitar:
$ alsactl -v alsactl version 1.0.27.2


А что, «из коробки» звук не работет?
он работает но плохо, 2 приложения не может использовать, сейчас я слушал музыку и включил программу «Rakarrack» и звук упал( а когда в игры играю я слышу как звук плачет(

я даже не знаю где это находится)

Особого смысла обновлять нет, там в архиве тот же alsa driver, что используется сейчас, вот выдержка из readme:
Можете попробовать использовать pulseaudio.
Ну а по поводу описанных вами проблем, так это надо просить инженеров Realtek, что бы они помогли разработчикам alsa в написании драйверов для их аудио кодеков или написали этот код для alsa сами.
купи нормальную звуковуху, которую мужыканты советуют, пульзаудию снеси напрочь
а зачем удалять ? я посмотрел, она одаляет системные фичи и параметры.
Если ты ее не трогал, похоже она падает. Можно попробовать найти гайд по отключению PulseAudio, если не поможет, значит альса виновата.
а если будет альса виновата то что делать ?
Покупать другую карту. Или пробовать ставить новое ядро в вашем дистрибутиве.
а я думал что если установлю линбку то проблем меньше будет) но не тут то было( но хоть не виснет как винта.
Тоже 14,04-и такая же звуковуха. наверное нужно будет пассатижами выдернуть микросхему. ALC888
tar jxvpf LinuxPkg_x.xxrcxx.tar.bz2 tar jxvpf alsa-driver-1.0.xx.tar.bz2 ./configure make make install
К этим дровам ещё нужно Pulseaudio, qpaeq. Ещё VLC с настроенным параметрическим эквалайзером. Тогда офигенный звук.
Чип ALC888S хорошая вещь, но ещё нужна и акустика вроде Defender Mercury 55 MkII.
Если есть всё выше описанное, то из всех плейеров самый лучший звук только в плейере VLC через чип ALC888S. Настройки в VLC нужно сбросить vlc —reset-config и настроить только аудио-фильтры галочки перенаправитель каналов, эффект виртуального объёма в наушниках, фильтр управления усилением, параметрический эквалайзер (20 15 20000 15 60 12,50 100 1000 -15 100 8000 12,50 100), нормализация громкости. qpaeq сделать от середины вниз улыбку. В итоге получится жирный бас и чистые высокие
Правда фирменные дрова от Realtek, в некоторых системах слетают при обновлении ядра Linux в системе. Просто нужно повторить в терминале суперпользователя:
Источник
Install Realtek d723 WiFi driver for GNU/Linux
I’ve been doing a lot of Linux Mint installations lately and one very annoying thing that I found in 2 laptops was the non availability of WiFi driver. Apparently, it’s a new hardware and is not in the Linux kernel.
The hardware is Realtek device d723 . This new WiFi hardware is being shipped in new PCs and laptops now. Without having the internet, one can’t do almost anything. So it’s important to have this fixed up.
UPDATE : Added a new method to make it work on Ubuntu 18.04 LTS
If method 1 doesn’t work for you, try method 2 or method 3.
Getting Internet
We need a temporary internet connection to fix WiFi. Ways to connect :
- Connect USB cable and use USB Tethering in your phone to connect your computer to the internet (through phone’s cellular data/WiFi)
- Use wired ethernet cable for connecting to internet
Finding Device
Open a terminal and do the command lspci . You will see all the PCI devices of your system. If you have the d723 device, you can see it at the bottom :
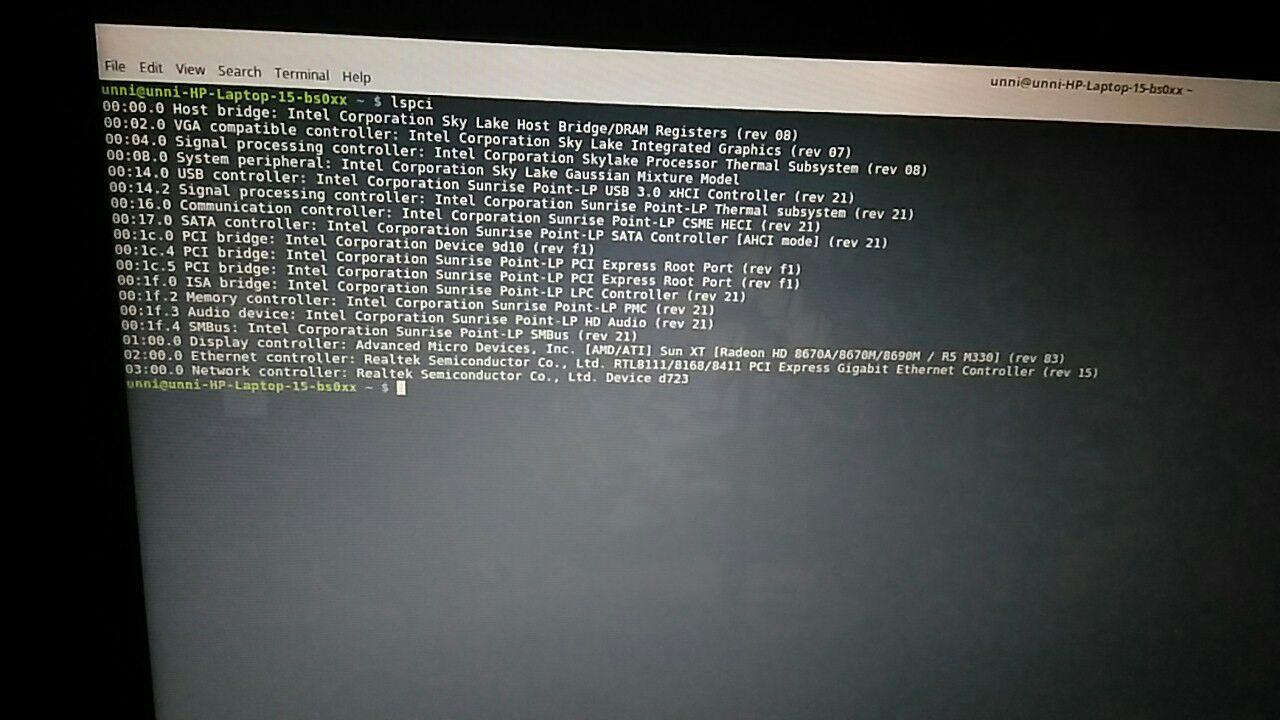
Or to quickly know if you have the d723 WiFi hardware, do :
Prerequisite
You should install the corresponding header of your kernel :
Next, install the packages necessary for building :
Method 1
This is the RECOMMENDED METHOD because in future, when kernel is updated, the installed driver will be automatically compiled to make it work in newer kernel.
To simplify everything, run the following commands one by one :
Restart your computer. And you’ll get your WiFi !
Method 2
To simplify everything, run the following commands one by one :
What the commands does is download the GitHub repository (extended branch) with wget . If your system doesn’t have wget , install it :
After that, the downloaded zip file is extracted with unzip . Then inside the extracted folder, the drivers are compiled and installed with make & make install
After that the drivers are enabled using the modprobe command with sudo .
PS : Thanks to Bruno Loy for confirming that this works !
Method 3
smlinux has made a driver for d723 . Compiling it and installing it will help you connect to WiFi.
First step is to identify the version of your Linux kernel :
The driver is different according to the Linux kernel version. Only the driver to download will vary. Rest of the installation steps are the same.
Download
Now according to the kernel version download the driver :
4.11 and up
If the Linux kernel version is 4.11 or greater (>=4.11), then download this file :
4.10 and down
If the Linux kernel version is 4.10 or below ( /etc/rc.local :
Replace gedit above with whatever text editor you have.
Then, in that file add :
Replace ant_sel=1 above with the one that worked for you. Either ‘1’ or ‘2’.
Источник
Install realtek drivers linux
Realtek R8101 linux driver source
This is the official linux driver source for Realtek RTL8101E/RTL8102E/RTL8103E/RTL8105E/RTL8106E/RTL8107E FE 100M NICs, obtained from here. Tested on Ubuntu 20.04 in my Dell Inspiron 1440 laptop, ethernet works flawlessly with a speed of 95 Mbps upload and download.
Since Ubuntu 18 these NICs are being used with the default r8169 driver (which is for the R8169 gigabit ethernet controller only), which causes terrible download and upload speeds. Installing the official driver for 810xE series fixes it.
Driver version: 1.035.03
Release date: 26/05/2020
NOTE: I upgraded to another laptop few months ago so I’m no longer maintaining this repo.
How to install this driver?
- First of all, clone this repo to some folder and cd into that folder
- Install basic dependencies for compiling the driver: sudo apt install build-essential linux-headers-$(uname -r)
- Unload the existing r8169 driver: sudo modprobe -r r8169
- Block the r8169 driver in modprobe: sudo sh -c ‘echo blacklist r8169 >> /etc/modprobe.d/blacklist.conf’
- Run the automatic build & install script: sudo ./autorun.sh . Ignore errors if any.
- Check if the driver is loaded: lsmod | grep r8101 , it will return a single line like r8101 204800 0
- If the driver is not loaded, then run sudo modprobe r8101 .
- Now try connecting. If you don’t see the connection then you might need a reboot.
- Enjoy ethernet speeds upto 100Mbps!
Some additional info
/r8101, the link status can be forced to one of the 4 modes as following command. # insmod ./src/r8101.ko speed=SPEED_MODE duplex=DUPLEX_MODE autoneg=NWAY_OPTION where SPEED_MODE = 100 for 100Mbps = 10 for 10Mbps DUPLEX_MODE = 0 for half-duplex = 1 for full-duplex NWAY_OPTION = 0 for auto-negotiation off (true force) = 1 for auto-negotiation on (nway force) For example: # insmod ./src/r8101.ko speed=100 duplex=0 autoneg=1 will force PHY to operate in 100Mpbs Half-duplex(nway force). 2. Force the link status by using ethtool. a. Insert the driver first. b. Make sure that ethtool exists in /sbin. c. Force the link status as the following command. # ethtool -s ethX speed SPEED_MODE duplex DUPLEX_MODE autoneg NWAY_OPTION where SPEED_MODE = 100 for 100Mbps = 10 for 10Mbps DUPLEX_MODE = half for half-duplex = full for full-duplex NWAY_OPTION = off for auto-negotiation off (true force) = on for auto-negotiation on (nway force) For example: # ethtool -s eth0 speed 100 duplex full autoneg on will force PHY to operate in 100Mpbs Full-duplex(nway force). RTL8101E, RTL8102E and RTL8103E do not support Jumbo Frame. «>
About
Official linux driver source for Realtek R810xE 100M ethernet controllers
Источник
Easy Linux Tips Project
Easy tips for Linux Mint and Ubuntu, both for beginners and for advanced users.
Realtek wireless chipset: install the right driver
In some cases you can try another driver for Realtek chipsets in Linux Mint 20.x and Ubuntu 20.04. Namely for the following common Realtek chipsets: RTL8192EU, RTL8723BE, RTL8723BU, RTL8723DE, RTL8821CE, RTL8822BE, RTL8822CE, RTL8814AU.
This page will show you how.
If unsure: determine the WiFi chipset
1. Are you unsure what Realtek WiFi chipset you have? That can happen easily, because the brand and type printed on a USB WiFi dongle or internal PCI card are meaningless; «under the hood» it can be anything.
Ordinarily, you can determine your WiFi chipset like this:
a. If it’s a USB WiFi dongle, connect it to your computer.
b. Launch a terminal window.
(You can launch a terminal window like this: *Click*)
c. Use copy/paste to transfer the following command into the terminal:
(if you type: the letter F is a capital letter, and don’t omit the space after inxi!)
Press Enter. In the complete hardware overview you get to see then, you should also find your WiFi chipset.
d. But in a few cases, inxi doesn’t give sufficient information. You can then proceed as follows:
For a USB WiFi dongle, use copy/paste to transfer the following word into the terminal :
For an internal PCI WiFi card, use the terminal command lspci
e. Now you should see at least one line that approximately resembles the following output (example from my own computer):
Bus 002 Device 007: ID 0bda:b720 Realtek Semiconductor Corp.
f. The combination of characters and numbers that I’ve printed in red, is the unique ID of your Realtek chipset. Use Google to find out what the type name of that chipset is.
Driver for the Realtek RTL8192EU chipset (2357:0109)
2. Below you’ll find a how-to for installing another driver for your RTL8192EU WiFi chipset. Proceed like this:
a. First establish temporary internet connection for your computer by means of your cell phone.
b. Launch a terminal window.
(You can launch a terminal window like this: *Click*)
c. Copy/paste the following command line into the terminal:
sudo apt-get install mokutil && mokutil —sb-state
Press Enter. Type your password when prompted. In Ubuntu this remains entirely invisible, not even dots will show when you type it, that’s normal. In Mint this has changed: you’ll see asterisks when you type. Press Enter again.
If it reports that Secure Boot is enabled: reboot and disable Secure Boot in the BIOS. In order to do this, you might need to set an administrator password in the BIOS first.
Disabling Secure Boot is no loss: it adds no meaningful security anyway. It’s primarily a means for Microsoft to enforce its vendor lock-in on your computer.
d. Copy/paste the following command lines into the terminal, one by one. Press Enter after each individual line:
sudo apt-get install git linux-headers-generic build-essential dkms
git clone https://github.com/clnhub/rtl8192eu-linux.git
sudo dkms add .
(note the dot at the end of the command line!)
sudo dkms install rtl8192eu/1.0
echo «blacklist rtl8xxxu» | sudo tee /etc/modprobe.d/rtl8xxxu.conf
e. Reboot your computer.
f. Now check whether the driver module has been loaded, with this terminal command:
lsmod | grep 8192eu
g. Now you’re going to remove the folder with the driver building blocks, which has become useless (and can’t be used for other kernels, as it has been tailored to your current kernel by «make»). With this command:
rm -v -R —interactive=never
Are the driver packages no longer available on github.com? Then get the driver packages from here (driver as it was on July 5, 2020). Then unpack the zipped file in your home folder, because it’s a compressed folder. Don’t unpack it in the subfolder Downloads, because then the terminal commands in my how-to won’t work.
HP laptop with RTL8723BE chipset: try antenna selection
3. Some HP laptops with the Realtek WiFi chipset card RTL8723BE have just one antenna on that card designed for two (stingy HP, anyone?). This has caused many problems for Linux users, as the default antenna is usually the missing one.
But thanks to Larry Finger and the good people at Realtek you can do some testing with a module parameter that allows for antenna selection. As follows:
a. Launch a terminal window.
(You can launch a terminal window like this: *Click*)
b. First unload the currently active module with this command (use copy/paste to transfer it into the terminal):
sudo modprobe -r rtw_8723be
Press Enter. Type your password when prompted. In Ubuntu this remains entirely invisible, not even dots will show when you type it, that’s normal. In Mint this has changed: you’ll see asterisks when you type. Press Enter again.
c. Then reload it with the instruction to use antenna number 2, with this command:
sudo modprobe rtw_8723be ant_sel=2
d. Then check the signal strength with this command:
iwlist scan | egrep -i ‘ssid|quality’
e. Then test the the other antenna (number 1), to find out which one has a stronger signal. For this, execute the following three commands:
sudo modprobe -r rtw_8723be
sudo modprobe rtw_8723be ant_sel=1
iwlist scan | egrep -i ‘ssid|quality’
f. If ant_sel=2 gives the best signal (which is usually the case), do this (this is one line, use copy/paste to transfer it to the terminal):
echo «options rtw_8723be ant_sel=2» | sudo tee -a /etc/modprobe.d/rtw_8723be.conf
Reboot your computer.
If ant_sel=1 gives the best signal (unusual, but not impossible), do this (this is one line, use copy/paste to transfer it to the terminal):
echo «options rtw_8723be ant_sel=1» | sudo tee -a /etc/modprobe.d/rtw_8723be.conf
Driver for the Realtek RTL8723BU chipset (0bda:b720)
4. For the Realtek RTL8723BU chipset, you might need to install another driver. In which case you can proceed like this:
a. First establish temporary internet connection for your computer by means of your cell phone.
b. Launch a terminal window.
(You can launch a terminal window like this: *Click*)
c. Copy/paste the following command line into the terminal:
sudo apt-get install mokutil && mokutil —sb-state
Press Enter. Type your password when prompted. In Ubuntu this remains entirely invisible, not even dots will show when you type it, that’s normal. In Mint this has changed: you’ll see asterisks when you type. Press Enter again.
If it reports that Secure Boot is enabled: reboot and disable Secure Boot in the BIOS. In order to do this, you might need to set an administrator password in the BIOS first.
Disabling Secure Boot is no loss: it adds no meaningful security anyway. It’s primarily a means for Microsoft to enforce its vendor lock-in on your computer.
d. Copy/paste the following command line into the terminal, in order to install the required build packages (the building tools with which you’re going to build the driver):
sudo apt-get install git build-essential linux-headers-$(uname -r)
e. Download the driver packages by means of git, with this command (use copy/paste):
git clone https://github.com/lwfinger/rtl8723bu
f. Now you’re going to disable a line in the makefile of the new driver, because without this hack, two instances of the wireless chipset will show in Network Manager (which would of course be bizarre and useless). The command below is one huge line; make sure you copy/paste it, in order to avoid typing errors:
sed -i ‘s/EXTRA_CFLAGS += -DCONFIG_CONCURRENT_MODE/#EXTRA_CFLAGS += -DCONFIG_CONCURRENT_MODE/g’
g. Now compile the required kernel module from the driver packages. Copy/paste this line into the terminal, in order to enter the folder with the driver packages:
And then run this command:
h. Finally, install the compiled module with this command:
sudo make install
i. Now put the current flawed driver on the blacklist; for that, use copy/paste to transfer the following command line to the terminal:
Now a text file is being opened. In that text file, add the following blue text block, at the end of the existing text (use copy/paste):
# The rtl8xxxu driver is flawed,
# so it needs to be prevented from loading.
# This should give the 8723au or the 8723bu driver
# the chance to load instead.
blacklist rtl8xxxu
Save the modified text file and close it.
j. Now you’re going to remove the folder with the driver building blocks, which has become useless (and can’t be used for other kernels, as it has been tailored to your current kernel by «make»). With this command:
rm -v -R —interactive=never
k. Reboot your computer.
l. Your wifi should work well now: click on the icon of Network Manager in the system tray, in order to see the available wireless networks.
Note: do NOT install kernel updates or new kernels, because then you’ll probably lose the driver again! So I advise to lock the current kernel (item 7).
Or if you want to install newer kernels anyway, from time to time: download the folder with the driver build packages again with git, create a compressed (.tar.gz) file from it, rename the compressed file to wifi-driver and keep it in reserve.
You can then use it in the now familiar way (first unzip it, of course) to build and install the driver again when you’ve lost your WiFi after booting with a newly installed kernel.
Are the driver packages no longer available on github.com? Then get the driver packages from here (driver as it was on July 5, 2020). Then unpack the zipped file in your home folder, because it’s a compressed folder. Don’t unpack it in the subfolder Downloads, because then the terminal commands won’t work.
HP laptop with RTL8723DE chipset: try antenna selection or a new driver
5. Some HP laptops with the Realtek WiFi chipset card RTL8723DE have just one antenna on that card designed for two (stingy HP, anyone?). This has caused many problems for Linux users, as the default antenna is usually the missing one.
But thanks to Larry Finger and the good people at Realtek you can do some testing with a module parameter that allows for antenna selection. As follows:
a. Launch a terminal window.
(You can launch a terminal window like this: *Click*)
b. First unload the currently active module with this command (use copy/paste to transfer it into the terminal):
sudo modprobe -r rtw_8723de
Press Enter. Type your password when prompted. In Ubuntu this remains entirely invisible, not even dots will show when you type it, that’s normal. In Mint this has changed: you’ll see asterisks when you type. Press Enter again.
c. Then reload it with the instruction to use antenna number 2, with this command:
sudo modprobe rtw_8723de ant_sel=2
d. Then check the signal strength with this command:
iwlist scan | egrep -i ‘ssid|quality’
e. Then test the the other antenna (number 1), to find out which one has a stronger signal. For this, execute the following three commands:
sudo modprobe -r rtw_8723de
sudo modprobe rtw_8723de ant_sel=1
iwlist scan | egrep -i ‘ssid|quality’
f. If ant_sel=2 gives the best signal (which is usually the case), do this (this is one line, use copy/paste to transfer it to the terminal):
echo «options rtw_8723de ant_sel=2» | sudo tee -a /etc/modprobe.d/rtw_8723de.conf
Reboot your computer.
If ant_sel=1 gives the best signal (unusual, but not impossible), do this (this is one line, use copy/paste to transfer it to the terminal):
echo «options rtw_8723de ant_sel=1» | sudo tee -a /etc/modprobe.d/rtw_8723de.conf
g. Hasn’t this hack improved matters? Then try the rtw88 driver from Larry Finger, as described in item 7 below.
Driver for the Realtek RTL8821CE chipset
6. Below you’ll find a how-to for installing a driver, which should get your RTL8821CE chipset to work.
Proceed like this:
a. First establish temporary internet connection for your computer by means of your cell phone.
b. Launch a terminal window.
(You can launch a terminal window like this: *Click*)
c. Copy/paste the following command line into the terminal, in order to install the application mokutil and to let it examine the Secure Boot status of your machine:
sudo apt-get install mokutil && mokutil —sb-state
Press Enter. Type your password when prompted. In Ubuntu this remains entirely invisible, not even dots will show when you type it, that’s normal. In Mint this has changed: you’ll see asterisks when you type. Press Enter again.
If it reports that Secure Boot is enabled: reboot and disable Secure Boot in the BIOS. In order to do this, you might need to set an administrator password in the BIOS first.
Disabling Secure Boot is no loss: it adds no meaningful security anyway. It’s primarily a means for Microsoft to enforce its vendor lock-in on your computer.
d. Copy/paste the following command line into the terminal, in order to install the driver:
sudo apt-get install rtl8821ce-dkms
e. Reboot your computer. Your WiFi card should work now. If not: try the rtw88 driver, as described in item 7 below.
The rtw88 driver from lwfinger for the RTL8723DE, RTL8821CE, RTL8822BE and RTL8822CE chipsets
7. For the following Realtek WiFi chipsets you can install the rtw88 driver from Larry Finger (lwfinger):
RTL8723DE, RTL8821CE, RTL8822BE and RTL8822CE.
Note: for the RTL8723DE chipset it’s sometimes not necessary to replace the driver, because the default driver can sometimes be fixed by switching the antenna selection, as described in item 5 on this page.
a. First establish temporary internet connection for your computer by means of your cell phone.
b. Launch a terminal window.
(You can launch a terminal window like this: *Click*)
c. Copy/paste the following command line into the terminal:
sudo apt-get install mokutil && mokutil —sb-state
Press Enter. Type your password when prompted. In Ubuntu this remains entirely invisible, not even dots will show when you type it, that’s normal. In Mint this has changed: you’ll see asterisks when you type. Press Enter again.
If it reports that Secure Boot is enabled: reboot and disable Secure Boot in the BIOS. In order to do this, you might need to set an administrator password in the BIOS first.
Disabling Secure Boot is no loss: it adds no meaningful security anyway. It’s primarily a means for Microsoft to enforce its vendor lock-in on your computer.
d. Copy/paste the following command line into the terminal, in order to download and install the required build packages (the building tools with which you’re going to build the driver):
sudo apt-get install git build-essential linux-headers-$(uname -r)
Press Enter. Type your password when prompted. In Ubuntu this remains entirely invisible, not even dots will show when you type it, that’s normal. In Mint this has changed: you’ll see asterisks when you type. Press Enter again.
e. Download the actual driver (the construction kit) by means of git, with this command (use copy/paste):
git clone https://github.com/lwfinger/rtw88.git
f. Copy/paste this line into the terminal, in order to enter the folder with the driver packages:
g. Now you’re going to compile the required kernel module from the driver package. For that, run this command:
h. Finally, install the compiled module with this command:
sudo make install
i. Now you’re going to remove the folder with the driver building blocks, which has become useless (and can’t be used for other kernels, as it has been tailored to your current kernel by «make»). With this command:
rm -v -R —interactive=never
j. Reboot your computer.
k. Your wifi should work well now: click on the icon of Network Manager in the system tray, in order to see the available wireless networks.
Note: do NOT install kernel updates or new kernels, because then you’ll probably lose the driver again! So I advise to lock the current kernel (item 7).
Or if you want to install newer kernels anyway, from time to time: download the folder with the driver build packages again with git, create a compressed (.tar.gz) file from it, rename the compressed file to wifi-driver and keep it in reserve.
You can then use it in the now familiar way (first unzip it, of course) to build and install the driver again when you’ve lost your WiFi after booting with a newly installed kernel.
Is the driver no longer available on github.com? Then get the driver from here (the driver as it was on July 10, 2020). Then unpack the zipped file in your home folder, because it’s a compressed folder. Don’t unpack it in the subfolder Downloads, because then the terminal commands won’t work!
Driver for the Realtek RTL8814AU WiFi chipset
8. For the Realtek RTL8814AU chipset, proceed as follows:
a. Establish temporary internet connection by means of your cell phone.
b. Launch a terminal window.
(You can launch a terminal window like this: *Click*)
c. Copy/paste the following command line into the terminal:
sudo apt-get install mokutil && mokutil —sb-state
If it reports that Secure Boot is enabled: reboot and disable Secure Boot in the BIOS. In order to do this, you might need to set an administrator password in the BIOS first.
Disabling Secure Boot is no loss: it adds no meaningful security anyway. It’s primarily a means for Microsoft to enforce its vendor lock-in on your computer.
c. Install some tools (use copy/paste to transfer the following command line into the terminal):
sudo apt-get install git build-essential linux-headers-$(uname -r)
d. Download the driver components from a GitHub account with the slightly menacing name of «aircrack-ng» (don’t worry, it’s harmless):
git clone https://github.com/aircrack-ng/rtl8814au.git
e. Go to the driver components folder:
f. Tailor the driver components to your Linux kernel:
g. Install the driver for your kernel:
sudo make dkms_install
h. Reboot and test. Your WiFi should work now.
Check the Draft tips for more Realtek WiFi solutions (RTL8188CUS, RTL8192CU, RTL8188EU, RTL8188FU, RTL8192DU, RTL8821CU)
9. Didn’t find what you were looking for? On the Draft tips page you’ll find more Realtek solutions. Namely for the following chipsets: RTL8188CUS, RTL8192CU, RTL8188EU, RTL8188FU, RTL8192DU and RTL8821CU.
Do you want more tips and tweaks? There’s a lot more of them on this website!
To the content of this website applies a Creative Commons license.
Источник


