- SDKMAN! on Windows
- mkovacek / Setup sdkman on windows 10
- This comment has been minimized.
- UgmaDevelopment commented Sep 11, 2020
- This comment has been minimized.
- mkovacek commented Sep 15, 2020
- Guide to SDKMAN!
- Get started with Spring 5 and Spring Boot 2, through the Learn Spring course:
- 1. Overview
- 2. What Is SDKMAN!?
- 3. Install SDKMAN!
- 4. List All SDK Candidates
- 5. Install and Manage Java Versions
- 5.1. Listing Versions
- 5.2. Install a Java Version
- 5.3. Switching Between Versions
- 5.4. Remove a Version
- 5.5. Display the Versions in Use
- 6. Using SDKMAN! with an IDE
- 6.1. IntelliJ IDEA
- 6.2. Eclipse
- 7. Conclusion
- How to Install SDKMAN on Windows 7/10?
SDKMAN! on Windows
SDKMAN! manages multiple versions of Java related SDKs. In its homepage, it says it runs on any UNIX based platform, but I gave it a try on Windows and it works quite fine there too.
In the installation page, it explains that it basically needs bash to run, together with some tooling. I don’t use Windows Linux Subsystem or Cygwin, but I do use Git Bash. In fact, although I prefer using Windows, I don’t have much experience with Powershell and I prefer using bash. I use Hyper as my terminal and I have configured both IntelliJ IDEA and Visual Studio Code to use Git Bash as a default.
The extra tooling that is needed consists of zip , unzip , curl , tar and gzip . According to the installation page, MinGW can be used to provide this tooling. In my case, I already had everything through one way or another:
So I should be good to go. I opened up my terminal and run the installation script:
The installation succeeds with no issues. At the end of the output, I see some interesting information:
So it already modified my .bashrc and my .zshrc (which I didn’t know I had, as I don’t use zsh). Following the instructions, I opened up a new terminal and indeed the sdk command works as expected.
First, I installed a JDK:
This also works fine. I had to restart my terminal but it picks up the newly installed JDK:
This also reveals where SDKMAN! stores the SDKs it manages. A version of a SDK is stored in a folder like $HOME/.sdkman/candidates/[sdk]/[version] and the current version of the SDK is at $HOME/.sdkman/candidates/[sdk]/current .
At this point, I got enough confidence that SDKMAN! is going to work for the rest of the tools I wanted to install (ant, maven, gradle and groovy). So I first went ahead and deleted what I already had.
Regarding Java, I uninstalled all Oracle JDKs from Apps and Features of Windows. For the rest, I was maintaining them by myself in a C:\opt folder where I unzip programs that don’t have an installer:
So I just went ahead and deleted ant, 3 version of Maven, gradle and groovy. Then, I installed them with SDKMAN! and it just worked.
Side note: got to love that older programs use -version to show their version, newer use —version , and the latest like docker and kubectl use just version .
Having everything installed nicely, I cleaned up my PATH in Windows, which was a bit messy. I prefer to modify the user and not the system environment variables. This is the before picture:
and this is the after (anything Java related is gone):
There’s also one path in the system variables that I removed:
I also removed variables like JAVA_HOME and M2_HOME .
Okay. Short pause to see where we are now:
- Installed SDKMAN!
- Installed JDK, Ant, Maven, Gradle and Groovy with SDKMAN!
- Removed versions of everything that was not installed via SDKMAN!
- Cleaned up environment variables in Windows
At this point, everything works fine from Git Bash. So if I open up Hyper (or Git Bash directly), I can use any of the commands I installed without a problem.
This isn’t the case with cmd or Powershell. They use the Windows environment variables to determine the current PATH . SDKMAN! enhances the PATH when bash starts up on the fly, so the tools work there but not in cmd/Powershell. As I mentioned in the beginning of the post, this isn’t a problem for me as I prefer to use bash. It is also trivial to go and edit the PATH in Windows and add some directories. For example, for Java I would have to add C:\Users\ngeor\.sdkman\candidates\java\current\bin and for Maven C:\Users\ngeor\.sdkman\candidates\maven\current\bin . Note that by adding the current version, I am still able to switch between multiple versions using SDKMAN! without having to edit the Windows environment variables.
The next step is to configure my IDEs. I mostly use IntelliJ IDEA Community Edition for Java. Sometimes I like to use Visual Studio Code as well, although for Java it can be a bit heavy.
For IntelliJ IDEA, close all projects so you’re at the welcome screen. From the Configure button, select Structure for New Projects:
There, you can add the JDK:
Notice that here I’m not using the current folder but the specific version folder 11.0.5-zulu . I can add multiple SDKs in IntelliJ and name them after that version. I can have different projects in IntelliJ using different JDK versions without having to mess with the current version.
For Visual Studio Code to work, you’re gonna have to go and edit the environment variables in Windows. Tip: press the Windows key, then type “env”. Most likely, you’ll get a fast way to edit them:
I had to make two changes:
- Set JAVA_HOME to C:\Users\ngeor\.sdkman\candidates\java\current
- Add C:\Users\ngeor\.sdkman\candidates\maven\current\bin to my PATH
And this makes Visual Studio Code happy as well.
In conclusion, SDKMAN! works quite fine in Windows too. Its homepage perhaps gets you scared that it only works on unix-based systems, but this isn’t the case.
mkovacek / Setup sdkman on windows 10
| Run powershell as administrator: |
| -posh-gvm installation: |
| Execute (new-object Net.WebClient).DownloadString(‘https://raw.githubusercontent.com/flofreud/posh-gvm/master/GetPoshGvm.ps1’) | iex |
| Execute Import-Module posh-gvm |
| // if you have problems with execution policy (https://msdn.microsoft.com/powershell/reference/5.1/Microsoft.PowerShell.Core/about/about_Execution_Policies) |
| // Set-ExecutionPolicy RemoteSigned -Scope CurrentUser |
| // later return to old value |
| Execute gvm help to get started! |
| -sdkman installation: |
| curl -s «get.sdkman.io» |
| enter again get.sdkman.io |
| — To install for example java, instead «sdk install java» execute «gvm install java» |
This comment has been minimized.
Copy link Quote reply
UgmaDevelopment commented Sep 11, 2020
I was hopeful that this would work, but when executing Import-Module posh-gvm , I get
Any ideas? Thanks, regardless.
This comment has been minimized.
Copy link Quote reply
mkovacek commented Sep 15, 2020
Hi, don’t have a windows machine anymore, but maybe this will help flofreud/posh-gvm#30
if not try with Cygwin https://sdkman.io/install
You can’t perform that action at this time.
You signed in with another tab or window. Reload to refresh your session. You signed out in another tab or window. Reload to refresh your session.
Guide to SDKMAN!
Last modified: August 15, 2020
Get started with Spring 5 and Spring Boot 2, through the Learn Spring course:
If you have a few years of experience in the Java ecosystem, and you’re interested in sharing that experience with the community (and getting paid for your work of course), have a look at the «Write for Us» page. Cheers, Eugen
1. Overview
With the new release cycle of Java, developers might need to manage parallel versions and different builds of Software Development Kits (SDK) in their environment. So setting the PATH variable can become a real pain at times.
In this tutorial, we’ll see how SDKMAN! can help to manage the installation and selection of SDKs with ease.
2. What Is SDKMAN!?
SDKMAN! is a tool to manage parallel versions of multiple SDKs, which SDKMAN! call “candidates”.
It provides a convenient Command-Line Interface (CLI) and API for listing, installing, switching, and removing candidates. Moreover, it takes care of setting environment variables for us.
It also allows the developers to install JVM-based SDKs like Java, Groovy, Scala, Kotlin, and Ceylon. Maven, Gradle, SBT, Spring Boot, Vert.x, and many others are also supported. SDKMAN! is a free, lightweight, open-source utility written in Bash.
3. Install SDKMAN!
SDKMAN! is supported by all major operating systems, and it can easily be installed on all Unix-based systems. Moreover, it supports Bash and Zsh shells.
So let’s begin by installing it using the terminal:
Then, follow the on-screen instructions to complete the installation.
We might need the zip and unzip packages installed to complete the installation process.
Next, open a new terminal or run:
Lastly, run the following command to ensure the installation worked. If all went well, the version should be displayed:
For more customization, please refer to the installation guide on the SDKMAN! website.
To see all the available commands, use the help command:
4. List All SDK Candidates
So, let’s start by listing all the available SDK candidates.
The list command shows all the available candidates, identified by a unique name, the description, the official website, and the installation command:
Therefore, we can use this identifier to install the default version of a candidate like Spring Boot (2.3.1.RELEASE) or Maven (3.6.3). The specified versions in this list represent the stable or LTS versions of each SDK.
5. Install and Manage Java Versions
5.1. Listing Versions
To list the available versions of Java, use the list command. The result is a table of entries grouped by the vendor and sorted by version:
We’ll need this command each time we want to check, switch, or manage the storage of candidates.
5.2. Install a Java Version
Let’s say we want to install the newest build of Java 14 from Azul Zulu. Therefore, we copy its identifier, which is the version from the table, and we add it as an argument in the install command:
SDKMAN! will download and unzip this version into a directory on our computer.
Moreover, it will update environment variables so that we can use Java in the terminal immediately.
We can verify the status and the usage of any version by using the list command. Consequently, the version 14.0.1 is now installed and in use:
In addition, it’s possible to install Java or any custom version from a computer with the same command but by specifying the path of binaries as an additional argument:
5.3. Switching Between Versions
We can control the switching between versions in two forms, temporarily:
5.4. Remove a Version
To remove an installed version, run the uninstall command with the targeted version:
5.5. Display the Versions in Use
To check the current version of Java, we run the current command:
Similarly, the last command has the same effect as:
To show the version by SDK on our machine, we can run the current command with no arguments:
6. Using SDKMAN! with an IDE
The installed SDKs are stored in the SDKMAN! directory which defaults to
For example, the different versions of Java will also be available under the
/.sdkman/candidates/java/ directory and the subdirectories are named after the versions:
Therefore, the currently selected version of Java will also be available as current in that directory.
In the same vein, Gradle or any other SDK will be installed under the candidates directory.
In this way, we can use any particular version of Java, for example in our favorite IDE. All we have to do is to copy the path of a specific version and set it in the configuration of our IDE.
6.1. IntelliJ IDEA
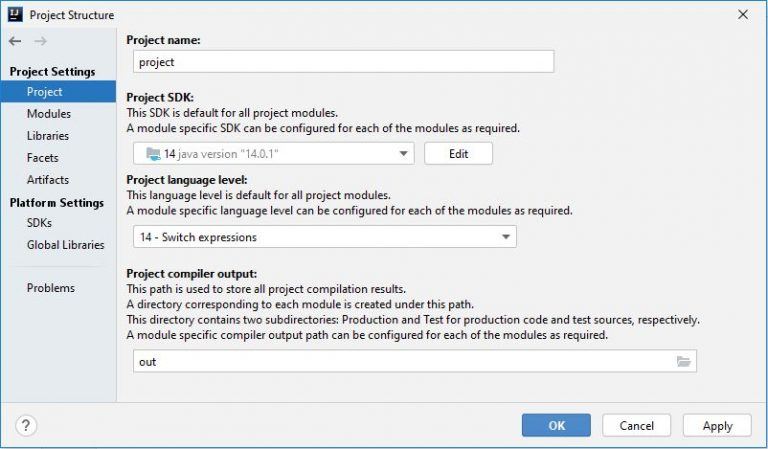
In IntelliJ IDEA, open “Project Structure”, then open “Project Settings”. In the project configuration, we can add a new Java version by selecting “New…” from the “Project SDK” section:
We can also define the version of Java, Gradle, or Maven to use in the “Build Tools” section:

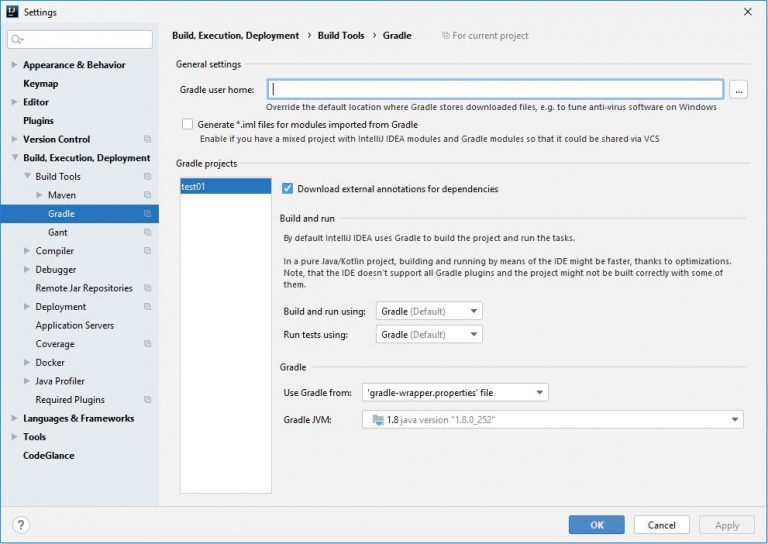
Tip: The version of Java must be the same as used in “Project SDK” for Gradle or Maven.
6.2. Eclipse
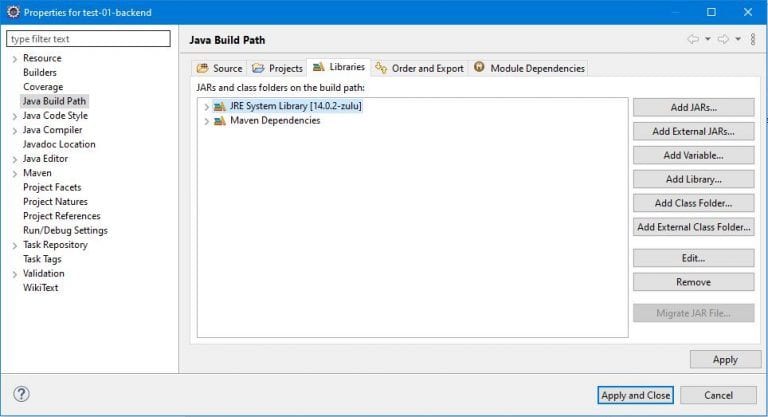
In Eclipse open “Project Properties”, select “Java Build Path”, and then switch to the “Libraries” tab. Here, we can manage the new SDK of Java via “Add Library…” and by following the instructions:
We can also control the installed SDKs for all the projects. Open “Preferences” under the “Window” menu, and then go to “Installed JREs”. Here we can manage the SDK of Java via “Add…” and by following the instructions:

7. Conclusion
In this tutorial, we’ve shown how SDKMAN! can help us in managing different versions of Java SDKs among other Java Environment tools such as Maven.
How to Install SDKMAN on Windows 7/10?
Apr 30, 2020 · 1 min read
Author: Mahmoud Osman
Date: November 8, 2019
How to install SDKMAN on Windows 10
Directions: Please follow these steps
Go to this Link, https://chocolatey.org/install and install chocolate into your machine. Copy this
code, and past in Windows terminal or command line.
Similarly, go to this link, https://chocolatey.org/packages/zip and install choco install zip package.
To do so, open your Windows terminal or Command Prompt and past this code.
This will install choco uninstall zip package into your machine; because SDKMAN requires this package.
This is th e last step you need for your SKDMAN installation. So, go this website https://chocolatey.org/packages/unzip and install unzip package as we did in step two.
Set-ExecutionPolicy Bypass -Scope Process -Force; [System.Net.ServicePointManager]::SecurityProtocol = [System.Net.ServicePointManager]::SecurityProtocol -bor 3072; iex ((New-Object System.Net.WebClient).DownloadString(‘https://chocolatey.org/install.ps1′))
choco uninstall zip
choco install unzip
As we have done in other steps, open your Windows Command Prompt or terminal and past this code
choco install unzip and then enter. This will install choco install unzip package.
Then: Follow the instructions on this website and you will be able to download SDKMAN.
© Copyright. 2019. All rights reserved. Mahmoud Osman


