- Classic Shell
- Dec 3rd, 2017 — Classic Shell is no longer actively developed
- Aug 12th, 2017 — General release 4.3.1 is out
- Jul 30th, 2016 — General release 4.3.0 is out
- May 22nd, 2016 — Beta version 4.2.7 is out
- May 21st, 2016 — Beta version 4.2.6 is out
- Choose between 3 different styles:
- Many usability improvements to Explorer (every feature can be turned on or off):
- Windows Shell
- Shell Development Scenarios
- Windows Shell SDK Documentation
- How to Install Linux Bash Shell on Windows 10
- What is Bash on Windows?
- Method 1: Install Linux Bash Shell on Windows 10 Newer Versions
- Step 1: Enable “Windows Subsystem for Linux” feature
- Step 2: Download a Linux system from the Windows store
- Step 3: Run Linux inside Windows 10
- Troubleshooting 1: The WSL optional component is not enabled. Please enable it and try again.
- Troubleshoot 2: Installation failed with error 0x80070003
- Method 2: Install Linux Bash Shell on older Windows 10
- Step 1:
- Step 2:
- Step 3:
- Step 4:
- Step 5:
- Step 6:
- Step 7:
- Step 8:
- Step 9:
- Step 10:
- Bonus Tip: Run GUI Apps On Windows Subsystem for Linux
- Step 1: Enable/Update WSL 2
- Step 2: Download and Install a Windows X Server Program
- Step 3: Configure Windows X Server
Classic Shell
Classic Shell™ is free software that improves your productivity, enhances the usability of Windows and empowers you to use the computer the way you like it. The main features are:
- Highly customizable start menu with multiple styles and skins
- Quick access to recent, frequently-used, or pinned programs
- Find programs, settings, files and documents
- Start button for Windows 7, Windows 8, Windows 8.1 and Windows 10
- Toolbar and status bar for Windows Explorer
- Caption and status bar for Internet Explorer
Note: As of December 2017, Classic Shell is no longer in active development. More details here
Development has been picked up by volunteers on GitHub under the name Open Shell
The latest stable version of Classic Shell is 4.3.1
|
|


Visit the Classic Shell forum to find custom menu skins and start buttons.
If you are having problems uninstalling or upgrading Classic Shell, please read this forum post.
Dec 3rd, 2017 — Classic Shell is no longer actively developed
After 8 years I have decided to stop developing Classic Shell. The source code for the latest version is released on SourceForge. More details here.
Aug 12th, 2017 — General release 4.3.1 is out
It officially supports the Creators Update for Windows 10. More details here.
Jul 30th, 2016 — General release 4.3.0 is out
It officially supports the Anniversary Update for Windows 10. More details here.
May 22nd, 2016 — Beta version 4.2.7 is out
QFE fix for a crash bug in beta version 4.2.6 that affects 32-bit Windows 10.
May 21st, 2016 — Beta version 4.2.6 is out
It improves support for Windows 10 Redstone, adds taskbar skinning, menu animations, and many new features. More details here.
Choose between 3 different styles:
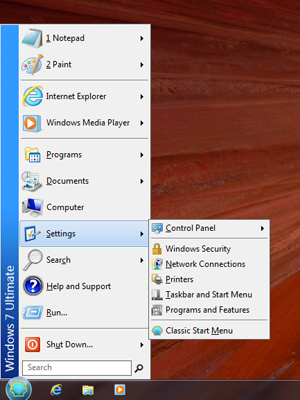
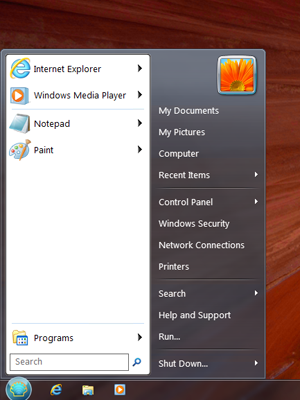
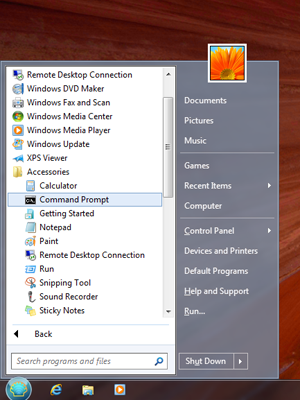
The Classic Start Menu is compatible with: 
Download DisplayFusion from here
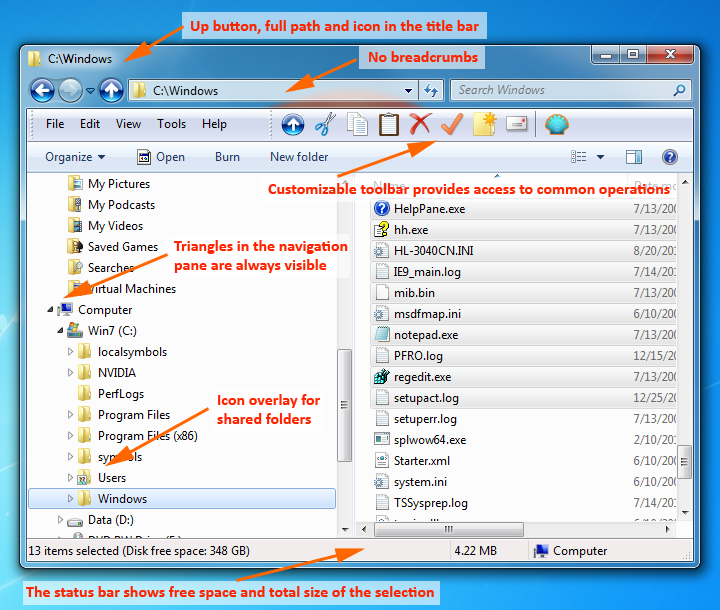
Many usability improvements to Explorer (every feature can be turned on or off):
«So happy to find this program. Very well made with lots of options. Makes Windows 7 worth using. Saves me from daily frustration. Thank you so much!» Eric
«Brilliant! No more frustration, I can work just like I used to! Thank you!» Anonymous Donor
Classic Shell works on Windows 7, Windows 8, Windows 8.1, Windows 10 and their server counterparts (Windows Server 2008 R2, Windows Server 2012, Windows Server 2012 R2, Windows Server 2016). Both 32 and 64-bit versions are supported. The same installer works for all versions.
Note: Windows RT is not supported.
Here are some of the people, who made significant contributions to the Classic Shell project:
Windows Shell
The Windows UI provides users with access to a wide variety of objects necessary for running applications and managing the operating system. The most numerous and familiar of these objects are the folders and files that reside on computer disk drives. There are also a number of virtual objects that allow the user to perform tasks such as sending files to remote printers or accessing the Recycle Bin. The Shell organizes these objects into a hierarchical namespace and provides users and applications with a consistent and efficient way to access and manage objects.
Shell Development Scenarios
The following development scenarios relate to application development:
- Extending the Shell, which consists of creating a data source (versus consuming the Shell data model)
- Implementing a subset of the Shell data source tasks
- Supporting libraries and item views in Windows Explorer
- Using the common file dialog
- Implementing Control Panel items
- Managing notifications
The following development scenarios relate to file format ownership:
- Implementing a subset of the Shell data source tasks
- Implementing any handler
- Supporting desktop search
The following development scenarios relate to data storage ownership:
- Supporting desktop search and OpenSearch
- Implementing a subset of the Shell data source tasks (virtual folders)
- Supporting libraries in Windows Explorer
The following development scenario relates to device support:
- Auto run and auto play
Windows Shell SDK Documentation
This documentation is broken into three major sections:
- The Shell Developer’s Guide provides conceptual material about how the Shell works and how to use the Shell’s API in your application.
- The Shell Reference section documents programming elements that make up the various Shell APIs.
- Shell Samples provides links to related code samples.
The following table provides an outline of the Shell Reference section. Unless otherwise noted, all programming elements are documented in unmanaged C++.
How to Install Linux Bash Shell on Windows 10
Last updated October 29, 2020 By Abhishek Prakash 104 Comments
Brief: This beginner’s tutorial shows you how to install bash on Windows.
Linux on Windows is a reality, thanks to the partnership between Canonical (parent company of Ubuntu) and Microsoft. When Microsoft’s CEO announced that the Bash shell was coming to Windows, a number of people just couldn’t believe it. #BashOnWindows trended on Twitter for days, such was the impact of this news.
But Bash on Windows was not available to everyone immediately. People had to install the Windows 10 technical preview to install Linux on Windows 10. But this is not the case anymore. The Windows 10 anniversary upgrade is here and now you can easily get Bash on Windows. And, before we go on installing Bash on Windows, let me tell you a little more about it.
Note: This tutorial was tested with the latest available Windows 10 version 2004 and build 19041.450. You might need to update your Windows installation if you’ve an older build to follow everything in this tutorial.
What is Bash on Windows?
Bash on Windows provides a Windows subsystem and Ubuntu Linux runs atop it. It is not a virtual machine or an application like Cygwin. It is complete Linux system inside Windows 10.
Basically, it allows you to run the same Bash shell that you find on Linux. This way you can run Linux commands inside Windows without the needing to install a virtual machine, or dual boot Linux and Windows. You install Linux inside Windows like a regular application. This is a good option if your main aim is to learn Linux/Unix commands.
I recommend reading this article to know more about Bash on Windows.
Method 1: Install Linux Bash Shell on Windows 10 Newer Versions
Good thing is that the Fall Creator’s Update and the recent Windows 10, version 2004 makes it easier to install Bash on Windows 10. You can get it in one click from Windows Store. There are still a few things to do however.
I am installing Ubuntu using Windows Subsystem for Linux. You can also use SUSE Linux. The procedure is same for both distributions.
Step 1: Enable “Windows Subsystem for Linux” feature
The first thing you need to do is to enable Windows Subsystem for Linux feature from PowerShell or from the Windows feature options.
If you want to utilize the GUI, you can simply search for option to get the list of Windows features to enable a few things as shown in the screenshot below.
Now, you just have to open it to access all the options. Among the ones listed, you have to enable (or check) the feature for “Windows Subsystem for Linux” and “Virtual Machine Platform” and then perform a reboot to make sure you have both of them enabled.

In either case, if you want to utilize the PowerShell, you can just go to the Start menu and search for PowerShell. Run it as administrator:

Once you have the PowerShell running, use the command below to enable Bash in Windows 10.
You’ll be asked to confirm your choice. Type Y or press enter:

Now you should be asked to reboot. Even if you are not asked to, you must restart your system.
Step 2: Download a Linux system from the Windows store
Once your system has rebooted, go to the Windows Store and search for “Linux” or just “Ubuntu”.

You’ll see the option to install Ubuntu or SUSE. I have installed Ubuntu for Bash on Windows here.

What’s the difference between using Ubuntu or openSUSE or SUSE Linux Enterprise? And which one should you use?
To tell you quickly, the main difference would be in the commands for installing new packages inside these Linux subsystems. I advise going for Ubuntu in this case.
Once you choose the distribution of your choice, you’ll see the option to install it. Do note that it will download files of around 1Gb in size or less depending on what you’re downloading.

Step 3: Run Linux inside Windows 10
You are almost there. Once you have installed Linux, it’s time to see how to access Bash in Windows 10.
Just search for the Linux distribution you installed in the previous step. In my case it was Ubuntu. You’ll see that it runs like a normal Windows application.
It will take some time installing and then you’ll have to set up the username and password.

Don’t worry, it’s just for the first run. Bash shell will be available for use directly from the next time onwards.
Enjoy Linux inside Windows 10.
Troubleshooting 1: The WSL optional component is not enabled. Please enable it and try again.
You may see an error like this when you try to run Linux inside Windows 10:
And when you press any key, the application closes immediately.
The reason here is that the Windows Subsystem for Linux is not enabled in your case. You should enable it as explained in step 1 of this guide. You can do that even after you have installed Linux from Windows Store.
Troubleshoot 2: Installation failed with error 0x80070003
This is because Windows Subsystem for Linux only runs on the system drive i.e. the C drive. You should make sure that when you download Linux from the Windows Store, it is stored and installed in the C Drive.
Go to Settings -> Storage -> More Storage Settings: Change where new content is saved and select C Drive here.
Method 2: Install Linux Bash Shell on older Windows 10
If you cannot get the Fall Creator’s update on Windows 10 for some reason, you can still install it if you have the Anniversary update of Windows 10. But here, you’ll have to enable developer mode. I still recommend upgrading to the Fall Creator’s update or the latest Windows 10 2004 version update though.
Step 1:
Press Windows Key + I to access Windows system settings. In here, go to Update & Security:

Step 2:
From the left side pane, choose “For developers.” You’ll see an option for “Developer mode.” Enable it.

Step 3:
Now search for Control Panel and in Control Panel, click on “Programs”:

Step 4:
In Programs, click “Turn Windows features on or off”:

Step 5:
When you do this, you’ll see several Windows features. Look for “Windows Subsystem for Linux” and enable it.

Step 6:
You’ll need to restart the system after doing this.

Step 7:
After restarting the computer, click the start button and search for “bash”.

Step 8:
When you run it for the first time, you’ll be given the option to download and install Ubuntu. You’ll be asked to create a username and password during this process. It will install an entire Ubuntu Linux system, so have patience as it will take some time in downloading and installing Linux on Windows.

Step 9:
Once this is done, go back to the Start menu and search for Ubuntu or Bash.

Step 10:
Now you have a command line version of Ubuntu Linux. You can use apt to install various command line tools in it.

Bonus Tip: Run GUI Apps On Windows Subsystem for Linux
The ability to run GUI apps on Windows Subsystem for Linux was introduced with WSL 2 release in May 2020.
It’s still not something officially supported out-of-the-box, but if you’re curious, you can experiment with it by following the steps below:
Step 1: Enable/Update WSL 2
If you have the latest Windows version 2004, build 19041, you already have WSL 2 support but you need to enable it and set it to default instead of WSL 1.
To do that, first you need to ensure that you have the latest WSL 2 Linux Kernel by updating the WSL 2 Linux Kernel.
You just need to follow the instructions on the official documentation page and download/install the package. Once done, you need to launch the PowerShell (run it as administrator) and set WSL 2 as the default by typing the following command:
You should get a message that says “For information on key differences with WSL 2 please visit https://aka.ms/wsl2”.
In case you get an error (Error: 0x1bc), you need to make sure that you have updated the WSL 2 Linux Kernel, that solved the issue for me.
Step 2: Download and Install a Windows X Server Program
As I mentioned, WSL 2 does not have the official support for running GUI apps by default. So, to do it, we need to download and install a Windows X Server program to give WSL access to display the apps.
You can try the open-source XLaunch server that we’re using here.
Step 3: Configure Windows X Server
Now that you have installed it, you just need to configure a few things.
First, Launch XLaunch and proceed to ensure that you have the following options enabled:
1. Keep the Display number set as -1 and select “Multiple Windows“
2. Next, you need to enable “Start no client“.

3. Finally, you just need to check “Disable access control” to avoid permission issues and save the configuration on the next step to complete the configuration.

Now everything’s almost done, you need to launch Ubuntu from the list of apps installed and configure it to launch Linux GUI apps on Windows.
Just enter the following command in the Linux terminal (Ubuntu):
Now, just install your favorite Linux GUI app from the terminal and test if it works! In my case, I installed and launched Gedit using the following commands:
And, here’s how it looks:

I hope you find this tutorial helpful for installing bash on Windows 10 and experimenting Linux GUI apps on Windows 10. No wonder WSL lets you play with Linux inside of Windows. If you have questions or suggestions, feel free to ask.
Like what you read? Please share it with others.


