- Установка и настройка Snort в Kali Linux
- Установить Snort
- Проверьте установку Snort
- Создайте следующие файлы snort.conf и icmp.rules:
- Ниже приводится структура предупреждения:
- (rule options)
- Использование Snort
- Показать журнал оповещения
- Оповещение Объяснение
- Выполните фырканье как Демон
- Как установить и использовать Snort в Ubuntu
- Установка Snort
- Необходимое условие
- Правила и настройка Snort
- Snort: 5 Steps to Install and Configure Snort on Linux
- 1. Download and Extract Snort
- 2. Install Snort
- 3. Verify the Snort Installation
- 4. Create the required files and directory
- 5. Execute snort
- How to Install Snort NIDS on Ubuntu Linux
- Synopsis
- System Requirements
- Prepare the System for Deployment
- Install Required Dependencies
- Install Snort from Source
- Configure Snort
- Testing Snort
- Create Snort Startup Script
- References
- NEVER MISS A BLOG
Установка и настройка Snort в Kali Linux
С сайта www.snort.org : Snort® – это система с открытым исходным кодом для предотвращения и обнаружения вторжений (IDS / IPS), разработанная Sourcefire. Сочетая преимущества проверки на основе сигнатур, протоколов и аномалий, Snort является наиболее широко распространенной технологией IDS / IPS во всем мире. С миллионами загрузок и почти 400 000 зарегистрированных пользователей, Snort стал стандартом де-факто для IPS.
В этой статье мы рассмотрим, как установить snort из исходного кода, написать правила и выполнить базовое тестирование.
Установить Snort
Проверьте установку Snort
Проверьте установку, как показано ниже.
Создайте следующие файлы snort.conf и icmp.rules:
Откройте файл конфигурации snort:
Проверьте файл конфигурации и проверьте, включены ли правила icmp или нет. Если нет, включите строку ниже.
Откройте файл правил icmp и включите правило, указанное ниже:
Включите указанную ниже строку в файл icmp.rule.
Приведенное выше основное правило предупреждает о наличии ICMP-пакета (ping).
Ниже приводится структура предупреждения:
(rule options)
| Structure | Example |
|---|---|
| Rule Actions | alert |
| Protocol | icmp |
| Source IP Address | any |
| Source Port | any |
| Direction Operator | -> |
| Destination IP Address | any |
| Destination Port | any |
| (rule options) | (msg:”ICMP Packet”; sid:477; rev:3;) |
Использование Snort
Запустите snort из командной строки, как указано ниже.
здесь -c указывает на файл с правилами и -l на каталог журнала
Показать журнал оповещения
Попробуйте пропинговать IP с вашего компьютера, чтобы проверить наше правило пинга. Ниже приведен пример предупреждения snort для этого правила ICMP.
Оповещение Объяснение
Пара строк добавляется для каждого предупреждения, которое включает в себя следующее:
Сообщение печатается в первой строке.
IP-
адрес источника IP-адрес назначения
Тип пакета и информация заголовка.
Если у вас другой интерфейс для сетевого подключения, используйте опцию -dev -i. В этом примере мой сетевой интерфейс – eth0.
Выполните фырканье как Демон
Добавьте опцию -D для запуска snort в качестве демона.
Источник
Как установить и использовать Snort в Ubuntu
До этого мы много рассматривали различные моменты по Snort.
Но так и не рассмотрели его установку с нуля.
Обнаружение вторжений в сети важно для обеспечения безопасности.
Система обнаружения вторжений, используемая для обнаружения незаконных и вредоносных попыток доступа в сети.
Snort – известная система обнаружения вторжений с открытым исходным кодом.
Веб-интерфейс (Snorby) можно использовать для более наглядного анализа алертов.
Snort может использоваться как система предотвращения вторжений с брандмауэром iptables / pf.
В этой статье мы будем устанавливать и настраивать snort-систему IDS с открытым исходным кодом.
Установка Snort
Необходимое условие
Библиотека сбора данных (DAQ) используется snort для захвата пакетов.
Она доступна на сайте snort. Процесс загрузки показан на следующем скриншоте:

Извлеките и запустите ./configure, команды make and make install для установки DAQ.
Однако DAQ требовует других инструментов.
Скрипт .configure может вывести следующие ошибки.
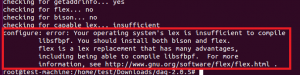

Поэтому сначала установите flex / bison и libcap перед установкой DAQ
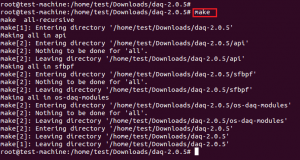
После установки необходимых инструментов снова запустите скрипт ./configure, который покажет следующий результат.

Результат выполнения команды make и make install будет показан на следующих скринах.

После успешной установки DAQ, теперь мы установим snort.
Загрузка с помощью wget показана на рисунке ниже.
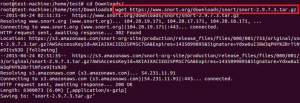
Извлеките сжатый пакет, используя приведенную ниже команду.

Создайте каталог установки и задайте параметр префикса в скрипте configure.
Также рекомендуется включить флаг sourcefire для контроля производительности пакетов (PPM).
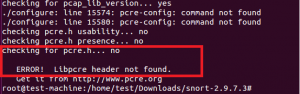
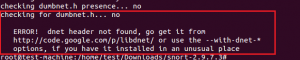
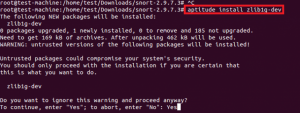
Configure script генерирует ошибку из-за отсутствия библиотек libpcre-dev, libdumbnet-dev и zlib.
ошибка из-за отсутствия библиотеки libpcre
ошибка из-за отсутствия библиотеки dnet (libdumbnet).
ошибка из-за отсутствия библиотеки zlib.

Установка всех необходимых библиотек разработки показана далее
После установки вышеуказанных требуемых библиотек для snort снова запустите скрипты configure без каких-либо ошибок.
Запустите make и make install для компиляции и установки snort в каталог / usr / local / snort.
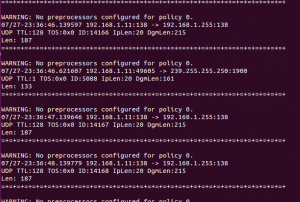
Наконец snort работает из каталога / usr / local / snort / bin.
В настоящее время он работает в режиме promisc (режим пакетной передачи) всего трафика на интерфейсе eth0.
Дамп трафика по интерфейсу snort показан на следующем рисунке.
Правила и настройка Snort
Установка Snort из исходников требует правил и настроек конфигурации, поэтому теперь мы скопируем правила и настройки в каталог / etc / snort.
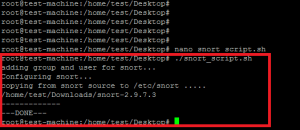
Мы создали одиночный скрипт bash для правил и настроек конфигурации.
Он используются для следующих настроек snort.
Создание пользователя snort для snort IDS-сервиса на linux.
Создание каталогов и файлов в каталоге / etc для настройки snort.
Установка разрешений и копирование данных из каталога иконок snort.
Удалите # (знак комментария) из пути rules в файле snort.conf.
Измените исходный каталог snort в скрипте и запустите его.
Последующие результаты появляются в случае успешного запуска.
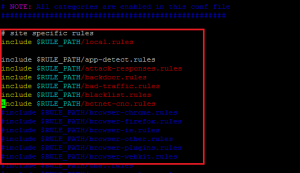
Файл конфигурации Snort очень сложный, однако вот необходимые изменения файла snort.conf для нормальной работы IDS.
файл $ RULE_PATH / local.rules # для пользовательских правил
удалить знак комментария (#) из других правил, таких как ftp.rules, exploit.rules и т. д.
Теперь скачайте правила Snort и извлеките их в каталоге / etc / snort / rules.
Включить правила сообщества и возникающие угрозы в файле snort.conf.


Выполните следующую команду для проверки конфигурационного файла после вышеупомянутых изменений.
В этой статье мы сосредоточили внимание на установке и настройке snort-системы с открытым исходным кодом IDPS на дистрибутив Ubuntu.
По умолчанию он используется для мониторинга событий, однако он может сконфигурировать встроенный режим защиты сети.
Правила Snort могут быть протестированы и проанализированы в автономном режиме с использованием файла захвата pcap.
Источник
Snort: 5 Steps to Install and Configure Snort on Linux
 Snort is a free lightweight network intrusion detection system for both UNIX and Windows.
In this article, let us review how to install snort from source, write rules, and perform basic testing.
1. Download and Extract Snort
Download the latest snort free version from snort website. Extract the snort source code to the /usr/src directory as shown below.
Note: We also discussed earlier about Tripwire (Linux host based intrusion detection system) and Fail2ban (Intrusion prevention framework)
2. Install Snort
Before installing snort, make sure you have dev packages of libpcap and libpcre.
Follow the steps below to install snort.
3. Verify the Snort Installation
Verify the installation as shown below.
4. Create the required files and directory
You have to create the configuration file, rule file and the log directory.
Create the following directories:
Create the following snort.conf and icmp.rules files:
The above basic rule does alerting when there is an ICMP packet (ping).
Following is the structure of the alert:
| Structure | Example |
|---|---|
| Rule Actions | alert |
| Protocol | icmp |
| Source IP Address | any |
| Source Port | any |
| Direction Operator | -> |
| Destination IP Address | any |
| Destination Port | any |
| (rule options) | (msg:”ICMP Packet”; sid:477; rev:3;) |
5. Execute snort
Execute snort from command line, as mentioned below.
Try pinging some IP from your machine, to check our ping rule. Following is the example of a snort alert for this ICMP rule.
Alert Explanation
A couple of lines are added for each alert, which includes the following:
- Message is printed in the first line.
- Source IP
- Destination IP
- Type of packet, and header information.
If you have a different interface for the network connection, then use -dev -i option. In this example my network interface is ppp0.
Источник
How to Install Snort NIDS on Ubuntu Linux
Synopsis
Security is a major issue in today’s enterprise environments. There are lots of tools available to secure network infrastructure and communication over the internet. Snort is a free and open source lightweight network intrusion detection and prevention system. Snort is the most widely-used NIDS (Network Intrusion and Detection System) that detects and prevent intrusions by searching protocol, content analysis, and various pre-processors. Snort provides a wealth of features, like buffer overflow, stealth port scans, and CGI attacks, just to name a few. Snort tries to detect malicious activity, denial of service attacks, and port scans by monitoring network traffic. It’s divided into five major components: Packet decoder, Preprocessor, Detection engine, Logging and Alerting system, and Output modules.
Here, we will explain how to install from source, create a configuration file for Snort, create sample rules, and finally test on Ubuntu 16.04.
System Requirements
- Newly deployed Ubuntu 16.04 server.
- Minimum 4 GB RAM and multicore CPU for better performance.
- At least 1 TB hard disk.
Prepare the System for Deployment
Before starting, ensure your system is up to date and all installed software is running the latest version.
First, log in to root user and update your system by running the following command:
Install Required Dependencies
Before installing Snort, you will need to install required dependencies on your system.
You will also need to install DAQ. To do this, first download the latest version of DAQ with the following command:
Once the download is completed, extract the downloaded file with the following command:
Next, change the directory to daq-2.0.6 :
Now run the following command to compile and install DAQ:
Install Snort from Source
You can install Snort from its source code or deb packages on Ubuntu. It is recommended to build Snort from source code, because the latest version of Snort may not be available in Linux distro repositories. Also note that the following examples use eth0 for the network interface. Your main network interface may differ.
First, download the latest version of the Snort source code with the following command:
Once the download is completed, extract the downloaded file with the following command:
Change the directory to snort-2.9.8.3:
Then run the following command to compile and install Snort:
Next, you will need to update the shared libraries, otherwise you will get an error when you try to run Snort:
Next, create a symlink to the Snort binary:
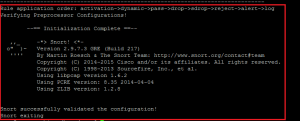
Finally, you can verify the installation and configuration with the following command:
You should see the following output:
Configure Snort
You can configure Snort in three modes: Sniffer mode, Packet logger mode, and Network IDS mode. Here, we will configure Snort for Network IDS Mode.
Before configuring Snort, you will need to create a directory structure for Snort.
To do this, create the following directories and files:
Now set proper permission to the following directories:
Next, you will need to copy configuration files from Nnort source:
Change the directory to snort-2.9.8.3 :
Then, copy .conf , .map and .dtd files to the /etc/snort/ directory:
You will also need to copy the dynamic preprocessors files:
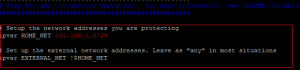
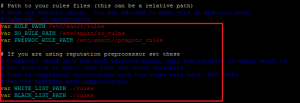
Now we will edit the Snort configuration file. First, comment out all rulesets with the following command:
Next, open /etc/snort/snort.conf file in your favorite editor:
Change the file as shown below:
Save and close the file when you are done.
Next, validate the configuration file with the following command:
If everything is okay, you should see the following output:
Testing Snort
Snort is now ready for testing—but before starting, you will need to create a rule set.
Let’s create a rule to test Snort.
Edit the local.rules file:
Add the following lines:
Save and close the file.
The above rules will generate an alert when someone tries to Ping, FTP, or Telnet to the server.
Now start Snort in Network IDS mode from the terminal and tell it to output any alert to the console:
Specification of all the options are listed below:
- -A console: Prints fast mode alerts to stdout
- -q : Quiet mode. Don’t show banner and status report
- -c : The path to our snort.conf file
- -i : The interface to listen on
Now, since Snort is up and listening on interface eth0 , so let’s try to Ping, FTP, and Telnet from remote machine.
On the remote machine run the following command:
Note: 192.168.15.189 is the IP address of Snort server
On the Snort server, you should see the output something like this:
You can stop Snort at any time by pressing Ctrl+c from your keyboard.
Create Snort Startup Script
You will also need to create a startup script to run Snort at boot time. You can do this by creating snort.service file:
Add the following lines:
Save the file, then enable the script to run at boot time:
Finally, start Snort:
You can check the status of Snort by running the following command:
You should see the following output:
References
NEVER MISS A BLOG
Get the latest stories, expertise, and news about security today.
Источник


