- Как установить SSH Server в Windows Server 2008
- Что такое SSH?
- Какие опции сервера SSH доступны для Windows 2008 Server?
- Как установить FreeSSHd — SSH сервер в Windows Server 2008?
- Резюме
- How to install and configure Open SSH Server in Windows 10
- How to Identify if Windows 10 Open SSH Server installed from GUI
- How to Identify if OpenSSH Server installed from Powershell
- How to Install in Windows 10 the OpenSSH Server from GUI
- How to Install in Windows 10 the OpenSSH Server from Powershell
- How to start and Configure in Windows 10 the OpenSSH Server
- How to connect with ssh from Linux to Windows 10 OpenSSHServer
- How to disable password authentication in OpensshServer
Как установить SSH Server в Windows Server 2008


 Посетителей: 35062 | Просмотров: 49976 (сегодня 0)


![]()
Существует несколько опций командной строки, доступных для настройки Window Server 2008 через сеть. Например, Windows Powershell, ServerManager.exe, или сервер telnet. Однако, проверенным и надежным способом, который так хорошо работал практически на всех типах устройств инфраструктуры, использующихся сегодня (включая Windows Server 2008, Cisco Routers, Linux серверы и т.д.) является SSH. В этой статье мы узнаем, как устанавливать SSH Server в Windows Server 2008.
Что такое SSH?
SSH – это безопасная оболочка (secure shell), стандарт, определенный в RFC 4251. Это сетевой протокол, который открывает безопасный канал между двумя устройствами, используя TCP порт 22. Этот канал также можно использовать для SFTP и SCP (безопасного FTP и защищенного копирования соответственно). Чтобы он работал, вам нужен безопасный сервер в системе, к которому вы подключаетесь, и безопасный клиент на клиенте, с которого вы подключаетесь.
Следует помнить, что SSH функционально совместим с различными платформами. К примеру, вы можете подключить SSH сервер на маршрутизаторе Cisco с клиента Windows, вы можете подключиться к серверу Linux с маршрутизатора Cisco, а также можете подключиться к Windows 2008 Server с клиента Linux.
Единственной возможной проблемой совместимости может стать тот факт, что существует две версии SSH, SSH версии 1 и SSH версии 2. Вы должны убедиться, что клиент и сервер поддерживают одну и ту же версию, чтобы знать, какую версию использовать при подключении. Обычно версии могут быть оговорены.
Хотя ни одна из ОС Windows не идет с SSH сервером или клиентом, их очень просто устанавливать.
Имея SSH сервер на своем Windows 2008 Server, вы можете:
- Удаленно иметь доступ к командной строке вашего Windows 2008 Server
- Управлять сервером через сеть, даже если вы не имеете доступа к интерфейсу GUI
- Удаленно управлять вашим Windows 2008 Server с любого устройства, имеющего SSH клиента
- Делать все это через зашифрованное соединение, которое может безопасно проходить даже через интернет
Какие опции сервера SSH доступны для Windows 2008 Server?
Существует ряд опций сервера SSH, доступных для Windows Server 2008. Вот лишь некоторые из тех, с которыми мне довелось иметь дело:
Как только вы запустили SSH сервер, вам понадобится SSH клиент для Windows. Вот несколько самых популярных SSH клиентов для Windows, которых мне удалось найти:
Как установить FreeSSHd — SSH сервер в Windows Server 2008?
Поскольку установка Free SSHd так проста по сравнению с другими опциями (особенно с OpenSSH в Windows), я выбрал эту версию, чтобы показать процесс установки Free SSHd. Помните, что FreeSSHd абсолютно бесплатен (как видно из его названия) для личного / некоммерческого использования, а также для коммерческого использования.
Чтобы начать процесс, я скачал FreeSSHd.exe на свою систему Windows Server 2008 и запустил загруженную программу. Графическая установка началась.
Я принял все параметры по умолчанию для установки и нажал «Установить», чтобы начать процесс.
По завершении я решил не запускать SSHd в качестве службы, однако вы можете выбрать этот вариант при желании.
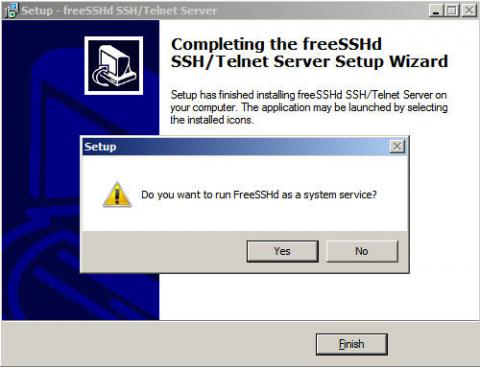
Рисунок 1: Вы хотите запустить FreeSSHd в качестве службы?
Запустив FreeSSHd в качестве службы, он будет доступен независимо от того, вошли вы в консоль или нет. Я также решил выбрать создание частных ключей для SSH сервера.
Далее, я запустил ярлык FreeSSHd на рабочем столе, чтобы настроить и запустить SSH сервер.

Рисунок 2: Запуск FreeSSH приложения
Я заметил, что SSHd сервер уже работал.
Приложение FreeSSHd может предложить следующее:
- Возможности SSH сервера и Telnet сервера
- Опции запуска SSHd только в определенных интерфейсах
- Различные способы аутентификации, включая интегрированную NTLM аутентификацию на Windows AD
- Различные способы шифрования, включая AES 128, AES 256, 3DES, Blowfish и т.д.
- Опция создания защищенного туннеля в соединении
- Опциональный Secure FTP (sFTP) – для безопасного FTP, смотреть FreeFTPd website
- Возможность управлять пользователями и ограничивать доступ к безопасной оболочке, безопасному туннелю и безопасному FTP
- Возможность предоставлять доступ только определенным узлам или подсетям
- Возможность регистрировать в журнал все подключения и команды, выполненные через FreeSSHd
- Просмотр пользователей, подключенных в данный момент
- Автоматическое обновление FreeSSHd
Чтобы войти, мне понадобилось выполнить две вещи:
- Добавить новую пользовательскую учетную запись и разрешить доступ к командной строке SSH
- Открыть исключения в моем брандмауэре Windows Server 2008
Чтобы добавить нового пользователя, я перешел по вкладке «Пользователи» и нажал Добавить.
Я решил установить логин для моей учетной записи локального администратора Windows. Я установил авторизацию на NTLM. Так в базе данных FreeSSHd нет локального пароля, и если пароль администратора измениться в базе данных локальной учетной записи Windows, вам не придется менять пароль в базе данных учтенной записи FreeSSHd.
Я авторизировал этого нового пользователя на вход только в SSH.
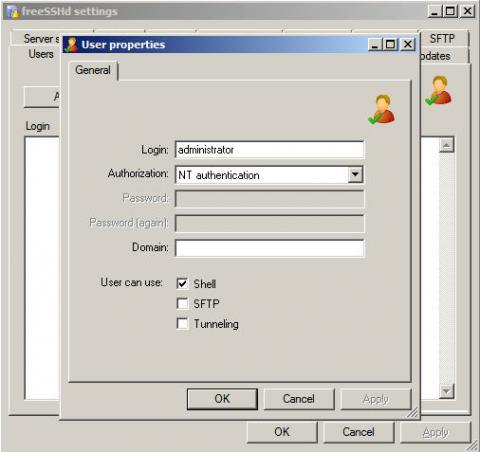
Рисунок 3: Добавление SSHd пользовательской учетной записи с NTLM авторизацией
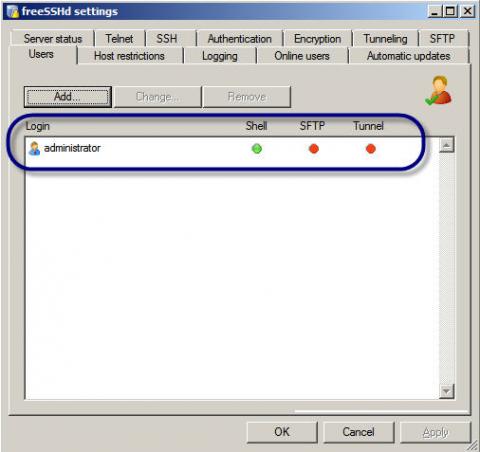
Рисунок 4: Новая пользовательская учетная запись SSHd добавлена
Второе, что мне нужно было сделать для того, чтобы позволить себе вход, это открыть исключения брандмауэра Windows. Хотя я мог вообще отключить брандмауэр Windows вместо того, чтобы открывать порты, конечно, самой безопасной опцией было оставить брандмауэр включенным и разрешить исключение для SSH ‘ TCP порт 22.
Для этого я перешел в меню Пуск -> Администрирование -> Брандмауэр Windows с расширенной безопасностью.
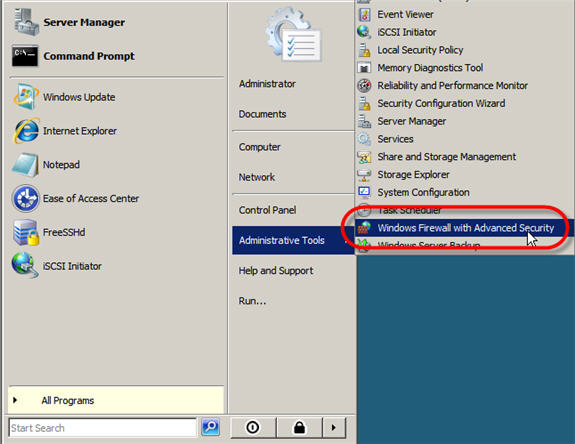
Рисунок 5: Открытие брандмауэра Windows с расширенной безопасностью
Далее, я нажал на входящих правилах, а затем Новое правило.
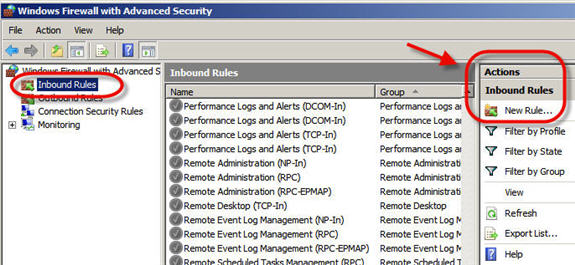
Рисунок 6: Добавление нового входящего правила
Далее я выбрал добавление правила порта.
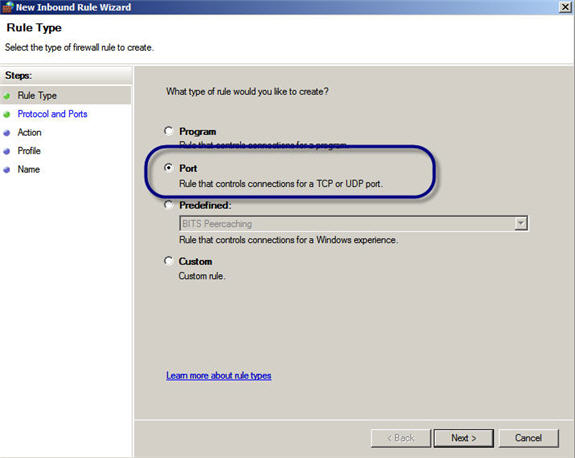
Рисунок 7: Выбор добавления правила для порта
Я указал только TCP порт 22.
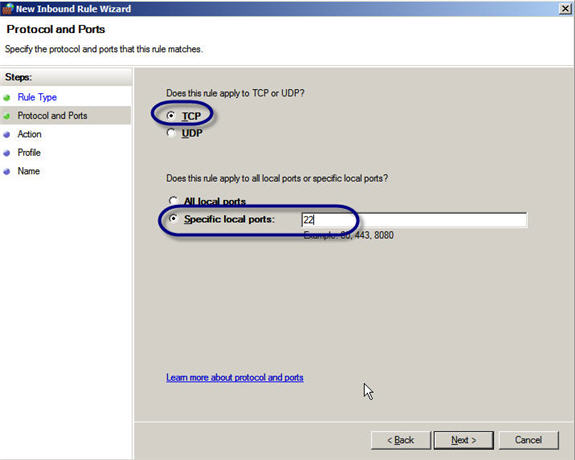
Рисунок 8: Определение только TCP порта 22
Воспользуйтесь умолчаниями чтобы Разрешить это соединение, примените ко Всем доменам, и назовите правило на свой вкус.
Чтобы протестировать подключение, я использовал SecureCRT со своей машины Windows XP на Windows Server 2008 сервер через SSH.
Для этого я подключился к серверу через IP адрес (или имя домена). Я выбрал опцию «Принять» сертификат сервера и сохранил его.
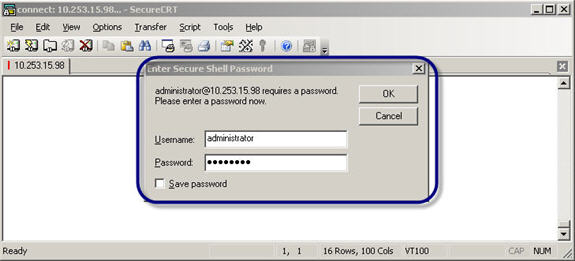
Рисунок 9: Подключение через SSH и вход с вашим именем пользователя и паролем Windows
Я вошел на сервер, используя логин и пароль администратора.
И, успех! Я смог получить доступ к серверу через SSH!
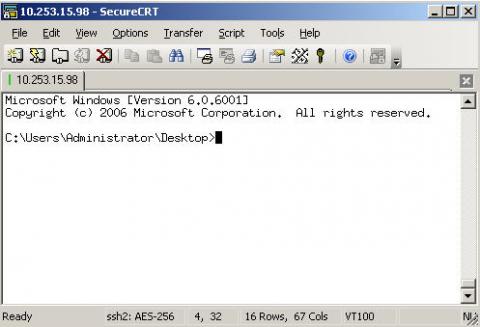
Рисунок 10: Успешное подключение к Windows 2008 Server через SSH
Резюме
SSH – это отличный инструмент для администраторов Windows Server 2008, желающих воспользоваться возможностями удаленного управления сервером. В этой статье вы узнали, как SSH может помочь вам, вы узнали о доступных вариантах установки SSH сервера и SSH клиента, а также о том, как устанавливать одну из этих опций, FreeSSHd.
How to install and configure Open SSH Server in Windows 10
In previous article i describe How to install Open SSH in Windows 10 as Optional Feature and use it. Today i will continue with OpenSSH and i will describe step by step how can install OpenSSH Server in Windows 10 and configure it.
OpenSSH Server and client included in Windows 10 v.1809 and later and in Windows Server 2019
How to Identify if Windows 10 Open SSH Server installed from GUI
Before start with the installation its better to identify if already OpenSSH Server installed.
- Click Start and Gear Icon
- Click in Apps

- From the right side select Manage Optional Features.

- if you see Open SSH Server then it means that already installed.
- If you can’t see this means that you must install the Feature.

How to Identify if OpenSSH Server installed from Powershell
If you like Powershell you can use the following command to identify if OpenSSH Server already installed
Get-WindowsCapability -Online | ? name -like «openssh*»
Check the State status to identify if is installed or not
- State:Installed means it’s already installed
- State:Not Present means it’s not installed

How to Install in Windows 10 the OpenSSH Server from GUI
After identify that OpenSSH Server it’s not installed we can proceed to install the OpenSSH Server
- Click Start and Gear Icon
- Click in Apps
- From the right side select Manage Optional Features
- Click Add Feature

- Find and click Open SSH Server
- Click Install

How to Install in Windows 10 the OpenSSH Server from Powershell
If you would like to proceed the installation of OpenSSH Server from Powershell you can do it with one command.
Type the following command and wait to finish the installation
Add-WindowsCapability -Online -Name OpenSSH.Server

How to start and Configure in Windows 10 the OpenSSH Server
Now it’s time to Configure OpenSSH Server to start use it.
- Open Powershell command as Administrator
- Type the following command to start the Service of the OpenSSH Server
Start-service sshd - Type the following command to add Automatic Startup in Service
- Set-Service -Name sshd -StartupType ‘Automatic’
- Type the following command to find the Rule for OpenSSH Server in Windows Firewall and verify that is Allow
Get-NetFirewallRule -Name *ssh*

How to connect with ssh from Linux to Windows 10 OpenSSHServer
The reality with ssh is that most of them use it with Public key authentication instead of password authentication because it prevent attacks.
But by default after the installation the OpenSSH Server use password authentication.
We will keep the password authentication to be able to connect through the configuration that must be done to use the Public key authentication
So for the best practices and better security let’s explain how can generate ssh keys and use it to connect in OpenSSH Server
- Login in Windows 10 OpenSSH Server and create the users that you want to connect.
- If you have Domain users and have already decide which should be connect then avoid the previous step
- Login in the Linux that you will use it to connect in OpenSSH Server
- Type the following command to start generate the keys
- ssh keygen
- It will ask how you would like to save the file name but you can leave it as the default and click Enter
- Also it will ask to create a passphrase.
- Just write down a passphrase and keep it in a safe place because it will ask when you will connect in OpenSSH Server.

- Now if you type ls to see the files and folder of the ssh directory you will see 2 files. These are the private key and the public key with the extension .pub
- id_rsa
- id_rsa.pub

- To be able create the authentication must be copy the public key in the Openssh Server in the following path of the user which will connect from Linux. Note that we must have create the user before proceed with this step.
- The name of the public key file must be authorized_keysin the .ssh folder
- C:\Users\ \.ssh
- So let’s type the following command from the Linux which create the ssh keys and replace the user1@192.168.50.151 with your username and ip address of the opensshserver
- scp
/.ssh/id_rsa.pub user1@192.168.50.151:»c:\users\user1\.ssh\authorized_keys»
- scp

- Login in the Openssh server and verify that the authorized_keys created in the .ssh of the user folder.
- Now we must configure the permission of the authorized_keys because if you try to connect as it you will get an error Permission denied (publickey,keyboard-interactive)
- If we check the permissions of the authorized_keys file we will see that has access the user which will connect in my scenario is the user1 and the Domain Administrator.
- But these users must be removed.

- If you search in Google you will find most of the Blogs and forums to say that you can download the Powershell module OpenSSHUtil but this module has been deprecated and if you try you will fail to downloaded
- Before try to remove the access from users in the authorized_keys file must be disable the inheritance. If you don’t do it and try to remove the users with icaclscommand then you will get the info that succesfull proceed with the file but if you will check the permission will be the same without remove the users.
- Right click in authorized_keys file — Properties.
- Click Advanced button.
- Click Disable inheritance.
- Click Convert inherited permissions into explicit permissions on this object.

- Login again in Linux which will use it to connect and type the following command to connect with ssh and password authentication for now
- ssh user1@192.168.50.151
- After connect type the following commands to remove the user access from the authorized_keys
- Icacls «authorized_keys» /remove user1
- Icacls «authorized_keys» /remove administrator

- Now type the following command to check the permissions in the file.
- Only these users must has access in this file
- icacls authorized_keys

- The last step is to disable the password authentication and enable the Pubkey authentication from the ssh_config file to be able authorized only with the ssh keys and not with password
How to disable password authentication in OpensshServer
After the basic configuration of OpensshServer to set Automatic the Service and verify the Rule in Windows Firewall you can proceed in more advance configuration.
Let’s explain how can change configuration of Openssh server.
- Open Powershell as Administrator
- Type the command notepad.exe $env:PROGRAMDATA\ssh\sshd_configto open the ssh_config file

- Change the following lines with these values .
-
- PubkeyAuthentication yes
- PasswordAuthentication no
PermitEmptyPasswords no

- Then type the following commands to restart the Openssh Server service
- Stop-Service sshd
- Start-Service sshd

- Let’s connect in Linux and type the command to connect trough ssh.
- If all works without issues you will see that ask the passphrase before connect

- Type it and the connection will be established.

If you failed to connect with Public key authentication then the better solution is to use Logs of SSH to identify the cause of the issue.
This has been change from previous versions and now the SSH Logs located in Windows Event Logs in stead of the C:\ProgramData\ssh\logs\sshd.log and you can find it in Application and Services Logs — OpenSSH Logs

I hope my article to help you or explore something new or resolve a problem.


