- Install ubuntu and mac os
- Apple hardware considerations
- 2. Requirements
- 3. Prepare the USB stick
- 4. Install and run Etcher
- 5. Etcher configuration
- 6. Write to device
- 7. Boot your Mac
- Finding help
- Ubuntu Documentation
- UNetbootin (Automated, graphical approach)
- Manual Approach
- MacBook Air 3,2
- Other procedure
- Ubuntu Documentation
- Introduction
- Note on encrypted disks/partitions
- BACKUP YOUR DATA
- Single-Boot: Ubuntu Only
- Avoid long EFI wait before GRUB
- Dual-Boot: Mac OSX and Ubuntu
- Quick Steps
- Detailed How-To
- Installing rEFIt
- Partitioning
- The Ubuntu LiveCD
- Boot your Mac from the CD
- Start Installing
- Fix the Partition Tables
- Other Partitioning Options Multi-booting
- Triple Boot: Mac OSX, Windows, and Ubuntu
- Multi linux
- Mac OSX and multi Linux
- Manual partitioning using Disk Utility GUI
- Mac OSX, Vista, and Ubuntu
- This method won’t work for XP because XP wants to be on the last MBR partition.
- Partitioning Diagram
- Mac OSX, XP, and Ubuntu
- Partitioning Diagram
- Mac OSX, Vista, XP, and Ubuntu
- Shared storage partitons
- problems
- share that partition
- helpfull links
- Installing ubuntu using wubi in vista and other complex systems
- Other Info
- Multiple Hard Drives (Mac Pro)
- GRUB2 / GRUB_EFI
- Example Ubuntu Installation after Mac OSX and Vista
- You have already installed Mac OSX and Windows Vista, now to install Ubuntu.
- Troubleshooting
- Obtaining Help
- External Links
Install ubuntu and mac os
With a bootable Ubuntu USB stick, you can:
- Install or upgrade Ubuntu, even on a Mac
- Test out the Ubuntu desktop experience without touching your PC configuration
- Boot into Ubuntu on a borrowed machine or from an internet cafe
- Use tools installed by default on the USB stick to repair or fix a broken configuration
Creating a bootable USB stick is very simple, especially if you’re going to use the USB stick with a generic Windows or Linux PC. We’re going to cover the process in the next few steps.
Apple hardware considerations
There are a few additional considerations when booting the USB stick on Apple hardware. This is because Apple’s ‘Startup Manager’, summoned by holding the Option/alt (⌥) key when booting, won’t detect the USB stick without a specific partition table and layout. We’ll cover this in a later step.
2. Requirements
- A 2GB or larger USB stick/flash drive
- An Apple computer or laptop running macOS
- An Ubuntu ISO file. See Get Ubuntu for download links
3. Prepare the USB stick
To ensure maximum compatibility with Apple hardware, we’re going to first blank and reformat the USB stick using Apple’s ‘Disk Utility’. But this step can be skipped if you intend to use the USB stick with only generic PC hardware.
- Launch Disk Utility from Applications>Utilities or Spotlight search
- Insert your USB stick and observe the new device added to Disk Utility
- Select the USB stick device (you may need to enable the option View>Show All Devices) and select Erase from the tool bar (or right-click menu)
- Set the format to MS-DOS (FAT) and the scheme to GUID Partition Map
- Check you’ve chosen the correct device and click Erase

Warning: Disk Utility needs to be used with caution as selecting the wrong device or partition can result in data loss.
4. Install and run Etcher
To write the ISO file to the USB stick, we’re going to use a free and open source application called Etcher. After downloading this and clicking to mount the package, Etcher can either be run in-place or dragged into your Applications folder.
By default, recent versions of macOS block the running of applications from unidentified developers. To side-step this issue, enable ‘App Store and identified developers’ in the ‘Security & Privacy’ pane of System Preferences. If you are still warned against running the application, click ‘Open Anyway’ in the same pane.

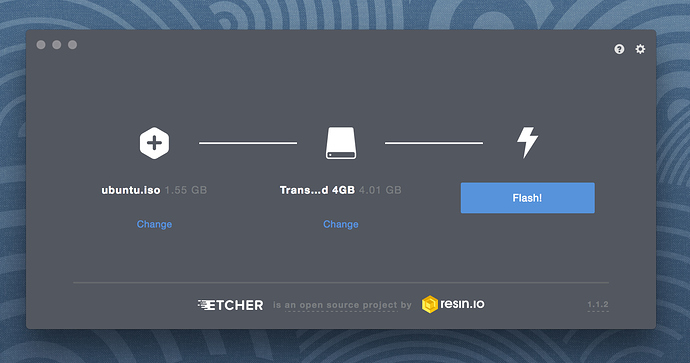
5. Etcher configuration
Etcher will configure and write to your USB device in three stages, each of which needs to be selected in turn:
Select image will open a file requester from which should navigate to and select the ISO file downloaded previously. By default, the ISO file will be in your Downloads folder.
Select drive, replaced by the name of your USB device if one is already attached, lets you select your target device. You will be warned if the storage space is too small for your selected ISO.
Flash! will activate when both the image and the drive have been selected. As with Disk Utility, Etcher needs low-level access to your storage hardware and will ask for your password after selection.
6. Write to device
After entering your password, Etcher will start writing the ISO file to your USB device.
The Flash stage of the process will show progress, writing speed and an estimated duration until completion. This will be followed by a validation stage that will ensure the contents of the USB device are identical to the source image.
When everything has finished, Etcher will declare the process a success.
Congratulations! You now have Ubuntu on a USB stick, bootable and ready to go.
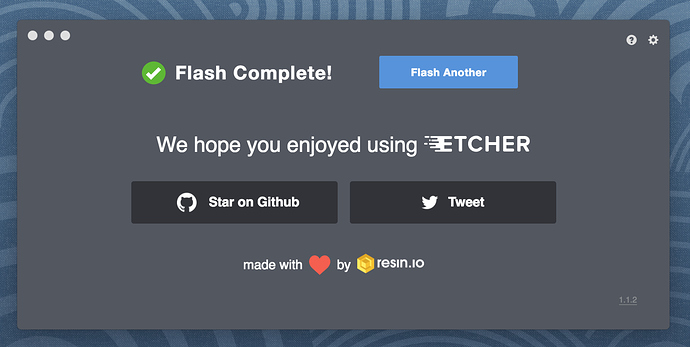
Warning: After the write process has completed, macOS may inform you that ‘The disk you inserted was not readable by this computer’. Don’t select Initialise. Instead, select Eject and remove the USB device.
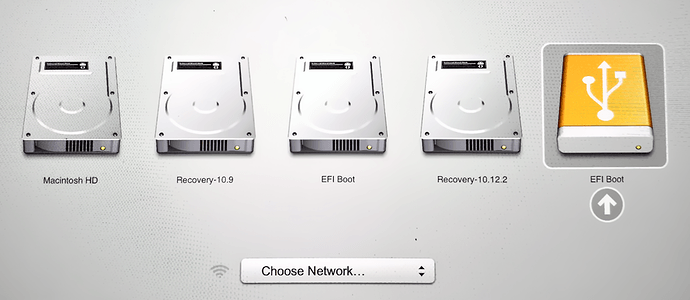
7. Boot your Mac
If you want to use your USB stick with an Apple Mac, you will need to restart or power-on the Mac with the USB stick inserted while the Option/alt (⌥) key is pressed.
This will launch Apple’s ‘Startup Manager’ which shows bootable devices connected to the machine. Your USB stick should appear as gold/yellow and labelled ‘EFI Boot’. Selecting this will lead you to the standard Ubuntu boot menu.
Finding help
If your Mac still refuses to boot off your USB stick you may find it easier to boot and install off an Ubuntu DVD instead. See our How to burn a DVD on macOS for further details.
Alternatively, if you feel confident using the macOS command line, see the community documentation on How to install Ubuntu on MacBook using USB Stick for a more manual approach.
If you want to install Ubuntu, follow our install Ubuntu desktop tutorial.
Finally, if you get stuck, help is always at hand:
Источник
Ubuntu Documentation
UNetbootin (Automated, graphical approach)
UNetbootin for Mac OS X can be used to automate the process of extracting the Ubuntu ISO file to USB, and making the USB drive bootable. The resulting USB drive, however, can be booted on PCs only. If attempting to make a USB drive that can be booted from a Mac, follow the instructions below.
Manual Approach
We would encourage Mac users to download Ubuntu Desktop Edition by burning a CD for the time being. But if you would prefer to use a USB, please follow the instructions below.
Note: this procedure requires an .img file that you will be required to create from the .iso file you download.
TIP: Drag and Drop a file from Finder to Terminal to ‘paste’ the full path without typing and risking type errors.
- Download the desired file
Open the Terminal (in /Applications/Utilities/ or query Terminal in Spotlight)
Convert the .iso file to .img using the convert option of hdiutil
Note: OS X tends to put the .dmg ending on the output file automatically.
Run to get the current list of devices
Insert your flash media
Run again and determine the device node assigned to your flash media (e.g. /dev/disk2)
(replace N with the disk number from the last command; in the previous example, N would be 2)
If you see the error «Unmount of diskN failed: at least one volume could not be unmounted», start Disk Utility.app and unmount the volume (don’t eject).
Execute (replace /path/to/downloaded.img with the path where the image file is located; for example, ./ubuntu.img or ./ubuntu.dmg).
Using /dev/rdisk instead of /dev/disk may be faster.
If you see the error dd: Invalid number ‘1m’, you are using GNU dd. Use the same command but replace bs=1m with bs=1M.
If you see the error dd: /dev/diskN: Resource busy, make sure the disk is not in use. Start Disk Utility.app and unmount the volume (don’t eject).
Run and remove your flash media when the command completes
Restart your Mac and press alt while the Mac is restarting to choose the USB-Stick
MacBook Air 3,2
Please notice: While all of the info and above commands are executed properly on a MacBook Air 3,2 (that is the 2010 version 13″ version of the Air) the end result will not produce a bootable USB device, at least not with the image for Ubuntu 10.10 64-bit. When booting of the USB device the following message or something similar will appear: «Missing operating system» and the process is auto-magically halted.
To get the USB device (e.g. a USB stick) to show up at all in the boot menu you also may have to reboot/turn on/off the computer a couple of times and also resync the partition tables using rEFIt. After doing this the USB should then appear as a bootable device while holding in the alt or c key when you are rebooting the computer. Notice that both the computers built in bootloader and rEFIt will identify the USB device as a Windows device, but that’s not a problem and expected.
A workaround to the-usb-device-is-not-booting-problem is to:
- Install rEFIt.
- Create a bootable start disk using Ubuntu and a USB stick.
- Create a separate partition on the Airs HD.
- dd the whole USB stick to that partition.
- Resync with rEFIt. Turn power off and on.
- Select Pingo/Windows logo: Install should start. (Here you might want to press F6 to change parameters, e.g. use nomodeset)
Alternatively, burning a CD and installing via an external CD-drive will work fine on the Macbook Air 3,2.
Other procedure
We would encourage Mac users to download Ubuntu Desktop Edition by burning a CD for the time being. But if you would prefer to use a USB, please follow the instructions below. Note: this procedure requires an .img file that you will be required to create from the .iso file you download. TIP: Drag and Drop a file from Finder to Terminal to ‘paste’ the full path without typing and risking type errors.
- Download the desired file
Open the Terminal (in /Applications/Utilities/ or query Terminal in Spotlight)
Convert the .iso file to .img using the convert option of hdiutil (e.g., hdiutil convert -format UDRW -o
Note: OS X tends to put the .dmg ending on the output file automatically.
Run diskutil list to get the current list of devices
Insert your flash media
Run diskutil list again and determine the device node assigned to your flash media (e.g., /dev/disk2)
Run diskutil unmountDisk /dev/diskN (replace N with the disk number from the last command; in the previous example, N would be 2)
Execute sudo dd if=/path/to/downloaded.img of=/dev/rdiskN bs=1m (replace /path/to/downloaded.img with the path where the image file is located; for example, ./ubuntu.img or ./ubuntu.dmg).
Using /dev/rdisk instead of /dev/disk may be faster.
If you see the error dd: Invalid number ‘1m’, you are using GNU dd. Use the same command but replace bs=1m with bs=1M.
If you see the error dd: /dev/diskN: Resource busy, make sure the disk is not in use. Start the ‘Disk Utility.app’ and unmount (don’t eject) the drive.
Run diskutil eject /dev/diskN and remove your flash media when the command completes
How to install Ubuntu on MacBook using USB Stick (последним исправлял пользователь waitingallday 2013-04-30 12:21:08)
The material on this wiki is available under a free license, see Copyright / License for details
You can contribute to this wiki, see Wiki Guide for details
Источник
Ubuntu Documentation
As with all wiki documentation, this page continues to be updated.
The partitioning options require additional testing.
This information will not work for iMac (11,1 or newer) users installing recent versions of Ubuntu (e.g., Maverick, Precise, Quantal. ), for this you may try this guide Ubuntu 12.10 on 2011 imac. The presence of the bios-grub partition that the Ubuntu installer creates by default (e.g., sda3) causes a conflict that prevents syncing the GPT and MBR partition tables. Deleting sda3 does not help since grub2 requires that bios-grub partition, nor will it use either sda or sda4 aborting with the error: «This GPT partition table has no BIOS boot partition; embedding won’t be possible!». So installing Ubuntu with the bios-grub partition fails and installing without it fails. See «Single-Boot».
Introduction
Slightly adventurous Intel-based Mac («Mactel») owners seem to often be afraid or confused about installing Ubuntu alongside OS X, but it is not very difficult. There are some oddities (see NOTE) that make installation on Mactel different from installation on a PC (but if it were the same, it wouldn’t be a Mac, now would it?). Guidelines for different configurations are detailed here.
If your computer does not have a CD-ROM drive, such as the Mac Book Air, this document may not have enough information. See the «Install Ubuntu on MacBook from USB» guide.
In Ubuntu do not try COMPIZ, this will completely mess around Unity and make it necessary to reinstall Ubuntu. Be aware that it keeps being tricky running Linux on a Macintosh
Note on encrypted disks/partitions
This guide does not mention how to use e.g. diskutility to resize an encrypted mac partition.
BACKUP YOUR DATA
You may laugh now, but when you make a mistake and wipe out your disk, you will be sorry! Time Machine comes with Leopard, and it is so easy to use that it isn’t funny, so most people have no excuse for not backing up their data. Better even, a backup to another system, external disk or cloud (e.g., Mozy) are not subject to partition configuration errors. When Bootcamp fails or you have strange faults maybe you want to clean up your harddrive. When erasing the hard drive choose «Security Options . » — «Zero Out Data».
Single-Boot: Ubuntu Only

It is recommended that you keep an install of OS X, even if you do not plan to use it, so that you can install firmware updates in the future. (Such updates may be required for your Mac to continue to operate properly.) One way to avoid using space for OS X on your internal hard drive, is to install it to an external USB or Firewire hard drive; if a firmware update is released, you can boot from the external drive to upgrade.
Many users would like to make Ubuntu their only operating system. If this is what you plan to do, there are some changes that you can make to your system that will make its operation closer to that of a PC, avoiding some of the special partition considerations detailed in the other installation situations below.
Intel Macs have an EFI instead of a BIOS as in an ‘IBM compatible’ system. A different partition table scheme, GPT, is used on the hard drive.
The EFI is capable of using MBR partition table format. Since the recommended Ubuntu installation methods use the «legacy mode» of the EFI, it make sense for a single-booter to convert their hard drive to the MBR format.
As an Ubuntu installer developer, I recommend against making this change. —> GPT is a fundamentally better partition table format, and is expected to be used more generally in the future MBR partition tables can’t cope with disks over 2TB).
I recommend staying with GPT. Perhaps the author of this recommendation could contact me (cjwatson AT ubuntu.com) to discuss it. —ColinWatson qqq I didn’t want to loose this in case Colin wants it back in DGerman qqq
You can convert your hard drive partition format with gparted on the Ubuntu LiveCD.
- Insert the Ubuntu LiveCD into your Mac and Shutdown. Restart the Mac and hold the Option Key. When the boot selector screen comes up, choose to boot from the CD.
- Choose you language and and select «Try Ubuntu». This won’t make any changes to your Mac.
Once you get to the Ubuntu desktop, go to System > Administration > Partition Editor
gParted will start. From gParted’s menu, choose Device > Create Partition Table.
Avoid long EFI wait before GRUB
If your Macbook spends 30 seconds with «white screen» before GRUB shows, try booting from your Mac OS X install disc, select language, then click Utilities->Terminal, and enter:
bless --device /dev/disk0s1 --setBoot --legacy
Assuming that the bootloader is on sda1, otherwise /dev/disk0s2 if it’s on sda2, etc.
Dual-Boot: Mac OSX and Ubuntu

Quick Steps
- Install rEFIt and make sure it is working (you should get a boot chooser on startup)
- Use Bootcamp or Disk Utility to create a partition at the end of the disc. Don’t worry about what format, just make it the size you want for Ubuntu and your swap partition. If you you are using OS X Lion which comes with Bootcamp 4.0 you will need to use the Disk Utility. Boot Camp 4.0 will only allow you to resize if you provide a Windows 7 installation disk.
Boot the Ubuntu desktop CD, and select «Try Ubuntu. Start the partition editor (gparted) under System > Adminstration. Use gparted to delete the partition you just made in OS X. It should be the last partition on the disc and follows after the HFS+ partition (OS X). Deleting it will leave an area called unallocated. This is free space, and exactly what you want. Use gparted to manually partition the space on your drive for Ubuntu. First create a SWAP area of about 1GB. Then the rest of the unallocated area format as EXT4. Apply changes and take note the label of the EXT4 partition such as /dev/sda3.
Detailed How-To
Installing rEFIt
INSTALL rEFIt! You don’t HAVE to use it once you get Ubuntu up and running, but until then, INSTALL rEFIt! You will need it after installing to sync partitions, once you have done that and Ubuntu works, then you can uninstall it. You can even burn a rEFIt CD if you prefer. If you do not see the rEFIt boot menu when starting your Mac on the second reboot (It takes two reboots to apear after using the package installer), it is not installed properly!
Partitioning
The first thing we need to do is repartition your Mac’s hard drive. Of course, we would like to do this non-destructively (without wiping out the partition you have already). With Leopard, this is quite easy as Apple has provided a nifty little tool that will shrink your OSX partition and create a Windows partition in the freed space (which we can convert to Linux partitions later). BootCamp is probably the easiest way to accomplish what you need.

Leopard’s DiskUtility can also shrink the OS X partition and add partitions in a single step. It cannot create Linux format partitions though, so if you choose this route, you should create “free space” or an “msdos” format partition, which can be modified later.

At this point, we are really just allocating the space you want for Ubuntu. The actual Linux partitions will be created later during the installation.
For pre-Leopard OS X, there are no such tools. BootCamp does not run, and Disk Utility will only allow you to create more partitions if you wipe out all the current partitions. However, the underlying commandline utility still exists.
Here’s a usage example. Let’s say you want to resize your OS X partition to 200GB and leave the rest of the disk free (for Ubuntu of course). You would open a terminal and type the following, followed by the «Return» key.
You can read more on diskutil by typing ‘diskutil help’ in your OS X terminal.
The Ubuntu LiveCD
You can download the Ubuntu Desktop Edition ISO from ubuntu.com. (You can choose 32-bit or 64-bit, the choice is yours. If you want to see the pros and cons, you can check out the sticky.)
NOTE: Core Duo machines (early Mactels) are 32-bit only! Core 2 Duo machines can use 32-bit or 64-bit ISOs.
An ISO is an “image” of a CD-ROM. You do not burn an ISO onto a CD like you do with pictures or music. Instead, you burn the image onto a disc. It’s kind of like mixing Cool-Aid. You don’t just drop the packet (ISO) into the water (disc), you must open the packet and dump the contents into the water.
ISO images can be burned with Apple’s Disk Utility or other burning apps. You should burn the CD as slow as you can to increase its “bootableness”.
Boot your Mac from the CD
Put the Ubuntu LiveCD in your Mac and reboot.
When the rEFIt menu comes up You should get the option to boot from the Ubuntu CD. If you do not see this option, try pressing the Option key when your computer starts. On a Mac, the «c» key will instruct the Mac to attempt booting off of a CD/DVD.
On the Ubuntu CD’s boot menu, select your keyboard language, then choose to «Try Ubuntu». This will start a LiveCD Ubuntu session, which makes no changes to your Mac.
Booting into Ubuntu this way takes many minutes, including a minutes-long period where Ubuntu appears to have locked up on the boot menu. Most likely it has not. Just wait! note I had to set the boot option to nomodeset. If you press function f6 at the boot options screen you can choose that option. Note 2: I had to press function f6 when I saw a man and keyboard.
Once booted, you have a Ubuntu desktop. Start gparted (partitioning tool) by navigating to System > Adminstration > Partition Editor.
If you previously created an “msdos” style partition used Boot Camp, you should use gparted to delete this partition. It will be located after an EFI partition (hidden in OSX) and an HFS+ partition (HFS+ is OS X’s filesystem). Deleting the new partition leaves “free space” on the disk for the Ubuntu install. Use gparted to manually partition the space on your drive for Ubuntu. First create a SWAP area of about 1GB. Then the rest of the unallocated area format as EXT4. Apply changes and take note the label of the EXT4 partition such as /dev/sda3.
Start Installing
Back on the Ubuntu LiveCD desktop, start the Ubuntu Installer from the desktop icon. When prompted, choose to manually partition. Select the EXT4 partition and click change. Select to use the space as the EXT4 filesystem and root (/) as the mount point. You will also want to check the box to format the partition. On the last dialog of the installer, be sure to click the “Advanced” button and choose to install the boot loader (grub) to your root Ubuntu partition, for example /dev/sda3. This will be the only partition with the EXT4 file system.
When the installer is finished, reboot.

Fix the Partition Tables
There is a bug in the installer that causes a problem on Macs. FIXME: Describe problem? It can be fixed with rEFIt.
Reboot to the rEFIt menu and select the “partition tool”. rEFIt will ask if you would like to sync your partition tables. Say Yes and let it do it’s magic. (If you don’t have an English keyboard, note that the keys «Z» and «Y» are swapped in the partition tool.) If you see the error «GPT partition of type ‘Unknown’ found, will not touch this disk» instead of the ‘yes’ prompt, follow the instructions in comment #6 of this thread and make sure to install gptsync_0.13-10 or higher.
rEFIt may not offer to sync your partition tables, but just show the error and leave no option but a return to the main menu. For suggestions on other ways to fix the table, see the discussion at Ubuntu on MacBookPro — difficulties w partition tables.
if you have errors such as «GPT partition of type ‘Unknown’ found, will not touch this disk.» or «analysis inconclusive» as explained in this thread, then you have to use gdisk to rebuild the partition table. This is best explained in this post — boot a live Ubuntu CD (the instructions say this is also possible from an OS X terminal), install and run the gdisk tool as the instructions say.
After it is done, SHUTDOWN your Mac (not reboot) and startup again. You should now be able to boot into Ubuntu. If you select the Linux Icon in rEFIt, and it freezes on the grey Tux logo, shutdown again and try one more time.

Other Partitioning Options Multi-booting
Most Intel macs will use the Mac OS X default GPT partitioning scheme. The MBR/PC-BIOS compatibility of Intel Macs is limited and cannot provide all the disk/BIOS management features found in a PC. This is the reason why some extra attention is needed for partitioning layouts in Intel Macs to get what you want. (The alternative msdos/MBR partitioning avoids many of these limitations, but Mac OSX support and utilities are lost, which is why it was recommended only for the single-boot section.)
Additional partitions can be created for installation of an additional OS (Linux, Windows, BSD) or shared storage. Mac OSX can be installed on an external drive, and Linux on an external is possible with the installation of a small boot partition on the HD.
If Windows is installed, rules apply to choice of partition, and this depends on Windows version (Vista or XP). Some methods used for Vista will not work for XP.
It is not intended to detail all the possible combinations here, but some general rules and examples of multi-booting partition arrangements and tools required are shown to help you choose. Some of these require extra enthusiasm, and the more complex, the more need for backup.
Triple Boot: Mac OSX, Windows, and Ubuntu
 *Note, because this is likely the most popular scenario after dual-booting, it should be the first in the «multi-booting» section and deserves a full write up.
Multi linux
Mac OSX and multi Linux
Manual partitioning using Disk Utility GUI
For a complete new installation with partitioning requirements known, it can be easier to set out the partitions initiallly using the Mac OSX installer DVD Disk Utility GUI, then using ubuntu gparted to finish off. This screen shot shows an example (OSX 10.4), the OSX partition is p2, initially unjournalled to allow write access for ubuntu. The external drive was partitioned the same way. (This method requires careful choice of partition formats if MS Windows is involved).

The following screen shot shows the same partitoning and resizing options as seen in ubuntu desktop gparted.

Mac OSX, Vista, and Ubuntu
This method won’t work for XP because XP wants to be on the last MBR partition.
- Assuming that OS X is installed, use bootcamp to install Windows Vista. NOTE: MAKE ENOUGH SPACE FOR BOTH WINDOWS AND UBUNTU WITH BOOT CAMP!
- Install windows normally.
- Start your computer with the Ubuntu disk in the drive. Install Ubuntu by partitioning the boot camp drive that Windows is located on, and install both Ubuntu and GRUB bootloader onto the new partition. (There are programs that allow Mac OS X to write to ext2, you’ll just have to mount your ext3 partition as ext2 in Mac OS X)
- Start the computer and boot back into Mac and install rEFIt. This will allow you to boot into every operating system on boot.
Partitioning Diagram
(Do not use the above method to install with XP, it will fail)
Mac OSX, XP, and Ubuntu
Partitioning Diagram
If XP is installed before its partition number changes, then its boot.ini will need editing to change the partition number. The alternative is to install XP after the OSX partition is split and the XP partition number has changed. This has not been tested. Changing «boot.ini» afterwards has been tested though.
Back-up all data using «Time machine» and repair disk permissions.
Make sure you have the currently running OSX installation disk ready and your system is up to date.
Start Boot Camp and create a partition for Windows XP (15Gb is enough but 30Gb is recommended by MS apparently).
install Windows using Boot Camp.
Delete the Linux partition you just created and follow the steps as described in the section above «Start Installing» in Detailed How-To: create a SWAP area of about 1GB. The rest of the unallocated area format as EXT4. Apply changes and take note the label of the EXT4 partition such as /dev/sda3.
If XP was installed before the partition change, it will need boot.ini to be edited to change its partition from 3 to 4.
Mac OSX, Vista, XP, and Ubuntu
- Quad booting method and discussion.
FIXME: add summary.
Shared storage partitons
To share your home directory between OSX and ubuntu you need to use hfsplus with journaling turned off. R/W of hfsplus is experimental on ubuntu as far as I know and ymmv I have been succesfully doing this on my G4 and now on an intel macbook pro, with some problems but no data loss so far.
problems
- you cannot hibernate the system in e.g. ubuntu and then boot OSX, you will corrupt data this way.
- If you have an unclean unmount, because suspend to ram fails on an empty battery or any other reason, ubuntu won’t mount the disk in RW before a lengthy fsck.hfsplus (30minutes)
- recently I noticed that bot OSX and ubuntu have to go through this filecheck everytime I boot the other system.
share that partition
- disable journaling in OSX
- boot ubuntu, don’t log in, open a terminal (CTRL-ALT-F3)
- add an entry in /etc/fstab
/dev/sda2 /media/Mac hfsplus user,force,rw,nodev 0 0
- change uid to match that of OSX (google it I forgot how to do it)
- rename your old homedir
- make a symlink in your /home to your Mac /Users:
sudo ln -s /media/Mac/Users/yourusername /home/yourusername
helpfull links
Installing ubuntu using wubi in vista and other complex systems
Other Info
Multiple Hard Drives (Mac Pro)
The basic single and dual system partitioning, tools, and installation method have been described above for a single, internal hard disk. Macs with multiple disks have the additional simple option of separate disk for each OS (with some traps such as refit being limited to gptsync the first disk). Some information on this can be found on the Mac Pro page
GRUB2 / GRUB_EFI
Some Intel macs can use the EFI version of the grub bootloader (AKA GRUB2 or grub-efi) which enables external booting similar to the Mac OSX EFI bootloader.
Example Ubuntu Installation after Mac OSX and Vista
You have already installed Mac OSX and Windows Vista, now to install Ubuntu.
- Startup your laptop with Ubuntu Desktop CD inserted into the drive.
- In rEFIt menu, choose to boot the Ubuntu CD.
- Select English as the language to be used.
- Select the 2nd option, the one that says : «Install Ubuntu»
- After the loading, on the install screen, select the O.S. Language (English) and hit «Forward» button, then select your country location.
- On the Keyboard layout, choose your keyboard language, and on the other window select the variant Macintosh (mine is Portugal — Macintosh), and test the typing if you want.
On the «Prepare Disk Space» menu, select the 1st option: «Guided — Resize SCSI3 (0,1,0), Partition #3 (sda) and use Free Space», and with your mouse select the desired partition size (I set mine to 80% Windows Vista & 20% Ubuntu), and hit «Forward» button.
Use the refit Partitioning Tool to re sync the MBR, then restart again, select the Linux icon on rEFIt to boot into Ubuntu.
Troubleshooting
In case you are stuck with a «No bootable device» message or a blank screen, a bug prevents booting after a successful install (a blank screen or blinking cursor) See information on the forum here to fix it.
If you are attempting to triple boot (OSX, WIN7 using bootcamp and now adding Ubuntu) you probebly installed rEFIT. rEFIt version 0.14 has a built in limitation that messes up the Hybrid MBR that bootcamp set up, so now either booting into windows doesn’t work or choosing Ubuntu in GRUB always boots into windows (depends on how you partitiond your HD). So go here or here for detailed explenation, the solution on both is the same.
Obtaining Help
For further assistance please refer to the Ubuntu Apple Users forum.
External Links
The MactelSupportTeam is restructuring and reorganizing the documentation for Intel-based Macs. If you are interested in helping, please visit our team page for information. For all Mactel wikis, there is a starting place here. There is also a thread about planning the Mactel docummentation going on.
MactelSupportTeam/AppleIntelInstallation (последним исправлял пользователь knome 2013-12-14 00:51:29)
The material on this wiki is available under a free license, see Copyright / License for details
You can contribute to this wiki, see Wiki Guide for details
Источник


